Fuel Injector Circuit
Circuit diagnosis · Vehicles built from Nov 2010
Versions by build date: Jul 2007 – Nov 2007 Dec 2007 – Jul 2009 Aug 2009 – Oct 2010 from Nov 2010
DESCRIPTION
The fuel injectors are located on the intake manifold. They inject fuel into the cylinders based on the signals from the ECM.WIRING DIAGRAM
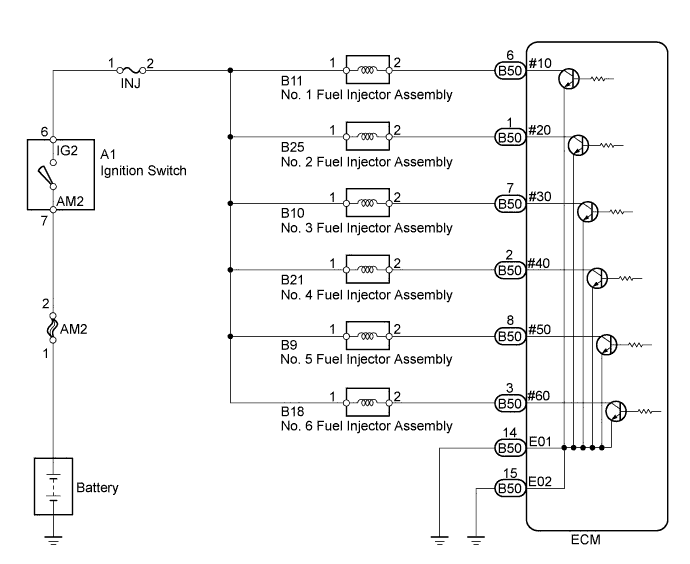

INSPECTION PROCEDURE
- NOTICE:
- Inspect the fuses for circuits related to this system before performing the following inspection procedure.
| 1. INSPECT FUEL INJECTOR ASSEMBLY (POWER SOURCE) |

Disconnect the fuel injector assembly connectors.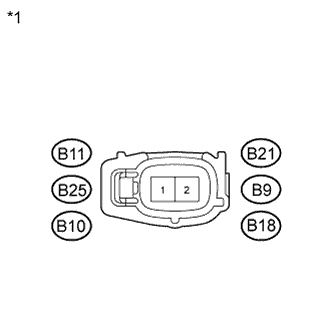
Turn the ignition switch to ON.
Measure the voltage according to the value(s) in the table below.
- Standard Voltage:
Tester Connection
Switch Condition
Specified Condition
B11-1 - Body ground
Ignition switch ON
11 to 14 V
B25-1 - Body ground
Ignition switch ON
11 to 14 V
B10-1 - Body ground
Ignition switch ON
11 to 14 V
B21-1 - Body ground
Ignition switch ON
11 to 14 V
B9-1 - Body ground
Ignition switch ON
11 to 14 V
B18-1 - Body ground
Ignition switch ON
11 to 14 V
Text in Illustration *1
Front view of wire harness connector
(to Fuel Injector)
|
|
||||

| OK | |
 |
| 2. INSPECT FUEL INJECTOR ASSEMBLY (INJECTOR RESISTANCE) |
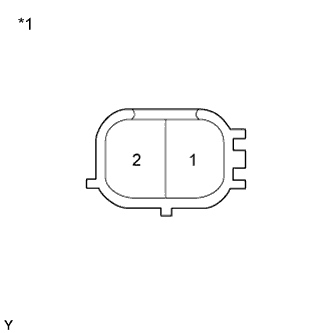 |
Disconnect the fuel injector assembly connectors.
Measure the resistance according to the value(s) in the table below.
- Standard Resistance:
Tester Connection
Condition
Specified Condition
1 - 2
20°C (68°F)
11.6 to 12.4 Ω
Text in Illustration *1
Component without harness connected
(Fuel Injector assembly)
|
|
||||

| OK | |
|
| 3. CHECK HARNESS AND CONNECTOR (FUEL INJECTOR ASSEMBLY - ECM) |
Disconnect the ECM connector.
Disconnect the fuel injector assembly connectors.
Measure the resistance according to the value(s) in the table below.
- Standard Resistance (Check for Open):
Tester Connection
Condition
Specified Condition
B11-2 - B50-6 (#10)
Always
Below 1 Ω
B25-2 - B50-1 (#20)
Always
Below 1 Ω
B10-2 - B50-7 (#30)
Always
Below 1 Ω
B21-2 - B50-2 (#40)
Always
Below 1 Ω
B9-2 - B50-8 (#50)
Always
Below 1 Ω
B18-2 - B50-3 (#60)
Always
Below 1 Ω
- Standard Resistance (Check for Short):
Tester Connection
Condition
Specified Condition
B11-2 or B50-6 (#10) - Body ground
Always
10 kΩ or higher
B25-2 or B50-1 (#20) - Body ground
Always
10 kΩ or higher
B10-2 or B50-7 (#30) - Body ground
Always
10 kΩ or higher
B21-2 or B50-2 (#40) - Body ground
Always
10 kΩ or higher
B9-2 or B50-8 (#50) - Body ground
Always
10 kΩ or higher
B18-2 or B50-3 (#60) - Body ground
Always
10 kΩ or higher
|
|
||||
| OK | |
|
| 4. CHECK HARNESS AND CONNECTOR (ECM - BODY GROUND) |
Disconnect the ECM connector.
Measure the resistance according to the value(s) in the table below.
- Standard Resistance (Check for Short):
Tester Connection
Condition
Specified Condition
B50-14 (E01) - Body ground
Always
Below 1 Ω
B50-15 (E02) - Body ground
Always
Below 1 Ω
|
|
||||
| OK | |
|
| 5. INSPECT FUEL INJECTOR ASSEMBLY (INJECTION AND VOLUME) |
Check the fuel injection and volume (Click here).
|
|
||||
| OK | ||
 |
||
| ||
| 6. CHECK HARNESS AND CONNECTOR (FUEL INJECTOR ASSEMBLY - IGNITION SWITCH) |
Disconnect the fuel injector assembly connectors.
Disconnect the ignition switch connector.
Measure the resistance according to the value(s) in the table below.
- Standard Resistance (Check for Open):
Tester Connection
Condition
Specified Condition
B11-1 - A1-6 (IG2)
Always
Below 1 Ω
B25-1 - A1-6 (IG2)
Always
Below 1 Ω
B10-1 - A1-6 (IG2)
Always
Below 1 Ω
B21-1 - A1-6 (IG2)
Always
Below 1 Ω
B9-1 - A1-6 (IG2)
Always
Below 1 Ω
B18-1 - A1-6 (IG2)
Always
Below 1 Ω
- Standard Resistance (Check for Short):
Tester Connection
Condition
Specified Condition
B11-1 or A1-6 (IG2) - Body ground
Always
10 kΩ or higher
B25-1 or A1-6 (IG2) - Body ground
Always
10 kΩ or higher
B10-1 or A1-6 (IG2) - Body ground
Always
10 kΩ or higher
B21-1 or A1-6 (IG2) - Body ground
Always
10 kΩ or higher
B9-1 or A1-6 (IG2) - Body ground
Always
10 kΩ or higher
B18-1 or A1-6 (IG2) - Body ground
Always
10 kΩ or higher
|
|
||||
| OK | ||
|
||
| ||