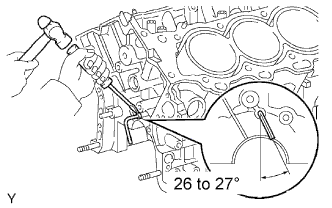
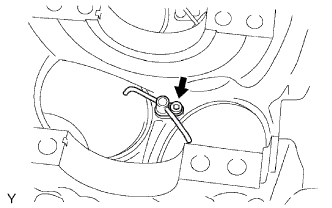
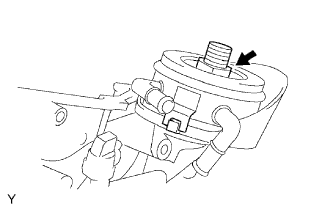
Using a screw driver and hammer, tap in the oil jet.
6.
INSTALL NO. 1 SUB-ASSEMBLY OIL NOZZLE
Using a 5 mm socket hexagon wrench, install the 3 oil nozzles.
Torque:
9.0 N*m{
92 kgf*cm
, 80 in.*lbf
}
7.
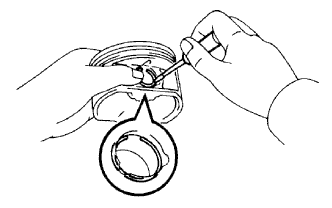
INSTALL HOLE SNAP RING
Using a small screwdriver, install a new snap ring onto the side of the piston pin hole.
HINT:
Check that the end gap of the snap ring does not overlap with the pin hole cutout portion of the piston.
8.
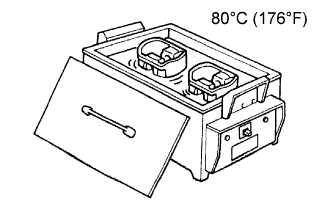
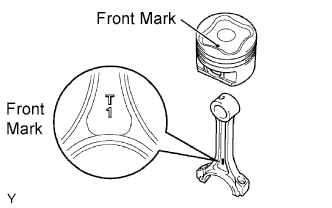
INSTALL WITH PIN PISTON SUB-ASSEMBLY
Gradually heat the piston to about 80°C (176°F).
Coat the piston pin with engine oil.
Align the front marks of the piston and connecting rod, and push in the piston pin with a thumb.
9.
INSTALL HOLE SNAP RING
Using a small screwdriver, install a new snap ring onto the other side of the piston pin hole.
HINT:
Make sure that the gap in the snap ring does not overlap with the pin hole cutout portion of the piston.
10.
INSTALL PISTON RING SET
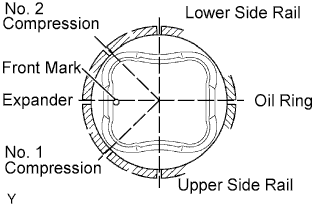
Install the oil ring expander and 2 side rails by hand.
Using a piston ring expander, install the 2 compression rings.
NOTICE:
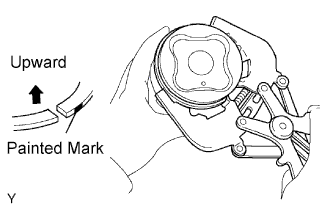
Install compression ring No. 2 with the painted mark facing upward.
Position the piston rings so that the ring ends are as shown.
11.
INSTALL CONNECTING ROD BEARING
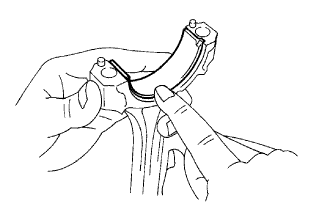
Align the bearing claw with the groove of the connecting rod or connecting cap.
NOTICE:
Clean the back side of the bearing and the bearing surface of the connecting rod and keep them free of oil.
12.
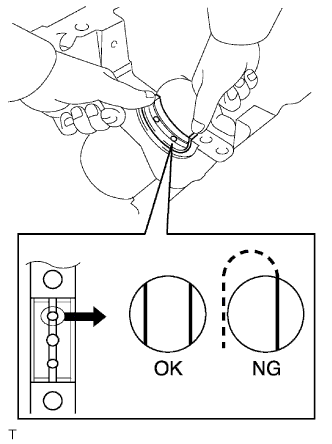
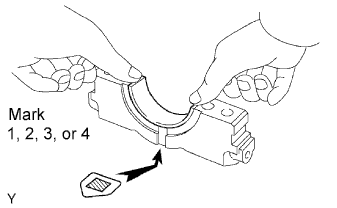
INSTALL CRANKSHAFT BEARING
HINT:
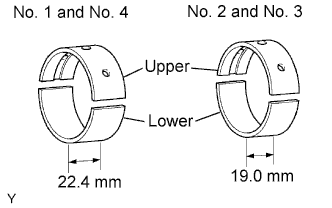
There are 2 types of main bearings with different widths (19.0 mm (0.748 in.) and 22.4 mm (0.882 in.)) for use in the inspection. Install the 22.4mm (0.882 in.) bearings in the No. 1 and No. 4 cylinder block journal positions with the main bearing cap. Install the 19.0 mm (0.748 in.) bearings in the No. 2 and No. 3 positions.
Clean each main journal and bearing.
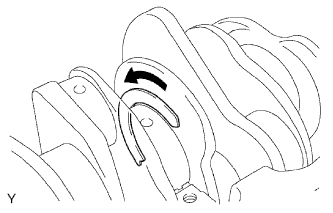
Install the 4 upper bearings.
Install the upper bearings near the center of the cylinder block.
NOTICE:
The widths of the No. 1 and No. 4 journal bearings are different from those of the No. 2 and No. 3 journal bearings. Therefore, confirm the identity of each journal bearing prior to installation.
Do not apply engine oil to the bearing installation surfaces of the cylinder block and the back side of the bearings.
Check that the oil groove on the cylinder block can be seen through the oil supply holes of the upper bearing.
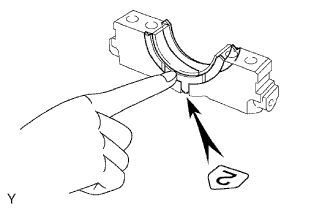
Install the 4 lower bearings.
Install the lower bearings near the center of the cylinder block.
NOTICE:
Do not apply engine oil to the bearing or its contact surface.
HINT:
The number marked on each main bearing cap indicates the installation position.
13.
INSTALL CRANKSHAFT
Apply engine oil to the upper bearing and install the crankshaft onto the cylinder block.
Install the 2 upper thrust washers onto the No. 2 journal position of the cylinder block.
Push the crankshaft toward the front (rear) side.
Install the 2 upper thrust washers with the oil grooves facing outward.
Install the 2 lower thrust washers onto the No. 2 bearing cap with the grooves facing outward.
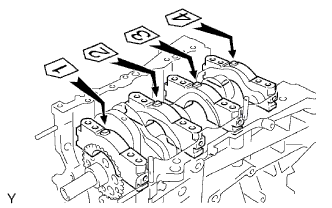
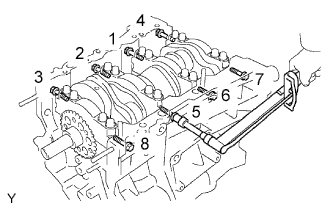
Examine the front marks and numbers, check the sequence number is as shown in the illustration and install the bearing caps on the cylinder block.
Apply a light coat of engine oil to the threads of the bearing cap bolts.
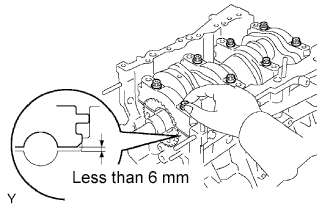
Temporarily install the 8 main bearing cap bolts in the inside positions.
Install the main bearing caps. Tighten the 2 bolts for each bearing cap until the clearance between the bearing cap and the cylinder block is under 6 mm (0.23 in.).
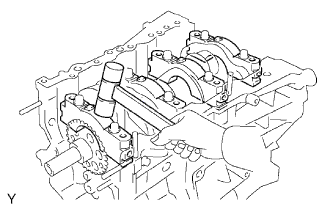
Using a plastic-faced hammer, lightly tap the bearing cap to ensure a proper fit.
Apply a light coat of engine oil to the threads of the main bearing cap bolts.
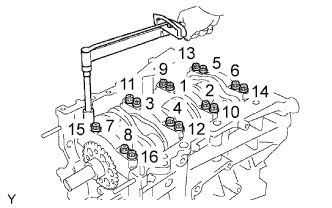
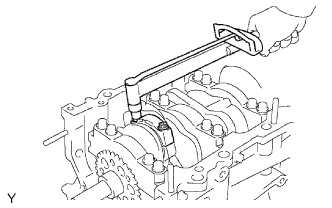
Install the 16 main bearing cap bolts. Using several steps, tighten the bolts uniformly in the sequence shown in the illustration.
Torque:
61 N*m{
622 kgf*cm
, 45 ft.*lbf
}
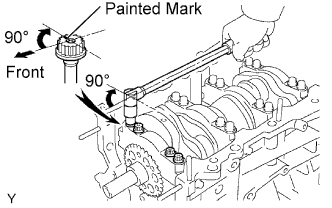
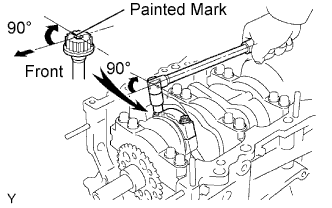
Mark the front side of the bearing cap bolts with paint.
Retighten the bearing cap bolts 90° in the sequence as shown.
Check that the painted marks are now at a 90° angle from the front.
Check that the crankshaft turns smoothly.
Using several steps, tighten the 8 main bearing cap bolts uniformly in the sequence shown in the illustration.
Torque:
25 N*m{
255 kgf*cm
, 18 ft.*lbf
}
14.
INSTALL PISTON SUB-ASSEMBLY WITH CONNECTIONG ROD
Apply engine oil to the cylinder walls, pistons, and surfaces of connecting rod bearings.
Check the position of the piston ring ends.
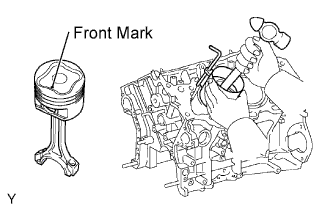
Using a piston ring compressor, push the correct number piston and connecting rod into each cylinder with the front mark of the piston facing forward.
NOTICE:
Clean the back side of the bearing and the bearing surface of the connecting rod cap and keep them free of oil.
Match the numbered connecting rod cap with the connecting rod.
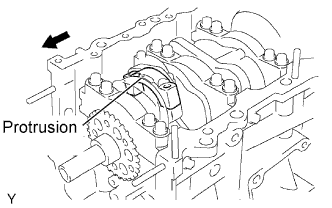
Check that the protrusion of the connecting rod cap is facing in the correct direction.
Apply a light coat of engine oil to the threads of the connecting rod cap bolts.
Tighten the bolts alternately to the specified torque.
Torque:
25 N*m{
250 kgf*cm
, 18 ft.*lbf
}
Mark the front side of the each connecting cap bolt with paint.
Retighten the cap bolts 90° as shown.
Check that the crankshaft turns smoothly.
15.
INSTALL REAR ENGINE OIL SEAL RETAINER
Remove any old packing material and oil from the contact surfaces of the oil seal retainer and cylinder block.
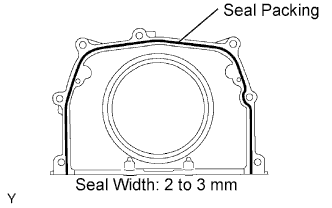
Apply a continuous bead of seal packing (diameter 2 to 3 mm (0.08 to 0.12 in.)) to the oil seal retainer as shown in the illustration.
Seal packing:
Toyota Genuine Seal Packing Black, Three Bond 1207B or the equivalent
NOTICE:
Parts must be assembled within 3 minutes of application. Otherwise, the seal packing must be removed and reapplied.
Install the oil seal retainer with the 5 bolts and 2 nuts.
Torque:
Nut:
9.0 N*m{
92 kgf*cm
, 80 in.*lbf
}
Bolt:
10 N*m{
102 kgf*cm
, 7.4 ft.*lbf
}
16.
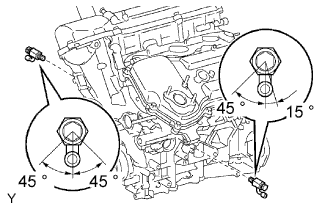
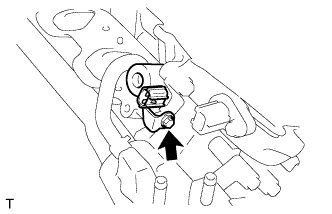
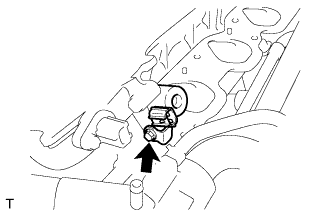
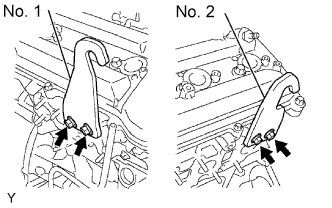
INSTALL KNOCK SENSOR
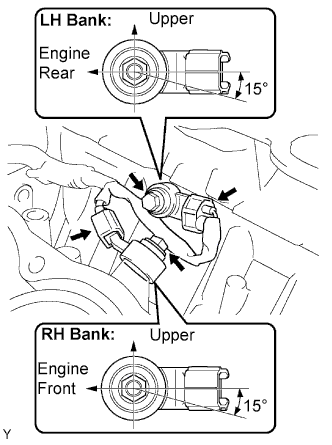
Install the 2 knock sensors with the 2 bolts as shown in the illustration.
Torque:
20 N*m{
204 kgf*cm
, 15 ft.*lbf
}
Connect the knock sensor connectors.
Install the knock sensor wire.
17.
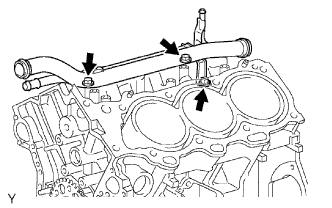
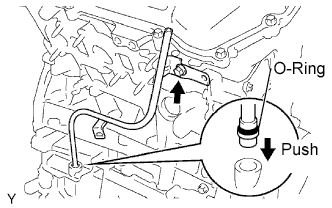
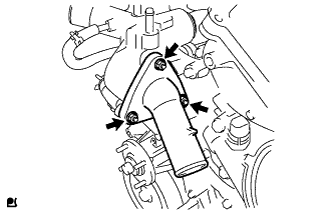
INSTALL NO. 1 WATER OUTLET PIPE
Install the water outlet pipe with the 3 bolts.
Torque:
10 N*m{
102 kgf*cm
, 7.4 ft.*lbf
}
18.
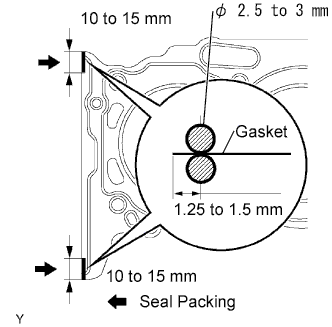
INSTALL CYLINDER HEAD GASKET
Remove any old packing material and oil from the contact surfaces of the cylinder head and cylinder block.
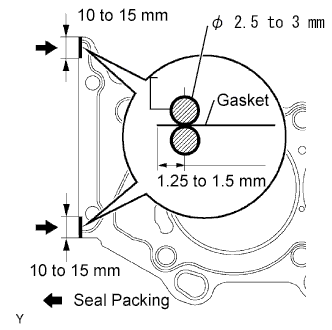
Apply a continuous bead of seal packing (diameter 2.5 to 3 mm (0.098 to 0.118 in.)) to a new cylinder head gasket as shown in the illustration.
Seal packing:
Toyota Genuine Seal Packing Black, Three Bond 1207B or the equivalent
NOTICE:
Install the cylinder head within 3 minutes of applying the seal packing. After installation, cylinder head bolts must be tightened within 15 minutes. Otherwise, the seal packing must be removed and reapplied.
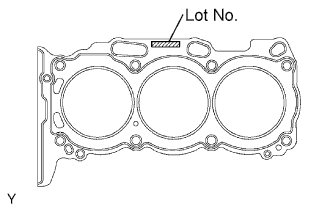
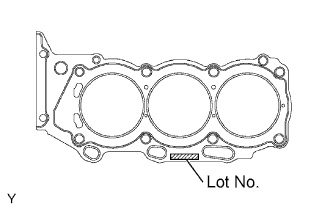
Place the cylinder head gasket on the cylinder block surface with the Lot No. stamp upward.
NOTICE:
Install the cylinder head gasket in the correct direction.
Place the cylinder head carefully in order not to damage the gasket with the bottom part of the head.
19.
INSTALL CYLINDER HEAD SUB-ASSEMBLY
Place the cylinder head RH on the cylinder head gasket.
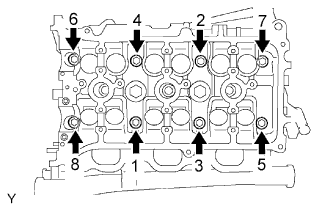
Install the 8 cylinder head bolts.
HINT:
The cylinder head bolts are tightened in 2 successive steps (steps (*1), (*2) and (*3)).
If any cylinder head bolts are broken or deformed, replace them.
Apply a light coat of engine oil to the threads and under the heads of the cylinder head bolts.
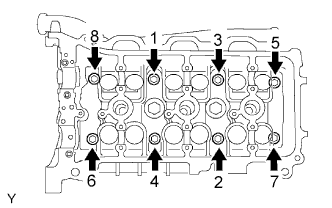
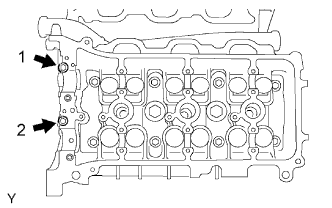
Using several steps, uniformly install and tighten the 10 cylinder head bolts and plate washers with a bi-hexagon wrench 10 mm in the sequence shown in the illustration.
Torque:
36 N*m{
367 kgf*cm
, 27 ft.*lbf
}
If any cylinder head bolts do not meet the torque specification, replace them.
NOTICE:
Do not drop the washers into the cylinder head.
Mark the front of the cylinder head bolt with paint. (*1)
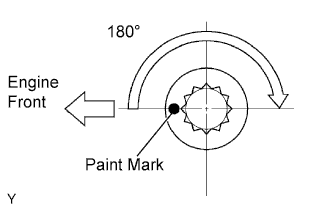
Retighten the cylinder head bolts by 180° as shown. (*2)
Check that the painted marks are now at 180° from the engine front. (*3)
20.
INSTALL NO. 2 CYLINDER HEAD GASKET
Remove any old packing material and oil from the contact surfaces of the cylinder head and cylinder block.
Apply a continuous bead of seal packing (Diameter 2.5 to 3 mm (0.098 to 0.118 in.)) to a new cylinder head gasket as shown in the illustration.
Seal packing:
Toyota Genuine Seal Packing Black, Three Bond 1207B or the equivalent
NOTICE:
Install the cylinder head within 3 minutes of applying the seal packing. After installation, cylinder head bolts must be tightened within 15 minutes. Otherwise, the seal packing must be removed and reapplied.
Place the cylinder head gasket on the cylinder block surface with the Lot No. stamp upward.
NOTICE:
Be careful of the installation direction.
Place the cylinder head carefully in order not to damage the gasket with the bottom part of the head.
21.
INSTALL CYLINDER HEAD LH
Place the cylinder head LH on the cylinder head gasket.
Install the 8 cylinder head bolts.
HINT:
The cylinder head bolts are tightened in 2 successive steps (steps (*4), (*5) and (*6)).
If any cylinder head bolts are broken or deformed, replace them.
Apply a light coat of engine oil to the threads and under the heads of the cylinder head bolts.
Using several steps, uniformly install and tighten the 8 cylinder head bolts and plate washers with a bi-hexagon wrench 10 mm in the sequence shown in the illustration.
Torque:
36 N*m{
367 kgf*cm
, 27 ft.*lbf
}
If any cylinder head bolts do not meet the torque specification, replace them.
NOTICE:
Do not drop the washers into the cylinder head.
Mark the front of the cylinder head bolt with paint. (*4)
Retighten the cylinder head bolts by 180° as shown. (*5)
Check that the painted marks are now at 180° from the engine front. (*6)
Install the 2 cylinder head bolts.
Apply a light coat of engine oil to the threads of the cylinder head bolts.
Using several steps, uniformly install and tighten the 10 cylinder head bolts and plate washers with a bi-hexagon wrench 10 mm in the sequence shown in the illustration.
Torque:
30 N*m{
306 kgf*cm
, 22 ft.*lbf
}
22.
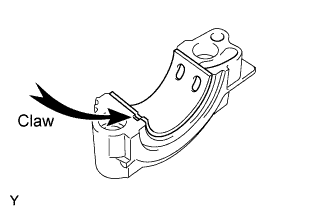
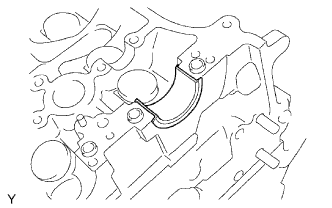
INSTALL NO. 1 CAMSHAFT BEARING
Align the bearing claw with the claw groove of the bearing cap, and push in the camshaft bearing.
NOTICE:
Install the bearing while aligning it with the oil hole in the bearing cap.
Clean the back side of the bearing and the surface of the bearing cap and keep them free of oil.
23.
INSTALL NO. 2 CAMSHAFT BEARING
Install the No. 2 camshaft bearing onto the cylinder head.
NOTICE:
Clean the back side of the bearing and the bearing surface of the cylinder head and keep them free of oil.
24.
INSTALL CAMSHAFTS
NOTICE:
Keep the camshaft level while it is being removed. The camshaft thrust clearance is very small and failing to keep it level could crack or damage the cylinder head journal surface, which receives the thrust force. This could subsequently lead the camshaft to seize or break. Perform the following steps to avoid such problems.
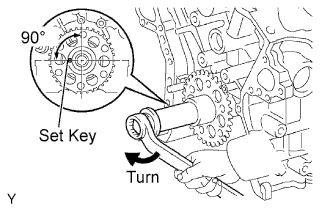
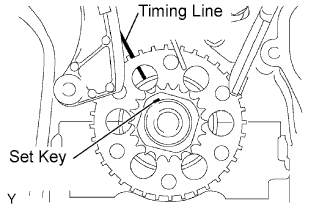
Set the crankshaft position.
Using the crankshaft pulley set bolt, turn the crankshaft, and set the crankshaft set key in the left horizontal position as indicated.
NOTICE:
Setting the crankshaft at the wrong angle could cause the piston head and valve head to come into contact with each other when the camshaft is installed. This could cause damage, so always set the camshaft at the correct angle.
Apply new engine oil to the thrust portion and journal of the camshafts.
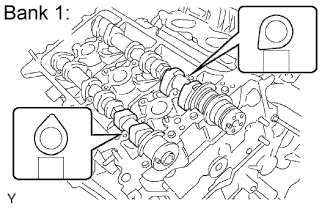
Install the camshafts of bank 1.
Place the 2 camshafts on the cylinder head RH with the No. 1 cam lobes facing as shown the illustration.
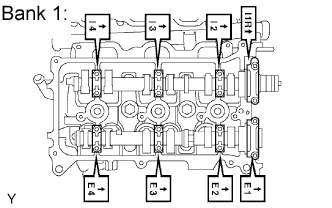
Install the 8 bearing caps in their correct locations.
Apply a light coat of engine oil to the threads of the bearing cap bolts.
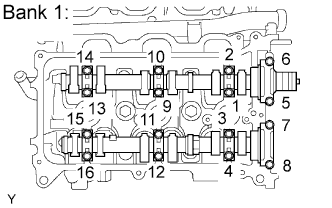
Using several steps, uniformly tighten the 16 bearing cap bolts in the sequence shown in the illustration.
Torque:
10 mm (0.39 in.) head:
9.0 N*m{
92 kgf*cm
, 80 in.*lbf
}
12 mm (0.47 in.) head:
24 N*m{
245 kgf*cm
, 18 ft.*lbf
}
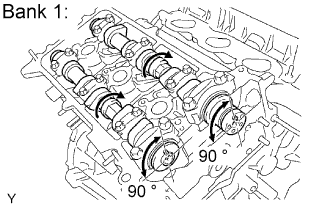
Using a wrench, turn the camshafts clockwise until each camshaft knock pin comes to a position 90° to the cylinder head.
Install the camshafts of bank 2.
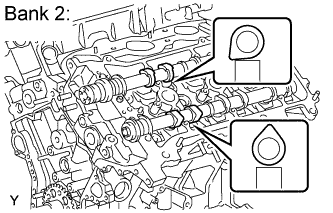
Place the 2 camshafts on the cylinder head LH with the No.1 cam lobes facing as shown the illustration.
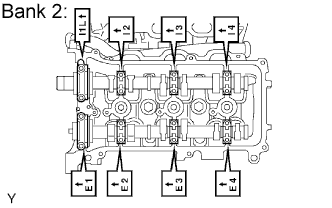
Install the 8 bearing caps in the correct locations as shown.
Apply a light coat of engine oil to the threads and under the heads of the bearing cap bolts.
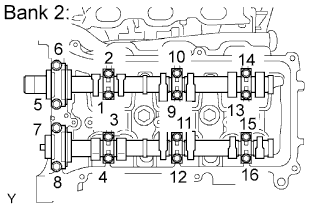
Using several steps, uniformly tighten the 16 bearing cap bolts in the sequence shown in the illustration.
Torque:
10 mm (0.39 in.) head:
9.0 N*m{
92 kgf*cm
, 80 in.*lbf
}
12 mm (0.47 in.) head:
24 N*m{
245 kgf*cm
, 18 ft.*lbf
}
25.
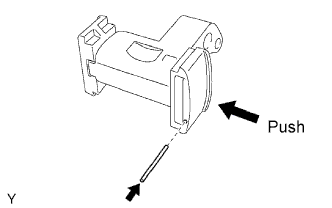
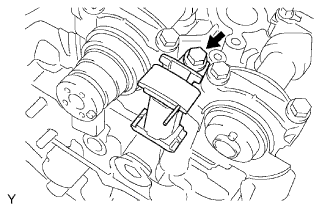
INSTALL NO. 2 CHAIN TENSIONER ASSEMBLY
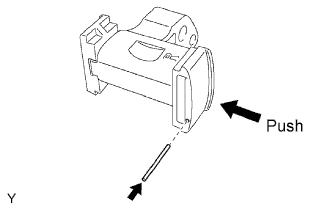
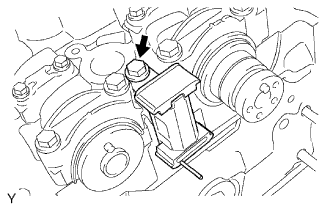
While pushing in the tensioner, insert a pin of φ 1.0 mm (0.039 in.) into the hole to fix it.
Install chain tensioner No. 2 with the bolt.
Torque:
19 N*m{
194 kgf*cm
, 14 ft.*lbf
}
26.
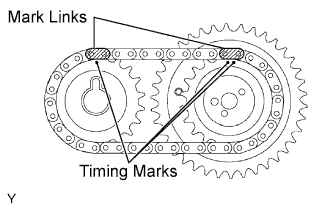
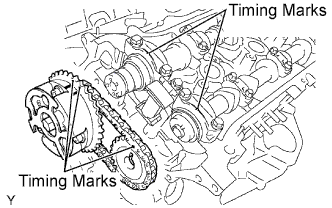
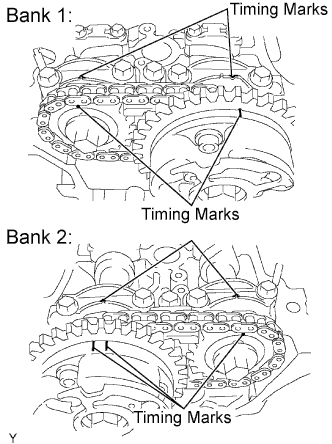
INSTALL CAMSHAFT TIMING GEARS AND NO. 2 CHAIN (for Bank 1)
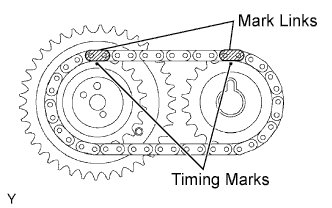
Align the yellow mark links with the timing marks (1 dot mark) of camshaft timing gears as shown in the illustration.
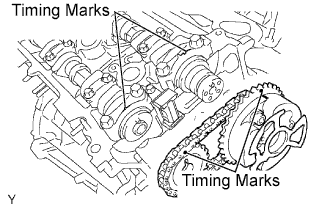
Align the timing marks on the camshaft timing gears with the timing marks on the bearing caps, and install the camshaft timing gears with the chain onto the bank 1 camshafts.
Temporarily install the 2 camshaft timing gear bolts.
NOTICE:
Do not push the camshaft timing gear assembly onto the camshaft forcibly when installing it.
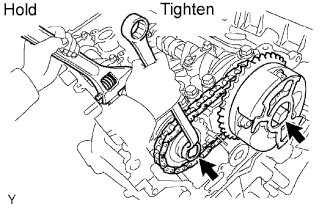
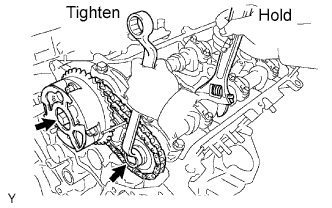
Hold the hexagonal portion of the camshaft with a wrench, and tighten the 2 bolts.
Torque:
100 N*m{
1,020 kgf*cm
, 74 ft.*lbf
}
Remove the pin from chain tensioner No. 2.
27.
INSTALL NO. 3 CHAIN TENSIONER ASSEMBLY
While pushing in the tensioner, insert a pin of φ 1.0 mm (0.039 in.) into the hole to hold it.
Install chain tensioner No. 3 with the bolt.
Torque:
19 N*m{
194 kgf*cm
, 14 ft.*lbf
}
28.
INSTALL CAMSHAFT TIMING GEARS AND NO. 2 CHAIN (for Bank 2)
Align the yellow mark links with the timing marks (1 dot mark and 2 dot marks) on the camshaft timing gears as shown in the illustration.
Align the timing marks on the camshaft timing gears with the timing marks on the bearing caps, and install the camshaft timing gears with the chain onto the bank 2 camshafts.
Temporarily install the 2 camshaft timing gear bolts.
NOTICE:
Do not push the camshaft timing gear assembly onto the camshaft forcibly when installing it.
Hold the hexagonal portion of the camshaft with a wrench, and tighten the 2 bolts.
Torque:
100 N*m{
1,020 kgf*cm
, 74 ft.*lbf
}
Remove the pin from chain tensioner No. 3.
29.
INSTALL NO. 1 CHAIN VIBRATION DAMPER
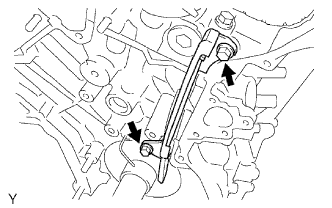
Install chain vibration damper No. 1 with the 2 bolts.
Torque:
19 N*m{
194 kgf*cm
, 14 ft.*lbf
}
30.
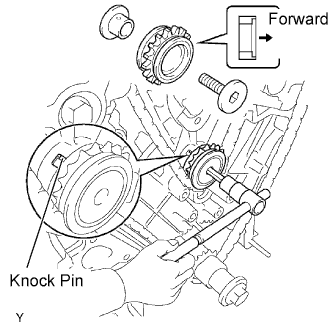
INSTALL CRANKSHAFT TIMING GEAR OR SPROCKET
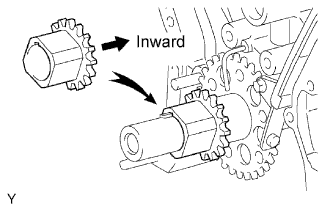
Align the timing gear set key with the key groove of the timing gear.
Install the timing gear onto the crankshaft with the gear side facing inward.
31.
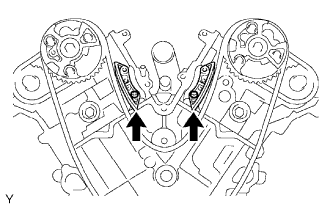
INSTALL CHAIN TENSIONER SLIPPER
32.
INSTALL NO. 1 CHAIN TENSIONER ASSEMBLY
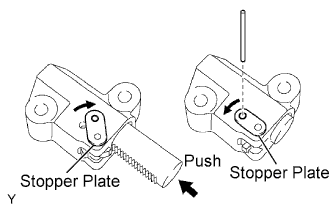
While turning the stopper plate of the tensioner clockwise, push in the plunger of the tensioner as shown in the illustration.
While turning the stopper plate of the tensioner counterclockwise, insert a bar of φ 3.5 mm (0.138 in.) into the holes in the stopper plate and tensioner to fix the stopper plate.
Install the chain tensioner with the 2 bolts.
Torque:
10 N*m{
102 kgf*cm
, 7.4 ft.*lbf
}
33.
INSTALL CHAIN SUB-ASSEMBLY
Set the No. 1 cylinder to TDC/ compression.
Align the timing marks of the camshaft timing gears and bearing caps.
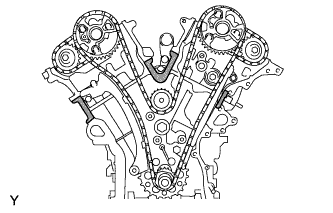
Using the crankshaft pulley set bolt, turn the crankshaft to align the crankshaft set key with the timing line of the cylinder block.
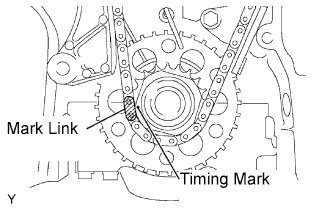
Align the yellow mark link with the timing mark of the crankshaft timing gear.
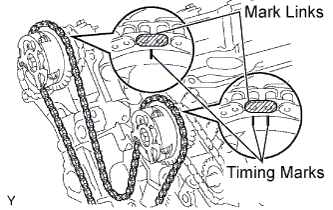
Align the orange mark links with the timing marks of the camshaft timing gears, and install the chain.
34.
INSTALL NO. 2 CHAIN VIBRATION DAMPER
Instal the 2 No. 2 chain vibration dampers.
35.
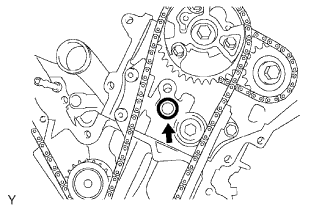
INSTALL NO. 1 IDLE GEAR
Apply a light coat of engine oil to the rotating surface of idle gear shaft No. 1.
Temporarily install idle gear shaft No. 1 together with idle gear shaft No. 2 while aligning the knock pin of idle gear shaft No. 1 with the knock pin groove of the cylinder block.
NOTICE:
Install the idle gear in the correct direction.
Using a 10 mm hexagon wrench, tighten idle gear shaft No. 2.
Torque:
60 N*m{
612 kgf*cm
, 44 ft.*lbf
}
Remove the bar from the chain tensioner.
36.
INSTALL TIMING CHAIN OR BELT COVER SUB-ASSEMBLY
Remove any old packing material and oil from the contact surfaces of the timing chain cover, cylinder head and cylinder block.
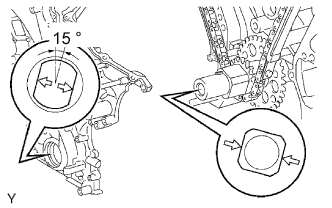
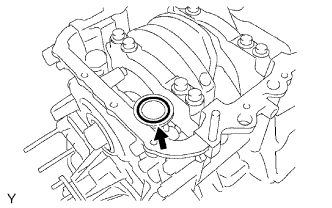
Install a new O-ring onto the cylinder head LH as shown in the illustration.
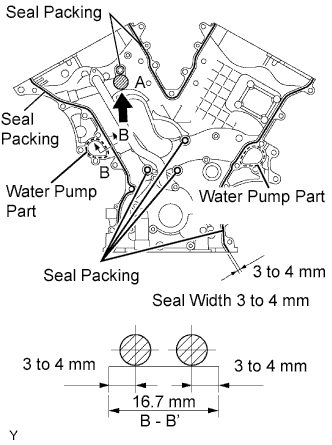
Apply a continuous bead of seal packing (diameter 3 to 4 mm (0.12 to 0.16 in.)) to the timing chain cover as shown in the illustration.
Seal packing:
Water pump part:
Toyota Genuine Seal Packing 1282B, Three Bond 1282B or the equivalent
Other parts:
Toyota Genuine Seal Packing Black, Three Bond 1207B or the equivalent
NOTICE:
Install the timing chain cover within 3 minutes of applying the seal packing. After installation, the timing chain cover bolts and nuts must be tightened within 15 minutes. Otherwise, the seal packing must be removed and reapplied.
Do not apply seal packing to A as shown in the illustration.
Keep the seal surface between the cylinder block and the cylinder head shown in the illustration free of oil before installing the chain cover.
Align the key way of the oil pump drive rotor with the rectangular portion of the crankshaft timing gear, and slide the timing chain cover into place.
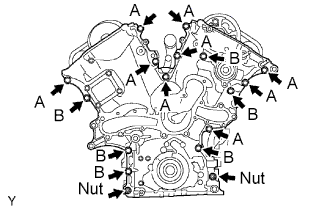
Install the timing chain cover with the 15 bolts and 2 nuts. Tighten the bolts and nuts uniformly in several steps.
Torque:
23 N*m{
235 kgf*cm
, 17 ft.*lbf
}
NOTICE:
Do not wrap the chain and slipper beyond the timing chain cover seal line.
After installing the timing chain cover, install the water pump within 15 minutes.
HINT:
Each bolt length is as follows:
Bolt
length
A
25 mm (0.98 in.)
B
55 mm (2.17 in.)
Install the timing chain cover plate with the 4 bolts.
Torque:
9.0 N*m{
92 kgf*cm
, 80 in.*lbf
}
37.
INSTALL WATER PUMP ASSEMBLY
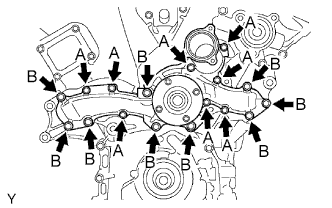
Install a new gasket and the water pump with the 17 bolts.
Torque:
Bolt A:
9.0 N*m{
92 kgf*cm
, 80 in.*lbf
}
Bolt B:
23 N*m{
235 kgf*cm
, 17 ft.*lbf
}
38.
INSTALL OIL PAN SUB-ASSEMBLY
Remove any old packing material and oil from the contact surfaces of the cylinder block, rear oil seal retainer and oil pan.
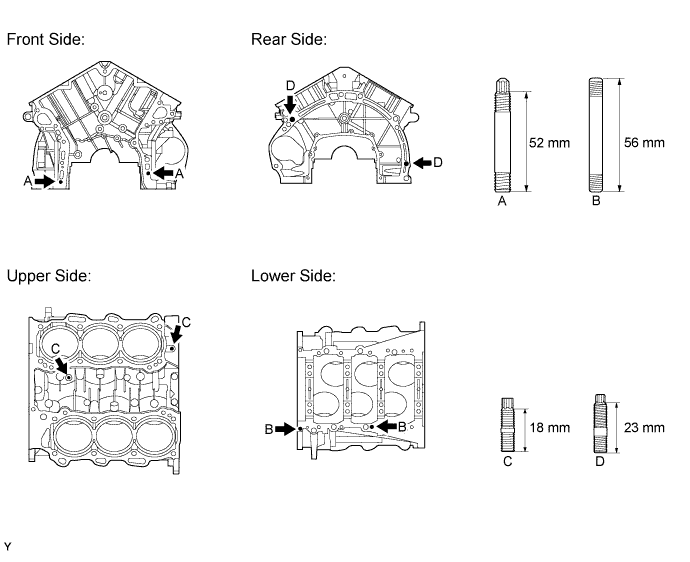
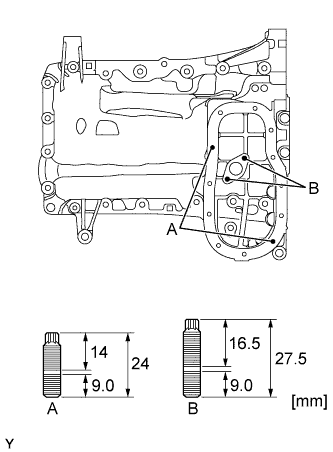
Install the 4 stud bolts.
Torque:
4.0 N*m{
41 kgf*cm
, 35 in.*lbf
}
Install a new O-ring onto the oil pump.
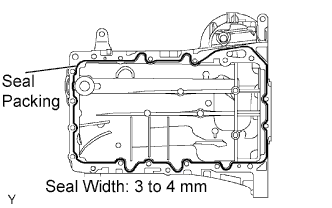
Apply a continuous bead of seal packing (diameter 3 to 4 mm (0.12 to 0.16 in.)) to the oil pan as shown in the illustration.
Seal packing:
Toyota Genuine Seal Packing Black, Three Bond 1207B or the equivalent
NOTICE:
Install the oil pan within 3 minutes of applying the seal packing. After installation, the oil pan bolts and nuts must be tightened within 15 minutes. Otherwise, the seal packing must be removed and reapplied.
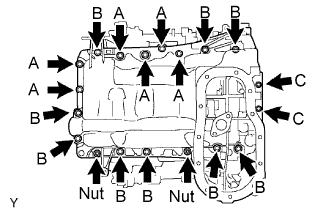
Install the oil pan with the 17 bolts and 2 nuts. Tighten the bolts and nuts uniformly in several steps.
Torque:
10 mm (0.39 in.) head:
10 N*m{
102 kgf*cm
, 7 ft.*lbf
}
12 mm (0.47 in.) head:
21 N*m{
214 kgf*cm
, 16 ft.*lbf
}
HINT:
Each bolt length is as follows:
Bolt
length
A
25 mm (0.98 in.)
B
45 mm (1.77 in.)
C
14 mm (0.55 in.)
39.
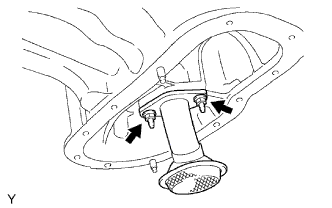
INSTALL OIL STRAINER SUB-ASSEMBLY
Install a new gasket, then install the oil strainer with the 2 nuts.
Torque:
9.0 N*m{
92 kgf*cm
, 80 in.*lbf
}
40.
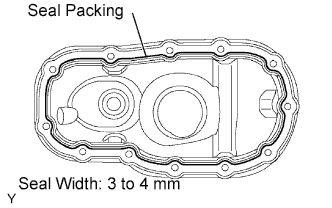
INSTALL NO. 2 OIL PAN SUB-ASSEMBLY
Remove any old packing material and be careful not to drop any oil on the No. 2 contact surfaces of the oil pan and oil pan.
Apply a continuous bead of seal packing (diameter 3 to 4 mm (0.12 to 0.16 in.)) as shown in the illustration.
Seal packing:
Toyota Genuine Seal Packing Black, Three Bond 1207B or the equivalent
NOTICE:
Install the No. 2 oil pan within 3 minutes of applying the seal packing. After installation, the No. 2 oil pan bolts and nuts must be tightened within 15 minutes. Otherwise, the seal packing must be removed and reapplied.
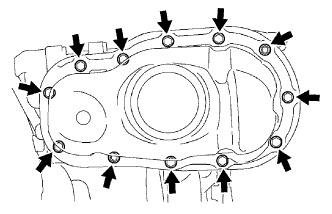
Install the No. 2 oil pan with the 10 bolts and 2 nuts. Tighten the bolts and nuts uniformly in several steps.
Torque:
Bolt:
9.0 N*m{
92 kgf*cm
, 80 in.*lbf
}
Nut:
10 N*m{
102 kgf*cm
, 7.4 ft.*lbf
}
41.
INSTALL OIL PAN DRAIN PLUG
Install the drain plug with a new gasket.
Torque:
40 N*m{
408 kgf*cm
, 30 ft.*lbf
}
42.
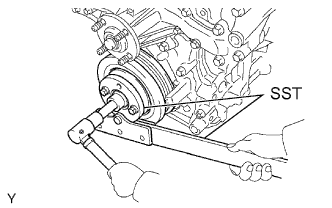
INSTALL CRANKSHAFT PULLEY
Using SST, fix the pulley and tighten the bolt.
SST
09213-54015
(91651-60855)
09330-00021
Torque:
250 N*m{
2,549 kgf*cm
, 185 ft.*lbf
}
43.
SET NO. 1 CYLINDER TO TDC/COMPRESSION
44.
INSPECT VALVE CLEARANCE
45.
ADJUST VALVE CLEARANCE
46.
INSTALL CYLINDER HEAD COVER SUB-ASSEMBLY
Remove any old packing material and oil from the contact surfaces of the cylinder head, timing chain cover and cylinder head cover.
Install the gasket onto the cylinder head cover.
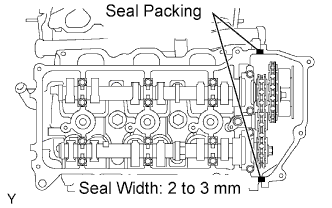
Apply a continuous bead of seal packing (diameter 2 to 3 mm (0.08 to 0.12 in.)) to the cylinder head and timing chain cover as shown in the illustration.
Seal packing:
Toyota Genuine Seal Packing Black, Three Bond 1207B or the equivalent
NOTICE:
Install the cylinder head cover within 3 minutes of applying the seal packing. After installation, the cylinder head cover bolts and nuts must be tightened within 15 minutes. Otherwise the seal packing must be removed and reapplied.
Install the seal washers onto the bolts.
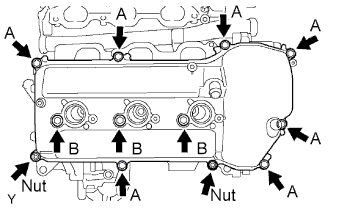
Install the cylinder head cover with the 10 bolts and 2 nuts. Tighten the bolts and nuts uniformly in several steps.
Torque:
Bolt A:
10 N*m{
102 kgf*cm
, 7.4 ft.*lbf
}
Bolt B:
9.0 N*m{
92 kgf*cm
, 80 in.*lbf
}
Nut:
9.0 N*m{
92 kgf*cm
, 80 in.*lbf
}
HINT:
Each bolt length is as follows:
Bolt
length
A
25 mm (0.98 in.)
B
60 mm (2.36 in.)
47.
INSTALL CYLINDER HEAD COVER SUB-ASSEMBLY LH
Remove any old packing material and oil from the contact surfaces of the cylinder head, timing chain cover and cylinder head cover.
Apply adhesive to the threads of the ventilation valve.
Adhesive:
Toyota Genuine Adhesive 1324, Three Bond 1324 or the equivalent
Install the ventilation valve onto the cylinder head cover.
Torque:
27 N*m{
275 kgf*cm
, 20 ft.*lbf
}
Install the gasket onto the cylinder head cover.
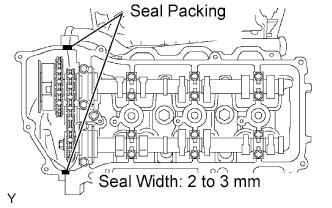
Apply a continuous bead of seal packing (diameter 2 to 3 mm (0.08 to 0.12 in.)) to the cylinder head and timing chain cover as shown in the illustration.
Seal packing:
Toyota Genuine Seal Packing Black, Three Bond 1207B or the equivalent
NOTICE:
Install the cylinder head cover of 3 minutes of applying the seal packing. After installation, the cylinder head cover bolts and nuts must be tightened within 15 minutes. Otherwise, the seal packing must be removed and reapplied.
Install the seal washers onto the bolts.
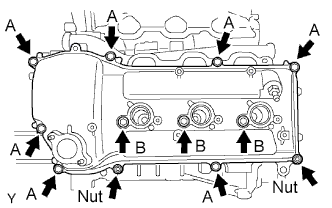
Install the cylinder head cover with the 10 bolts and 2 nuts. Tighten the bolts and nuts uniformly in several steps.
Torque:
Bolt A:
10 N*m{
102 kgf*cm
, 7.4 ft.*lbf
}
Bolt B:
9.0 N*m{
92 kgf*cm
, 80 in.*lbf
}
Nut:
9.0 N*m{
92 kgf*cm
, 80 in.*lbf
}
HINT:
Each bolt length is as follows:
Bolt
length
A
25 mm (0.98 in.)
B
60 mm (2.36 in.)
48.
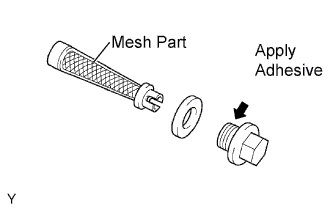
INSTALL OIL CONTROL VALVE FILTER
Check that no foreign objects on the mesh part of the 2 filters.
Install a new gasket onto each new plug.
Insert the filters into the plugs.
Apply adhesive to 2 or 3 threads of the plugs.
Adhesive:
Toyota Genuine Adhesive 1344, Three Bond 1344 or the equivalent
Install the plugs onto each cylinder head.
Torque:
62 N*m{
632 kgf*cm
, 46 ft.*lbf
}
49.
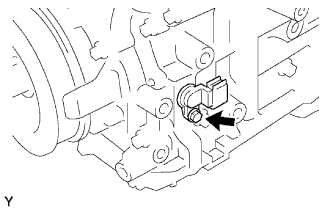
INSTALL CRANKSHAFT POSITION SENSOR
Install the crankshaft position sensor with the bolt.
Torque:
10 N*m{
102 kgf*cm
, 7.4 ft.*lbf
}
50.
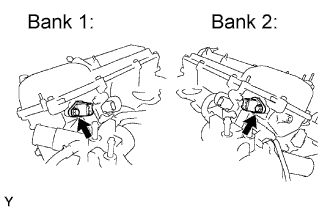
INSTALL VVT SENSOR
Apply a light coat of engine oil to the O-ring of each VVT sensor.
Install the 2 VVT sensors with the 2 bolts.
Torque:
8.0 N*m{
82 kgf*cm
, 71 in.*lbf
}
51.
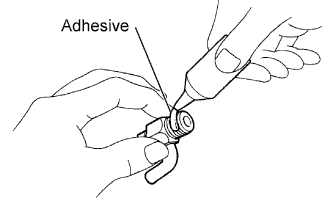
INSTALL CYLINDER BLOCK WATER DRAIN COCK SUB-ASSEMBLY
Apply adhesive to 2 or 3 threads of the drain cock ends.
Adhesive:
Toyota Genuine Adhesive 1324, Three Bond 1324 or the equivalent
Tighten the drain cocks to the specified torque, and rotate them clockwise as shown in the illustration.
Torque:
25 N*m{
255 kgf*cm
, 18 ft.*lbf
}
NOTICE:
Do not rotate the drain cocks more than 1 complete revolution (360°) after tightening the drain cocks to the specified torque.
Do not loosen the drain cocks after setting them correctly.
52.
INSTALL OIL LEVEL GAUGE GUIDE
Install a new O-ring onto the oil level gauge guide.
Apply a light coat of engine oil to the O-ring.
Push the oil level gauge guide end into the guide hole of the oil pan.
Install the oil level gauge guide with the bolt.
Torque:
9.0 N*m{
92 kgf*cm
, 80 in.*lbf
}
53.
INSTALL SPARK PLUG
Using a spark plug wrench, install the 6 spark plugs.
Torque:
20 N*m{
200 kgf*cm
, 14 ft.*lbf
}
54.
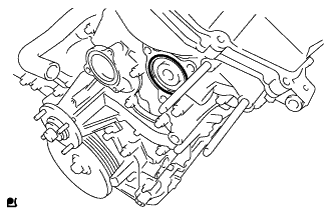
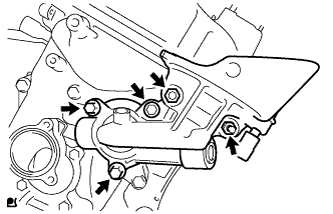
INSTALL WATER INLET
Install a new gasket onto the timing chain cover.
Install a new O-ring onto the water by-pass outlet pipe.
Install the water inlet with the 5 bolts.
Torque:
9.0 N*m{
92 kgf*cm
, 80 in.*lbf
}
55.
INSTALL WATER BY-PASS HOSE
Install the water by-pass hose with the 2 clamps.
56.
INSTALL NO. 2 WATER BY-PASS HOSE
Install the No. 2 water by-pass hose with the 2 clamps.
57.
INSTALL NO. 3 WATER BY-PASS HOSE
Install the No. 3 water by-pass hose with the 2 clamps.
58.
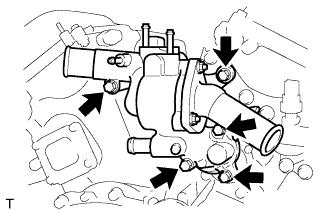
INSTALL WITH THERMOSTAT WATER INLET SUB-ASSEMBLY
Install a new O-ring and the water inlet with thermostat with the 3 nuts.
Torque:
9.0 N*m{
92 kgf*cm
, 80 in.*lbf
}
59.
INSTALL OIL FILTER BRACKET SUB-ASSEMBLY
Install the 2 stud bolts.
Torque:
10 N*m{
102 kgf*cm
, 7.4 ft.*lbf
}
Install a new gasket.
Install the oil filter bracket with the 3 bolts and 2 nuts.
Torque:
19 N*m{
194 kgf*cm
, 14 ft.*lbf
}
60.
INSTALL ENGINE OIL PRESSURE SWITCH ASSEMBLY
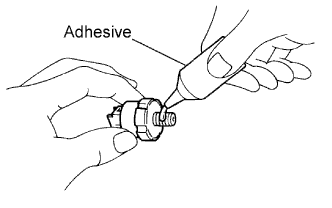
Apply adhesive to 2 or 3 threads of the oil pressure switch.
Adhesive:
Toyota Genuine Adhesive 1344, Three Bond 1344 or the equivalent
Using a 24 mm deep socket wrench, install the oil pressure switch.
Torque:
15 N*m{
153 kgf*cm
, 11 ft.*lbf
}
61.
INSTALL OIL FILTER UNION (w/o Oil Cooler)
Using a 12 mm hexagon wrench, install the oil filter union.
Torque:
30 N*m{
306 kgf*cm
, 22 ft.*lbf
}
62.
INSTALL OIL COOLER ASSEMBLY (w/ Oil Cooler)
Clean the contact surfaces of the oil filter bracket and oil cooler.
Place a new O-ring on the oil cooler.
Apply a light coat of engine oil to the threads of the union bolt.
Install the oil cooler and plate washer with the union bolt.
Torque:
68 N*m{
693 kgf*cm
, 50 ft.*lbf
}
Connect the 2 hoses to the oil cooler.
63.
INSTALL OIL FILTER SUB-ASSEMBLY
Clean the oil filter contact surface on the oil filter bracket.
Apply clean engine oil to the rubber gasket of a new oil filter.
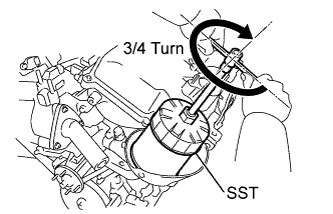
Tighten the oil filter by hand until the rubber gasket comes into contact with the seat of the filter bracket.
Using SST, tighten it an additional 3/4 turn to set the oil filter.
SST
09228-07501
Torque:
18 N*m{
184 kgf*cm
, 13 ft.*lbf
}
64.
INSTALL CAMSHAFT TIMING OIL CONTROL VALVE ASSEMBLY (for Bank 2)
Install the camshaft timing oil control valve bank 2 with the bolt.
Torque:
9.0 N*m{
92 kgf*cm
, 80 in.*lbf
}
65.
INSTALL CAMSHAFT TIMING OIL CONTROL VALVE ASSEMBLY (for Bank 1)
Install the camshaft timing oil control valve bank 1 with the bolt.
Torque:
9.0 N*m{
92 kgf*cm
, 80 in.*lbf
}
66.
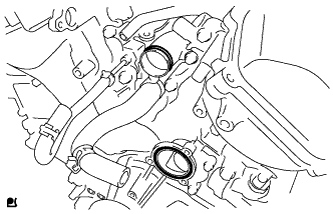
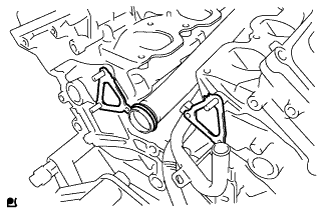
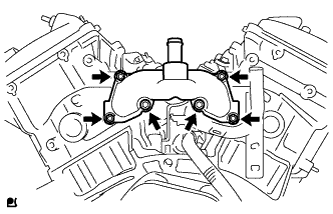
INSTALL WATER BY-PASS JOINT REAR
Install a new O-ring onto the water outlet pipe.
Install the 2 gaskets onto the bank 1 and bank 2 cylinder heads.
Install the water by-pass rear joint with the 2 bolts and 4 nuts.
Torque:
9.0 N*m{
92 kgf*cm
, 80 in.*lbf
}
67.
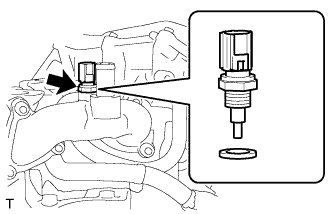
INSTALL ENGINE COOLANT TEMPERATURE SENSOR
Install the engine coolant temperature sensor with a new gasket.