Home › BODY ELECTRICAL › LIGHTING › LIGHTING SYSTEMIllumination Circuit
Circuit diagnosis · Vehicles built Aug 2012 – Jul 2014
Versions by build date: Jul 2007 – Oct 2010 Nov 2010 – Jul 2012 Aug 2012 – Jul 2014 from Aug 2014
DESCRIPTION
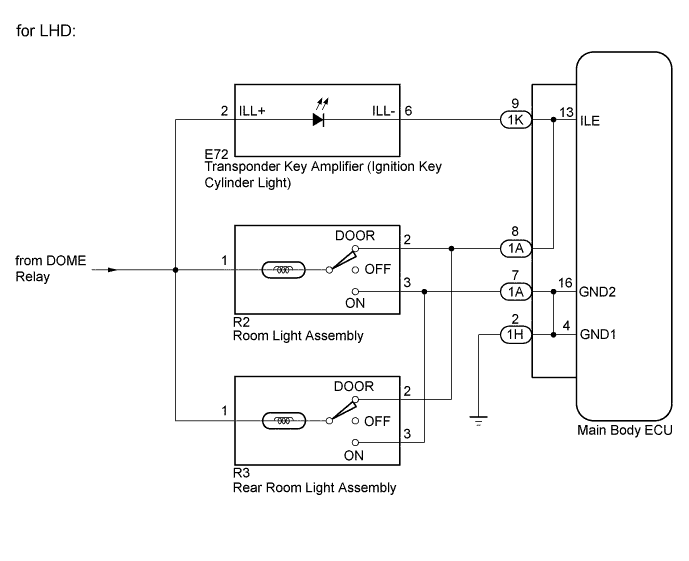
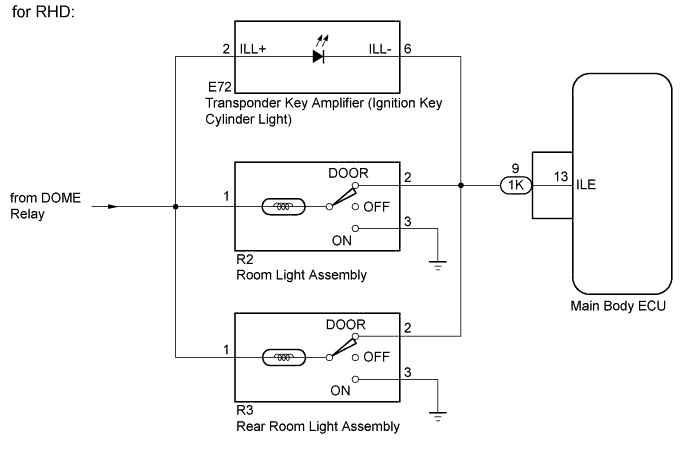
Upon receiving signals from the switches, the main body ECU illuminates the lights. WIRING DIAGRAM
INSPECTION PROCEDURE
NOTICE:
Inspect the fuses and bulbs for circuits related to this system before performing the following inspection procedure.
1. PERFORM ACTIVE TEST USING INTELLIGENT TESTER
Connect the intelligent tester to the DLC3.
Turn the ignition switch to ON.
Turn the tester on.
Turn the room lights switch to the DOOR position.
Make sure all doors are closed (courtesy light switches OFF).
Enter the following menus: Body Electrical / Body / Active Test.
According to the display on the tester, perform the Active Test.
Body (Main Body)
Tester Display
Test Part
Control Range
Normal Condition
Illuminated Entry System
Transponder key amplifier (Ignition key cylinder light)
OFF/ON
-
OK:
The illuminated entry system operates normally when operating it through the intelligent tester.
Result
Result
Proceed to
OK
A
NG (Transponder key amplifier (ignition key cylinder light) does not come on)
B
NG (Room light assembly does not come on)
C
NG (Rear Room light assembly does not come on)
D
A
PROCEED TO NEXT SUSPECTED AREA SHOWN IN PROBLEM SYMPTOMS TABLE (Click here )
2. INSPECT TRANSPONDER KEY AMPLIFIER (IGNITION KEY CYLINDER LIGHT)
Inspect the transponder key amplifier (Click here ).
NG
REPLACE TRANSPONDER KEY AMPLIFIER (IGNITION KEY CYLINDER LIGHT) (Click here )
OK
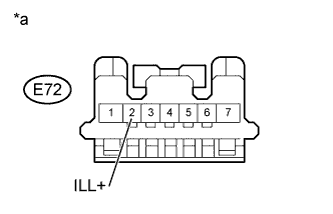
3. CHECK HARNESS AND CONNECTOR (TRANSPONDER KEY AMPLIFIER - DOME RELAY)
Disconnect the transponder key amplifier connector. Measure the voltage according to the value(s) in the table below.
Standard Voltage:
Tester Connection
Condition
Specified Condition
E72-2 (ILL+) - Body ground
Always
11 to 14 V
Text in Illustration
*a
Front view of wire harness connector
Reconnect the transponder key amplifier connector.
NG
REPAIR OR REPLACE HARNESS OR CONNECTOR
OK
4. CHECK HARNESS AND CONNECTOR (TRANSPONDER KEY AMPLIFIER - MAIN BODY ECU)
Disconnect the E72 transponder key amplifier connector.
Disconnect the 1K main body ECU connector.
Measure the resistance according to the value(s) in the table below.
Standard Resistance:
Tester Connection
Condition
Specified Condition
E72-6 (ILL-) - 1K-9
Always
Below 1 Ω
E72-6 (ILL-) - Body ground
Always
10 kΩ or higher
Reconnect the E72 main body ECU connector.
Reconnect the 1K transponder key amplifier connector.
NG
REPAIR OR REPLACE HARNESS OR CONNECTOR
OK
5. INSPECT ROOM LIGHT ASSEMBLY
Inspect the room light assembly (Click here ).
NG
OK
6. CHECK HARNESS AND CONNECTOR (ROOM LIGHT ASSEMBLY - DOME RELAY)
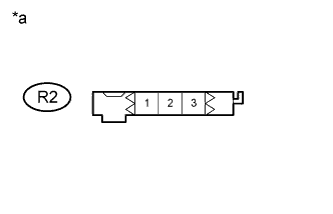
Disconnect the room light assembly connector. Measure the voltage according to the value(s) in the table below.
Standard Voltage:
Tester Connection
Condition
Specified Condition
R2-1 - Body ground
Always
11 to 14 V
Text in Illustration
*a
Front view of wire harness connector
Reconnect the room light assembly connector.
NG
REPAIR OR REPLACE HARNESS OR CONNECTOR
OK
7. CHECK HARNESS AND CONNECTOR (ROOM LIGHT ASSEMBLY - MAIN BODY ECU)
Disconnect the R2 room light assembly connector.
for LHD
Disconnect the 1A main body ECU connector.
for RHD
Disconnect the 1K main body ECU connector.
Measure the resistance according to the value(s) in the table below.
Standard Resistance:
for LHD
Tester Connection
Condition
Specified Condition
R2-2 - 1A-8
Always
Below 1 Ω
R2-2 - Body ground
Always
10 kΩ or higher
for RHD
Tester Connection
Condition
Specified Condition
R2-2 - 1K-9
Always
Below 1 Ω
R2-2 - Body ground
Always
10 kΩ or higher
Reconnect the main body ECU connector.
Reconnect the R2 room light assembly connector.
NG
REPAIR OR REPLACE HARNESS OR CONNECTOR
OK
8. INSPECT REAR ROOM LIGHT ASSEMBLY
Inspect the rear room light assembly (Click here ).
NG
OK
9. CHECK HARNESS AND CONNECTOR (REAR ROOM LIGHT ASSEMBLY - DOME RELAY)
Disconnect the rear room light assembly connector. Measure the voltage according to the value(s) in the table below.
Standard Voltage:
Tester Connection
Condition
Specified Condition
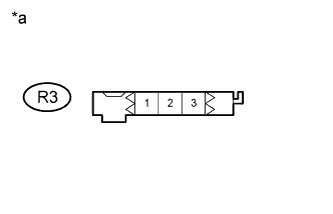
R3-1 - Body ground
Always
11 to 14 V
Text in Illustration
*a
Front view of wire harness connector
Reconnect the rear room light assembly connector.
NG
REPAIR OR REPLACE HARNESS OR CONNECTOR
OK
10. CHECK HARNESS AND CONNECTOR (REAR ROOM LIGHT ASSEMBLY - MAIN BODY ECU)
Disconnect the R3 rear room light assembly connector.
for LHD
Disconnect the 1A main body ECU connector.
for RHD
Disconnect the 1K main body ECU connector.
Measure the resistance according to the value(s) in the table below.
Standard Resistance:
for LHD
Tester Connection
Condition
Specified Condition
R3-2 - 1A-8
Always
Below 1 Ω
R3-2 - Body ground
Always
10 kΩ or higher
for RHD
Tester Connection
Condition
Specified Condition
R3-2 - 1K-9
Always
Below 1 Ω
R3-2 - Body ground
Always
10 kΩ or higher
Reconnect the main body ECU connector.
Reconnect the rear room light assembly connector.
NG
REPAIR OR REPLACE HARNESS OR CONNECTOR
OK