P0705 Transmission Range Sensor Circuit Malfunction (PRNDL Input)
Diagnostic trouble codes · Vehicles built Aug 2009 – Oct 2010
Versions by build date: Jul 2007 – Jul 2009 Aug 2009 – Oct 2010 Nov 2010 – Jul 2011 Aug 2011 – Jul 2012 Aug 2012 – Jul 2014 from Aug 2014
DESCRIPTION
The park/neutral position switch detects the shift lever position and sends signals to the ECM.| DTC No. |
DTC Detection Conditions |
Trouble Areas |
| P0705 |
When one of following conditions is met: |
|
(A) Any 2 or more of the following signals are ON simultaneously (2-trip detection logic).
| ||
(B) All of the following conditions are met simultaneously (2-trip detection logic).
| ||
(C) When any of following conditions is met, the 4 or L position signal is ON for 2.0 seconds or more (2-trip detection logic).
|
MONITOR DESCRIPTION
The DTC indicates a problem with the park/neutral position switch and the wire harness in the park/neutral position switch circuit.For security, the park/neutral position switch detects the shift lever position so that the engine can be started only when the shift lever is in P or N.
When the park/neutral position switch sends more than one signal at a time from switch positions P, R, N, D, 3 or 2, the ECM interprets this as a fault in the switch. The ECM will turn on the MIL and store the DTC.
WIRING DIAGRAM
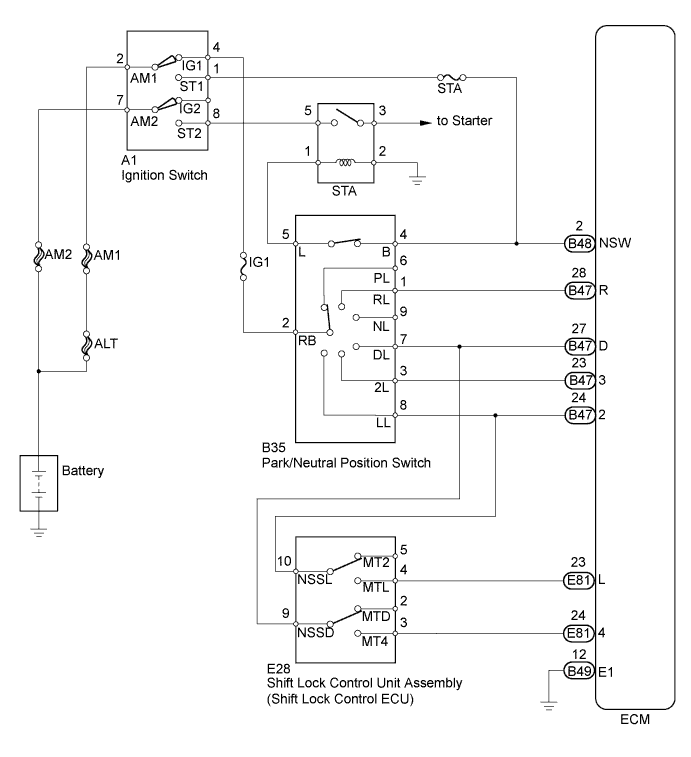

INSPECTION PROCEDURE
- NOTICE:
- Inspect the fuses for circuits related to this system before performing the following inspection procedure.
- HINT:
- According to the Data List displayed on a intelligent tester, you can read the values of components, such as the switches, sensors and actuators, without removing any parts. Reading the Data List as a first step of troubleshooting is one method of shortening labor time.
- NOTICE:
- In the table below, the values listed under "Normal Condition" are for reference only. Do not depend solely on these reference values when judging whether a part is faulty or not.
- Turn the ignition switch off.
- Connect the intelligent tester to the DLC3.
- Turn the ignition switch to ON.
- Turn the tester on.
- Enter the following menus: Powertrain / Engine and ECT / Data List / All Data.
- According to the display on the tester, read the Data List.
Engine and ECT Tester Display
Measurement Item/Range
Normal Condition
Diagnostic Note
Neutral Position SW Signal
PNP Switch Status/
ON or OFF
Shift lever position is:
P or N: ON
Except P and N: OFF
When the shift lever position displayed on the intelligent tester differs from the actual position, adjustment of the PNP switch or the shift cable may be incorrect.
Shift SW Status (R Range)
PNP Switch Status/
ON or OFF
Shift lever position is:
R: ON
Except R: OFF
Shift SW Status (D Range)
PNP Switch Status/
ON or OFF
Shift lever position is:
D or 4: ON
Except D and 4: OFF
Shift SW Status (4 Range)
PNP Switch Status/
ON or OFF
Shift lever position is:
4: ON
Except 4: OFF
Shift SW Status (3 Range)
PNP Switch Status/
ON or OFF
Shift lever position is:
3: ON
Except 3: OFF
Shift SW Status (2 Range)
PNP Switch Status/
ON or OFF
Shift lever position is:
2 or L: ON
Except 2 and L: OFF
Shift SW Status (L Range)
PNP Switch Status/
ON or OFF
Shift lever position is:
L: ON
Except L: OFF
| 1. CHECK HARNESS AND CONNECTOR (IG1 FUSE - PARK/NEUTRAL POSITION SWITCH) |

Disconnect the connector from the park/neutral position switch.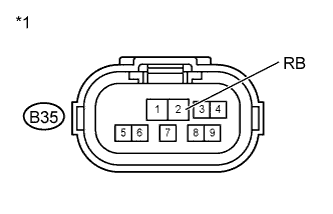
Turn the ignition switch to ON.
Measure the voltage according to the value(s) in the table below.
- Standard Voltage:
Tester Connection
Switch Condition
Specified Condition
B35-2 (RB) - Body ground
Ignition switch ON
11 to 14 V
Text in Illustration *1
Front view of wire harness connector:
(to Park/Neutral Position Switch)
|
|
||||

| OK | |
 |
| 2. CHECK HARNESS AND CONNECTOR (NSW TERMINAL VOLTAGE) |
Measure the voltage according to the value(s) in the table below.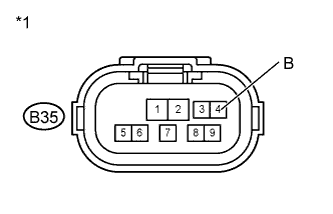
- Standard Voltage:
Tester Connection
Switch Condition
Specified Condition
B35-4 (B) - Body ground
Ignition switch ON
11 to 14 V
Text in Illustration *1
Front view of wire harness connector:
(to Park/Neutral Position Switch)
|
|
||||

| OK | |
|
| 3. INSPECT PARK/NEUTRAL POSITION SWITCH ASSEMBLY |
Turn the ignition switch off.
Measure the resistance according to the value(s) in the table below.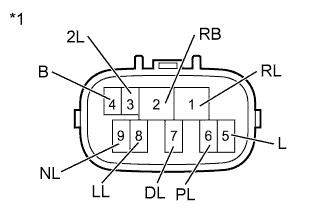
- Standard Resistance:
Tester Connection
Condition
Specified Condition
4 (B) - 5 (L)
Shift lever position P or N
Below 1 Ω
Shift lever position not P and N
10 kΩ or higher
2 (RB) - 6 (PL)
Shift lever position P
Below 1 Ω
Shift lever position not P
10 kΩ or higher
1 (RL) - 2 (RB)
Shift lever position R
Below 1 Ω
Shift lever position not R
10 kΩ or higher
2 (RB) - 9 (NL)
Shift lever position N
Below 1 Ω
Shift lever position not N
10 kΩ or higher
2 (RB) - 7 (DL)
Shift lever position D and 4
Below 1 Ω
Shift lever position not D and 4
10 kΩ or higher
2 (RB) - 3 (2L)
Shift lever position 3
Below 1 Ω
Shift lever position not 3
10 kΩ or higher
2 (RB) - 8 (LL)
Shift lever position 2 and L
Below 1 Ω
Shift lever position not 2 and L
10 kΩ or higher
Text in Illustration *1
Component without harness connected:
(Park/Neutral Position Switch)
|
|
||||
| OK | |
|
| 4. INSPECT SHIFT LOCK CONTROL UNIT ASSEMBLY (SHIFT LOCK CONTROL ECU) |
Connect the park/neutral position switch connector.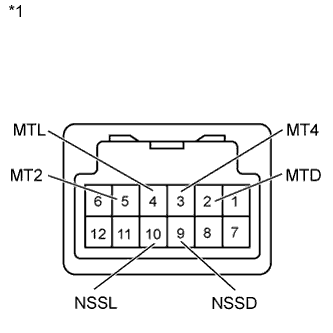
Disconnect the shift lock control ECU connector.
Measure the resistance according to the value(s) in the table below.
- Standard Resistance:
Tester Connection
Condition
Specified Condition
9 (NSSD) - 2 (MTD)
Shift lever position D
Below 1 Ω
Shift lever position 4
10 kΩ or higher
9 (NSSD) - 3 (MT4)
Shift lever position D
10 kΩ or higher
Shift lever position 4
Below 1 Ω
10 (NSSL) - 5 (MT2)
Shift lever position 2
Below 1 Ω
Shift lever position L
10 kΩ or higher
10 (NSSL) - 4 (MTL)
Shift lever position 2
10 kΩ or higher
Shift lever position L
Below 1 Ω
| *1 |
Component without harness connected: (Shift Lock Control ECU (Transmission Control Switch)) |
|
|
||||
| OK | |
|
| 5. CHECK HARNESS AND CONNECTOR (PARK/NEUTRAL POSITION SWITCH - SHIFT LOCK CONTROL ECU) |
Turn the ignition switch to ON.
Measure the voltage according to the value(s) in the table below.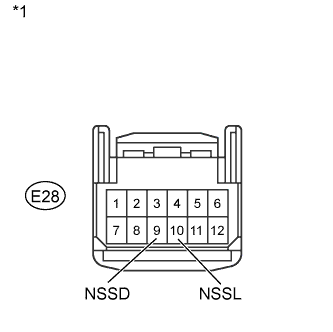
- Standard Voltage:
Tester Connection
Switch Condition
Specified Condition
E28-9 (NSSD) - Body ground
- Ignition switch ON
- Shift lever position D
11 to 14 V
- Ignition switch ON
- Shift lever position not D
Below 1 V
E28-10 (NSSL) - Body ground
- Ignition switch ON
- Shift lever position 2
11 to 14 V
- Ignition switch ON
- Shift lever position not 2
Below 1 V
- Ignition switch ON
Text in Illustration *1
Front view of wire harness connector:
(to Shift Lock Control ECU (Transmission Control Switch))
|
|
||||
| OK | |
|
| 6. CHECK HARNESS AND CONNECTOR (PARK/NEUTRAL POSITION SWITCH - ECM) |
Connect the shift lock control ECU connector.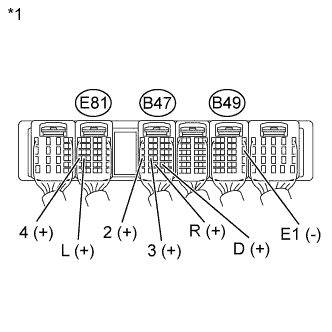
Turn the ignition switch to ON.
Measure the voltage according to the value(s) in the table below.
- Standard Voltage:
Tester Connection
Switch Condition
Specified Condition
B47-23 (3) - B49-12 (E1)
- Ignition switch ON
- Shift lever position 3
11 to 14 V
- Ignition switch ON
- Shift lever position not 3
Below 1 V
B47-24 (2) - B49-12 (E1)
- Ignition switch ON
- Shift lever position 2
11 to 14 V
- Ignition switch ON
- Shift lever position not 2
11 to 14 V
B47-27 (D) - B49-12 (E1)
- Ignition switch ON
- Shift lever position D and 4
11 to 14 V
- Ignition switch ON
- Shift lever position not D and 4
Below 1 V
B47-28 (R) - B49-12 (E1)
- Ignition switch ON
- Shift lever position R
11 to 14 V*
- Ignition switch ON
- Shift lever position not R
Below 1 V
E81-23 (L) - B49-12 (E1)
- Ignition switch ON
- Shift lever position L
11 to 14 V
- Ignition switch ON
- Shift lever position not L
Below 1 V
E81-24 (4) - B49-12 (E1)
- Ignition switch ON
- Shift lever position 4
11 to 14 V
- Ignition switch ON
- Shift lever position not 4
Below 1 V
- Ignition switch ON
Text in Illustration *1
Component with harness connected:
(ECM)
- HINT:
- *: The voltage will drop slightly due to illumination of the back up light.
|
|
||||
| OK | ||
 |
||
| ||
| 7. CHECK HARNESS AND CONNECTOR (PARK/NEUTRAL POSITION SWITCH - ECM) |
Turn the ignition switch off.
Disconnect the connector from the ECM.
Measure the resistance according to the value(s) in the table below.
- Standard Resistance:
Tester Connection
Switch Condition
Specified Condition
B48-2 (NSW) - B35-4 (B)
Always
Below 1 Ω
B35-4 (B) - Body ground
Always
10 kΩ or higher
|
|
||||
| OK | ||
|
||
| ||