Front Passenger Side Seat Belt Warning Light Malfunction
Circuit diagnosis · Vehicles built from Nov 2010
Versions by build date: Jul 2007 – Oct 2010 from Nov 2010
DESCRIPTION
When the passenger seat belt is not fastened with the ignition switch ON and the passenger seat occupied, the passenger seat belt warning light display blinks. The occupant detection sensor detects if the passenger seat is occupied and sends signals to the combination meter assembly. The inner belt detects the passenger seat belt condition and sends signals to the combination meter assembly. After receiving the signals from the occupant detection sensor and inner belt, the combination meter assembly sends signals to the integration control and panel assembly to request the passenger seat belt warning light to blink or go off.WIRING DIAGRAM
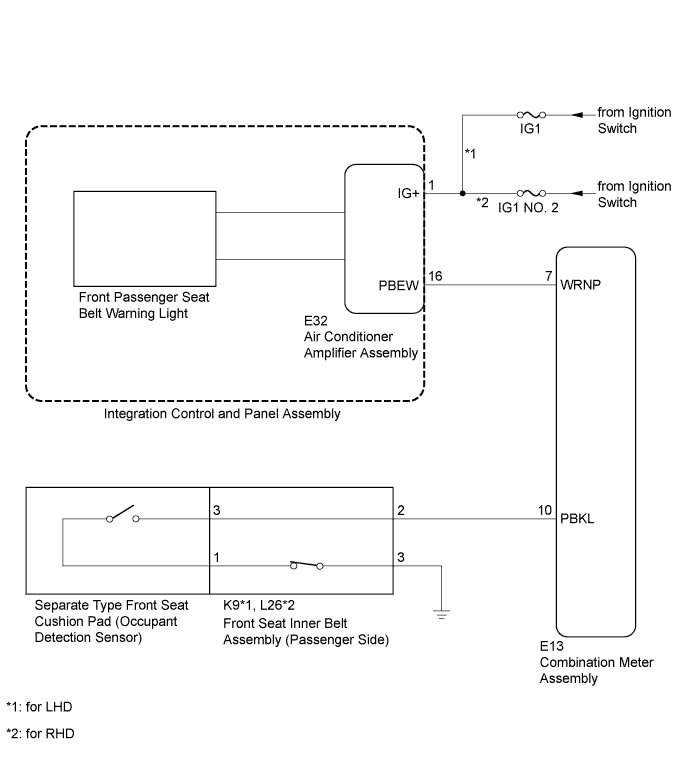

INSPECTION PROCEDURE
- NOTICE:
- Inspect the fuses for circuits related to this system before performing the following inspection procedure.
| 1. READ VALUE USING INTELLIGENT TESTER (P-SEATBELT BUCKLE SW) |

Connect the intelligent tester to the DLC3.
Turn the ignition switch to ON.
Turn the tester on.
Enter the following menus: Body / Combination Meter / Data List.
According to the display on the tester, read the Data List.
Combination Meter Tester Display
Measurement Item/Range
Normal Condition
Diagnostic Note
P-Seatbelt Buckle SW
Buckle switch (Front passenger side)/ ON or OFF
ON: Front passenger side seat belt is fastened
OFF: Front passenger side seat belt is unfastened
-
- OK:
- The display is as specified in the normal condition column.
|
|
||||

| OK | |
 |
| 2. PERFORM ACTIVE TEST USING INTELLIGENT TESTER (FRONT PASSENGER SIDE SEAT BELT) |
Connect the intelligent tester to the DLC3.
Turn the ignition switch to ON.
Turn the tester on.
Enter the following menus: Body / Combination Meter / Active Test.
According to the display on the tester, perform the Active Test.
Combination Meter Tester Display
Test Part
Control Range
Diagnostic Note
Front Passenger Side Seat Belt
Front passenger side seat belt warning light
ON/OFF
-
- OK:
- Passenger seat belt warning light condition can be switched by Active Test.
|
|
||||
| OK | ||
 |
||
| ||
| 3. INSPECT FRONT SEAT INNER BELT ASSEMBLY (PASSENGER SIDE) |
Inspect the front seat inner belt assembly (passenger side) (Click here).
|
|
||||

| OK | |
|
| 4. INSPECT SEPARATE TYPE FRONT SEAT CUSHION PAD (OCCUPANT DETECTION SENSOR) |
Disconnect the separate type front seat cushion pad connector.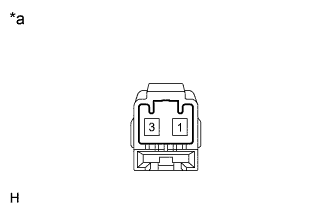
Measure the resistance according to the value(s) in the table below.
- Standard Resistance:
Tester Connection
Condition
Specified Condition
1 - 3
Passenger seat is occupied
Below 100 Ω
Passenger seat is not occupied
1 MΩ or higher
Text in Illustration *a
Component without harness connected
(Separate Type Front Seat Cushion Pad)
Connect the separate type front seat cushion pad connector.
|
|
||||
| OK | |
|
| 5. CHECK HARNESS AND CONNECTOR (FRONT SEAT INNER BELT ASSEMBLY (PASSENGER SIDE) - COMBINATION METER ASSEMBLY AND BODY GROUND) |
for LHD
Disconnect the K9 front seat inner belt assembly (passenger side) connector.
for RHD
Disconnect the L26 front seat inner belt assembly (passenger side) connector.
Disconnect the E13 combination meter assembly connector.
Measure the resistance according to the value(s) in the table below.
- Standard Resistance:
for LHD Tester Connection
Condition
Specified Condition
K9-2 - E13-10 (PBKL)
Always
Below 1 Ω
K9-2 - Body ground
Always
10 kΩ or higher
K9-3 - Body ground
Always
Below 1 Ω
for RHD Tester Connection
Condition
Specified Condition
L26-2 - E13-10 (PBKL)
Always
Below 1 Ω
L26-2 - Body ground
Always
10 kΩ or higher
L26-3 - Body ground
Always
Below 1 Ω
Reconnect the combination meter assembly connector.
Reconnect the front seat inner belt assembly (passenger side) connector.
|
|
||||
| OK | ||
|
||
| ||
| 6. INSPECT INTEGRATION CONTROL AND PANEL ASSEMBLY (FRONT PASSENGER SEAT BELT WARNING LIGHT) |
Inspect the integration control and panel assembly (Click here).
|
|
||||
| OK | |
|
| 7. CHECK HARNESS AND CONNECTOR (AIR CONDITIONER AMPLIFIER ASSEMBLY - IGNITION SWITCH) |
Disconnect the E32 air conditioner amplifier assembly connector.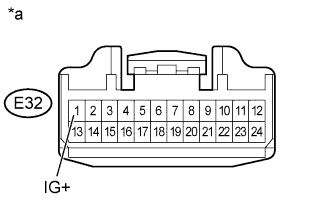
Measure the voltage according to the value(s) in the table below.
- Standard Voltage:
Tester Connection
Switch Condition
Specified Condition
E32-1 (IG+) - Body ground
Ignition switch ON
11 to 14 V
Text in Illustration *a
Front view of wire harness connector
(to Air Conditioner Amplifier Assembly)
Reconnect the air conditioner amplifier assembly connector.
|
|
||||
| OK | |
|
| 8. CHECK HARNESS AND CONNECTOR (AIR CONDITIONER AMPLIFIER ASSEMBLY - COMBINATION METER ASSEMBLY) |
Disconnect the E32 air conditioner amplifier assembly connector.
Disconnect the E13 combination meter assembly connector.
Measure the resistance according to the value(s) in the table below.
- Standard Resistance:
Tester Connection
Condition
Specified Condition
E32-16 (PBEW) - E13-7 (WRNP)
Always
Below 1 Ω
E32-16 (PBEW) - Body ground
Always
10 kΩ or higher
Reconnect the combination meter assembly connector.
Reconnect the air conditioner amplifier assembly connector.
|
|
||||
| OK | ||
|
||
| ||