B1500 Fuel Sender Open Detected
Diagnostic trouble codes · Vehicles built Nov 2010 – Oct 2012
Versions by build date: Nov 2010 – Oct 2012 from Nov 2012
DESCRIPTION
This DTC is output when the combination meter assembly detects a fuel sender gauge malfunction.| DTC Code |
DTC Detection Condition |
Trouble Area |
| B1500 |
When combination meter detects fuel sender gauge malfunction |
|
WIRING DIAGRAM
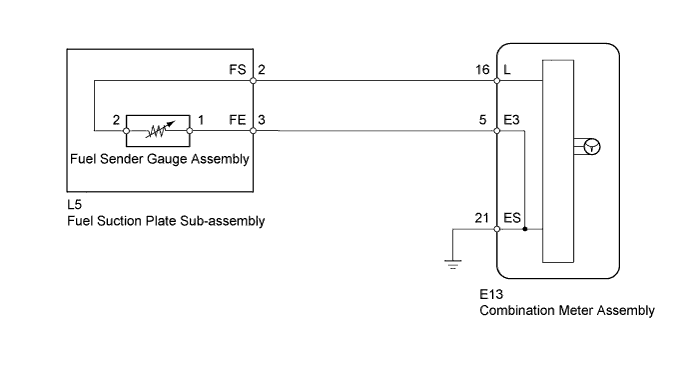

INSPECTION PROCEDURE
| 1. PERFORM ACTIVE TEST USING INTELLIGENT TESTER (FUEL METER OPERATION) |

Connect the intelligent tester to the DLC3.
Turn the ignition switch to ON.
Turn the intelligent tester on.
Enter the following menus: Body / Combination Meter / Active Test.
According to the display on the intelligent tester, perform the Active Test.
Combination Meter Tester Display
Test part
Control Range
Diagnostic Note
Fuel Meter Operation
Fuel receiver gauge
EMPTY / 1/2 / FULL
Perform the test with the vehicle stopped and the engine idling.
- OK:
- Fuel receiver gauge indication is normal.
|
|
||||

| OK | |
 |
| 2. READ VALUE USING INTELLIGENT TESTER (FUEL INPUT) |
Connect the intelligent tester to the DLC3.
Turn the ignition switch to ON.
Turn the intelligent tester on.
Enter the following menus: Body / Combination Meter / Data List.
According to the display on the intelligent tester, read the Data List.
Combination Meter Tester Display
Measurement Item/Range
Normal Condition
Diagnostic Note
Fuel Input
Fuel input signal/
Min.: 0, Max.: 127.5
Fuel sender input value
Unit: Liters
- OK:
- Fuel value displayed on the tester is approximately the same as needle indication.
|
|
||||

| OK | ||
 |
||
| ||
| 3. INSPECT FUEL SENDER GAUGE ASSEMBLY |
Remove the fuel sender gauge assembly (Click here).
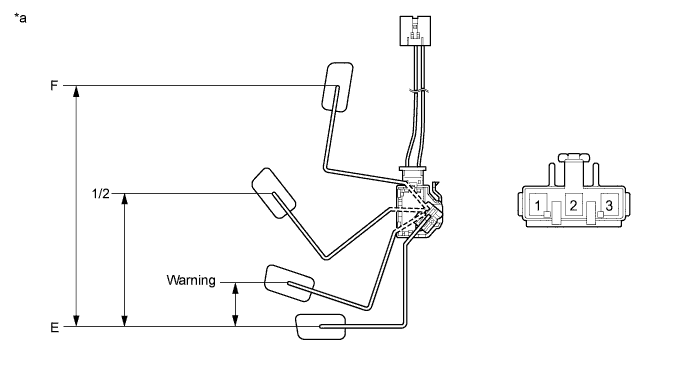
| *a |
Component without harness connected (Fuel Sender Gauge Assembly) |
- |
- |
Check that the float moves smoothly between E and F.
Measure the resistance according to the value(s) in the table below.
- Standard Resistance:
Tester Connection
Float Level
Float Position (mm (in.))
Specified Condition
1 - 2
F
181.9 to 177.9 (7.161 to 7.003)
12.0 to 18.0 Ω
1/2
99.5 (3.917)
212.5 Ω
Warning
32.3 (1.271)
375.4 Ω
E
0 (0)
405.0 to 415.0 Ω
Reinstall the fuel sender gauge assembly.
|
|
||||
| OK | |
|
| 4. INSPECT FUEL SUCTION PLATE SUB-ASSEMBLY |
Remove the fuel suction plate sub-assembly (Click here).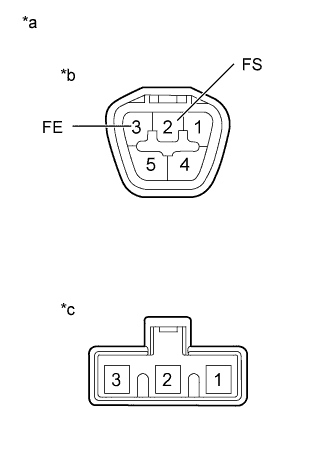
Measure the resistance according to the value(s) in the table below.
- Standard Resistance:
Tester Connection
Condition
Specified Condition
A-2 (FS) - B-2
Always
Below 1 Ω
A-3 (FE) - B-1
Always
Below 1 Ω
Text in Illustration *a
Component without harness connected
(Fuel Suction Plate Sub-assembly)
*b
Connector A
*c
Connector B
Reinstall the fuel suction plate sub-assembly.
|
|
||||
| OK | |
|
| 5. CHECK HARNESS AND CONNECTOR (COMBINATION METER ASSEMBLY - FUEL SUCTION PLATE SUB-ASSEMBLY) |
Disconnect the E13 combination meter assembly connector.
Disconnect the L5 fuel suction plate sub-assembly connector.
Measure the resistance according to the value(s) in the table below.
- Standard Resistance:
Tester Connection
Condition
Specified Condition
E13-16 (L) - L5-2 (FS)
Always
Below 1 Ω
E13-16 (L) - Body ground
Always
10 kΩ or higher
E13-5 (E3) - L5-3 (FE)
Always
Below 1 Ω
E13-5 (E3) - Body ground
Always
10 kΩ or higher
E13-21 (ES) - Body ground
Always
Below 1 Ω
Reconnect the fuel suction plate sub-assembly connector.
Reconnect the combination meter assembly connector.
|
|
||||
| OK | ||
|
||
| ||