B1500 Fuel Sender Open Detected
Diagnostic trouble codes · Vehicles built from Nov 2012
Versions by build date: Nov 2010 – Oct 2012 from Nov 2012
DESCRIPTION
This DTC is output when the combination meter assembly detects a fuel sender gauge malfunction.| DTC Code |
DTC Detection Condition |
Trouble Area |
| B1500 |
When combination meter detects fuel sender gauge malfunction |
|
- *1: for Double Tank Type
WIRING DIAGRAM
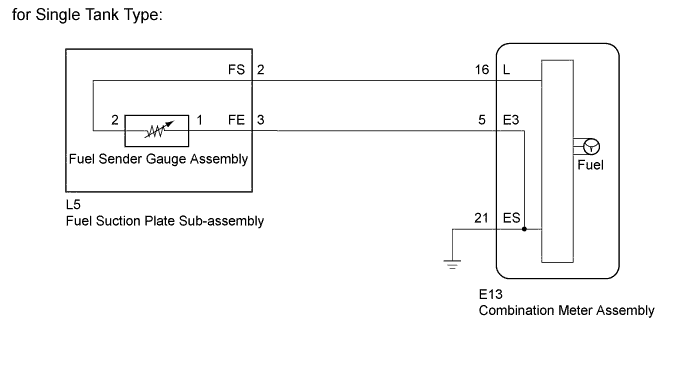

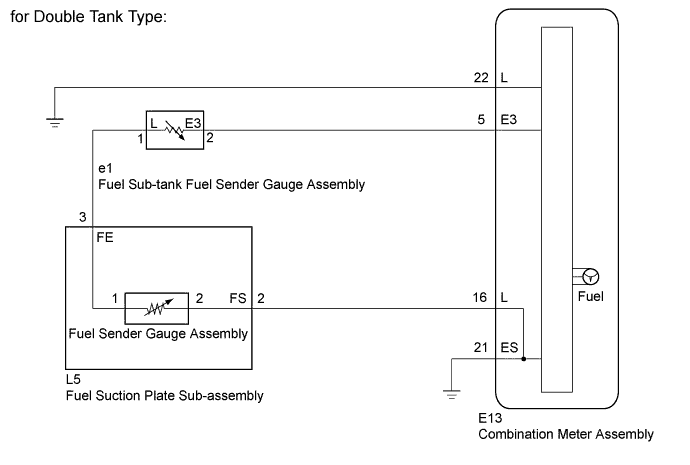
INSPECTION PROCEDURE
| 1. SYSTEM CHECK |

Check the vehicle specifications.
Result Result
Proceed to
for Single Tank Type
A
for Double Tank Type
B
|
|
||||

| A | |
 |
| 2. INSPECT FUEL SENDER GAUGE ASSEMBLY |
Remove the fuel sender gauge assembly (Click here).
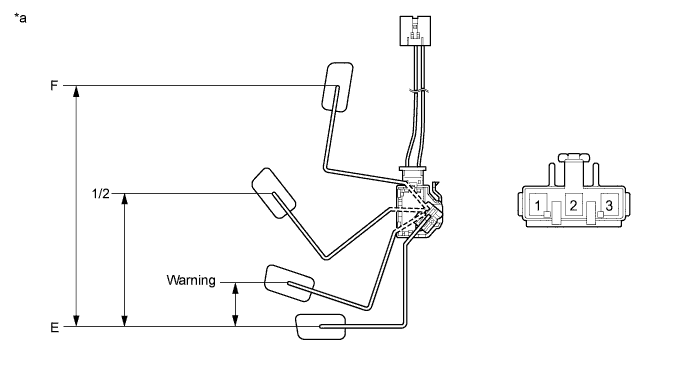
| *a |
Component without harness connected (Fuel Sender Gauge Assembly) |
- |
- |
Check that the float moves smoothly between E and F.
Measure the resistance according to the value(s) in the table below.
- Standard Resistance:
Tester Connection
Float Level
Float Position (mm (in.))
Specified Condition
1 - 2
F
181.9 to 177.9 (7.161 to 7.003)
12.0 to 18.0 Ω
1/2
99.5 (3.917)
212.5 Ω
Warning
32.3 (1.271)
375.4 Ω
E
0 (0)
405.0 to 415.0 Ω
Reinstall the fuel sender gauge assembly (Click here).
|
|
||||

| OK | |
|
| 3. INSPECT FUEL SUCTION PLATE SUB-ASSEMBLY |
Remove the fuel suction plate sub-assembly (Click here).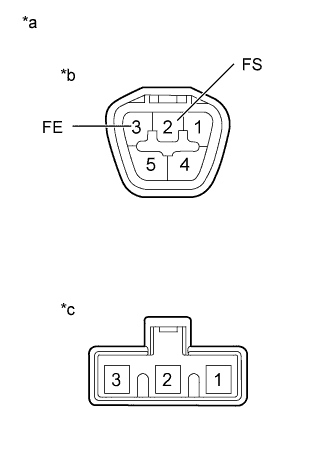
Measure the resistance according to the value(s) in the table below.
- Standard Resistance:
Tester Connection
Condition
Specified Condition
A-2 (FS) - B-2
Always
Below 1 Ω
A-3 (FE) - B-1
Always
Below 1 Ω
Text in Illustration *a
Component without harness connected
(Fuel Suction Plate Sub-assembly)
*b
Connector A
*c
Connector B
Reinstall the fuel suction plate sub-assembly (Click here).
|
|
||||
| OK | |
|
| 4. CHECK HARNESS AND CONNECTOR (COMBINATION METER ASSEMBLY - FUEL SUCTION PLATE SUB-ASSEMBLY) |
Disconnect the E13 combination meter assembly connector.
Disconnect the L5 fuel suction plate sub-assembly connector.
Measure the resistance according to the value(s) in the table below.
- Standard Resistance:
Tester Connection
Condition
Specified Condition
E13-16 (L) - L5-2 (FS)
Always
Below 1 Ω
E13-16 (L) - Body ground
Always
10 kΩ or higher
E13-5 (E3) - L5-3 (FE)
Always
Below 1 Ω
E13-5 (E3) - Body ground
Always
10 kΩ or higher
E13-21 (ES) - Body ground
Always
Below 1 Ω
Reconnect the fuel suction plate sub-assembly connector.
Reconnect the combination meter assembly connector.
|
|
||||
| OK | ||
 |
||
| ||
| 5. INSPECT FUEL SUB-TANK FUEL SENDER GAUGE ASSEMBLY |
Remove the fuel sub-tank fuel sender gauge assembly (Click here).
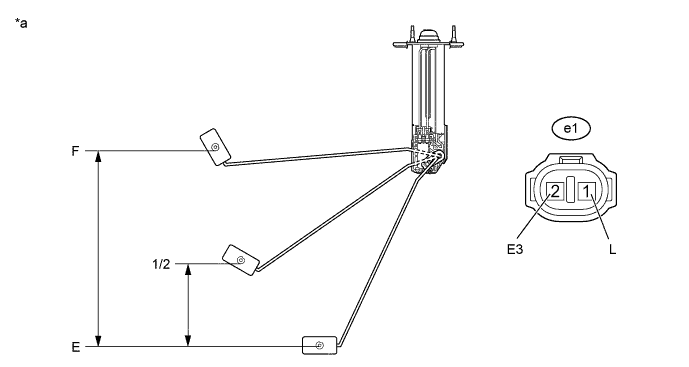
Text in Illustration *a
Component without harness connected
(Fuel Sub-tank Fuel Sender Gauge Assembly)
-
-
Check that the float moves smoothly between E and F.
Measure the resistance according to the value(s) in the table below.
- Standard Resistance:
Tester Connection
Float Level
Float Position (mm (in.))
Specified Condition
e1-1 (L) - e1-2 (E3)
F
214 (8.425)
6.5 to 8.5 Ω
1/2
91.9 (3.618)
114.5 to 126.9 Ω
E
0 (0)
199.2 to 204.2 Ω
Reinstall the fuel sub-tank fuel sender gauge assembly (Click here).
|
|
||||
| OK | |
|
| 6. CHECK HARNESS AND CONNECTOR (FUEL SUB-TANK FUEL SENDER GAUGE - COMBINATION METER ASSEMBLY, FUEL SUCTION PLATE SUB-ASSEMBLY |
Disconnect the E13 combination meter assembly connector.
Disconnect the L5 fuel suction plate sub-assembly connector.
Measure the resistance according to the value(s) in the table below.
- Standard Resistance:
Tester Connection
Condition
Specified Condition
e1-2 (E3) - E13-5 (E3)
Always
Below 1 Ω
e1-2 (E3) - Body ground
Always
10 kΩ or higher
e1-1 (L) - L5-3 (E)
Always
Below 1 Ω
e1-1 (L) - Body ground
Always
10 kΩ or higher
E13-22 (L) - Body ground
Always
Below 1 Ω
|
|
||||
| OK | |
|
| 7. INSPECT FUEL SENDER GAUGE ASSEMBLY |
Remove the fuel sender gauge assembly (Click here).
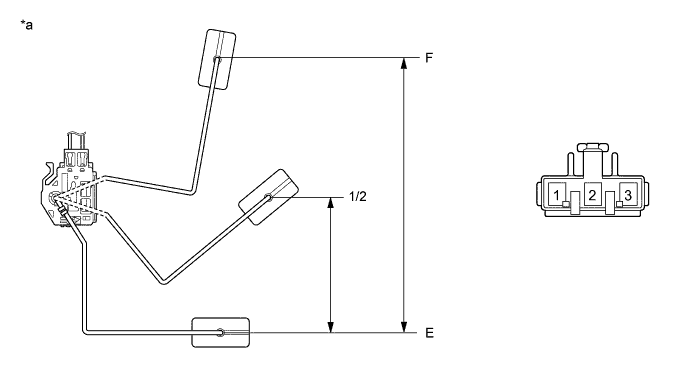
Text in Illustration *a
Component without harness connected
(Fuel Sender Gauge Assembly)
-
-
Check that the float moves smoothly between E and F.
Measure the resistance according to the value(s) in the table below.
- Standard Resistance:
Tester Connection
Float Level
Float Position (mm (in.))
Specified Condition
1 - 2
F
171.9 to 183.9
(6.768 to 7.240)
6.5 to 8.5 Ω
1/2
82.4 to 95.3
(3.244 to 3.752)
118.6 to 132.6 Ω
E
0 (0)
205.8 to 210.8 Ω
Reinstall the fuel sender gauge assembly (Click here).
|
|
||||
| OK | |
|
| 8. INSPECT FUEL SUCTION PLATE SUB-ASSEMBLY |
Remove the fuel suction plate sub-assembly (Click here).
Measure the resistance according to the value(s) in the table below.
- Standard Resistance:
Tester Connection
Condition
Specified Condition
A-2 (FS) - B-2
Always
Below 1 Ω
A-3 (FE) - B-1
Always
Below 1 Ω
Text in Illustration *a
Component without harness connected
(Fuel Suction Plate Sub-assembly)
*b
Connector A
*c
Connector B
Reinstall the fuel suction plate sub-assembly (Click here).
|
|
||||
| OK | |
|
| 9. CHECK HARNESS AND CONNECTOR (COMBINATION METER ASSEMBLY - FUEL SUCTION PLATE SUB-ASSEMBLY) |
Disconnect the E13 combination meter assembly connector.
Disconnect the L5 fuel suction plate sub-assembly connector.
Measure the resistance according to the value(s) in the table below.
- Standard Resistance:
Tester Connection
Condition
Specified Condition
E13-16 (L) - L5-2 (FS)
Always
Below 1 Ω
E13-16 (L) - Body ground
Always
10 kΩ or higher
E13-21 (ES) - Body ground
Always
Below 1 Ω
|
|
||||
| OK | ||
|
||
| ||