REMOVAL
Removal / installation · Vehicles built from Oct 2014
| 1. PLACE FRONT WHEELS FACING STRAIGHT AHEAD |
| 2. SEPARATE BATTERY NEGATIVE CABLE |
| 3. REMOVE FRONT WHEELS |
| 4. REMOVE ENGINE UNDER COVER NO.1 (w/ Engine Under Cover No.1) |
| 5. REMOVE ENGINE UNDER COVER NO.2 (w/ Engine Under Cover No.2) |
| 6. REMOVE ENGINE SIDE UNDER COVER LH (w/ Engine Side Under Cover LH) |
| 7. REMOVE ENGINE SIDE UNDER COVER RH (w/ Engine Side Under Cover RH) |
| 8. DRAIN POWER STEERING FLUID |
| 9. DRAIN ENGINE COOLANT |

- CAUTION:
- Do not remove the radiator reservoir cap sub-assembly while the engine and radiator are still hot. Pressurized, hot engine coolant and steam may be released and cause serious burns.
Loosen the radiator drain cock plug.
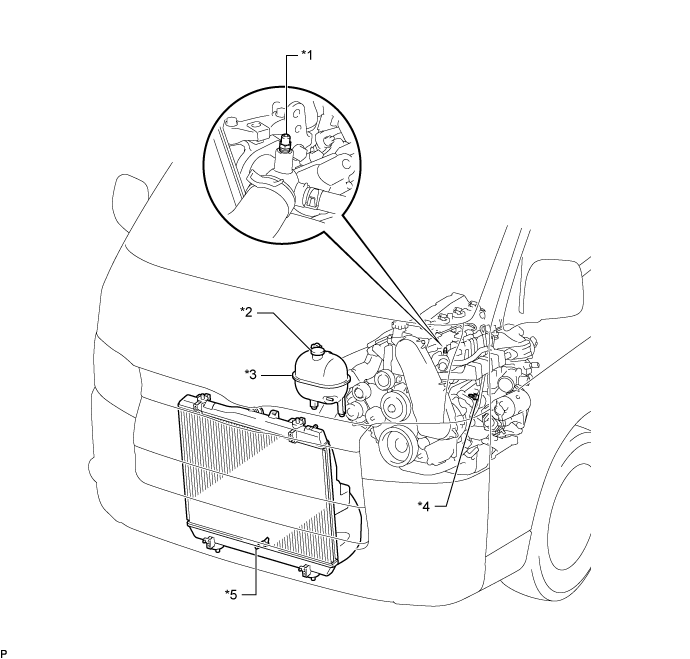

Text in Illustration *1
Bleeder Plug
*2
Radiator Reservoir Cap Sub-assembly
*3
Radiator Reservoir Assembly
*4
Cylinder Block Drain Cock Plug
*5
Radiator Drain Cock Plug
-
-
Remove the radiator reservoir cap sub-assembly.
Loosen the cylinder block drain cock plug (on the engine oil cooler cover), and drain the engine coolant.
Tighten the radiator drain cock plug.
Tighten the cylinder block drain cock plug (on the engine oil cooler cover).
- Torque:
- 8.0 N*m{ 82 kgf*cm , 71 in.*lbf }
| 10. DRAIN ENGINE OIL |
Remove the oil filler cap.
Remove the oil drain plug, and drain the engine oil from the oil pan.
Install a new gasket and the drain plug.
- Torque:
- 34 N*m{ 347 kgf*cm , 25 ft.*lbf }
| 11. REMOVE FRONT SEAT ASSEMBLY RH (for Hi-back Seat Type) |
Perform the same procedure as above on the opposite side. (Click here)
| 12. REMOVE FRONT SEAT ASSEMBLY RH (for Low-back Seat Type) |
Perform the same procedure as above on the opposite side. (Click here)
| 13. REMOVE FRONT DOOR SCUFF PLATE RH |
| 14. REMOVE ENGINE SERVICE HOLE SUB COVER ASSEMBLY |
Roll up the carpet, and remove the engine service hole sub cover assembly.
| 15. REMOVE FAN & GENERATOR V BELT |
Remove the drive belt by rotating the tensioner pulley in clockwise direction to loosen its tension with the pulley set bolt of the tensioner.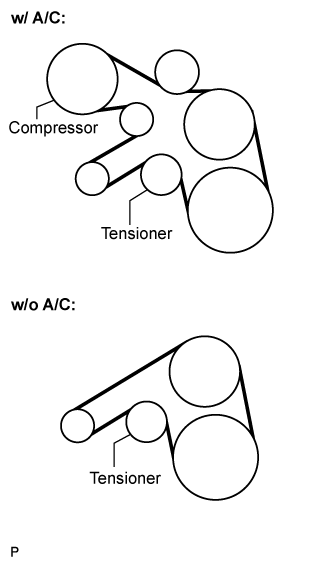
| 16. REMOVE FENDER APRON MUDGUARD SEAL |
| 17. REMOVE AIR CLEANER HOSE ASSEMBLY |
Remove the bolt and air cleaner hose assembly.
| 18. REMOVE COMPRESSOR OUTLET ELBOW |
Remove the 2 bolts and 2 clamps, then remove the compressor outlet elbow.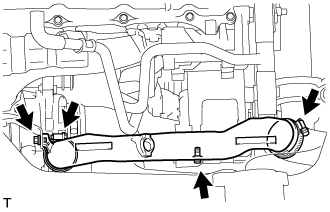
| 19. DISCONNECT OIL RETURN HOSE (w/ Intercooler) |
Disconnect the oil return hose from the intake manifold.
| 20. DISCONNECT AIR HOSE NO.4 |
Remove the clamp, and disconnect the air hose No.4 from the diesel throttle body.
| 21. DISCONNECT RADIATOR HOSE INLET |
Remove the clamp, and disconnect the radiator inlet hose from the water inlet.
| 22. DISCONNECT RADIATOR HOSE NO.4 |
Remove the clamp, and disconnect the radiator hose No.4 from the water outlet.
| 23. DISCONNECT WATER BY-PASS HOSE NO.3 |
Remove the clamp, and disconnect the water by-pass hose No.3 from the water by-pass pipe.
| 24. DISCONNECT FUEL HOSE NO.2 |
Remove the clamp, and disconnect the fuel hose No.2 from the nozzle leakage pipe No.2.
| 25. DISCONNECT FUEL HOSE NO.1 |
Remove the clamp, and disconnect the fuel hose No.1 from the injection pump assembly.
| 26. DISCONNECT VACUUM HOSE |
Disconnect the vacuum hose from the vacuum pump assembly.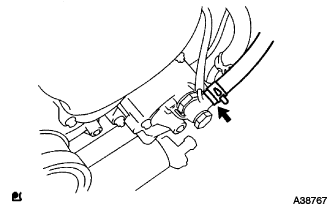
| 27. DISCONNECT ENGINE WIRE |
Disconnect the ECM connector (Click here).
Disconnect the clamps of the engine wire and earth cable.
Remove the 4 connectors and nut as shown in the illustration.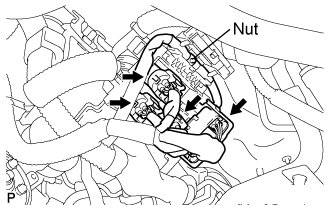
| 28. SEPARATE COMPRESSOR AND MAGNETIC CLUTCH (w/ Air Conditioning System) |
Disconnect the connector.
Remove the 4 bolts and compressor and magnetic clutch.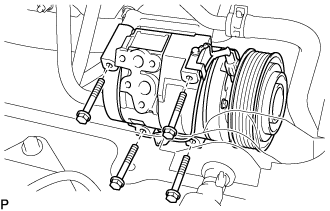
| 29. SEPARATE VANE PUMP OIL RESERVOIR ASSEMBLY |
Remove the 2 bolts and vane pump oil reservoir assembly.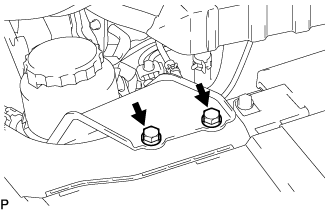
- NOTICE:
- Suspend the vane pump oil reservoir assembly with wire to prevent power steering fluid from spilling out.
| 30. REMOVE EXHAUST PIPE ASSEMBLY FRONT (for Super Long Wheelbase) |
Remove the 4 bolts, 2 nuts, 2 compression springs. exhaust pipe assembly front and 2 gaskets.
Disconnect the exhaust pipe support, and remove the exhaust pipe assembly front and 2 gaskets.
| 31. REMOVE EXHAUST PIPE ASSEMBLY FRONT (for Long Wheelbase) |
Remove the 4 bolts, 2 nuts and 2 compression springs. 2 gasket and exhaust pipe assembly front.
Disconnect the exhaust pipe support, and remove the exhaust pipe assembly front and 2 gaskets.
| 32. REMOVE EXHAUST PIPE ASSEMBLY CENTER (for Super Long Wheelbase) |
Remove the 2 bolts.
Disconnect the exhaust pipe supports, and remove the exhaust pipe assembly center and gasket.
| 33. REMOVE PROPELLER WITH CENTER BEARING SHAFT ASSEMBLY (for Super Long Wheelbase) |
Put matchmarks on both flanges.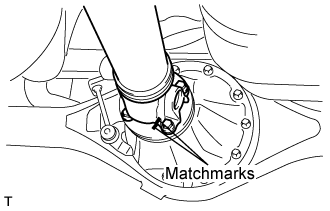
Remove the 4 nuts, bolts and washers.
- HINT:
- If the flange connection is hard to separate, temporarily tighten one nut only and evenly tap the flange with a brass bar and hammer to separate the propeller with center bearing shaft assembly from the differential companion flange.
Remove the 2 bolts and center support bearing assembly No.1.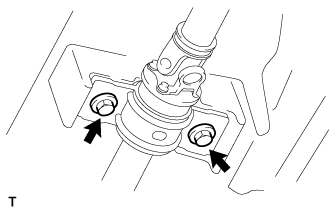
Remove the propeller with center bearing shaft assembly.
Insert SST in the transmission to prevent oil leakage.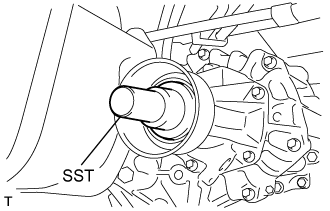
- NOTICE:
- Do not damage the oil seal.
Use the following SST for the automatic transmission.
- SST
- 09325-40010
Use the following SST for the manual transmission.
- SST
- 09325-20010
| 34. REMOVE PROPELLER SHAFT ASSEMBLY (for Long Wheelbase) |
Put matchmarks on both flanges.
Remove the 4 nuts, bolts and washers.
- HINT:
- If the flange connection is hard to separate, temporarily tighten one nut only and evenly tap the flange with a brass bar and hammer to separate the propeller shaft assembly from the differential companion flange.
Remove the propeller shaft assembly.
Insert SST in the transmission to prevent oil leakage.
- NOTICE:
- Do not damage the oil seal.
Use the following SST for the automatic transmission
- SST
- 09325-40010
Use the following SST for the manual transmission
- SST
- 09325-20010
| 35. REMOVE SPEED SENSOR FRONT LH (w/ ABS) |
Remove the 2 bolts, and separate the speed sensor from the steering knuckle.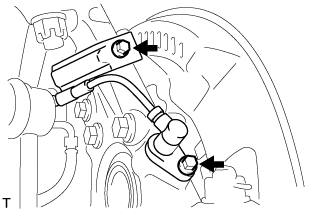
- NOTICE:
- Be careful not to damage the speed sensor.
- Prevent foreign matter from adhering to the speed sensor.
- Be careful not to damage the speed sensor.
| 36. REMOVE SPEED SENSOR FRONT RH (w/ ABS) |
- HINT:
- Use the same procedures described for the LH side.
| 37. REMOVE FRONT DISC BRAKE CALIPER ASSEMBLY LH |
Remove the 2 bolts, and disconnect the brake caliper assembly.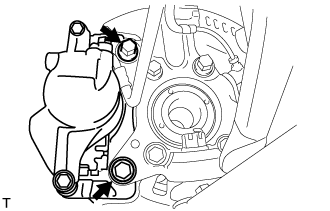
- NOTICE:
- Use a wire or an equivalent to keep the brake caliper from hanging down by the flexible hose.
| 38. REMOVE FRONT DISC BRAKE CALIPER ASSEMBLY RH |
- HINT:
- Use the same procedures described for the LH side.
| 39. SEPARATE FRONT SUSPENSION ARM SUB-ASSEMBLY UPPER LH |
Remove the cotter pin and loosen the nut.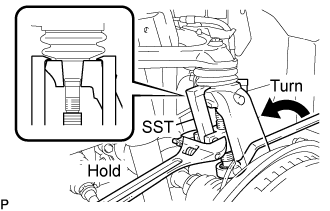
- SST
- 09628-62011
- NOTICE:
- Do not remove the nut.
Using SST, separate the steering knuckle from the suspension upper arm and remove the nut.
- NOTICE:
- Fix the steering knuckle with a wire so that the flexible hose does not receive excessive force.
- Do not damage the ball joint dust cover.
- Fix the steering knuckle with a wire so that the flexible hose does not receive excessive force.
| 40. SEPARATE FRONT SUSPENSION ARM SUB-ASSEMBLY UPPER RH |
- HINT:
- Use the same procedures described for the LH side.
| 41. SEPARATE SHOCK ABSORBER ASSEMBLY FRONT LH |
Remove the bolt and separate the front shock absorber from the front suspension lower arm.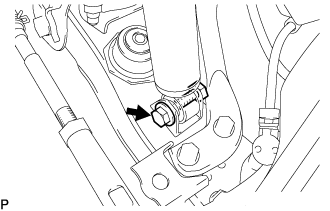
| 42. SEPARATE SHOCK ABSORBER ASSEMBLY FRONT RH |
- HINT:
- Use the same procedures described for the LH side.
| 43. SEPARATE CLUTCH RELEASE CYLINDER ASSEMBLY (for Manual Transmission) |
Remove the 2 bolts and separate the clutch release cylinder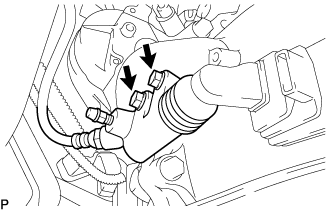
| 44. SEPARATE TRANSMISSION CONTROL CABLE ASSEMBLY (for Manual Transmission) |
Put matchmarks on the control cable assembly and the outer lever.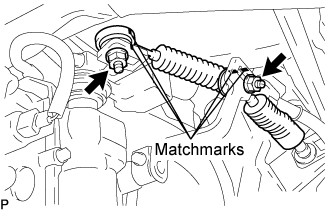
Remove the 2 nuts and separate the transmission control cable from the outer lever.
Using a screwdriver, disengage the claws of the 2 clips.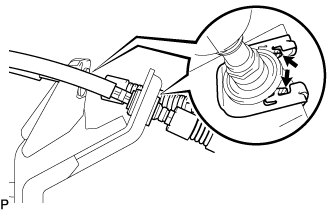
Remove the transmission control cable and 2 clips from the transmission control cable bracket No.1.
| 45. REMOVE TRANSMISSION OIL LEVEL GAUGE SUB-ASSEMBLY (for Automatic Transmission) |
Remove the transmission oil level gauge sub-assembly from the transmission oil filler tube.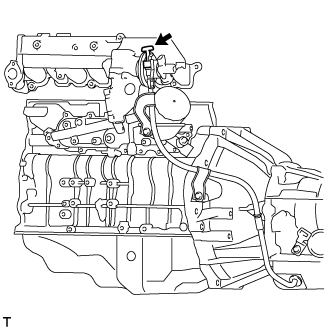
| 46. REMOVE TRANSMISSION OIL FILLER TUBE SUB-ASSEMBLY (for Automatic Transmission) |
Remove the 2 bolts transmission oil filler tube sub-assembly.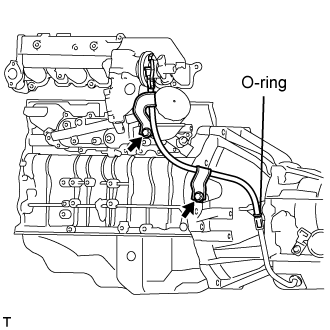
Remove the O-ring from the oil filler tube sub-assembly.
| 47. DISCONNECT TRANSMISSION CONTROL CABLE ASSEMBLY (for Automatic Transmission) |
Remove the nut and disconnect transmission control cable assembly from the transmission control shaft lever assembly.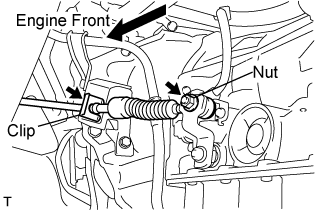
Remove the clip and disconnect the transmission control cable assembly from the transmission control bracket.
| 48. DISCONNECT OIL COOLER TUBE (for Automatic Transmission) |
Remove each clamp and disconnect the oil cooler inlet tube and oil cooler outlet tube from the oil cooler.
| 49. SEPARATE STEERING TORQUE SHAFT ASSEMBLY |
Loosen bolt (A) and remove bolt (B), then slide the steering torque shaft assembly.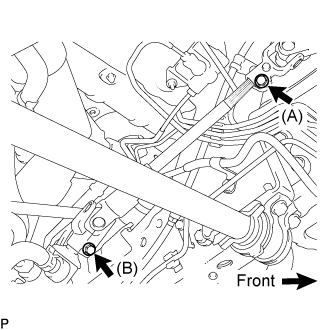
- HINT:
- Do not remove bolt (A).
- Do not disconnect the steering torque shaft assembly from the power steering link assembly.
- Do not remove bolt (A).
Put matchmarks on the steering torque shaft assembly and the power steering link assembly.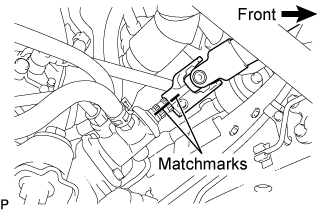
Separate the steering torque shaft assembly from the power steering link assembly.
| 50. REMOVE ENGINE ASSEMBLY WITH TRANSMISSION |
Using the engine lifter, hold the engine assembly and separate the rear engine mount.
Remove the stabilizer brackets and 16 bolts of the front suspension cross member.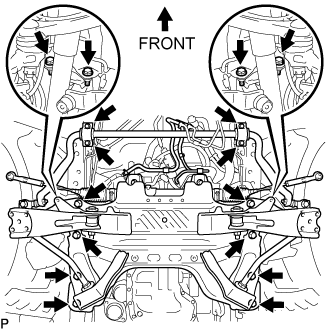
Remove the engine assembly w/ transmission out of the vehicle slowly and carefully.
| 51. REMOVE STARTER ASSEMBLY (for 2.0 kW Type) |
for Wide Body: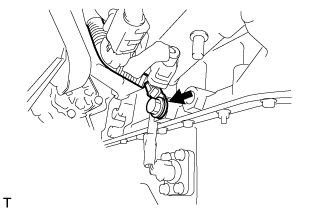
Remove the bolt, then remove the ground cable.
Open the terminal cap.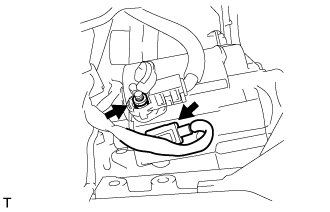
Remove the nut and disconnect the wire harness from terminal 30.
Disconnect the terminal 50 connector from the starter assembly.
Remove the bolt and 2 nuts, then remove the starter.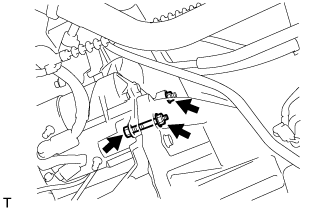
| 52. REMOVE STARTER ASSEMBLY (for 2.2 kW Type) |
Remove the No. 2 terminal cap.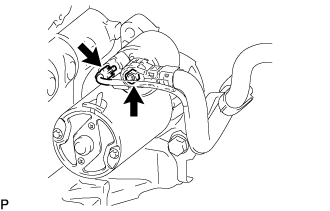
Disconnect the starter connector.
Remove the nut and disconnect the starter wire.
Remove the 2 bolts and disconnect the wiring harness clamp bracket.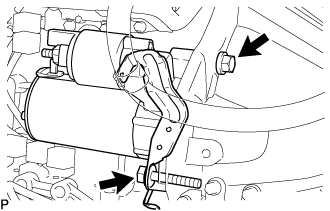
Remove the stater assembly.
| 53. REMOVE STARTER ASSEMBLY (for 2.7 kW Type) |
for Wide Body:
Remove the bolt, then disconnect the ground cable.
Open the terminal cap.
Remove the nut and disconnect the wire harness from terminal 30.
Disconnect the terminal 50 connector from the starter assembly.
Remove the bolt and 2 nuts, then remove the starter.
| 54. REMOVE MANUAL TRANSMISSION UNIT ASSEMBLY (for Manual Transmission) |
| 55. REMOVE AUTOMATIC TRANSMISSION ASSEMBLY (for Automatic Transmission) |
| 56. REMOVE CLUTCH COVER ASSEMBLY (for Manual Transmission) |
Put matchmarks on the clutch cover assembly and the flywheel sub-assembly.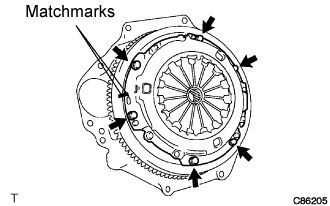
Loosen each set bolt one turn at a time until spring tension is released.
Remove the set bolts, and pull off the clutch cover assembly.
- NOTICE:
- Do not drop the clutch disc assembly.
| 57. REMOVE CLUTCH DISC ASSEMBLY (for Manual Transmission) |
- NOTICE:
- Keep the lining part of the clutch disc assembly, the pressure plate and surface of the flywheel sub-assembly away from oil and foreign matter.
| 58. REMOVE FLYWHEEL SUB-ASSEMBLY |
Fix the crankshaft with SST.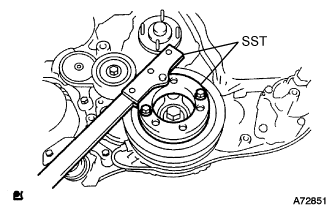
- SST
- 09213-58013
09330-00021
For manual transmission.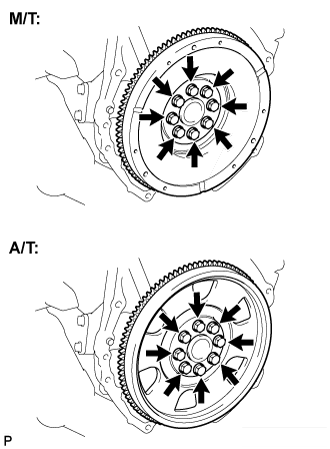
Remove the 8 bolts and flywheel.
For automatic transmission.
Remove the 8 bolts, and remove the drive plate spacer rear, drive plate and flywheel.
| 59. REMOVE REAR END PLATE |
Remove the bolt and rear end plate.
| 60. REMOVE ENGINE WIRE |
Disconnect the engine wire from the engine assembly.
| 61. INSTALL ENGINE HANGERS |
Set the engine hanger No.1 upper and engine hanger No.2 to the locations shown in the illustration.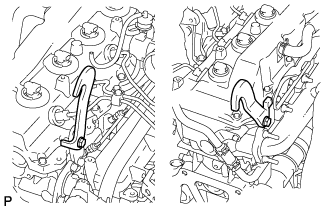
- Torque:
- Engine hanger No.1 upper:
- 25 N*m{ 255 kgf*cm , 18 ft.*lbf }
- Engine hanger No.2:
- 68 N*m{ 693 kgf*cm , 50 ft.*lbf }
Parts name
Parts No.
Engine hanger No.1 upper
Bolt
12284-30020
91512-61014
Engine hanger No.2
Bolt
12282-67020
91642-81030
- NOTICE:
- Use a new bolt for the engine hanger.
| 62. SEPARATE OIL RESERVOIR TO PUMP HOSE NO.1 |
Remove the clip and separate the oil reservoir to pump hose No.1.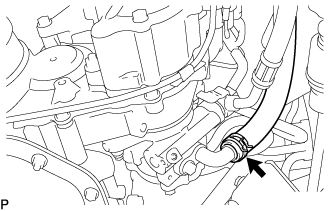
| 63. SEPARATE PRESSURE FEED TUBE ASSEMBLY |
Remove the union bolt and separate the pressure feed tube assembly.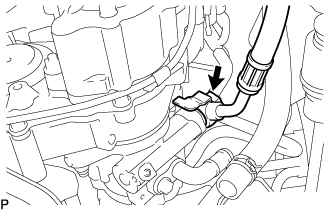
| 64. REMOVE FRONT SUSPENSION CROSS MEMBER |
Hold the engine with the engine sling device and chain block.
Remove the 4 bolts from the front suspension cross member.
Remove the engine assembly by operating the engine sling device and chain block.
| 65. INSTALL ENGINE STAND |
| 66. REMOVE VANE PUMP ASSEMBLY |
Remove the 2 nuts and the vane pump assembly.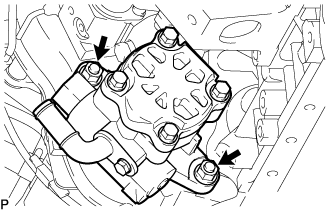
Remove the vane pump O-ring from the vane pump assembly.
| 67. REMOVE TIMING BELT COVER NO.1 |
Remove the 6 bolts and timing belt No.1 cover.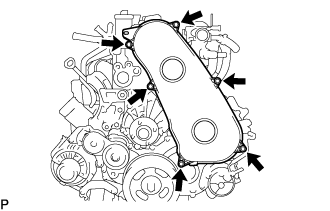
| 68. REMOVE TIMING BELT |
Turn the crankshaft in the clockwise direction and align the timing marks as shown in the illustration.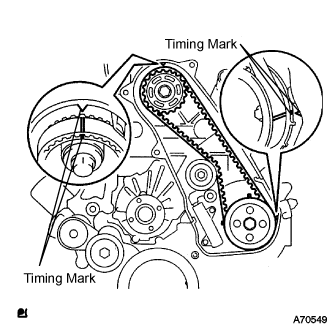
Uniformly loosen the 2 bolts, and remove the chain tensioner assembly No.1.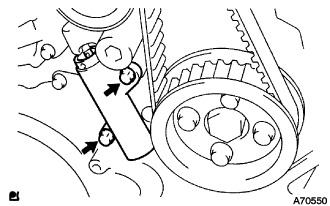
Remove the timing belt.
| 69. REMOVE FAN PULLEY |
Remove the 4 nuts and fan pulley.
| 70. REMOVE EGR PIPE SUB-ASSEMBLY NO.1 (w/ EGR Valve) |
Disconnect the fuel pressure sensor connector.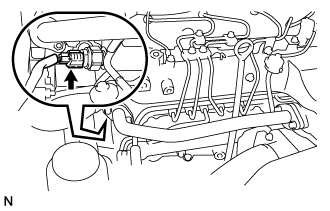
Remove the 2 bolts, 2 nuts, and the EGR pipe sub-assembly.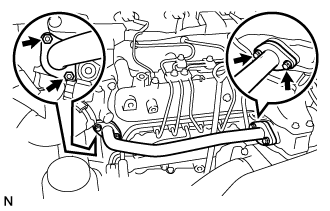
Remove the 2 gaskets.
| 71. REMOVE DIESEL THROTTLE BODY ASSEMBLY |
Disconnect the 2 throttle body connectors.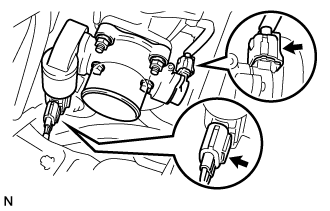
Remove the 2 bolts, 2 nuts, and the diesel throttle body assembly.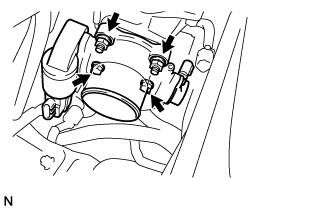
Remove the gasket from intake air connector.
| 72. REMOVE INTAKE AIR CONNECTOR (w/o EGR Valve) |
Remove the bolt, and separate the manifold stay.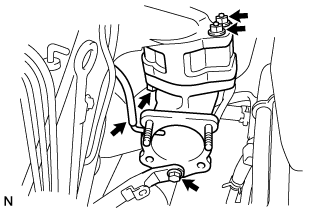
Disconnect the vacuum hose from intake air connector.
Remove the bolt, 2 nuts and the intake air connector assembly.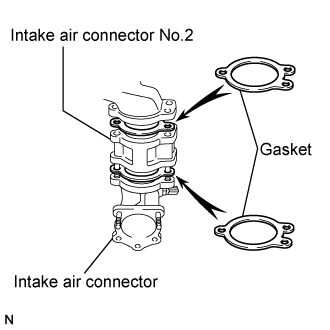
Remove the 2 gaskets and intake air connector No.2 from the intake air connector.
| 73. REMOVE ELECTRIC EGR CONTROL VALVE ASSEMBLY (w/ EGR Valve) |
Remove the vacuum regulating valve.
Remove the 2 vacuum hoses and the vacuum regulating valve connector.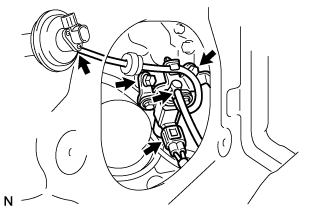
Remove the 2 bolts and the vacuum regulating valve.
Remove the EGR valve assembly with the sensor.
Remove the bolt, and separate the manifold stay.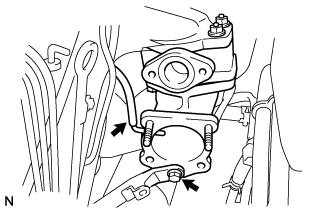
Disconnect the vacuum hose from the intake air connector.
Disconnect the intake air temperature sensor connector.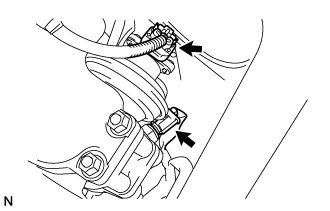
Disconnect the EGR valve position sensor connector.
Remove the bolt, 2 nuts and the intake air connector assembly.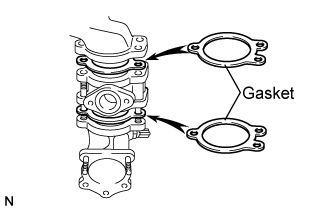
Remove the 2 gaskets and EGR valve assembly from the intake air connector.
| 74. REMOVE OIL LEVEL GAUGE GUIDE |
Remove the oil level gauge.
Remove the bolt and oil level gauge guide.
| 75. REMOVE INJECTION PIPE |
- SST
- 09023-12701
Remove the injection pipe.
Remove the 2 nuts and injection pipe clamp No.3.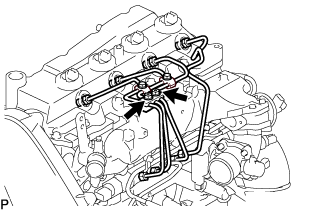
Using SST, remove the 4 injection pipes.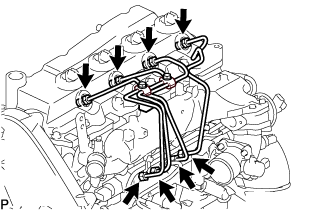
- SST
- 09023-12701
| 76. REMOVE FUEL INLET PIPE SUB-ASSEMBLY |
Using SST, remove the fuel inlet pipe sub-assembly.
- SST
- 09023-12701
| 77. REMOVE NOZZLE LEAKAGE PIPE ASSEMBLY NO.2 |
Remove the union bolt and gasket.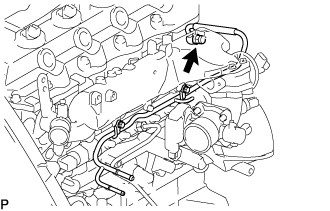
Remove the 2 bolts and the nozzle leakage pipe assembly No.2.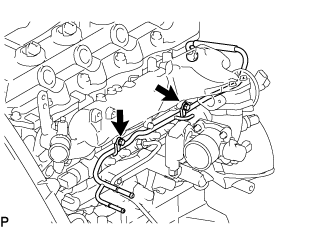
| 78. REMOVE INTAKE MANIFOLD |
Remove the bolt, nut, and the manifold stay.
Remove the bolt, and disconnect the ground cable.
Remove the 4 bolts, 2 nuts, and intake manifold.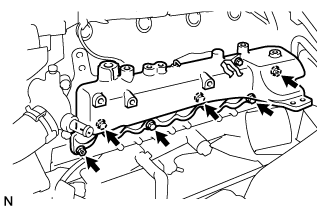
Remove the gasket from the cylinder head.
| 79. REMOVE OIL FILTER SUB-ASSEMBLY |
Using SST, remove the oil filter.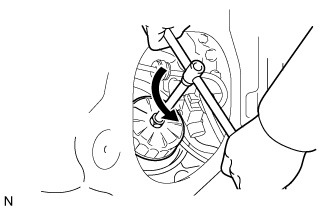
- SST
- 09228-07501
- HINT:
- Position the drain oil container to collect the oil from the oil filter.
| 80. REMOVE COMMON RAIL ASSEMBLY |
Disconnect the fuel pressure sensor connector from the common rail assembly.
Disconnect the fuel hose from the fuel pressure limiter.
Remove the 2 bolts and common rail assembly.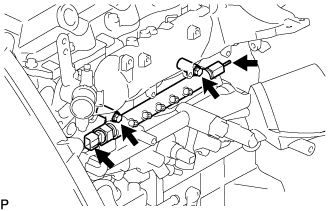
| 81. REMOVE INJECTION OR SUPPLY PUMP ASSEMBLY |
Remove the 4 bolts.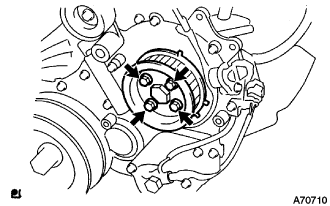
Remove the camshaft timing pulley flange No.2 and pump drive shaft pulley.
Using SST, remove the supply pump gear set nut and O-ring while holding the crankshaft pulley.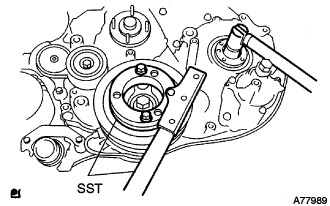
- SST
- 09213-58013
09330-00021
Disconnect the 2 fuel hoses.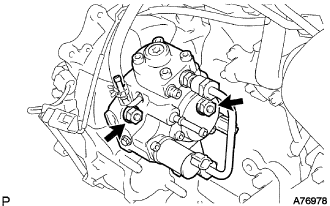
Disconnect the 2 connectors and wire harness.
Loosen the 2 nuts as shown in the illustration.
Using SST, disengage the supply pump from the supply pump gear.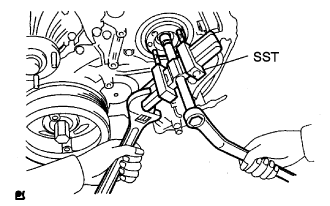
- SST
- 09950-50013
(09951-05010, 09952-05010, 09953-05020, 09954-05021)
Remove the 2 nuts and supply pump from the engine.
Remove the O-ring from the supply pump.
Remove the pulley key from the supply pump.
| 82. REMOVE OIL COOLER COVER SUB-ASSEMBLY (w/o EGR Valve) |
Disconnect the oil pressure switch connector.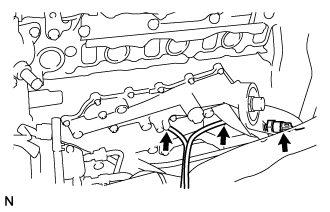
Disconnect the oil filter drain hoses.
Remove the 2 nuts, 13 bolts, oil cooler cover, and gasket.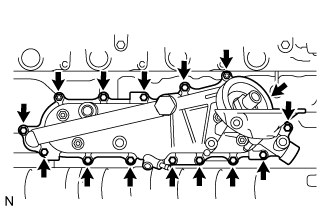
| 83. REMOVE OIL COOLER COVER SUB-ASSEMBLY (w/ EGR Valve) |
Disconnect the oil pressure switch connector.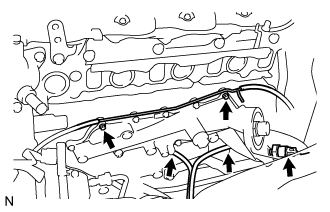
Disconnect the oil filter drain hoses.
Remove the 2 nuts and the vacuum transmitting pipe No.2 from the oil cooler cover.
Remove the 13 bolts, oil cooler cover, and gasket.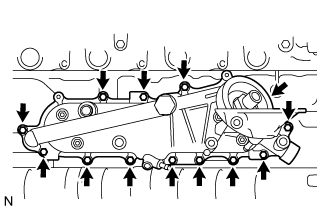
| 84. REMOVE WATER OUTLET |
Remove the 2 bolts, water outlet and gasket.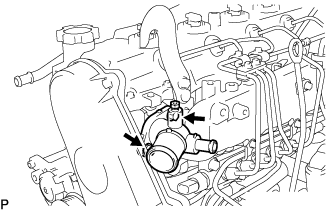
| 85. REMOVE ENGINE MOUNTING BRACKET FRONT NO.1 LH |
Remove the 4 bolts and the engine mounting bracket front No.1 LH.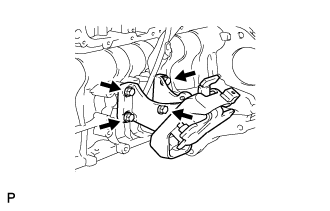
| 86. REMOVE GLOW PLUG NO.1 CONNECTOR |
Remove the 4 grommets.
Remove the 4 nuts and glow plug No.1 connectors.
| 87. REMOVE GLOW PLUG |
Using a deep socket wrench (12 mm), remove the 4 glow plugs.
| 88. REMOVE WATER INLET |
Remove the 3 bolts and water inlet.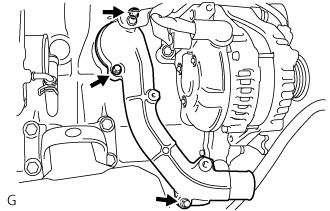
| 89. REMOVE THERMOSTAT |
Remove thermostat and gasket.
| 90. REMOVE COMPRESSOR BRACKET (w/ Air Conditioning System) |
Remove the 4 bolts and compressor bracket.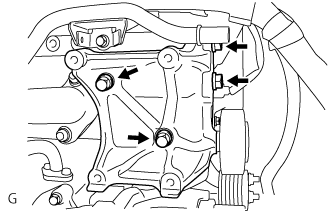
| 91. REMOVE IDLE PULLEY ASSEMBLY (w/ Air Conditioning System) |
Remove the bolt, washers and idle pulley assembly.
| 92. REMOVE GENERATOR BRACKET |
Remove the 2 bolts and generator bracket.
| 93. REMOVE GENERATOR ASSEMBLY |
Disconnect the generator connector.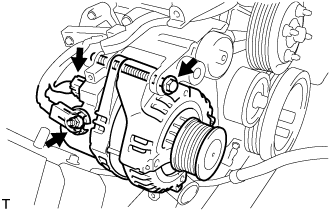
Remove the terminal cap.
Remove the nut and disconnect the wire harness from terminal B.
Remove the bolt and generator assembly.
| 94. REMOVE V-RIBBED BELT TENSIONER ASSEMBLY |
Remove the 4 bolts and belt tensioner assembly.
| 95. REMOVE VENTILATION PIPE |
Remove the bolt and ventilation pipe.
| 96. REMOVE VENTILATION HOSE HEAT INSULATOR |
Remove the 2 bolts and ventilation hose insulator heat.
| 97. REMOVE TURBINE OUTLET ELBOW |
Remove the 4 nuts and the turbine outlet elbow.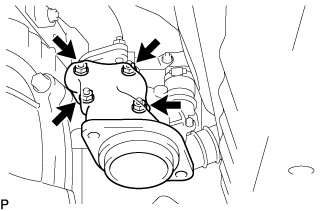
| 98. REMOVE TURBOCHARGER STAY |
Remove the 3 bolts and the turbocharger stay.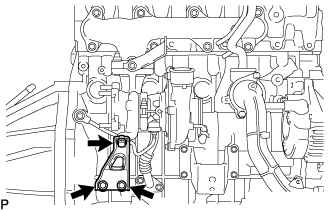
| 99. REMOVE TURBO OIL INLET PIPE SUB-ASSEMBLY |
Remove the 2 bolts and the turbo oil inlet pipe from the cylinder block. (A)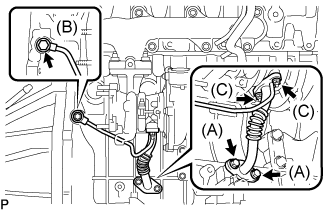
- HINT:
- Place a container under the connection before disconnecting the turbo oil inlet pipe because oil in the pipe may spill out.
Remove the 2 bolts and the turbo oil inlet pipe from the turbocharger. (C)
Remove the union-bolt and gasket from the turbo oil inlet pipe. (B)
Remove the 2 gaskets.
| 100. REMOVE COMPRESSOR ELBOW STAY |
Remove the bolt and the compressor elbow stay.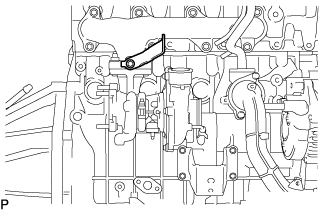
| 101. REMOVE WATER BY-PASS PIPE SUB-ASSEMBLY NO.2 |
Water cooled turbocharger (w/ heater)
Disconnect the clip and the heater water inlet hose E.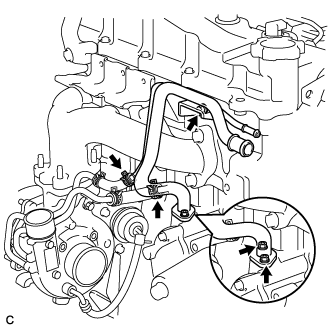
Disconnect the clip and the water by-pass hose No.3.
Disconnect the 2 clips and the 2 water hoses.
Remove the 2 nuts, bolts and water bypass pipe No.2.
Remove the gasket.
Water cooled turbocharger (w/o heater)
Disconnect the clip and the water by-pass hose No.3.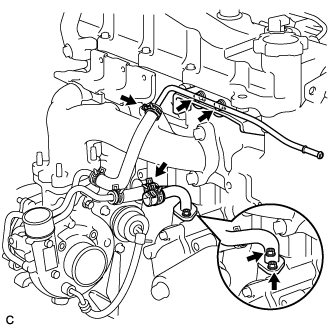
Disconnect the 2 clips and the 2 water hoses.
Remove the 2 bolts and the turbo water pipe No.2.
Remove the 2 nuts and water by-pass pipe No.2.
Remove the gasket.
Air cooled turbocharger (w/o heater)
Remove the 2 nuts and water by-pass pipe No.2.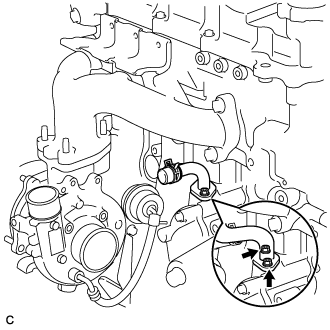
Remove the gasket.
| 102. REMOVE TURBO WATER PIPE SUB-ASSEMBLY NO.2 (for Water Cooled Turbocharger) |
Remove the bolt, 2 nuts and the turbo water pipe.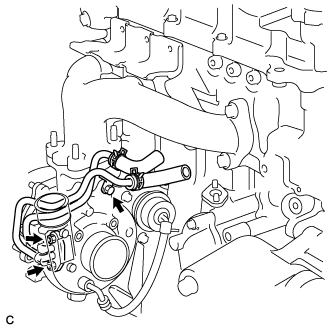
| 103. REMOVE TURBOCHARGER SUB-ASSEMBLY |
Remove the 3 bolts and the turbocharger.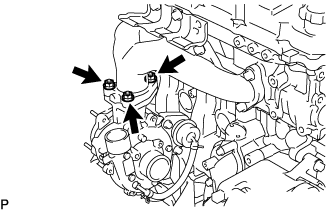
Remove the gasket.
| 104. REMOVE EXHAUST MANIFOLD |
Remove the 2 bolts, 6 nuts and the exhaust manifold from the cylinder head.
| 105. REMOVE ENGINE MOUNTING BRACKET FRONT NO.1 RH |
Remove the 4 bolts and the engine mounting bracket front No.1 RH.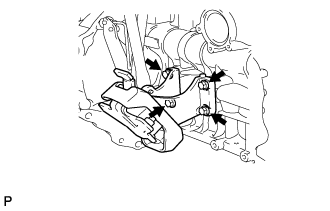
| 106. REMOVE TIMING BELT IDLER SUB-ASSEMBLY NO.1 |
Using a 10 mm socket hexagonal wrench, remove the bolt, plate washer and timing belt idler No.1.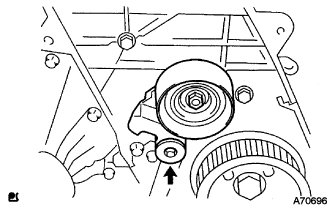
| 107. REMOVE CRANKSHAFT PULLEY |
Remove the bolt holding the crankshaft with SST.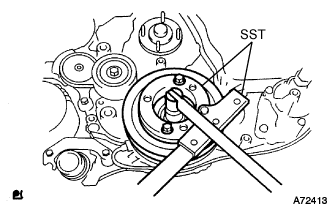
- SST
- 09213-58013
09330-00021
Insert the service bolt.
Remove the crankshaft pulley with SST.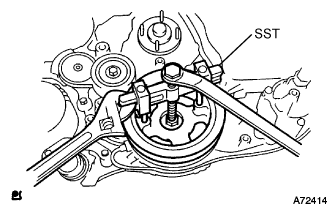
- SST
- 09950-50013
(09951-05010, 09952-05010, 09953-05020, 09954-05021)
| 108. REMOVE VACUUM PUMP ASSEMBLY |
| 109. REMOVE DIESEL ENGINE WATER TEMPERATURE SENSOR |
Using a deep-socket wrench (17 mm), remove the water temperature sensor.
| 110. REMOVE CAMSHAFT POSITION SENSOR |
Disconnect the camshaft position sensor connector.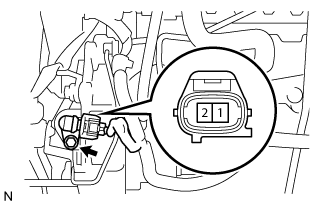
Remove the bolt and the camshaft position sensor.
| 111. REMOVE CRANKSHAFT POSITION SENSOR |
Disconnect the crankshaft position sensor connector.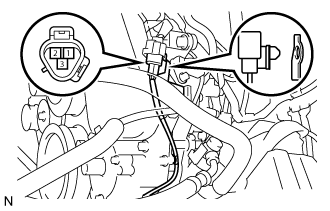
Separate the connector from the vacuum pipe No.1.
Separate the 3 wire harness clamps.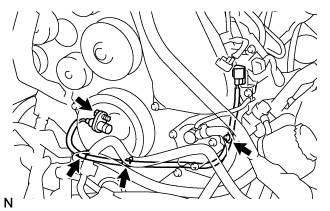
Remove the bolt and the crankshaft position sensor.
| 112. REMOVE ENGINE OIL LEVEL SENSOR |
Remove the 4 bolts and engine oil level sensor.
| 113. REPLACE PARTIAL ENGINE ASSEMBLY |