ECM Power Source Circuit
Circuit diagnosis · Vehicles built from Jan 2017
DESCRIPTION
When the ignition switch is turned to ON, the battery voltage is applied to terminal IGSW of the ECM. The MREL output signal from ECM causes a current to flow to the coil, closing the contacts of the EFI MAIN1 relay and supplying power to terminal +B, +B2 and +B3 of the ECM.WIRING DIAGRAM
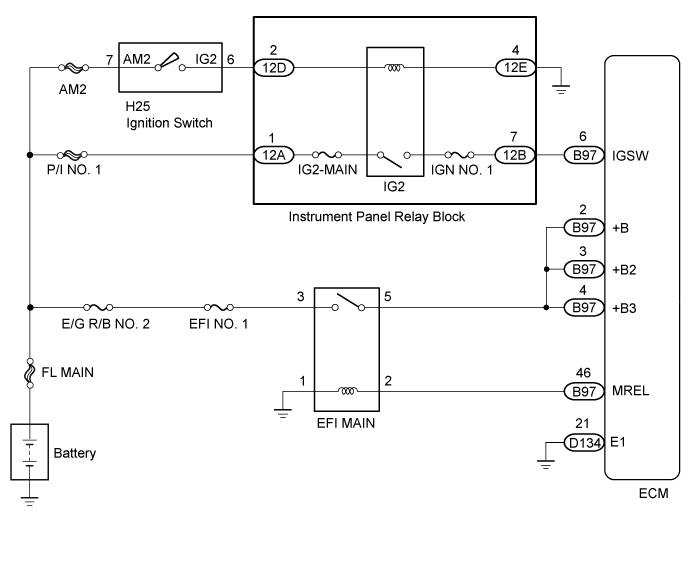

INSPECTION PROCEDURE
- NOTICE:
- After replacing the ECM, the new ECM needs registration (Click here) and initialization (Click here).
- Inspect the fuses of circuits related to this system before performing the following inspection procedure.
- After replacing the ECM, the new ECM needs registration (Click here) and initialization (Click here).
| 1. CHECK HARNESS AND CONNECTOR (ECM - BODY GROUND) |

Disconnect the ECM connector.
Measure the resistance according to the value(s) in the table below.
- Standard Resistance::
Tester Connection
Condition
Specified Condition
D134-21 (E1) - Body ground
Always
Below 1 Ω
Reconnect the ECM connector.
|
|
||||

| OK | |
 |
| 2. CHECK TERMINAL VOLTAGE (IGSW TERMINAL VOLTAGE) |
Disconnect the ECM connector.
Turn the ignition switch to ON.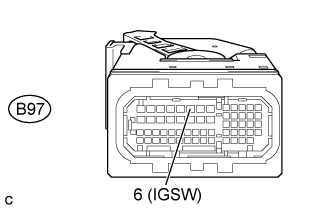
Measure the voltage according to the value(s) in the table below.
- Standard voltage:
Tester Connection
Condition
Specified Condition
B97-6 (IGSW) - Body ground
Ignition switch ON
11 to 14 V
Text in Illustration *a
Front view of wire harness connector
(to ECM)
|
|
||||

| OK | |
|
| 3. INSPECT EFI MAIN RELAY |
Inspect the EFI MAIN relay (Click here).
|
|
||||
| OK | |
|
| 4. CHECK HARNESS AND CONNECTOR (EFI MAIN RELAY - ECM) |
Remove the EFI MAIN relay from the instrument relay block.
Disconnect the ECM connector.
Measure the resistance according to the value(s) in the table below.
- Standard resistance:
Tester Connection
Condition
Specified Condition
EFI MAIN relay terminal 2 - B97-46 (MREL)
Always
Below 1 Ω
EFI MAIN relay terminal 5 - B97-2 (+B)
Always
Below 1 Ω
EFI MAIN relay terminal 5 - B97-3 (+B2)
Always
Below 1 Ω
EFI MAIN relay terminal 5 - B97-4 (+B3)
Always
Below 1 Ω
EFI MAIN relay terminal 2 or B97-46 (MREL) - Body ground and other terminals
Always
10 kΩ or higher
EFI MAIN relay terminal 5 or B97-2 (+B) - Body ground and other terminals
Always
10 kΩ or higher
EFI MAIN relay terminal 5 or B97-3 (+B2) - Body ground and other terminals
Always
10 kΩ or higher
EFI MAIN relay terminal 5 or B97-4 (+B3) - Body ground and other terminals
Always
10 kΩ or higher
Reinstall the EFI MAIN relay.
Reconnect the ECM connector.
|
|
||||
|
|
||||
| 5. CHECK TERMINAL VOLTAGE (EFI MAIN RELAY) |
Remove the EFI MAIN relay from the instrument panel relay block.
Measure the voltage according to the value(s) in the table below.
- Standard voltage:
Tester Connection
Condition
Specified Condition
EFI MAIN relay terminal 3 - Body ground and other terminals
Ignition switch ON
11 to 14 V
Reinstall the EFI MAIN relay.
|
|
||||
| OK | |
|
| 6. CHECK HARNESS AND CONNECTOR (EFI MAIN RELAY - BODY GROUND) |
Remove the EFI MAIN relay from the instrument panel relay block.
Disconnect the ECM connector.
Measure the resistance according to the value(s) in the table below.
- Standard Resistance:
Tester Connection
Condition
Specified Condition
EFI MAIN relay terminal 1 - Body ground and other terminals
Always
Below 1 Ω
Reinstall the EFI MAIN relay.
Reconnect the ECM connector.
|
|
||||
| OK | |
|
| 7. INSPECT INSTRUMENT PANEL RELAY BLOCK (IG2) |
Inspect the instrument panel relay block (IG2 relay).
|
|
||||
| OK | |
|
| 8. CHECK HARNESS AND CONNECTOR |
Disconnect the ECM connector.
Remove the instrument panel relay block.
Measure the resistance according to the value(s) in the table below.
- Standard resistance::
Tester Connection
Condition
Specified Condition
B97-6 (IGSW) - 12B-7
Always
Below 1 Ω
B97-6 (IGSW) or 12B-7 - Body ground
Always
10 kΩ or higher
|
|
||||
| OK | |
|
| 9. CHECK TERMINAL VOLTAGE (IG2) |
Remove the instrument panel relay block.
Measure the voltage according to the value(s) in the table below.
- Standard voltage:
Tester Connection
Condition
Specified Condition
12A-1 - Body ground
Always
11 to 14 V
|
|
||||
| OK | |
|
| 10. CHECK HARNESS AND CONNECTOR (INSTRUMENT PANEL RELAY BLOCK - BODY GROUND) |
Remove the instrument panel relay block.
Measure the resistance according to the value(s) in the table below.
- Standard resistance:
Tester Connection
Condition
Specified Condition
12E-4 - Body ground and other terminals
Always
Below 1 Ω
|
|
||||
| OK | |
|
| 11. INSPECT IGNITION OR STARTER SWITCH ASSEMBLY |
Inspect the ignition or starter switch assembly (Click here).
|
|
||||
| OK | |
|
| 12. CHECK HARNESS AND CONNECTOR (IGNITION OR STARTER SWITCH ASSEMBLY - INSTRUMENT PANEL RELAY BLOCK) |
Disconnect the ignition or starter switch assembly connector.
Remove the instrument panel relay block.
Measure the resistance according to the value(s) in the table below.
- Standard resistance::
Tester Connection
Condition
Specified Condition
H25-6 (IG2) - 12D-2
Always
Below 1 Ω
H25-6 (IG2) or 12D-2 - Body ground
Always
10 kΩ or higher
|
|
||||
| OK | ||
 |
||
| ||