Turbocharger Noise
Circuit diagnosis · Vehicles built from Jan 2017
DESCRIPTION
- HINT:
- Turbocharger noise is classified into two types. These are whistling sound and chattering sound. During troubleshooting, first determine the type of noise.
| Noise Type |
Noise Description |
Main Trouble Area |
| Whistling sound (airflow sound) |
The whistling sound volume and pitch are proportional to the turbocharger or engine speed. The abnormal noise level becomes clear when the engine speed is increased. |
|
| Chattering sound (metallic sound) |
The chattering sound pitch is lower than the whistling sound pitch. Has a comparatively constant pitch that is independent of the engine speed and vehicle speed. |
Turbocharger
|
| Faults and Symptoms of Diesel Engine Components |
| Main fault |
Unstable turbocharger turbine shaft (interference, seizing, poor balance, etc.) |
|
| Symptoms |
|
|
| Main fault |
Leak |
|
| Symptoms |
Abnormal noise during intake leak |
|
| Symptoms |
Gear noise
|
|
INSPECTION PROCEDURE
| 1. CONFIRM CONDITION IN WHICH NOISE OCCURRED |

Confirm with the customer the condition when noise occurred.
- HINT:
- To clearly understand the conditions in which the noise occurred, the items in the table below are useful.
Item
Note
Engine speed
Engine speed range
Vehicle speed
Vehicle speed range
Transmission gear
Which gear?
Accelerator pedal position
During acceleration or deceleration?
Temperature
- Ambient temperature
- Engine temperature (cold, warmed up, etc.)
Road conditions
- City or highway driving
- Uphill or downhill
Noise level
- Did the noise occur suddenly, or build gradually?
- Has the noise gradually been getting louder?
Other symptoms
- Lack of power
- High fuel consumption, etc.
Noise recognition
What made the customer determine that the sound was a malfunction?
| NEXT | |
 |
| 2. PERFORM SIMULATION TEST |
Check whether the noise described by the customer occurs.
- HINT:
- If an abnormal noise is heard, check whether it matches the noise described by the customer.
| Result |
Proceed to |
| Abnormal noise generated while idling (ticking or rattling (metallic sound)) |
A |
| Abnormal noise generated while driving |
B |
|
|
||||

| A | |
|
| 3. CHECK FOR NOISE FROM SOURCE OTHER THAN TURBOCHARGER |
Check for the noise source with a sound scope.
The source of the noise is not the turbocharger, but a part other than the turbocharger (e.g. a part inside the engine, transmission, or vacuum pump).
Sometimes gear noise may be mistaken for turbocharger noise. For gear noise, pay attention to the gear inside the engine and transmission gear.
Rev the engine up and check if the noise reduces at the same time the engine speed decreases. If the noise reduces at the same time the engine speed decreases, it is gear noise. If the noise reduces a short time after the engine speed decreases, it is turbocharger noise.
Check whether the noise described by the customer occurs.
Result: Result
Proceed to
Abnormal noise generated from turbocharger
A
Abnormal noise generated from parts other than turbocharger
B
|
|
||||
| A | |
|
| 4. CHECK TURBOCHARGER SUB-ASSEMBLY |
Check for damage to the compressor impeller.
Check for interference between the compressor impeller and the compressor housing.
Result: Result
Proceed to
No damage or interference
A
Damage or interference exists
B
|
|
||||

| A | ||
 |
||
| ||
| 5. CONFIRM NOISE SOURCE (FROM TURBOCHARGER OR NOT) |
Connect the GTS to the DLC3.
Start the engine and warm it up.
Turn the GTS on.
Enter the following menus: Powertrain / Engine and ECT / Active Test / Activate the VN Turbo Open.
Perform the Active Test under the conditions* from the time the noise occurred described by the customer and compare the noise to the noise heard when not performing the Active Test and check if the noise is reduced.
- HINT:
- *: Some examples of conditions are idling, racing the engine and driving at full throttle.
Result: Result
Proceed to
The noise is reduced (or disappears)
A
The noise is the same as in Procedure 2 (The noise does not change)
B
- HINT:
- By performing Activate the VN Turbo Open Active Test, the variable nozzle of the turbocharger sub-assembly becomes fully open regardless of the engine condition, and the turbocharger speed does not increase.
- If the turbocharger sub-assembly is the cause of the noise, the noise will be reduced when Activate the VN Turbo Open Active Test is performed because turbocharger speed does not increase.
- By performing Activate the VN Turbo Open Active Test, the variable nozzle of the turbocharger sub-assembly becomes fully open regardless of the engine condition, and the turbocharger speed does not increase.
|
|
||||
| A | |
|
| 6. PERFORM SIMULATION TEST |
Check whether the noise described by the customer occurs.
- HINT:
- If an abnormal noise is heard, check whether it matches the noise described by the customer.
If an abnormal noise is confirmed, determine which system emits it.
| Result |
Proceed to |
| Noise occurs (squealing (metallic sound) when driving) |
A |
| Noise occurs (hissing (airflow sound) when driving) |
B |
| Noise occurs (whistling or foghorn-like (airflow sound) during acceleration) |
C |
| Noise occurs (whistling (airflow sound) during deceleration) |
D |
|
|
||||
|
|
||||
|
|
||||
| D | |
|
| 7. CHECK GEAR NOISE |
Check if gear noise is the source of the abnormal noise (not noise from the turbocharger).
| NEXT | ||
|
||
| ||
| 8. CHECK FOR NOISE FROM SOURCE OTHER THAN TURBOCHARGER (PROCEDURE 8) |
Check for the noise source.
- CAUTION:
- When performing this check, make sure that the sound scope, your body, etc., do not get caught on the V-belt.
- HINT:
- The source of the noise is not the turbocharger sub-assembly, but a part other than the turbocharger sub-assembly (e.g. a part inside the engine, transmission, or vacuum pump).
- Sometimes gear noise may be mistaken for turbocharger noise. For gear noise, pay attention to the gear inside the engine and transmission gear.
- Rev the engine up and check if the noise reduces at the same time the engine speed decreases. If the noise reduces at the same time the engine speed decreases, it is gear noise. If the noise reduces a short time after the engine speed decreases, it is turbocharger noise.
- The source of the noise is not the turbocharger sub-assembly, but a part other than the turbocharger sub-assembly (e.g. a part inside the engine, transmission, or vacuum pump).
| NEXT | |
|
| 9. REPLACE THE PARTS DETECTED IN PROCEDURE 8 |
Replace the parts detected in Procedure 8 as the noise source.
| NEXT | |
|
| 10. CONFIRM CONFIRM WHETHER THE NOISE PROBLEM HAS BEEN SUCCESSFULLY SOLVED |
Check whether the noise problem has been successfully solved.
| NEXT | ||
|
||
| ||
| 11. CHECK TURBOCHARGER SUB-ASSEMBLY |
Check that the turbine shaft rotates smoothly, without catching (Click here).
Check for loose turbine mounting nuts and for axial play in the turbine shaft (Click here).
- HINT:
- If the turbine shaft catches or if there no play or excessive play, it could indicate poor sliding due to seal damage due to seizing or a deposit build-up.
- Standard value:
- 0.10 mm (0.00394 in.) or less
| Result |
Proceed to |
| No turbine shaft malfunction |
A |
| Turbine shaft malfunction |
B |
|
|
||||
| A | |
|
| 12. CHECK TURBOCHARGER SUB-ASSEMBLY |
Check for damage to the compressor impeller.
Check for interference between the compressor impeller and the compressor housing.
| Result |
Proceed to |
| Damage or interference exists |
A |
| No damage or interference |
B |
|
|
||||
| A | |
|
| 13. REPLACE TURBOCHARGER SUB-ASSEMBLY |
Replace the turbocharger sub-assembly (Click here).
| NEXT | |
|
| 14. PERFORM SIMULATION TEST |
Check that the abnormal noise has disappeared.
| NEXT | ||
|
||
| ||
| 15. CHECK TURBOCHARGER SUB-ASSEMBLY |
Check for interference between the turbine wheel and the turbine housing.
| Result |
Proceed to |
| No damage or interference* |
A |
| Damage or interference exists |
B |
- HINT:
- *: Replace the turbocharger sub-assembly, as the abnormal noise may have been caused by interference between the turbine blades and housing.
|
|
||||
|
|
||||
| 16. CHECK TURBOCHARGER SUB-ASSEMBLY |
Check that no soot or oil adheres to the turbocharger sub-assembly connectors.
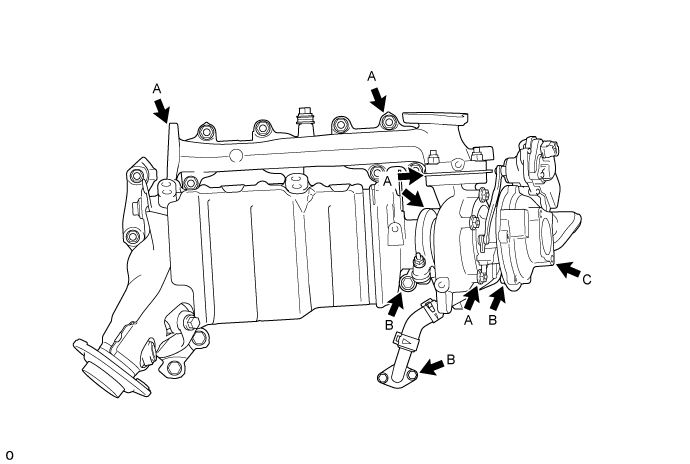

- HINT:
- If adhering soot or an oil leak exists, air leaking at that position may be the cause of the abnormal noise.
| Result |
Proceed to |
| No adhering soot or an oil* |
A |
| Soot adhering around the turbine housing, flange, or V band (A in the illustration) |
B |
| Oil leak from the contact surface between the compressor housing and bearing housing (B in the illustration) |
C |
| Oil adhering to the compressor flange (C in the illustration) |
D |
- HINT:
- *: Since abnormal noise may be the result of airflow noise from the blades, replace the turbocharger sub-assembly.
|
|
||||
|
|
||||
|
|
||||
| A | |
|
| 17. REPLACE TURBOCHARGER SUB-ASSEMBLY |
Replace the turbocharger sub-assembly (Click here).
| NEXT | |
|
| 18. PERFORM SIMULATION TEST |
Check that the abnormal noise has disappeared.
| NEXT | ||
|
||
| ||
| 19. CHECK EXHAUST MANIFOLD CONVERTER SUB-ASSEMBLY |
Check for deformation or cracks in the mounting surfaces on the exhaust manifold converter sub-assembly and the turbine with valve housing sub-assembly.
- HINT:
- Deformation or cracks on a mounting surface may allow exhaust gas to leak from the damaged position.
- Standard:
- No deformation or cracks on a mounting surface
| Result |
Proceed to |
| No problem with the mounting surface |
A |
| Deformation or cracks on the exhaust manifold converter sub-assembly mounting surface |
B |
| Deformation or cracks on the turbine with valve housing sub-assembly mounting surface |
C |
|
|
||||
|
|
||||
| A | |
|
| 20. REPLACE EXHAUST PIPE CLAMP AND GASKET |
Replace the exhaust pipe clamp and the gasket.
| NEXT | |
|
| 21. PERFORM SIMULATION TEST |
Check that the abnormal noise has disappeared.
| NEXT | ||
|
||
| ||
| 22. CHECK TURBOCHARGER SUB-ASSEMBLY |
Check that the turbine shaft rotates smoothly, without catching (Click here).
Check for loose turbine mounting nuts and for axial play in the turbine shaft (Click here).
- HINT:
- If the turbine shaft catches or if there no play or excessive play, it could indicate poor sliding due to seal damage due to seizing or a deposit build-up.
- Standard value:
- 0.10 mm (0.00394 in.) or less
| Result |
Proceed to |
| No turbine shaft malfunction |
A |
| Turbine shaft malfunction |
B |
|
|
||||
| A | |
|
| 23. CHECK TURBOCHARGER SUB-ASSEMBLY |
Check for damage to the compressor impeller.
Check for interference between the compressor impeller and the compressor housing.
- HINT:
- If the previous checks find no malfunction, replace the turbocharger sub-assembly and determine if the noise improved.
| Result |
Proceed to |
| Damage or interference exists |
A |
| No damage or interference |
B |
|
|
||||
| A | |
|
| 24. REPLACE TURBOCHARGER SUB-ASSEMBLY |
Replace the turbocharger sub-assembly (Click here).
| NEXT | |
|
| 25. PERFORM SIMULATION TEST |
Check that the abnormal noise has disappeared.
| NEXT | ||
|
||
| ||
| 26. CHECK TURBOCHARGER SUB-ASSEMBLY |
Check for interference between the turbine wheel and the turbine housing.
| Result |
Proceed to |
| No damage or interference* |
A |
| Damage or interference exists |
B |
- HINT:
- *: Replace the turbocharger sub-assembly, as the abnormal noise may have been caused by loss of rotational balance and deterioration over time.
|
|
||||
| A | ||
|
||
| ||