Engine Knocking or Rattling
Circuit diagnosis · Vehicles built Jan 2015 – Mar 2016
Versions by build date: Oct 2014 – Dec 2014 Jan 2015 – Mar 2016 Apr 2016 – Dec 2016 from Jan 2017
DESCRIPTION
| Malfunction Condition |
Main Trouble Area |
Related Trouble Area |
|
|
|
- HINT:
- Specified values in the following troubleshooting flowchart are for reference only. Variations in the Data List values may occur depending on the measuring conditions or the vehicle's age. Do not judge the vehicle to be normal even when the Data List values indicate a standard level. There are possibly some concealed factors of the malfunction.
- Check that the vehicle has not been modified in any way prior to the vehicle inspection.
- Specified values in the following troubleshooting flowchart are for reference only. Variations in the Data List values may occur depending on the measuring conditions or the vehicle's age. Do not judge the vehicle to be normal even when the Data List values indicate a standard level. There are possibly some concealed factors of the malfunction.
INSPECTION PROCEDURE
- HINT:
- This troubleshooting procedure checks for knocking and rattling.
- Knocking is most likely to occur while the engine is idling.
- This troubleshooting procedure checks for knocking and rattling.
- NOTICE:
- After replacing the ECM, the new ECM needs registration (Click here) and initialization (Click here).
- After replacing the fuel supply pump, the ECM needs initialization (Click here).
- After replacing an injector assembly, the ECM needs registration (Click here).
- After replacing the ECM, the new ECM needs registration (Click here) and initialization (Click here).
| 1. CHECK SOUND AREA |

Find the source of the abnormal sound using a mechanic's stethoscope.
Result Result
Proceed to
Combustion noise from engine
A
Noise from specific part
B
|
|
||||

| A | |
 |
| 2. READ OUTPUT DTCS (RELATING TO ENGINE) |
Connect the GTS to the DLC3.
Turn the ignition switch to ON and turn the GTS on.
Enter the following menus: Powertrain / Engine and ECT / Trouble Codes.
Read DTCs.
Result Result
Proceed to
No output
A
Engine related DTCs
B
|
|
||||
| A | |
|
| 3. CHECK INJECTOR COMPENSATION CODE |
- NOTICE:
- Injector compensation codes are unique, 30-digit, alphanumeric values printed on the head portion of each injector assembly. If an incorrect injector compensation code is input into the ECM, the engine may rattle or engine idling may become rough. In addition, engine failure may occur and the life of the engine may be shortened.
Check the injector compensation code (Click here).
- OK:
- Compensation codes of the installed injector assemblies are the same as the compensation codes registered in the ECM.
|
|
||||

| OK | |
|
| 4. TAKE SNAPSHOT DURING IDLING AND 4000 RPM (AFTER ENGINE WARMED UP) |
Connect the GTS to the DLC3.
Start the engine and turn the GTS on.
Enter the following menus: Powertrain / Engine and ECT / Data List.
Take a snapshot of the following Data List items.
- HINT:
- A snapshot can be used to compare vehicle data from the time of the malfunction to normal data and is very useful for troubleshooting. The data in the list below is that of a normal vehicle, but as the data varies between individual vehicles, this data should only be used for reference.
- Check the Data List at idling and at 4000 rpm with no load after the engine is warmed up.
- A snapshot can be used to compare vehicle data from the time of the malfunction to normal data and is very useful for troubleshooting. The data in the list below is that of a normal vehicle, but as the data varies between individual vehicles, this data should only be used for reference.
| NEXT | |
|
| 5. CHECK SNAPSHOT (INJECTION FEEDBACK VAL #1 TO #4 AND INJECTION VOLUME) |
Check Injection Feedback Val #1 to #4 and Injection Volume in the snapshot taken when the engine was idling and at 4000 rpm with no load.
Result Result
Proceed to
Injection Feedback Val for at least one cylinder is more than +3 mm3/st
A
Injection Volume is 8 mm3/st or less at 4000 rpm
B
Except above
C
|
|
||||
|
|
||||
| C | |
|
| 6. CHECK SNAPSHOT (COMMON RAIL PRESSURE AND TARGET COMMON RAIL PRESSURE) |
Check Common Rail Pressure and Target Common Rail Pressure in the snapshot taken when the engine was warmed up and idling.
- OK:
- Common Rail Pressure is within +/-5000 kPa of Target Common Rail Pressure.
|
|
||||
| OK | |
|
| 7. CHECK THE TEMPERATURE WHEN KNOCKING OCCURS |
Check the temperature when knocking trouble occurs.
Result Result
Proceed to
Knocking occurs only in cold engine
A
Knocking occurs both in cold and warmed up engine
B
|
|
||||
| A | |
|
| 8. INSPECT GLOW PLUG (RESISTANCE) |
Inspect the glow plug (Click here).
|
|
||||
| OK | |
|
| 9. TAKE SNAPSHOT DURING IDLING (WHEN ENGINE COLD) |
Make sure that the engine is cold so that the snapshot can be taken under the correct conditions.
Connect the GTS to the DLC3.
Start the engine and turn the GTS on.
Enter the following menus: Powertrain / Engine and ECT / Data List / Diesel Knocking.
Take a snapshot of the following Data List items.
- HINT:
- A snapshot can be used to compare vehicle data from the time of the malfunction to normal data and is very useful for troubleshooting. The data in the list below is that of a normal vehicle, but as the data varies between individual vehicles, this data should only be used for reference.
| NEXT | |
|
| 10. CHECK SNAPSHOT (INJECTION FEEDBACK VAL #1 TO #4) |
Check Injection Feedback Val #1 to #4 in the snapshot taken when the engine was idling.
Result Result
Proceed to
Injection Feedback Val for at least one cylinder is more than +3 mm3/st
A
Except above
B
|
|
||||
|
|
||||
| 11. REPLACE INJECTOR ASSEMBLIES OF ALL CYLINDERS |
Replace the injector assemblies (Click here).
- NOTICE:
- When replacing the injector assembly for a cylinder, always be sure to use a new injection pipe.
- Follow the procedure in the repair manual and temporarily install the injection pipes and nozzle leakage pipe, and then correctly position the injector assemblies. After that, tighten parts according to the torque specifications.
- If the installation procedure is not performed correctly, injector assemblies may become out of position, which may cause the injector assemblies to deteriorate, resulting in malfunctions.
- If an injector assembly deteriorates and malfunctions, other problems such as knocking, rough idle, etc. may occur.
- If an injector assembly becomes out of position, it is possible that the seal between the injector assembly and injection pipe may become incomplete, resulting in a fuel leak.
- When replacing the injector assembly for a cylinder, always be sure to use a new injection pipe.
|
|
||||
| 12. CHECK CYLINDER COMPRESSION PRESSURE |
Check the cylinder compression pressure (Click here).
- HINT:
- When compression is low, there may be cracks in the piston or the injector may be installed improperly.
|
|
||||
| OK | |
|
| 13. REPLACE INJECTOR ASSEMBLY OF MALFUNCTIONING CYLINDER |
Replace the injector assembly of the malfunctioning cylinder (Click here).
- NOTICE:
- When replacing the injector assembly for a cylinder, always be sure to use a new injection pipe.
- Follow the procedure in the repair manual and temporarily install the injection pipes and nozzle leakage pipe, and then correctly position the injector assemblies. After that, tighten parts according to the torque specifications.
- If the installation procedure is not performed correctly, injector assemblies may become out of position, which may cause the injector assemblies to deteriorate, resulting in malfunctions.
- If an injector assembly deteriorates and malfunctions, other problems such as knocking, rough idle, etc. may occur.
- If an injector assembly becomes out of position, it is possible that the seal between the injector assembly and injection pipe may become incomplete, resulting in a fuel leak.
- When replacing the injector assembly for a cylinder, always be sure to use a new injection pipe.
| NEXT | |
|
| 14. CLEAN OR REPLACE FUEL FILTER |
Clean the interior of the fuel filter case.
If the fuel filter is obviously dirty or clogged, replace the fuel filter.
| NEXT | |
|
| 15. BLEED AIR FROM FUEL SYSTEM |
Bleed the air from the fuel system (Click here).
| NEXT | |
|
| 16. PERFORM ECM INITIALIZATION AND REGISTER INJECTOR COMPENSATION CODE |
Perform the ECM initialization.
Connect terminals 13 (TC) and 4 (CG) of the DLC3.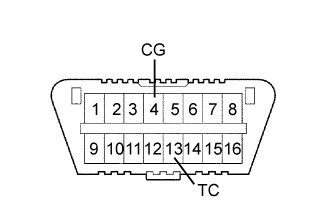

Turn the ignition switch to ON for 50 minutes or more.
- NOTICE:
- Perform ECM initialization only when the injectors for all the cylinders have been replaced.
- It is necessary to wait for 50 minutes or more. Otherwise, ECM initialization is not completed.
- Perform ECM initialization only when the injectors for all the cylinders have been replaced.
Turn the ignition switch off.
Disconnect terminals 13 (TC) and 4 (CG).
Register the injector compensation codes (Click here).
| NEXT | |
|
| 17. CONFIRM WHETHER MALFUNCTION HAS BEEN SUCCESSFULLY REPAIRED |
Check whether the knocking has been successfully repaired.
| NEXT | ||
 |
||
| ||
| 18. REPLACE SUCTION CONTROL VALVE |
Replace the suction control valve (Click here).
- HINT:
- If the common rail pressure becomes too high when transitioning due to problems with SCV operation, knocking noise worsens.
| NEXT | |
|
| 19. BLEED AIR FROM FUEL SYSTEM |
Bleed the air from the fuel system (Click here).
| NEXT | |
|
| 20. PERFORM FUEL SUPPLY PUMP INITIALIZATION |
Perform fuel supply pump initialization (Click here).
| NEXT | |
|
| 21. CONFIRM WHETHER MALFUNCTION HAS BEEN SUCCESSFULLY REPAIRED |
Check whether the knocking has been successfully repaired by starting the engine.
| NEXT | ||
|
||
| ||
| 22. READ VALUE USING GTS (MAP AND ATMOSPHERE PRESSURE) |
Connect the GTS to the DLC3.
Turn the ignition switch to ON and turn the GTS on.
Enter the following menus: Powertrain / Engine and ECT / Data List / MAP and Atmosphere Pressure.
Compare MAP to Atmosphere Pressure when the ignition switch is ON (do not start the engine).
- Standard:
- Difference between MAP and Atmosphere Pressure is less than 8 kPa.
- HINT:
- If MAP and Atmosphere Pressure have the same value, both are normal. If there is a difference of 8 kPa or more, compare the values to the atmospheric pressure for that day. The sensor whose deviation is the greatest is malfunctioning.
- Standard atmospheric pressure is 101 kPa. For every 100 m increase in elevation, pressure drops by 1 kPa. This varies by weather.
- If MAP and Atmosphere Pressure have the same value, both are normal. If there is a difference of 8 kPa or more, compare the values to the atmospheric pressure for that day. The sensor whose deviation is the greatest is malfunctioning.
Result Result
Proceed to
MAP and Atmosphere Pressure have same value
A
MAP is different from actual atmospheric pressure
B
Atmosphere Pressure is different from actual atmospheric pressure
C
|
|
||||
|
|
||||
| A | |
|
| 23. BASIC INSPECTION |
Check the fuel quality.
Check the fuel for air.
Check the fuel system for blockages.
Check the air filter.
Check the engine oil.
Check the engine coolant.
Check the engine idling speed and maximum engine speed.
Check the vacuum pump.
| NEXT | ||
|
||
| ||