Slide Door Closer Motor LH Circuit
Circuit diagnosis · Vehicles built Oct 2014 – Nov 2015
Versions by build date: Oct 2014 – Nov 2015 from Dec 2015
DESCRIPTION
- The slide door closer relay LH controls the power slide door lock assembly LH. In response to the output signals from the switches in the power slide door lock assembly LH, the slide door closer drives the closer motor.
- The door control relay assembly controls the power slide door lock assembly LH. In response to the output signals from the switches in the power slide door lock assembly LH, the slide door closer drives the closer motor.
WIRING DIAGRAM
| w/ Power Slide Door |
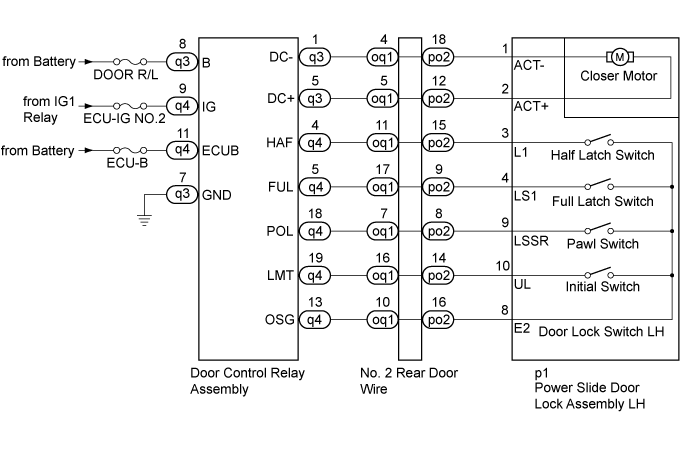

| w/o Power Slide Door |
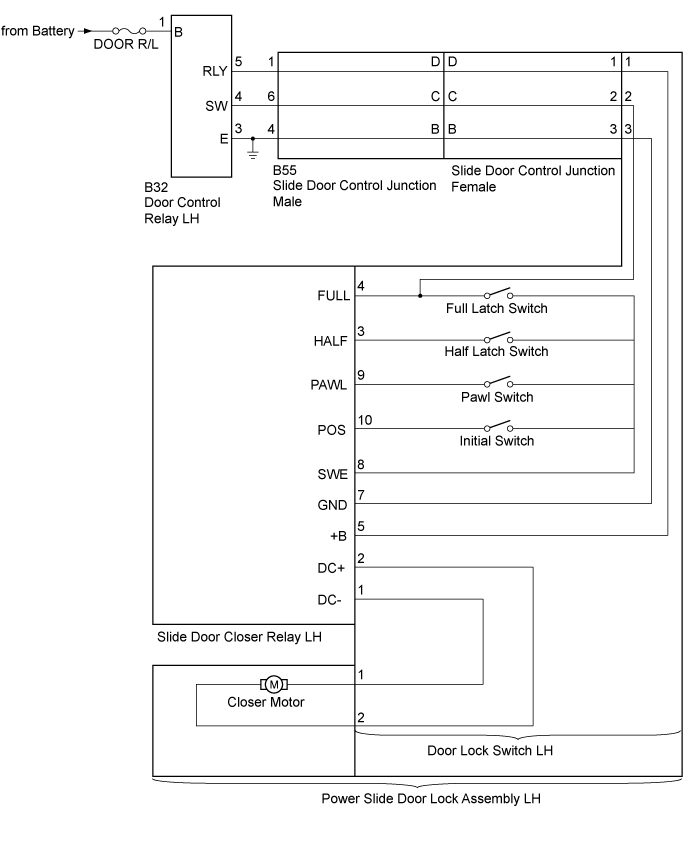
INSPECTION PROCEDURE
- NOTICE:
- Inspect the fuses for circuits related to this system before performing the following inspection procedure.
| 1. CHECK VEHICLE TYPE |

Check vehicle type.
Result Result
Proceed to
w/o Power Slide Door
A
w/ Power Slide Door
B
|
|
||||

| A | |
 |
| 2. INSPECT POWER SLIDE DOOR LOCK ASSEMBLY LH |
Check the motor.
Remove the power slide door lock assembly LH (Click here).
Inspect the power slide door lock assembly LH (Click here).
Check the switches.
Remove the power slide door lock assembly LH (Click here).
Inspect the power slide door lock assembly LH (Click here).
| Result |
Proceed to |
| OK |
A |
| NG (malfunctioning in motor) |
B |
| NG (malfunctioning in switches) |
C |
|
|
||||
|
|
||||

| A | ||
 |
||
| ||
| 3. INSPECT POWER SLIDE DOOR LOCK ASSEMBLY LH |
Check the motor.
Remove the power slide door lock assembly LH (Click here).
Inspect the power slide door lock assembly LH (Click here).
Check the switches.
Remove the power slide door lock assembly LH (Click here).
Inspect the power slide door lock assembly LH (Click here).
| Result |
Proceed to |
| OK |
A |
| NG (malfunctioning in motor) |
B |
| NG (malfunctioning in switches) |
C |
|
|
||||
|
|
||||
| A | |
|
| 4. INSPECT NO. 2 REAR DOOR WIRE |
Disconnect the oq1 and po2 No. 2 rear door wire connectors.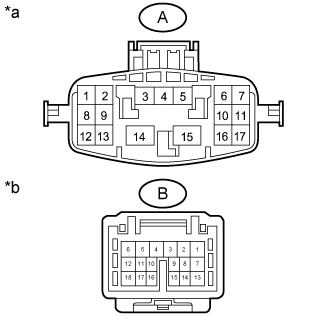
Measure the resistance according to the value(s) in the table below.
- Standard Resistance:
Tester Connection
Condition
Specified Condition
A-4 - B-18
Always
Below 1 Ω
A-5 - B-12
Always
Below 1 Ω
A-7 - B-8
Always
Below 1 Ω
A-10 - B-16
Always
Below 1 Ω
A-11 - B-15
Always
Below 1 Ω
A-16 - B-14
Always
Below 1 Ω
A-17 - B-9
Always
Below 1 Ω
Text in Illustration *a
No. 2 Rear Door Wire
(Door Control Relay Assembly Side)
*b
No. 2 Rear Door Wire
(Power Slide Door Lock Assembly LH Side)
|
|
||||
| OK | |
|
| 5. CHECK HARNESS AND CONNECTOR (DOOR CONTROL RELAY ASSEMBLY - POWER SLIDE DOOR LOCK ASSEMBLY LH) |
Disconnect the q3 and q4 door control relay assembly connectors.
Disconnect the p1 power slide door lock assembly LH connector.
Measure the resistance according to the value(s) in the table below.
- Standard Resistance:
Tester Connection
Condition
Specified Condition
q3-1 (DC-) - p1-1 (ACT-)
Always
Below 1 Ω
q3-5 (DC+) - p1-2 (ACT+)
Always
Below 1 Ω
q4-4 (HAF) - p1-3 (L1)
Always
Below 1 Ω
q4-5 (FUL) - p1-4 (LS1)
Always
Below 1 Ω
q4-18 (POL) - p1-9 (LSSR)
Always
Below 1 Ω
q4-19 (LMT) - p1-10 (UL)
Always
Below 1 Ω
q4-13 (OSG) - p1-8 (E2)
Always
Below 1 Ω
q3-1 (DC-) or p1-1 (ACT-) - Body ground
Always
10 kΩ or higher
q3-5 (DC+) or p1-2 (ACT+) - Body ground
Always
10 kΩ or higher
q4-4 (HAF) or p1-3 (L1) - Body ground
Always
10 kΩ or higher
q4-5 (FUL) or p1-4 (LS1) - Body ground
Always
10 kΩ or higher
q4-18 (POL) or p1-9 (LSSR) - Body ground
Always
10 kΩ or higher
q4-19 (LMT) or p1-10 (UL) - Body ground
Always
10 kΩ or higher
q4-13 (OSG) or p1-8 (E2) - Body ground
Always
10 kΩ or higher
|
|
||||
| OK | ||
|
||
| ||