Home › BODY ELECTRICAL › DOOR LOCK › POWER DOOR LOCK CONTROL SYSTEMSlide Door Lock Motor RH Circuit
Circuit diagnosis · Vehicles built Oct 2014 – Dec 2014
Versions by build date: Oct 2014 – Dec 2014 Jan 2015 – Dec 2016 from Jan 2017
DESCRIPTION
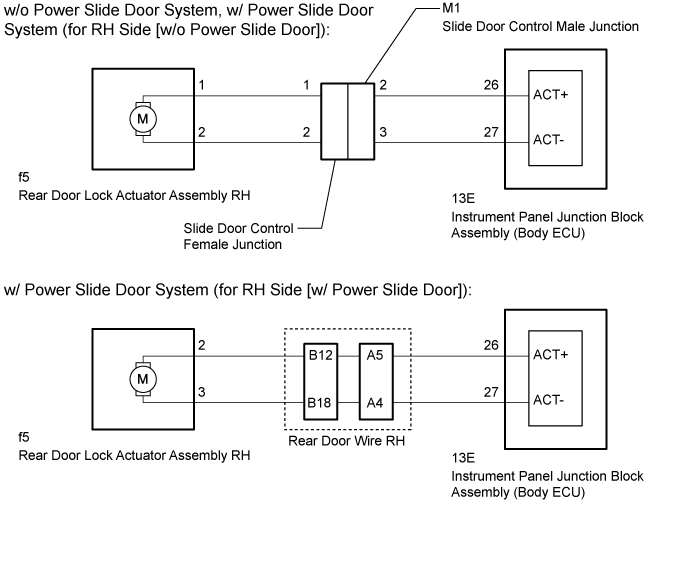
The instrument panel junction block assembly (body ECU) receives the rear left door lock/unlock request signal from the door control switch or door key cylinder. The instrument panel junction block assembly (body ECU) actives the door lock motor on rear door lock actuator assembly RH according to the signal. WIRING DIAGRAM
INSPECTION PROCEDURE
1. CHECK VEHICLE TYPE
Check vehicle type.
Result
Result
Proceed to
w/o Power Slide Door System, w/ Power Slide Door System (for RH Side [w/o Power Slide Door])
A
w/ Power Slide Door System (for RH Side [w/ Power Slide Door])
B
B
A
2. INSPECT REAR DOOR LOCK ACTUATOR ASSEMBLY RH
Remove the slide door lock actuator assembly RH (Click here ).
Inspect the slide door lock actuator assembly RH (Click here ).
NG
REPLACE REAR DOOR LOCK ACTUATOR ASSEMBLY RH (Click here )
OK
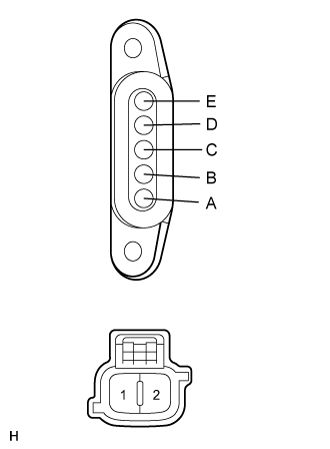
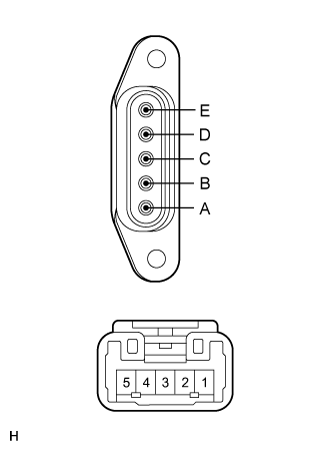
3. INSPECT SLIDE DOOR CONTROL FEMALE JUNCTION
Remove the slide door control female junction connector. Measure the resistance according to the value(s) in the table below.
Standard Resistance:
Tester Connection
Condition
Specified Condition
A - 1
Always
Below 1 Ω
E - 2
Always
Below 1 Ω
NG
REPLACE SLIDE DOOR CONTROL FEMALE JUNCTION
OK
4. INSPECT SLIDE DOOR CONTROL MALE JUNCTION
Remove the slide door control female junction connector. Measure the resistance according to the value(s) in the table below.
Standard Resistance:
Tester Connection
Condition
Specified Condition
A - 2
Always
Below 1 Ω
E - 3
Always
Below 1 Ω
NG
REPLACE SLIDE DOOR CONTROL MALE JUNCTION
OK
5. CHECK HARNESS AND CONNECTOR (INSTRUMENT PANEL JUNCTION BLOCK ASSEMBLY [BODY ECU] - REAR DOOR LOCK ACTUATOR ASSEMBLY RH)
Disconnect the 13E instrument panel junction block assembly (body ECU9 connector.
Disconnect the f5 rear door lock actuator assembly RH connector.
Measure the resistance according to the value(s) in the table below.
Standard Resistance:
Tester Connection
Condition
Specified Condition
13E-26 (ACT+) - f5-1
Always
Below 1 Ω
13E-27 (ACT-) - f5-2
Always
Below 1 Ω
13E-26 (ACT+) or f5-1 - Body ground
Always
10 kΩ or higher
13E-27 (ACT-) or f5-2 - Body ground
Always
10 kΩ or higher
NG
REPAIR OR REPLACE HARNESS OR CONNECTOR
OK
PROCEED TO NEXT CIRCUIT INSPECTION SHOWN IN PROBLEM SYMPTOMS TABLE (Click here )
6. INSPECT REAR DOOR LOCK ACTUATOR ASSEMBLY RH
Remove the slide door lock assembly RH (Click here ).
Inspect the slide door lock assembly RH (Click here ).
NG
REPLACE REAR DOOR LOCK ACTUATOR ASSEMBLY RH (Click here )
OK
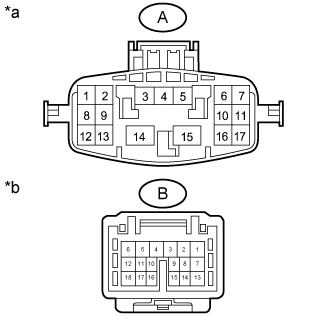
7. CHECK REAR DOOR WIRE RH
Disconnect the rear door wire RH connector. Measure the resistance according to the value(s) in the table below.
Standard Resistance:
Tester Connection
Condition
Specified Condition
A-4 -B-18
Always
Below 1 Ω
A-5 - B-12
Always
Below 1 Ω
Text in Illustration
*a
Rear Door Wire RH
*b
Rear Door Wire RH
NG
REPLACE REAR DOOR WIRE RH
OK
8. CHECK HARNESS AND CONNECTOR (INSTRUMENT PANEL JUNCTION BLOCK ASSEMBLY [BODY ECU] - REAR DOOR LOCK ACTUATOR ASSEMBLY RH)
Disconnect the 13E instrument panel junction block assembly (body ECU9 connector.
Disconnect the f5 rear door lock actuator assembly RH connector.
Measure the resistance according to the value(s) in the table below.
Standard Resistance:
Tester Connection
Condition
Specified Condition
13E-26 (ACT+) - f5-2
Always
Below 1 Ω
13E-27 (ACT-) - f5-3
Always
Below 1 Ω
13E-26 (ACT+) or f5-2 - Body ground
Always
10 kΩ or higher
13E-27 (ACT-) or f5-3 - Body ground
Always
10 kΩ or higher
NG
REPAIR OR REPLACE HARNESS OR CONNECTOR
OK
PROCEED TO NEXT CIRCUIT INSPECTION SHOWN IN PROBLEM SYMPTOMS TABLE (Click here )