INSPECTION
Inspection · Vehicles built from Oct 2014
| CLEAN CYLINDER HEAD SUB-ASSEMBLY |

Using a gasket scraper, remove all the gasket material from the surface of the cylinder head that contacts the cylinder block.
- NOTICE:
- Be careful not to scratch the surface of the cylinder head.
Using a valve guide bushing brush and solvent, clean all guide bushes.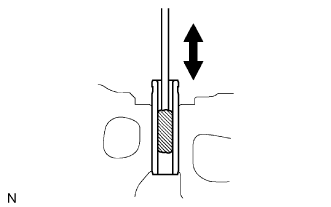

Using a soft brush and solvent, thoroughly clean the cylinder head.
| INSPECT CYLINDER HEAD SUB-ASSEMBLY |
Inspect the cylinder head warpage.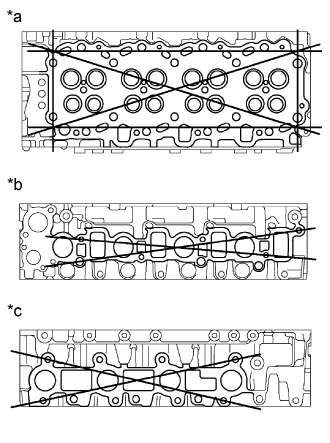
Using a precision straightedge and feeler gauge, measure the surfaces which contact the cylinder block and manifolds for warpage.
- Maximum warpage:
- 0.15 mm (0.005 in.)
If the warpage is more than the maximum, replace the cylinder head sub-assembly.Text in Illustration *a
Cylinder Block Side
*b
Intake Manifold Side
*c
Exhaust Manifold Side
Inspect the cylinder head for cracks.
Using a dye penetrant, check the combustion chamber, intake ports, exhaust ports and cylinder block surface for cracks.
If there are cracks, replace the cylinder head sub-assembly.
| CLEAN INTAKE VALVE |
Using a gasket scraper, chip off any carbon from the valve head.
Using a wire brush, thoroughly clean the valve.
| INSPECT INTAKE VALVE |
Using a micrometer, measure the diameter of the valve stem.
- Standard valve stem diameter:
- 5.970 to 5.985 mm (0.2350 to 0.2356 in.)
Check the valve face angle.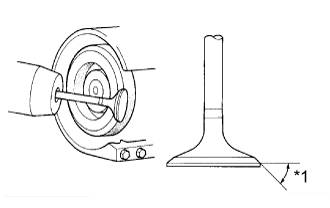
Grind the valve enough to remove pits and carbon.
Check that the valve is ground to the correct valve face angle.
- Standard valve face angle:
- 44.5°
If the result is not as specified, replace the valve.Text in Illustration *1
Valve Face Angle
Check the valve head margin thickness.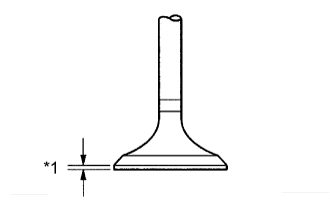
- Standard margin thickness:
- 1.1 mm (0.043 in.)
- Minimum margin thickness:
- 0.8 mm (0.032 in.)
If the margin thickness is less than the minimum, replace the valve.Text in Illustration *1
Margin Thickness
Check the valve overall length.
- Standard overall length:
- 105.15 to 105.75 mm (4.1398 to 4.1634 in.)
- Minimum overall length:
- 104.65 mm (4.1201 in.)
Check the surface of the valve stem tip for wear.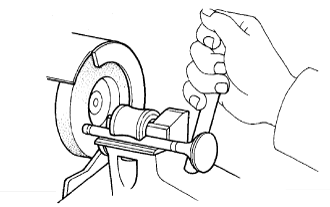
If the valve stem tip is worn, resurface the tip with a grinder or replace the valve.- NOTICE:
- Do not grind the valve so it becomes shorter than the minimum overall length.
| CLEAN EXHAUST VALVE |
Using a gasket scraper, chip off any carbon from the valve head.
Using a wire brush, thoroughly clean the valve.
| INSPECT EXHAUST VALVE |
Using a micrometer, measure the diameter of the valve stem.
- Standard valve stem diameter:
- 5.960 to 5.975 mm (0.2346 to 0.2352 in.)
Check the valve face angle.
Grind the valve enough to remove pits and carbon.
Check that the valve is ground to the correct valve face angle.
- Standard valve face angle:
- 44.5°
If the result is not as specified, replace the valve.Text in Illustration *1
Valve Face Angle
Check the valve head margin thickness.
- Standard margin thickness:
- 1.2 mm (0.047 in.)
- Minimum margin thickness:
- 0.7 mm (0.028 in.)
If the margin thickness is less than the minimum, replace the valve.Text in Illustration *1
Margin Thickness
Check the valve overall length.
- Standard overall length:
- 105.02 to 105.62 mm (4.1347 to 4.1583 in.)
- Minimum overall length:
- 104.52 mm (4.1150 in.)
Check the surface of the valve stem tip for wear.
If the valve stem tip is worn, resurface the tip with a grinder or replace the valve.- NOTICE:
- Do not grind the valve so it becomes shorter than the minimum overall length.
| INSPECT INNER COMPRESSION SPRING |
Using a steel square, measure the deviation of the inner compression spring.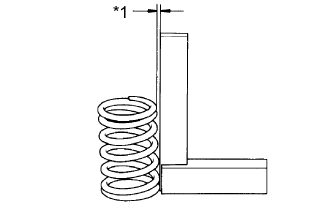
- Maximum deviation:
- 2.0 mm (0.079 in.)
If the deviation is more than the maximum, replace the inner compression spring.Text in Illustration *1
Deviation
Using a vernier caliper, measure the free length of the spring.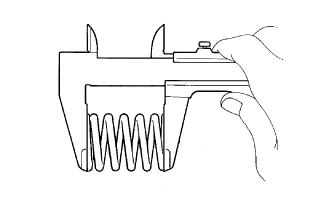
- Standard Free Length:
Item
Specified Condition
w/ DPF
48.43 mm (1.907 in.)
w/o DPF
46.5 mm (1.831 in.)
Using a spring tester, measure the tension of the valve spring at the specified installed length.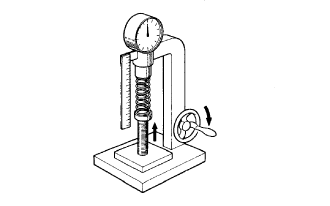
- Standard Installed Tension (at 33.1 mm (1.303 in.)):
Item
Specified Condition
w/ DPF
175 to 193 N (17.9 to 19.7 kgf, 39.2 to 43.4 lbf)
w/o DPF
150 to 165 N (15.3 to 16.9 kgf, 33.7 to 37.2 lbf)
| INSPECT INTAKE VALVE GUIDE BUSH |
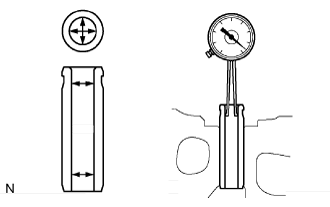 |
Using a caliper gauge, measure the inside diameter of the guide bush.
- Standard bush inside diameter:
- 6.01 to 6.03 mm (0.2366 to 0.2374 in.)
Subtract the valve stem diameter measurement from the guide bush inside diameter measurement.
- Standard oil clearance:
- 0.025 to 0.060 mm (0.0010 to 0.0024 in.)
- Maximum oil clearance:
- 0.08 mm (0.0032 in.)
| INSPECT EXHAUST VALVE GUIDE BUSH |
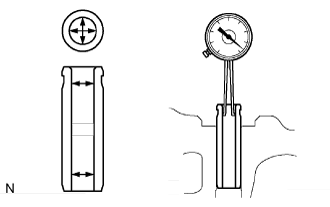 |
Using a caliper gauge, measure the inside diameter of the guide bush.
- Standard bush inside diameter:
- 6.01 to 6.03 mm (0.2366 to 0.2374 in.)
Subtract the valve stem diameter measurement from the guide bush inside diameter measurement.
- Standard oil clearance:
- 0.035 to 0.070 mm (0.0014 to 0.0028 in.)
- Maximum oil clearance:
- 0.10 mm (0.0039 in.)
| INSPECT INTAKE VALVE SEAT |
Using a 45° carbide cutter, resurface the valve seats. Remove only enough metal to clean the seats.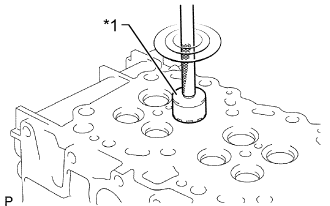
Text in Illustration *1
45° Carbide Cutter
Check the valve seating position.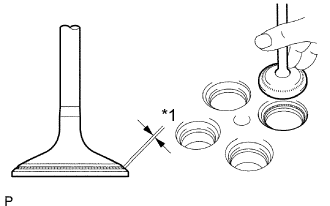
Apply a light coat of Prussian blue to the valve face.
Lightly press the valve against the seat. Do not rotate the valve.
Text in Illustration *1
Width
Check the valve face and seat for the following:
If Prussian blue appears 360° around the face, the valve is circular. If not, replace the valve.
If Prussian blue appears 360° around the valve seat, the guide and face are concentric. If not, resurface the seat.
Check that the seat contact is in the middle of the valve face with the width below.
- Standard width:
- 1.2 to 1.6 mm (0.047 to 0.063 in.)
| INSPECT EXHAUST VALVE SEAT |
Using a 45° carbide cutter, resurface the valve seats. Remove only enough metal to clean the seats.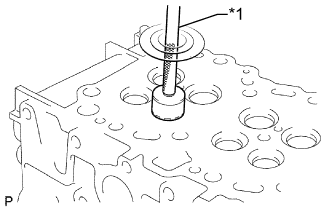
Check the valve seating position.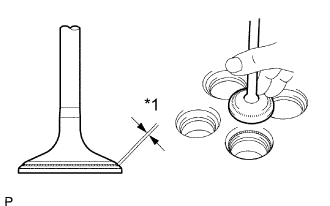
Apply a light coat of Prussian blue to the valve face.
Lightly press the valve against the seat. Do not rotate the valve.
Text in Illustration *1
Width
Check the valve face and seat for the following:
If Prussian blue appears 360° around the face, the valve is circular. If not, replace the valve.
If Prussian blue appears 360° around the valve seat, the guide and face are concentric. If not, resurface the seat.
Check that the seat contact is in the middle of the valve face with the width below.
- Standard width:
- 1.6 to 2.0 mm (0.063 to 0.079 in.)
| INSPECT VALVE LIFTER |
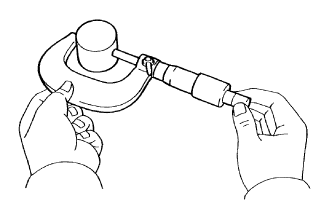 |
Using a micrometer, measure the lifter diameter.
- Standard lifter diameter:
- 30.966 to 30.976 mm (1.2191 to 1.2195 in.)
Using a caliper gauge, measure the lifter bore diameter of the cylinder head.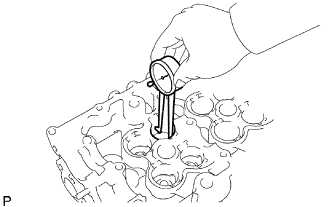
- Standard lifter bore diameter:
- 31.000 to 31.021 mm (1.2205 to 1.2213 in.)
Measure the oil clearance by subtracting the lifter diameter measurement from the lifter bore diameter measurement.
- Standard oil clearance:
- 0.024 to 0.055 mm (0.0009 to 0.0022 in.)
- Maximum oil clearance:
- 0.095 mm (0.0037 in.)
| INSPECT CYLINDER HEAD SET BOLT |
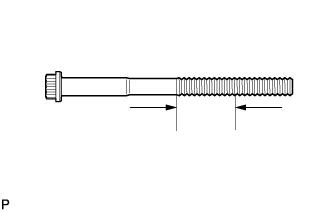 |
Using a vernier caliper, measure the diameter of the most elongated threads in the measurement area.
- Standard outside diameter:
- 11.76 to 11.97 mm (0.463 to 0.471 in.)
- Minimum outside diameter:
- 11.6 mm (0.457 in.)
- HINT:
- If a visual check reveals no excessively thin areas, check the center of the bolt (see illustration) and find the area that has the smallest diameter.
| INSPECT CAMSHAFT |
Inspect the circle runout.
Place the camshaft on V-blocks.
Using a dial indicator, measure the circle runout.
- Maximum circle runout:
- 0.03 mm (0.0012 in.)
Inspect the cam lobe height.
Using a micrometer, measure the cam lobe height.
- Standard Cam Lobe Height:
Item
Specified Condition
w/ DPF
46.991 to 47.091 mm (1.8500 to 1.8540 in.)
w/o DPF
47.180 to 47.280 mm (1.8575 to 1.8614 in.)
- Minimum Cam Lobe Height:
Item
Specified Condition
w/ DPF
46.571 mm (1.8335 in.)
w/o DPF
46.760 mm (1.8409 in.)
Inspect the journal diameter of the camshaft.
Using a micrometer, measure the journal diameter of the camshaft bearing.
- Standard journal diameter:
- 27.969 to 27.985 mm (1.1011 to 1.1018 in.)
Check the oil clearance.
Clean the bearing caps and journals.
Check the bearings for flaking and scoring.
If the bearings are damaged, replace the bearing caps and cylinder head as a set.Install the bearings to the bearing caps and cylinder head.
Place the camshaft on the cylinder head.
Lay a strip of Plastigage across each of the journals.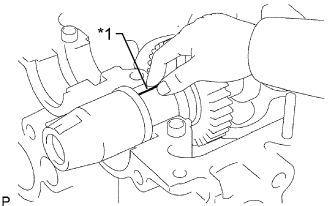
Text in Illustration *1
Plastigage
Install the bearing caps.
- NOTICE:
- Do not turn the camshaft.
Remove the bearing caps.
Measure the Plastigage at its widest point.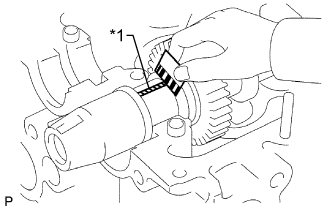
- Standard oil clearance:
- 0.025 to 0.062 mm (0.0010 to 0.0024 in.)
- Maximum oil clearance:
- 0.10 mm (0.0039 in.)
If the oil clearance is more than the maximum, replace the camshaft. If necessary, replace the bearing caps and cylinder head as a set.Text in Illustration *1
Plastigage
Completely remove the Plastigage.
Remove the camshaft (Click here).
Check the thrust clearance.
Install the camshaft (Click here).
Using a dial indicator, measure the thrust clearance while moving the camshaft back and forth.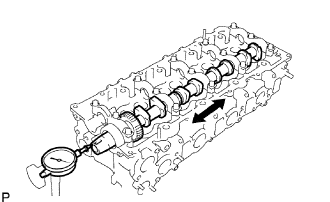
- Standard thrust clearance:
- 0.035 to 0.185 mm (0.0014 to 0.0073 in.)
- Maximum thrust clearance:
- 0.25 mm (0.0098 in.)
Using a dial indicator, measure the backlash.
Install the 2 camshafts.
Using a dial indicator, measure the backlash.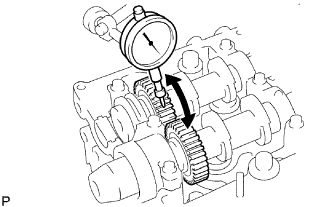
- Standard backlash:
- 0.035 to 0.089 mm (0.0014 to 0.0035 in.)
- Maximum backlash:
- 0.189 mm (0.0074 in.)
Remove the 2 camshafts (Click here).
| INSPECT NO. 2 CAMSHAFT |
Inspect the circle runout.
Place the camshaft on V-blocks.
Using a dial indicator, measure the circle runout.
- Maximum circle runout:
- 0.03 mm (0.0012 in.)
Inspect the cam lobe height.
Using a micrometer, measure the cam lobe height.
- Standard Cam Lobe Height:
Item
Specified Condition
w/ DPF
48.305 to 48.405 mm (1.9018 to 1.90570 in.)
w/o DPF
48.070 to 48.170 mm (1.8925 to 1.8965 in.)
- Minimum Cam Lobe Height:
Item
Specified Condition
w/ DPF
48.155 mm (1.8959 in.)
w/o DPF
47.920 mm (1.8866 in.)
Inspect the journal diameter of the camshaft.
Using a micrometer, measure the journal diameter of the camshaft bearing.
- Standard journal diameter:
- 27.969 to 27.985 mm (1.1011 to 1.1018 in.)
Check the oil clearance.
Clean the bearing caps and journals.
Check the bearings for flaking and scoring.
If the bearings are damaged, replace the bearing caps and cylinder head as a set.Install the bearings to the bearing caps and cylinder head.
Place the camshaft on the cylinder head.
Lay a strip of Plastigage across each of the journals.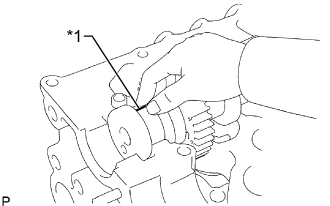
Text in Illustration *1
Plastigage
Install the bearing caps.
- NOTICE:
- Do not turn the camshaft.
Remove the bearing caps.
Measure the Plastigage at its widest point.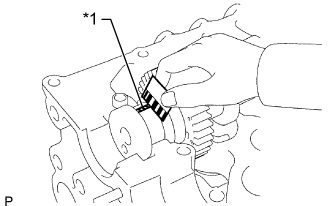
- Standard oil clearance:
- 0.025 to 0.062 mm (0.0010 to 0.0024 in.)
- Maximum oil clearance:
- 0.10 mm (0.0039 in.)
If the oil clearance is more than the maximum, replace the camshaft. If necessary, replace the bearing caps and cylinder head as a set.Text in Illustration *1
Plastigage
Completely remove the Plastigage.
Remove the camshaft (Click here).
Check the thrust clearance.
Install the camshaft (Click here).
Using a dial indicator, measure the thrust clearance while moving the camshaft back and forth.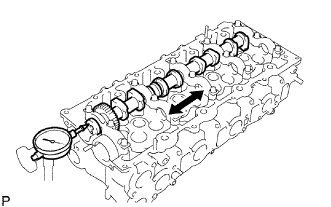
- Standard thrust clearance:
- 0.035 to 0.185 mm (0.0014 to 0.0073 in.)
- Maximum thrust clearance:
- 0.25 mm (0.0098 in.)
Remove the camshaft (Click here).