Front Passenger Side Seat Belt Warning Light Malfunction
Circuit diagnosis · Vehicles built Oct 2014 – Dec 2014
Versions by build date: Oct 2014 – Dec 2014 Jan 2015 – Dec 2016 from Jan 2017
DESCRIPTION
When the ignition switch is turned to ON, the combination meter assembly monitors the state of the passenger side seat and the front seat inner belt assembly RH*1 (or LH*2). The combination meter assembly illuminates, blinks or turns off the seat belt warning light on the combination meter according to the parking brake condition, shift lever position, vehicle speed and state of the passenger side seat and front seat inner belt assembly RH*1 (or LH*2).- *1: for LHD
- *2: for RHD
- HINT:
- The seat belt warning light on the combination meter assembly is used for both the driver side seat and front passenger side seat.
WIRING DIAGRAM
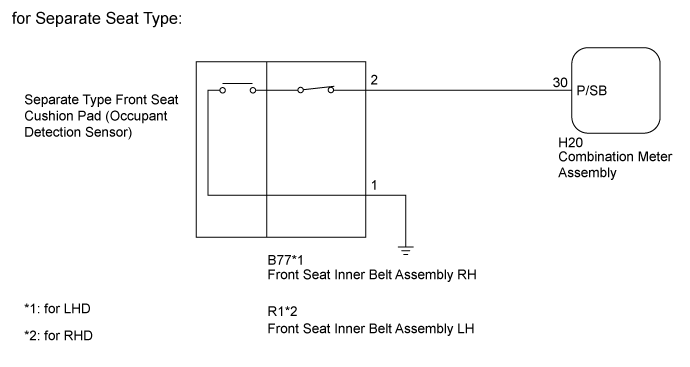

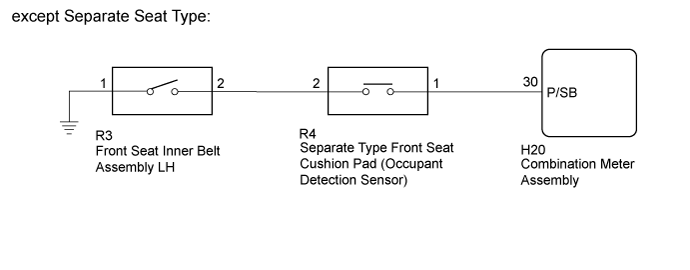
INSPECTION PROCEDURE
| 1. READ VALUE USING GTS (FRONT PASSENGER SIDE BUCKLE SW) |

Connect the GTS to the DLC3.
Turn the ignition switch to ON.
Turn the GTS on.
Enter the following menus: Body Electrical / Combination Meter / Data List.
Read the Data List according to the display on the GTS.
Combination Meter Tester Display
Measurement Item/Range
Normal Condition
Diagnostic Note
P-Seatbellt Buckle SW*
Front passenger side seat belt buckle signal / ON or OFF
ON: Front passenger side seat belt unfastened
OFF: Front passenger side seat belt fastened
Perform the inspection while sitting in the front passenger side seat.
- OK:
- The display is as specified in the normal condition column.
Result Result
Proceed to
OK
A
NG (for Separate Seat Type)
B
NG (except Separate Seat Type)
C
|
|
||||
|
|
||||

| A | ||
 |
||
| ||
| 2. CHECK HARNESS AND CONNECTOR (FRONT SEAT INNER BELT ASSEMBLY - COMBINATION METER ASSEMBLY AND BODY GROUND) |
Disconnect the H20 combination meter assembly connector.
Disconnect the B77*1 or R1*2 front seat inner belt assembly connector.
- *1: for LHD
- *2: for RHD
- *1: for LHD
Measure the resistance according to the value(s) in the table below.
- Standard Resistance:
- for LHD:
Tester Connection
Condition
Specified Condition
H20-30 (P/SB) - B77-2
Always
Below 1 Ω
H20-30 (P/SB) - Body ground
Always
10 kΩ or higher
B77-1 - Body ground
Always
Below 1 Ω
- for RHD:
Tester Connection
Condition
Specified Condition
H20-30 (P/SB) - R1-2
Always
Below 1 Ω
H20-30 (P/SB) - Body ground
Always
10 kΩ or higher
R1-1 - Body ground
Always
Below 1 Ω
|
|
||||

| OK | |
 |
| 3. INSPECT FRONT SEAT INNER BELT ASSEMBLY (FRONT PASSENGER SIDE) |
Remove the front seat inner belt assembly (front passenger side) (Click here).
Inspect the front seat inner belt assembly (front passenger side) (Click here).
|
|
||||
| OK | |
|
| 4. INSPECT SEPARATE TYPE FRONT SEAT CUSHION PAD (OCCUPANT DETECTION SENSOR) |
Remove the separate type front seat cushion pad (occupant detection sensor).
- for Hi-back Seat Type (Click here)
- for Low-back Seat Type (Click here)
- for Hi-back Seat Type (Click here)
Inspect the separate type front seat cushion pad (occupant detection sensor) (Click here).
Result Result
Proceed to
OK
A
NG (for Hi-back Seat Type)
B
NG (for Low-back Seat Type)
C
|
|
||||
|
|
||||
| A | ||
|
||
| ||
| 5. CHECK HARNESS AND CONNECTOR (COMBINATION METER ASSEMBLY - SEPARATE TYPE FRONT SEAT CUSHION PAD) |
Disconnect the H20 combination meter assembly connector.
Disconnect the R4 separate type front seat cushion pad (occupant detection sensor) connector.
Measure the resistance according to the value(s) in the table below.
- Standard Resistance:
Tester Connection
Condition
Specified Condition
H20-30 (P/SB) - R4-1
Always
Below 1 Ω
H20-30 (P/SB) - Body ground
Always
10 kΩ or higher
|
|
||||
| OK | |
|
| 6. CHECK HARNESS AND CONNECTOR (FRONT SEAT INNER BELT ASSEMBLY LH - SEPARATE TYPE FRONT SEAT CUSHION PAD AND BODY GROUND) |
Disconnect the R3 front seat inner belt assembly LH connector.
Disconnect the R4 separate type front seat cushion pad (occupant detection sensor) connector.
Measure the resistance according to the value(s) in the table below.
- Standard Resistance:
Tester Connection
Condition
Specified Condition
R3-2 - R4-2
Always
Below 1 Ω
R3-2 - Body ground
Always
10 kΩ or higher
R3-1 - Body ground
Always
Below 1 Ω
|
|
||||
| OK | |
|
| 7. INSPECT SEPARATE TYPE FRONT SEAT CUSHION PAD (OCCUPANT DETECTION SENSOR) |
Remove the separate type front seat cushion pad (occupant detection sensor) (Click here).
Inspect the separate type front seat cushion pad (occupant detection sensor) (Click here).
|
|
||||
| OK | |
|
| 8. INSPECT FRONT SEAT INNER BELT ASSEMBLY LH |
Remove the front seat inner belt assembly LH (Click here).
Inspect the front seat inner belt assembly LH (Click here).
|
|
||||
| OK | ||
|
||
| ||