2-3 Door Lock Initial Position Switch Malfunction
Diagnostic trouble codes · Vehicles built Oct 2014 – Dec 2014
Versions by build date: Oct 2014 – Dec 2014 Jan 2015 – Dec 2016 from Jan 2017
DESCRIPTION
Code 2-3 is output when the power slide door lock assembly LH or power slide door lock assembly RH* (initial position switch) is malfunctioning.| DTC No. |
DTC Detection Condition |
Trouble Area |
| 2-3 |
|
|
- *: for RH Side, w/ Power Slide Door
WIRING DIAGRAM
(Click here)INSPECTION PROCEDURE
| 1. CLEAR DTC |

Clear the DTC (Click here).
| NEXT | |
 |
| 2. CHECK FOR DTC |
Check for DTC (Click here).
Result Result
Proceed to
DTC is not output
A
DTC is output (for LH Side)
B
DTC is output (for RH Side, w/ Power Slide Door)
C
|
|
||||
|
|
||||

| A | ||
 |
||
| ||
| 3. INSPECT POWER SLIDE DOOR LOCK ASSEMBLY LH |
Remove the power slide door lock assembly LH (Click here).
Inspect the power slide door lock assembly LH (Click here).
|
|
||||

| OK | |
|
| 4. INSPECT NO. 2 REAR DOOR WIRE |
Disconnect the oq1 and po2 No. 2 rear door wire connectors.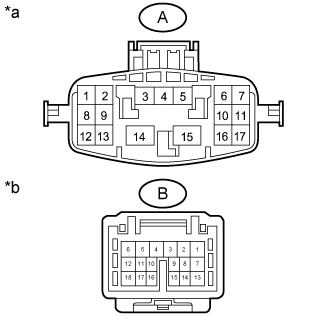

Measure the resistance according to the value(s) in the table below.
- Standard Resistance:
Tester Connection
Condition
Specified Condition
A-16 - B-14
Always
Below 1 Ω
A-10 - B-16
Always
Below 1 Ω
Text in Illustration *a
No. 2 Rear Door Wire
(Door Control Relay Assembly Side)
*b
No. 2 Rear Door Wire
(Power Slide Door Lock Assembly LH Side)
|
|
||||
| OK | |
|
| 5. CHECK HARNESS AND CONNECTOR (POWER SLIDE DOOR LOCK ASSEMBLY LH - DOOR CONTROL RELAY ASSEMBLY) |
Disconnect the p1 power slide door lock assembly LH connector.
Disconnect the q4 door control relay assembly connector.
Measure the resistance according to the value(s) in the table below.
- Standard Resistance:
Tester Connection
Condition
Specified Condition
q4-19 (LMT) - p1-10 (UL)
Always
Below 1 Ω
q4-13 (OSG) - p1-8 (E2)
Always
Below 1 Ω
q4-19 (LMT) or p1-10 (UL) - Body ground
Always
10 kΩ or higher
q4-13 (OSG) or p1-8 (E2) - Body ground
Always
10 kΩ or higher
|
|
||||
| OK | ||
|
||
| ||
| 6. INSPECT POWER SLIDE DOOR LOCK ASSEMBLY RH |
Remove the power slide door lock assembly RH (Click here).
Inspect the power slide door lock assembly RH (Click here).
|
|
||||
| OK | |
|
| 7. INSPECT REAR DOOR WIRE RH |
Disconnect the ci1 and fc1 rear door wire RH connectors.
Measure the resistance according to the value(s) in the table below.
- Standard Resistance:
Tester Connection
Condition
Specified Condition
A-16 - B-14
Always
Below 1 Ω
A-10 - B-16
Always
Below 1 Ω
Text in Illustration *a
Rear Door Wire RH
(Door Control Relay Assembly Side)
*b
Rear Door Wire RH
(Power Slide Door Lock Assembly RH Side)
|
|
||||
| OK | |
|
| 8. CHECK HARNESS AND CONNECTOR (POWER SLIDE DOOR LOCK ASSEMBLY RH - DOOR CONTROL RELAY ASSEMBLY) |
Disconnect the f1 power slide door lock assembly RH connector.
Disconnect the I4 door control relay assembly connector.
Measure the resistance according to the value(s) in the table below.
- Standard Resistance:
Tester Connection
Condition
Specified Condition
I4-19 (LMT) - f1-10 (HND)
Always
Below 1 Ω
I4-13 (OSG) - f1-8 (E1)
Always
Below 1 Ω
I4-19 (LMT) or f1-10 (HND) - Body ground
Always
10 kΩ or higher
I4-13 (OSG) or f1-8 (E1) - Body ground
Always
10 kΩ or higher
|
|
||||
| OK | ||
|
||
| ||