1GD-FTV ENGINE MECHANICAL REAR CRANKSHAFT OIL SEAL REMOVAL
CAUTION / NOTICE / HINT
The necessary procedures (adjustment, calibration, initialization, or registration) that must be performed after parts are removed, installed, or replaced during the rear crankshaft oil seal removal/installation are shown below.
| Replacement Part or Procedure | Necessary Procedures | Effects/Inoperative when not Performed | Link |
|---|---|---|---|
| Battery terminal is disconnected/reconnected | Memorize steering angle neutral point | Parking assist monitor system | ( ) |
w/ Stop and Start System:
Replacement of starter assembly
|
Clear the number of starter operations | Stop and start system | ()
|
w/ Stop and Start System:
·
Replacement of flywheel sub-assembly (for Automatic Transmission) ·
Replacement of flywheel with damper assembly (for Manual Transmission) |
Total number of engine starts reset | ||
for AE60E:
Replacement of automatic transmission assembly |
Reset memory | ·
Large shift shock ·
Engine overruns |
()
|
for AE60E:
Replacement of automatic transmission fluid |
ATF thermal degradation estimate reset | The value of the Data List item "ATF Thermal Degradation Estimate" is not estimated correctly |
- HINT:
-
When the cable is disconnected / reconnected to the battery terminal, systems temporarily stop operating. However, each system has a function that completes learning the first time the system is used.
- ·
Learning completes when vehicle is driven
Effect/Inoperative when not Performed Necessary Procedures Link Stop and start system Drive the vehicle until stop and start control is permitted (approximately 5 to 60 minutes). ( )
Lane control system Drive the vehicle straight ahead at 15 km/h (10 mph) or more for 1 second or more. ( )
Pre-collision system
·Learning completes when vehicle is operated normally
Effect/Inoperative when not Performed Necessary Procedures Link Power slide door system Fully close the slide door by hand.
- HINT:
-
Initialization is not necessary if the above procedures are performed while the slide door is closed.
( )
Air conditioning system After the ignition switch is turned to ON, the servo motor standard position is recognized. -
PROCEDURE

 33030
1.REMOVE MANUAL TRANSMISSION UNIT ASSEMBLY (for Manual Transmission)
35000
2.REMOVE AUTOMATIC TRANSMISSION ASSEMBLY (for Automatic Transmission)
31210
3.REMOVE CLUTCH COVER ASSEMBLY (for Manual Transmission)
Click hereDrivetrain>CLUTCH>CLUTCH UNIT>REMOVAL
31250
4.REMOVE CLUTCH DISC ASSEMBLY (for Manual Transmission)
Click hereDrivetrain>CLUTCH>CLUTCH UNIT>REMOVAL
13450
5.REMOVE FLYWHEEL WITH DAMPER ASSEMBLY (for Manual Transmission)
13405
6.REMOVE FLYWHEEL SUB-ASSEMBLY (for Automatic Transmission)
11355
7.REMOVE REAR END PLATE
11381A
8.REMOVE REAR ENGINE OIL SEAL
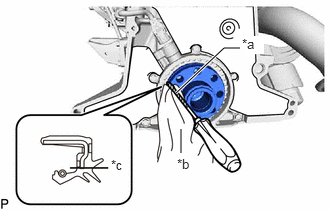
| *a | Protective Tape |
| *b | Cloth |
| *c | Cut |
Using a knife, cut off the lip of the rear engine oil seal.
Using a cloth and screwdriver, pry out the rear engine oil seal from the rear engine oil seal retainer.
- NOTICE:
-
Be careful not to damage the crankshaft and rear engine oil seal retainer.
- HINT:
- ·
After removal, check the crankshaft for damage. If damaged, smooth the surface with #400 sandpaper.
·Tape the screwdriver tip before use.