1GD-FTV ENGINE MECHANICAL ENGINE ASSEMBLY REMOVAL
CAUTION / NOTICE / HINT
The necessary procedures (adjustment, calibration, initialization, or registration) that must be performed after parts are removed, installed, or replaced during the engine assembly removal/installation are shown below.
| Replacement Part or Procedure | Necessary Procedures | Effects/Inoperative when not Performed | Link |
|---|---|---|---|
| Battery terminal is disconnected/reconnected | Memorize steering angle neutral point | Parking assist monitor system | ( ) |
| Replacement of ECM | ·
Learning Values Save ·
Learning Values Write ·
Perform Vehicle Identification Number (VIN) or frame number registration |
DTC P063051 is stored | ·
w/ DPF: ( ·
w/ Urea SCR System: ( ·
w/ EGR Cooler: ( ·
w/o EGR Cooler: ( |
| ECU communication ID registration | Engine start function | See the Service Bulletin for the registration method. | |
for RC60J:
Performing iMT installation information reset |
·
iMT system ·
DTCs are output |
()
|
|
| Replacement of engine assembly | Clear crank time compensation data | Engine starting | ·
w/ DPF: ( ·
w/ Urea SCR System: ( ·
w/ EGR Cooler: ( ·
w/o EGR Cooler: ( |
·
Input injector compensation code ·
Pilot quantity learning |
Engine starting | ·
w/ DPF: ( ·
w/ Urea SCR System: ( ·
w/ EGR Cooler: ( ·
w/o EGR Cooler: ( |
|
| Replacement of crankshaft position sensor plate | Clear crank time compensation data | Crank time compensation data compensation amount is same as before replacement, affecting crank time compensation data | ·
w/ DPF: ( ·
w/ Urea SCR System: ( ·
w/ EGR Cooler: ( ·
w/o EGR Cooler: ( |
w/ DPF, w/ Urea SCR System:
Replacement of air fuel ratio sensor |
Clear A/F sensor learning value data | - | ·
w/ DPF: ( ·
w/ Urea SCR System: ( |
w/ DPF, w/ Urea SCR System:
Replacement of exhaust manifold converter sub-assembly |
Clear DPF thermal deterioration data | - | ·
w/ DPF: ( ·
w/ Urea SCR System: ( |
| Replacement of injector assembly | ·
Injector compensation code registration ·
Pilot quantity learning |
Engine starting | ·
w/ DPF: ( ·
w/ Urea SCR System: ( ·
w/ EGR Cooler: ( ·
w/o EGR Cooler: ( |
·
Replacement of diesel throttle body assembly ·
Replacement of electric EGR control valve assembly ·
Replacement of turbocharger nozzle vane control actuator |
Perform initialization | - | ·
w/ DPF: ( ·
w/ Urea SCR System: ( ·
w/ EGR Cooler: ( ·
w/o EGR Cooler: ( |
w/ Stop and Start System:
Replacement of starter assembly
|
Clear the number of starter operations | Stop and start system | ()
|
w/ Stop and Start System:
·
Replacement of flywheel sub-assembly (for Automatic Transmission) ·
Replacement of flywheel with damper assembly (for Manual Transmission) |
Total number of engine starts reset | ||
for AE60E:
Replacement of automatic transmission assembly |
Reset memory | ·
Large shift shock ·
Engine overruns |
()
|
for AE60E:
Replacement of automatic transmission fluid |
ATF thermal degradation estimate reset | The value of the Data List item "ATF Thermal Degradation Estimate" is not estimated correctly | |
| Front wheel alignment adjustment | ·
Perform reset memory ·
Perform acceleration sensor zero point calibration and store system information memorization. |
·
VSC is disabled or malfunctions ·
DTCs are output ·
Slip indicator light illuminates ·
ABS warning light illuminates |
()
|
| Suspension, tires, etc. | Television camera assembly optical axis (Back camera position setting) | Parking assist monitor system | ()
|
- HINT:
-
When the cable is disconnected / reconnected to the battery terminal, systems temporarily stop operating. However, each system has a function that completes learning the first time the system is used.
- ·
Learning completes when vehicle is driven
Effect/Inoperative when not Performed Necessary Procedures Link Stop and start system Drive the vehicle until stop and start control is permitted (approximately 5 to 60 minutes). ( )
Lane control system Drive the vehicle straight ahead at 15 km/h (10 mph) or more for 1 second or more. ( )
Pre-collision system
·Learning completes when vehicle is operated normally
Effect/Inoperative when not Performed Necessary Procedures Link Power slide door system Fully close the slide door by hand.
- HINT:
-
Initialization is not necessary if the above procedures are performed while the slide door is closed.
( )
Air conditioning system After the ignition switch is turned to ON, the servo motor standard position is recognized. -
- CAUTION:
- ·
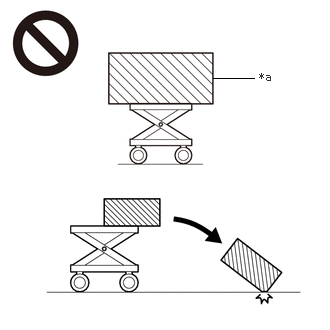 2.219,0.813 2.646,0.813 false 2.698,0.729 3.01,0.927 0.313,0.198 10 false *a
*a An Object Exceeding Weight Limit of Engine Lifter
The engine assembly is very heavy. Be sure to follow the procedure described in the repair manual, or the engine lifter may suddenly drop or the engine assembly may fall off the engine lifter.
·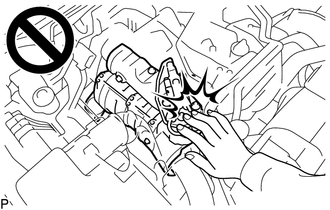
To prevent burns, do not touch the engine, exhaust manifold or other high temperature components while the engine is hot.
PROCEDURE

 1. PRECAUTION
- NOTICE:
-
After turning the ignition switch off, waiting time may be required before disconnecting the cable from the battery terminal.
-
Click hereGeneral>SETUP>WHEN DISCONNECTING OR RECONNECTING BATTERY TERMINAL>BEFORE DISCONNECTING BATTERY
2.DISCONNECT CABLE FROM NEGATIVE BATTERY TERMINAL
3. ALIGN FRONT WHEELS FACING STRAIGHT AHEAD
4.SECURE STEERING WHEEL ASSEMBLY
for LHD:
Click hereSteering>STEERING GEAR / LINKAGE>STEERING GEAR (for LHD)>REMOVAL
for RHD:
Click hereSteering>STEERING GEAR / LINKAGE>STEERING GEAR (for RHD)>REMOVAL
5.REMOVE FRONT WHEELS
51406A
6.REMOVE NO. 2 ENGINE UNDER COVER SUB-ASSEMBLY (w/ No. 2 Engine Under Cover Sub-assembly)
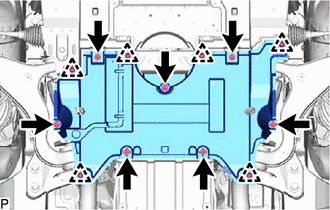
Remove the 6 clips, 7 bolts and No. 2 engine under cover sub-assembly.
52618
7.REMOVE LOWER FRONT BUMPER ABSORBER
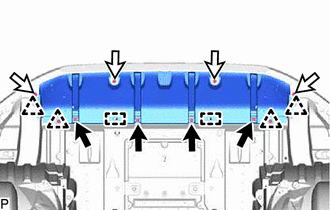

|
Bolt |

|
Screw |
Remove the 4 bolts, 4 screws and 4 clips.
Detach the 2 guides and remove the lower front bumper absorber.
51405A
8.REMOVE NO. 1 ENGINE UNDER COVER SUB-ASSEMBLY
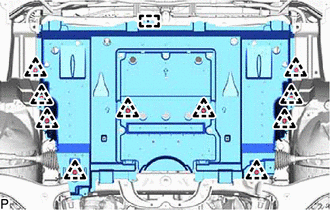
w/ No. 2 Engine Under Cover Sub-assembly:
Remove the 10 clips.
Detach the guide and remove the No. 1 engine under cover sub-assembly.
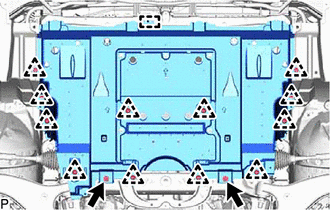
w/o No. 2 Engine Under Cover Sub-assembly:
Remove the 12 clips and 2 bolts.
Detach the guide and remove the No. 1 engine under cover sub-assembly.
51495
9.REMOVE TRANSMISSION UNDER COVER (w/ Cover)
51408B
10.REMOVE ENGINE UNDER COVER SUB-ASSEMBLY RH (w/ Cover)
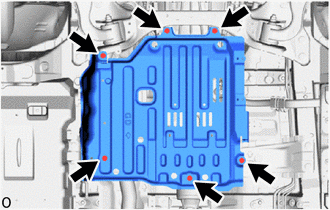
Remove the 6 bolts and engine under cover sub-assembly RH.
51773E
11.REMOVE STEP PLATE COVER RH (w/ Cover)
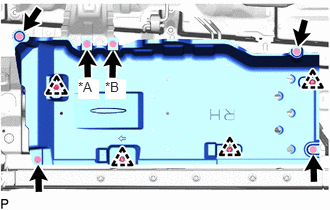
| *A | for Automatic Transmission |
| *B | for Manual Transmission |
Remove the 4 clips, 5 bolts and step plate cover RH.
12.DRAIN ENGINE OIL
13.DRAIN ENGINE COOLANT
14.DRAIN MANUAL TRANSMISSION OIL (for Manual Transmission)
15.DRAIN AUTOMATIC TRANSMISSION FLUID (for Automatic Transmission)
53106B
16.REMOVE RADIATOR COVER SUB-ASSEMBLY
17.RECOVER REFRIGERANT FROM REFRIGERATION SYSTEM (w/ Air Conditioning System)
85110
18.REMOVE WINDSHIELD WIPER MOTOR ASSEMBLY
55701J
19.REMOVE OUTER COWL TOP PANEL SUB-ASSEMBLY
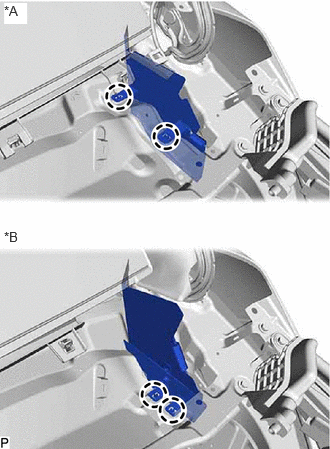
| *A | for LHD |
| *B | for RHD |
for LH Side:
Detach the 2 claws and remove the No. 2 heater air duct splash shield seal from the outer cowl top panel sub-assembly.
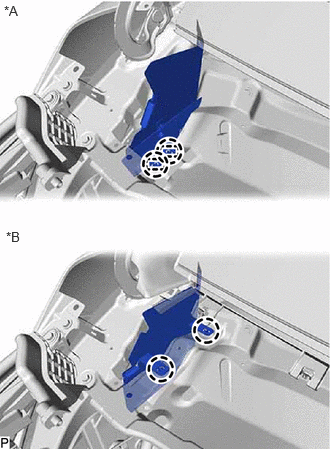
| *A | for LHD |
| *B | for RHD |
for RH Side:
Detach the 2 claws and remove the No. 2 heater air duct splash shield seal from the outer cowl top panel sub-assembly.
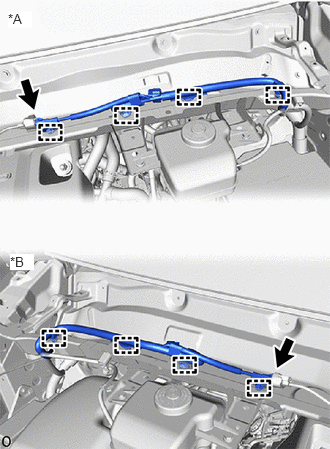
| *A | for LHD |
| *B | for RHD |
Disconnect the connector from the front wiper deicer wire harness.
Detach the 4 clamps and disconnect the engine room main wire from the outer cowl top panel sub-assembly.
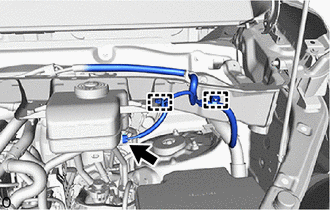
for LHD:
Disconnect the connector from the brake master cylinder reservoir assembly.
Detach the 2 clamps and disconnect the engine room main wire from the outer cowl top panel sub-assembly.
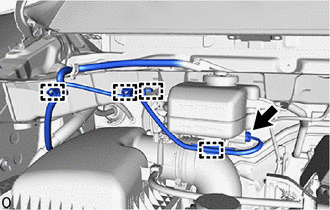
for RHD:
Disconnect the connector from the brake master cylinder reservoir assembly.
Detach the 4 clamps and disconnect the engine room main wire from the outer cowl top panel sub-assembly.
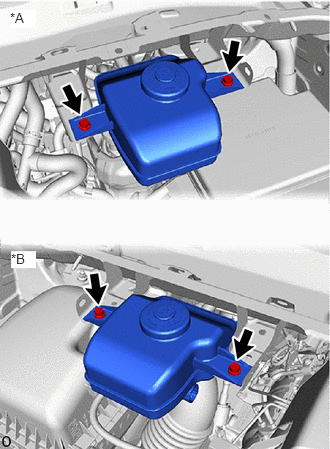
| *A | for LHD |
| *B | for RHD |
Remove the 2 bolts and disconnect the brake master cylinder reservoir assembly from the outer cowl top panel sub-assembly.
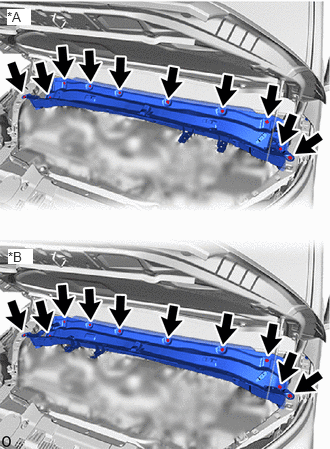
| *A | for LHD |
| *B | for RHD |
Remove the 10 bolts and outer cowl top panel sub-assembly from the body.
16400
20.REMOVE RADIATOR ASSEMBLY
12601B
21.REMOVE NO. 1 ENGINE COVER SUB-ASSEMBLY (w/ Cover)
82121
22.DISCONNECT ENGINE WIRE
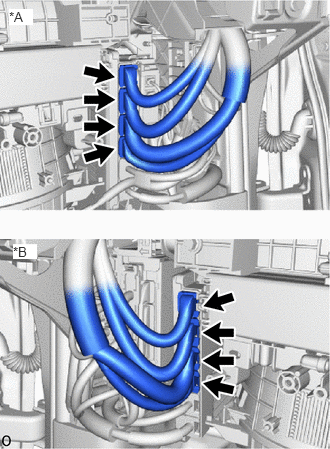
| *A | for LHD |
| *B | for RHD |
Disconnect the 4 connectors from the ECM.
Click hereEngine / Hybrid System>1GD-FTV (ENGINE CONTROL)>ECM>REMOVAL
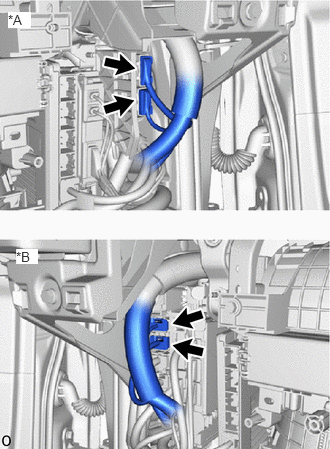
| *A | for LHD |
| *B | for RHD |
Disconnect the 2 connectors from the instrument panel wire.
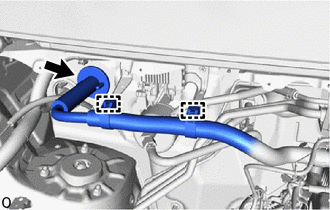
for LHD:
Detach the 2 clamps and grommet, and pull out the engine wire from the bracket.
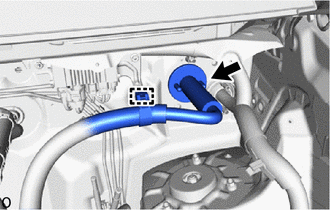
for RHD:
Detach the clamp and grommet, and pull out the engine wire from the bracket.
23.REMOVE AIR CLEANER CAP SUB-ASSEMBLY AND AIR CLEANER HOSE
17801
24.REMOVE AIR CLEANER FILTER ELEMENT SUB-ASSEMBLY
25760F
25.REMOVE VACUUM TRANSMITTING HOSE ASSEMBLY
17303T
26.REMOVE AIR PIPE SUB-ASSEMBLY
23941
27.DISCONNECT NO. 1 FUEL FILTER PROTECTOR
23271H
28.DISCONNECT NO. 1 FUEL HOSE
- CAUTION:
-
To prevent burns, do not touch the engine, exhaust manifold or other high temperature components while the engine is hot.
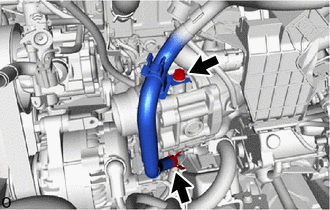
Remove the bolt and disconnect the No. 1 fuel hose from the diesel throttle body assembly.
Slide the clamp and disconnect the No. 1 fuel hose from the No. 2 fuel pipe.
23273H
29.DISCONNECT NO. 2 FUEL HOSE
- CAUTION:
-
To prevent burns, do not touch the engine, exhaust manifold or other high temperature components while the engine is hot.
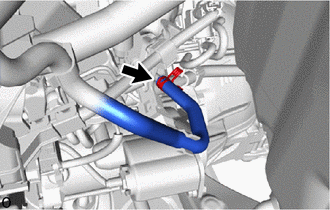
Slide the clamp and disconnect the No. 2 fuel hose from the No. 3 nozzle leakage pipe assembly.
30.DISCONNECT WIRE HARNESS
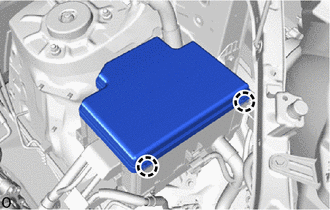
Detach the 2 claws and remove the upper No. 1 relay block cover from the No. 1 engine room relay block.
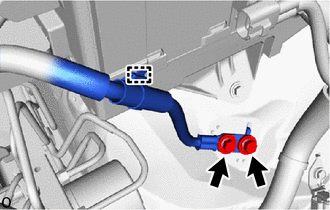
Remove the 2 bolts and disconnect the wire harness from the body.
Detach the clamp and disconnect the wire harness from the No. 1 engine room relay block.
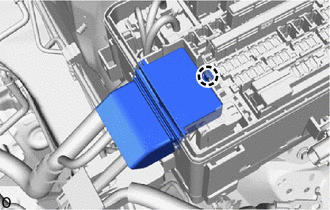
Detach the claw and remove the relay block cover from the No. 1 engine room relay block.
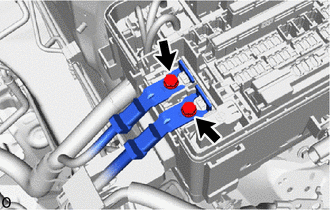
Remove the 2 bolts and disconnect the 2 wire harnesses from the No. 1 engine room relay block.
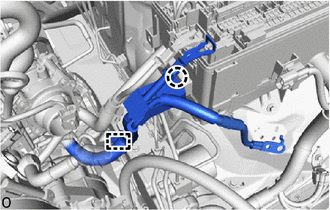
Detach the claw and clamp and disconnect the wire harness.
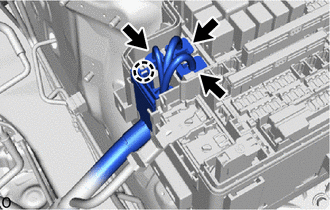
Detach the claw and 3 connectors from the No. 1 engine room relay block.
31.REMOVE WATER HOSE SUB-ASSEMBLY (w/ Heater)
44310
32.DISCONNECT VANE PUMP ASSEMBLY
- CAUTION:
-
To prevent burns, do not touch the engine, exhaust manifold or other high temperature components while the engine is hot.
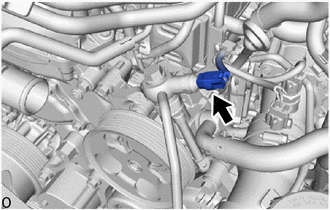
Disconnect the connector from the power steering oil pressure switch.
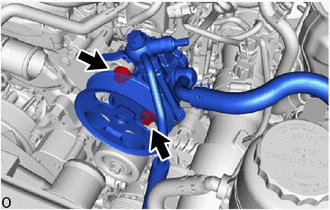
Remove the 2 bolts and disconnect the vane pump assembly from the generator bracket.
27020
33.REMOVE GENERATOR ASSEMBLY
53287B
34.REMOVE RADIATOR SUPPORT EXTENSION RH (for RHD)
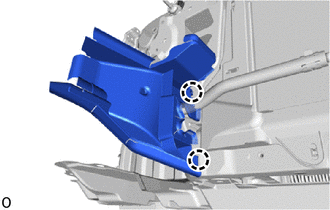
Detach the 2 claws and remove the radiator support extension RH from the body.
53288B
35.REMOVE RADIATOR SUPPORT EXTENSION LH
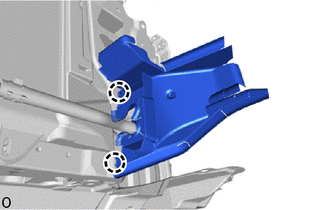
Detach the 2 claws and remove the radiator support extension LH from the body.
44402
36.DISCONNECT NO. 1 POWER STEERING OIL COOLER SUB-ASSEMBLY
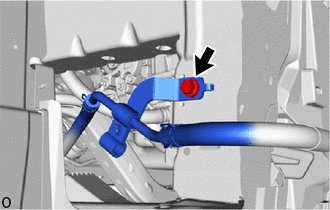
for RHD:
Remove the bolt and disconnect the return tube sub-assembly.
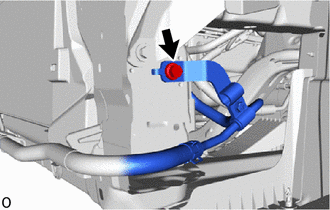
Remove the bolt and disconnect the return tube sub-assembly.
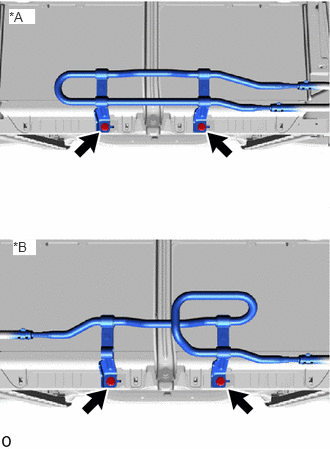
| *A | for LHD |
| *B | for RHD |
Remove the 2 bolts and disconnect the No. 1 power steering oil cooler sub-assembly.
88703
37.DISCONNECT DISCHARGE HOSE SUB-ASSEMBLY (w/ Air Conditioning System)
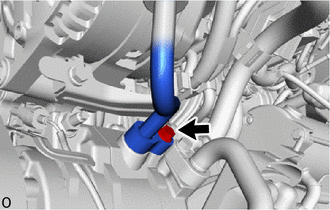
Remove the bolt and disconnect the discharge hose sub-assembly from the cooler compressor assembly.
Remove the O-ring from the discharge hose sub-assembly.
88704
38.REMOVE SUCTION HOSE SUB-ASSEMBLY (w/ Air Conditioning System)
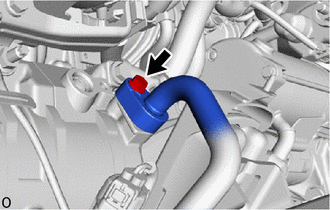
Remove the bolt and disconnect the suction hose sub-assembly from the cooler compressor assembly.
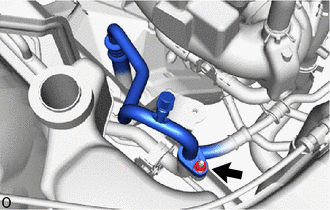
Remove the nut and disconnect the suction hose sub-assembly.
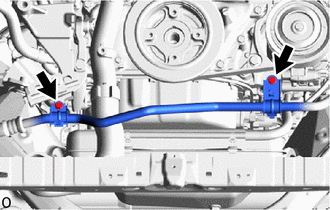
w/o Viscous Heater:
Remove the 2 bolts and suction hose sub-assembly from the water inlet and timing chain cover.
w/ Viscous Heater:
Remove the 2 bolts and suction hose sub-assembly from the No. 1 viscous heater bracket sub-assembly and timing chain cover.
Remove the 2 O-rings from the suction hose sub-assembly.
44773F
39.DISCONNECT UNION TO CHECK VALVE HOSE
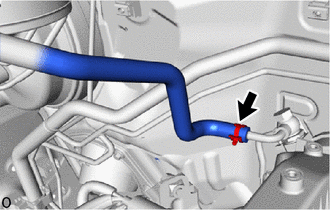
Slide the clamp and disconnect the union to check valve hose from the vacuum pump assembly.
40.DISCONNECT INTERMEDIATE SHAFT ASSEMBLY
for LHD:
Click hereSteering>STEERING GEAR / LINKAGE>STEERING GEAR (for LHD)>REMOVAL
for RHD:
Click hereSteering>STEERING GEAR / LINKAGE>STEERING GEAR (for RHD)>REMOVAL
89543
41.DISCONNECT FRONT SPEED SENSOR LH
89542
42.DISCONNECT FRONT SPEED SENSOR RH
- HINT:
-
Use the same procedure described for the LH side.
45047
43.DISCONNECT TIE ROD END SUB-ASSEMBLY LH
for LHD:
Click hereSteering>STEERING GEAR / LINKAGE>STEERING GEAR (for LHD)>REMOVAL
for RHD:
Click hereSteering>STEERING GEAR / LINKAGE>STEERING GEAR (for RHD)>REMOVAL
45046
44.DISCONNECT TIE ROD END SUB-ASSEMBLY RH
- HINT:
-
Use the same procedure described for the LH side.
45.DISCONNECT FRONT DISC BRAKE CALIPER ASSEMBLY LH
46.DISCONNECT FRONT DISC BRAKE CALIPER ASSEMBLY RH
- HINT:
-
Use the same procedure described for the LH side.
43512
47.REMOVE FRONT DISC
Click hereBrake>BRAKE (FRONT)>FRONT BRAKE>REMOVAL
48069
48.DISCONNECT FRONT LOWER NO. 1 SUSPENSION ARM SUB-ASSEMBLY LH
48068
49.DISCONNECT FRONT LOWER NO. 1 SUSPENSION ARM SUB-ASSEMBLY RH
- HINT:
-
Use the same procedure described for the LH side.
48810
50.REMOVE FRONT STABILIZER LINK ASSEMBLY LH
48820B
51.REMOVE FRONT STABILIZER LINK ASSEMBLY RH
- HINT:
-
Use the same procedure described for the LH side.
52.REMOVE FRONT AXLE ASSEMBLY LH
53.REMOVE FRONT AXLE ASSEMBLY RH
- HINT:
-
Use the same procedure described for the LH side.
51445
54.REMOVE ENGINE UNDER COVER BRACKET
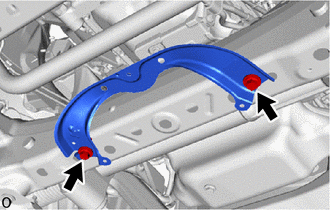
Remove the 2 bolts and engine under cover bracket from the front frame assembly.
55.REMOVE WATER HOSE SUB-ASSEMBLY (w/ Viscous Heater)
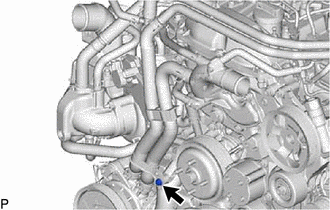
Remove the bolt and disconnect the water hose sub-assembly from the water inlet.
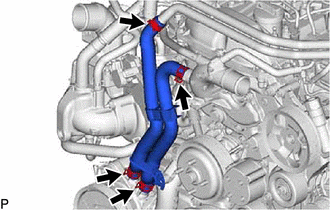
Slide the 4 clamps and remove the water hose sub-assembly from the viscous heater with magnet clutch assembly, No. 2 water pipe and water outlet sub-assembly.
87120G
56.REMOVE VISCOUS HEATER WITH MAGNET CLUTCH ASSEMBLY (w/ Viscous Heater)
Disconnect the connector from the viscous heater with magnet clutch assembly.
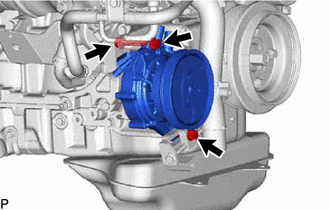
Remove the 2 bolts, nut and viscous heater with magnet clutch assembly from the No. 1 viscous heater bracket.
17410
57.REMOVE FRONT EXHAUST PIPE ASSEMBLY
37100
58.REMOVE PROPELLER SHAFT WITH CENTER BEARING ASSEMBLY
for High Roof:
Click hereDrivetrain>DRIVE SHAFT / PROPELLER SHAFT>PROPELLER SHAFT ASSEMBLY (for High Roof)>REMOVAL
for Standard Roof:
Click hereDrivetrain>DRIVE SHAFT / PROPELLER SHAFT>PROPELLER SHAFT ASSEMBLY (for Standard Roof)>REMOVAL
77840A
59.DISCONNECT UREA TUBE WITH HEATER ASSEMBLY (w/ Urea SCR System)
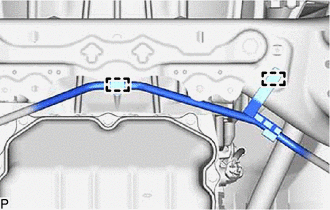
Detach the 2 clamps and disconnect the urea tube with heater assembly from the No. 2 engine under cover bracket and front frame assembly.
33030
60.REMOVE MANUAL TRANSMISSION UNIT ASSEMBLY (for Manual Transmission)
32101A
61.REMOVE DRIVE PLATE AND TORQUE CONVERTER SETTING BOLT (for Automatic Transmission)
35000
62.REMOVE AUTOMATIC TRANSMISSION ASSEMBLY (for Automatic Transmission)
31210
63.REMOVE CLUTCH COVER ASSEMBLY (for Manual Transmission)
Click hereDrivetrain>CLUTCH>CLUTCH UNIT>REMOVAL
31250
64.REMOVE CLUTCH DISC ASSEMBLY (for Manual Transmission)
Click hereDrivetrain>CLUTCH>CLUTCH UNIT>REMOVAL
13450
65.REMOVE FLYWHEEL WITH DAMPER ASSEMBLY (for Manual Transmission)
w/ Viscous Heater:
Remove the viscous heater crankshaft pulley.
Click hereEngine / Hybrid System>1GD-FTV (ENGINE MECHANICAL)>FRONT CRANKSHAFT OIL SEAL>REMOVAL
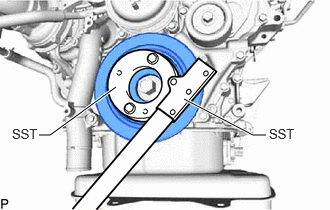
Using SST, hold the crankshaft pulley.
- SST
- 09213-58014 (91551-80840)
09330-00021
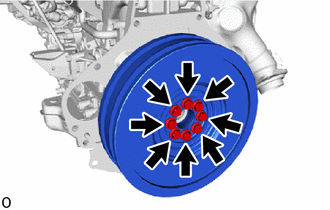
Remove the 8 bolts and flywheel with damper assembly from the crankshaft.
13405
66.REMOVE FLYWHEEL SUB-ASSEMBLY (for Automatic Transmission)
w/ Viscous Heater:
Remove the viscous heater crankshaft pulley.
Click hereEngine / Hybrid System>1GD-FTV (ENGINE MECHANICAL)>FRONT CRANKSHAFT OIL SEAL>REMOVAL
Remove the crankshaft pulley cover.
Click hereEngine / Hybrid System>1GD-FTV (ENGINE MECHANICAL)>FRONT CRANKSHAFT OIL SEAL>REMOVAL
Using SST, hold the crankshaft pulley.
- SST
- 09213-58014 (91551-80840)
09330-00021
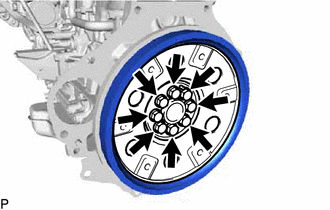
Remove the 8 bolts, rear drive plate spacer, pump impeller drive plate and flywheel sub-assembly from the crankshaft.
11355
67.REMOVE REAR END PLATE
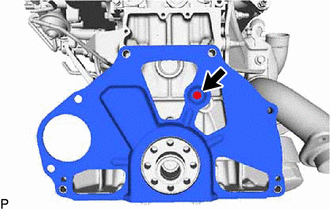
Remove the bolt and rear end plate from the cylinder block sub-assembly.
51108C
68.REMOVE REAR SIDE RAIL REINFORCEMENT SUB-ASSEMBLY LH
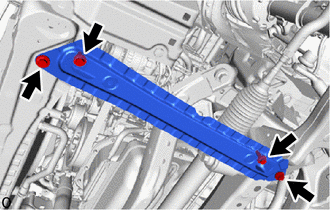
Remove the 4 bolts and rear side rail reinforcement sub-assembly LH.
51107D
69.REMOVE REAR SIDE RAIL REINFORCEMENT SUB-ASSEMBLY RH
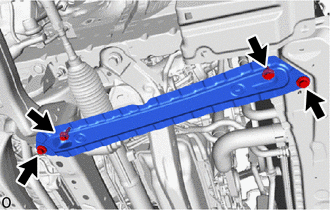
Remove the 4 bolts and rear side rail reinforcement sub-assembly RH.
70.REMOVE ENGINE ASSEMBLY
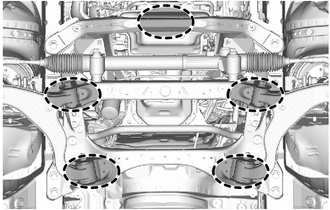

|
Place Wooden Block or Plate Attachments |
Set the engine assembly on an engine lifter.
- NOTICE:
- ·
Place wooden blocks or plate lift attachments so that the engine assembly is level.
·With the exception of installing the engine assembly to an engine stand or removing the engine assembly from an engine stand, do not perform any work on the engine assembly while it is suspended, as doing so is dangerous.
·Never install attachments to the oil pan of the engine assembly as doing so may deform the oil pan.
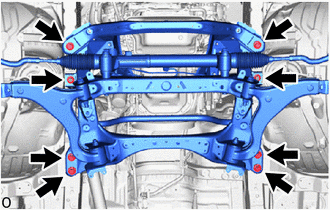
Remove the 6 bolts and 2 nuts shown in the illustration.
Operate the engine lifter and slowly remove the engine assembly with front frame assembly from the vehicle.
- NOTICE:
- ·
Make sure that the engine assembly is clear of all wiring and hoses.
·While lowering the engine assembly from the vehicle, do not allow it to contact the vehicle.
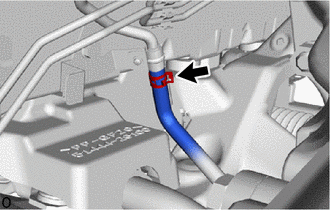
Slide the clamp and disconnect the hose.
71.INSTALL ENGINE HANGER
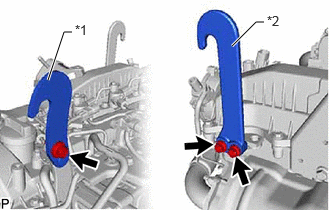
| *1 | Upper No. 1 Engine Hanger |
| *2 | No. 2 Engine Hanger |
Install the upper No. 1 engine hanger and No. 2 engine hanger with the 3 bolts as shown in the illustration.
- Torque:
- for upper No. 1 engine hanger : 29 N*m (296 kgf*cm, 21 ft.*lbf)
- for No. 2 engine hanger : 26 N*m (265 kgf*cm, 19 ft.*lbf)
- HINT:
Upper No. 1 Engine Hanger 12284-11010 No. 2 Engine Hanger 12282-11080 Bolt 91552-81025 and 91671-80835
Attach an engine sling device and hang the engine assembly with a chain block.
51100H
72.REMOVE FRONT FRAME ASSEMBLY
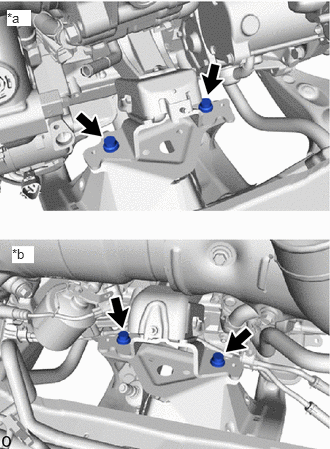
| *a | LH Side |
| *b | RH Side |
Remove the 4 bolts and disconnect the front frame assembly from the engine assembly.
12391
73.REMOVE FRONT ENGINE MOUNTING INSULATOR RH
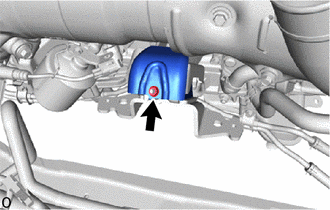
Remove the nut and front engine mounting insulator RH from the front engine mounting insulator.
12362A
74.REMOVE FRONT ENGINE MOUNTING INSULATOR
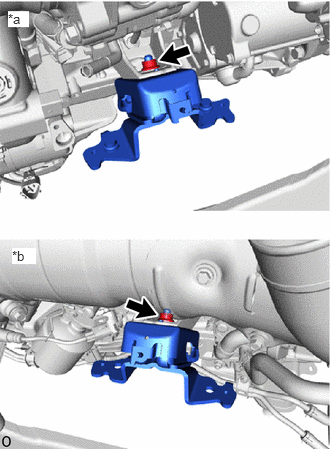
| *a | LH Side |
| *b | RH Side |
Remove the 2 nuts and 2 front engine mounting insulators from the 2 front engine mounting brackets.
75.INSTALL ENGINE ASSEMBLY TO ENGINE STAND
- NOTICE:
- ·
Pay attention to the angle of the sling device as the engine assembly or engine hangers may be damaged or deformed if the angle is incorrect.
·With the exception of installing the engine assembly to an engine stand or removing the engine assembly from an engine stand, do not perform any work on the engine assembly while it is suspended, as doing so is dangerous.
Install the engine assembly to the engine stand with the bolts.
Remove the 3 bolts, upper No. 1 engine hanger and No. 2 engine hanger.
82121
76.REMOVE ENGINE WIRE
Remove the engine wire from the engine assembly.