1GD-FTV FUEL FUEL TANK INSTALLATION
PROCEDURE

 77213E
1.INSTALL FUEL TANK TO FILLER PIPE HOSE
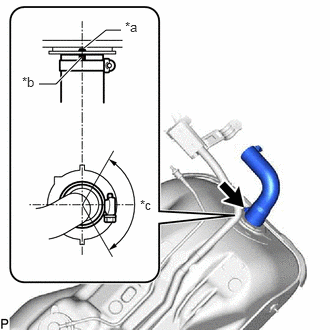
| *a | Protrusion |
| *b | Paint Mark |
| *c | 120° |
Install the fuel tank to filler pipe hose to the fuel tank assembly, and tighten the clamp to secure the hose.
- HINT:
-
Make sure the clamp is oriented as shown in the illustration.
77209C
2.INSTALL FUEL TANK MAIN TUBE SUB-ASSEMBLY
Attach the clamp and install the fuel main tube sub-assembly to the fuel tank assembly.
77204A
3.INSTALL FUEL TANK RETURN TUBE
Attach the clamp and install the fuel return tube to the fuel tank assembly.
77010
4.INSTALL FUEL TANK VENT TUBE ASSEMBLY
Apply a light coat of diesel fuel or grease to a new fuel tank vent tube gasket, and install it to the fuel tank sub-assembly.
Install the fuel tank vent tube assembly to the fuel tank sub-assembly.
- NOTICE:
-
Be careful not to bend the arm of the fuel sender gauge assembly.
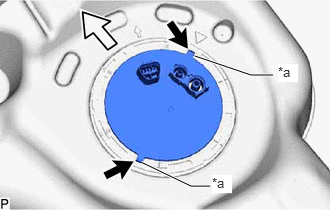
| *a | Protrusion |

|
Hole |

|
Front of Vehicle |
Align the protrusions of the fuel tank vent tube assembly with the holes in the fuel tank sub-assembly.
While pressing down on the fuel tank vent tube assembly, temporarily install the fuel pump gauge retainer.
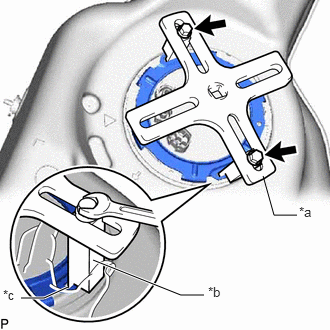
| *a | SST (Plate) |
| *b | SST (Claw) |
| *c | Insertion Point |
|
|
SST (Bolt) |
Set the 2 claws, 2 bolts and plate of SST on the fuel pump gauge retainer.
- SST
- 09808-14031 (09808-01010, 09808-01030, 09808-01090)
09808-01110
- HINT:
-
Securely insert the ends of SST into the insertion points in the fuel pump gauge retainer.
While firmly pressing the claws of SST into the insertion points in the fuel pump gauge retainer, tighten the bolts of the claws.
Attach the handle of SST.
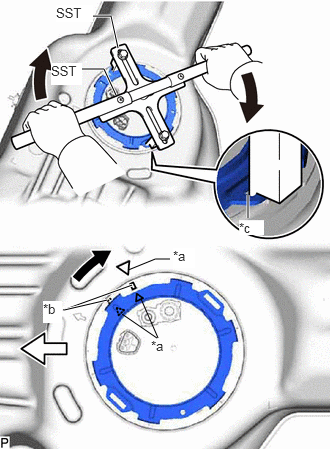
| *a | Alignment Mark |
| *b | Groove |
| *c | Insertion Point |
|
|
Turn |
|
|
Front of Vehicle |
Check once more that the tip of SST is securely inserted into the insertion area of the fuel pump gauge retainer as shown in the illustration.
Using SST, rotate the fuel pump gauge retainer so that the protrusions of the fuel pump gauge retainer are aligned with the grooves in the fuel tank sub-assembly to install the fuel tank vent tube assembly to the fuel tank sub-assembly.
- NOTICE:
- ·
Do not use any tools other than SST, such as a screwdriver, etc.
·Do not use excessive force when pressing down on SST, as the fuel pump gauge retainer will place excessive force on the fuel tank vent tube assembly and be difficult to remove, and parts may be damaged.
·Be sure to keep the handle level when turning it, as SST may slip off the retainer if the handle is turned at an angle with excessive force.
·Do not use an impact wrench or turn the handle with excessive force, as parts may be damaged.
·If SST slips off the fuel pump gauge retainer, loosen the bolts and reattach SST to the fuel pump gauge retainer.
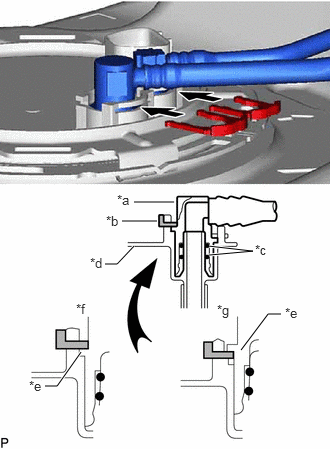
| *a | Fuel Tube Joint |
| *b | Tube Joint Clip |
| *c | O-Ring |
| *d | Fuel Tank Vent Tube Assembly |
| *e | Collar |
| *f | CORRECT |
| *g | INCORRECT |
Insert the fuel tank main tube sub-assembly and fuel tank return tube into the plugs of the fuel tank vent tube assembly and fix them in place with the 2 tube joint clips.
- NOTICE:
- ·
Check that there are no scratches or foreign objects on the connecting parts.
·Check that the fuel tube joints are inserted securely.
·Check that the tube joint clips are on the collars of the fuel tube joints.
·After installing the tube joint clips, check that the fuel tube joints cannot be pulled off.
·Be careful not to damage any clips.
If a clip is damaged, replace it.
77285R
5.INSTALL NO. 1 FUEL TUBE CLAMP
Attach the claw to install the No. 1 fuel tube clamp.
77651A
6.INSTALL FUEL TANK CUSHION
Install the 2 new No. 1 fuel tank cushions and a new No. 2 fuel tank cushion to the fuel tank assembly.
77697A
7.INSTALL NO. 2 FUEL TANK HEAT INSULATOR
Install the No. 2 fuel tank heat insulator to the fuel tank assembly with the 2 nuts.
- Torque:
- 5.0 N*m (51 kgf*cm, 44 in.*lbf)
77697
8.INSTALL NO. 1 FUEL TANK HEAT INSULATOR
Install the No. 1 fuel tank heat insulator to the fuel tank assembly with the 2 nuts.
- Torque:
- 5.0 N*m (51 kgf*cm, 44 in.*lbf)
9.INSTALL FUEL TANK ASSEMBLY
- CAUTION:
-
The fuel tank assembly is very heavy. Be sure to follow the procedure described in the repair manual, or the fuel tank assembly may fall off the engine lifter.
Set the fuel tank assembly on an engine lifter and raise the fuel tank assembly.
- NOTICE:
-
Do not allow the fuel tank sub-assembly to contact the vehicle, especially the differential.
Install the 2 fuel tank bands with the 4 bolts.
- Torque:
- 45 N*m (459 kgf*cm, 33 ft.*lbf)
Connect the fuel sender gauge connector to the fuel tank vent tube assembly.
77213E
10.CONNECT FUEL TANK TO FILLER PIPE HOSE
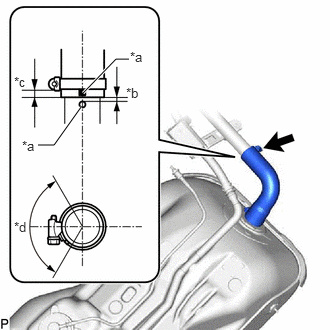
| *a | Paint Mark |
| *b | 0 to 3 mm (0 to 0.118 in.) |
| *c | 2 to 7 mm (0.0787 to 0.276 in.) |
| *d | 120° |
Connect the fuel tank to filler pipe hose to the fuel tank filler pipe sub-assembly, and tighten the clamp to secure the hose.
- HINT:
-
Make sure the clamp is oriented as shown in the illustration.
11.CONNECT FUEL TANK BREATHER HOSE
Connect the fuel tank breather hose to the fuel tank filler pipe sub-assembly, and slide the clamp to secure the hose.
Connect the fuel tank vent tube sub-assembly to the vehicle body.
77209C
12.CONNECT FUEL TANK MAIN TUBE SUB-ASSEMBLY AND FUEL TANK RETURN TUBE
Connect the fuel tank main tube sub-assembly and fuel tank return tube to the 2 fuel pipes, and slide the 2 clamps to secure the tubes.
77276
13.INSTALL FUEL HOSE PROTECTOR (w/o Cover)
Install the fuel hose protector and attach the clamp to the fuel tank to fuel filler pipe hose.
51408B
14.INSTALL ENGINE UNDER COVER SUB-ASSEMBLY RH (w/ Cover)
51495
15.INSTALL TRANSMISSION UNDER COVER (w/ Cover)
77310A
16.INSTALL FUEL TANK CAP ASSEMBLY
17.CONNECT CABLE TO NEGATIVE BATTERY TERMINAL
18. INITIALIZATION AFTER RECONNECTING BATTERY TERMINAL
Click hereGeneral>SETUP>WHEN DISCONNECTING OR RECONNECTING BATTERY TERMINAL>WORK PROCEDURE
- HINT:
-
When disconnecting and reconnecting the battery, there is an automatic learning function that completes learning when the respective system is used.
-
Click hereGeneral>SETUP>WHEN DISCONNECTING OR RECONNECTING BATTERY TERMINAL>AUTOMATIC LEARNING CHART
19.BLEED AIR FROM FUEL SYSTEM
20.INSPECT FOR FUEL LEAK