AUDIO / VIDEO STEREO JACK ADAPTER ASSEMBLY(for RHD) INSTALLATION
PROCEDURE

 86190C
1.INSTALL NO. 1 STEREO JACK ADAPTER ASSEMBLY
for Bench Seat Type:
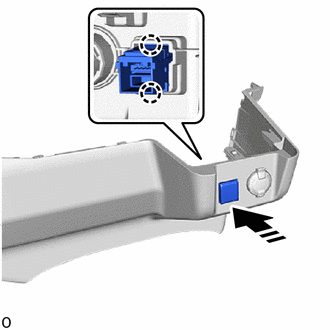

|
Install in this Direction |
Attach the claw to install the No. 1 stereo jack adapter assembly as shown in the illustration.
for Separate Seat Type:
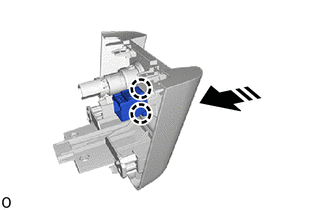
|
|
Install in this Direction |
Attach the claw to install the No. 1 stereo jack adapter assembly as shown in the illustration.
55524
2.INSTALL SWITCH BASE HOLE COVER (for Separate Seat Type)
55646
3.INSTALL NO. 3 INSTRUMENT PANEL UNDER COVER (for Bench Seat Type)
58534E
4.INSTALL CENTER FLOOR CARPET COVER LH (for Bench Seat Type)
58533C
5.INSTALL CENTER FLOOR CARPET COVER RH (for Bench Seat Type)
58802E
6.INSTALL FRONT CONSOLE BOX SUB-ASSEMBLY (for Bench Seat Type, w/ Console Tray)
58839A
7.INSTALL CONSOLE BOX HOLE COVER (for Bench Seat Type, w/ Console Tray)
55438A
8.INSTALL NO. 2 INSTRUMENT PANEL FINISH PANEL RETAINER (for Bench Seat Type)
55642
9.INSTALL NO. 2 INSTRUMENT PANEL UNDER COVER (for Bench Seat Type)
55318C
10.INSTALL INSTRUMENT SIDE PANEL LH (for Bench Seat Type)
55012A
11.INSTALL NO. 2 INSTRUMENT PANEL GARNISH SUB-ASSEMBLY (for Bench Seat Type)
55632B
12.INSTALL NO. 2 INSTRUMENT PANEL UNDER TRAY SUPPORT (for Bench Seat Type)
62112
13.INSTALL COWL SIDE TRIM BOARD LH (for Bench Seat Type)
67914B
14.INSTALL FRONT DOOR SCUFF PLATE LH (for Bench Seat Type)
67912A
15.INSTALL FRONT DOOR OUTSIDE SCUFF PLATE LH (for Bench Seat Type)
73900
16.INSTALL LOWER NO. 1 INSTRUMENT PANEL AIRBAG ASSEMBLY (for Bench Seat Type)
55433B
17.INSTALL LOWER NO. 2 INSTRUMENT PANEL FINISH PANEL (for Bench Seat Type)
55044C
18.INSTALL INSTRUMENT PANEL FINISH PANEL SUB-ASSEMBLY (for Bench Seat Type)
55432D
19.INSTALL LOWER NO. 1 INSTRUMENT PANEL FINISH PANEL (for Bench Seat Type)
77306
20.INSTALL FUEL LID LOCK OPEN LEVER SUB-ASSEMBLY (for Bench Seat Type)
53601
21.INSTALL HOOD LOCK CONTROL LEVER SUB-ASSEMBLY (for Bench Seat Type)
55641
22.INSTALL NO. 1 INSTRUMENT PANEL UNDER COVER (for Bench Seat Type)
55317A
23.INSTALL INSTRUMENT SIDE PANEL RH (for Bench Seat Type)
55011A
24.INSTALL NO. 1 INSTRUMENT PANEL GARNISH SUB-ASSEMBLY (for Bench Seat Type)
55631A
25.INSTALL NO. 1 INSTRUMENT PANEL UNDER TRAY STOPPER (for Bench Seat Type)
62111C
26.INSTALL COWL SIDE TRIM BOARD RH (for Bench Seat Type)
67913B
27.INSTALL FRONT DOOR SCUFF PLATE RH (for Bench Seat Type)
- HINT:
-
Use the same procedure described for the LH side.
-
Click hereVehicle Interior>INTERIOR PANELS / TRIM>ROOF HEADLINING (for Full-trim)>INSTALLATION
67911B
28.INSTALL FRONT DOOR OUTSIDE SCUFF PLATE RH (for Bench Seat Type)
- HINT:
-
Use the same procedure described for the LH side.
-
Click hereVehicle Interior>INTERIOR PANELS / TRIM>ROOF HEADLINING (for Full-trim)>INSTALLATION
29.CONNECT CABLE TO NEGATIVE BATTERY TERMINAL (for Bench Seat Type)
for 7GR-FKS:
for 1GD-FTV:
30. INITIALIZATION AFTER RECONNECTING BATTERY TERMINAL (for Bench Seat Type)
Click hereGeneral>SETUP>WHEN DISCONNECTING OR RECONNECTING BATTERY TERMINAL>WORK PROCEDURE
- HINT:
-
When disconnecting and reconnecting the battery, there is an automatic learning function that completes learning when the respective system is used.
-
Click hereGeneral>SETUP>WHEN DISCONNECTING OR RECONNECTING BATTERY TERMINAL>AUTOMATIC LEARNING CHART
31.PERFORM DIAGNOSTIC SYSTEM CHECK (for Bench Seat Type)
32.CHECK SRS WARNING LIGHT (for Bench Seat Type)