Driver Side Power Window does not Operate with Power Window Master Switch
Circuit diagnosis · Vehicles built from Jul 2010
Versions by build date: May 2007 – Jul 2008 Aug 2008 – Jun 2010 from Jul 2010
DESCRIPTION
If the manual UP/DOWN and AUTO DOWN functions do not operate, a malfunction may exist in the power window master switch, power window regulator motor or wire harness.WIRING DIAGRAM
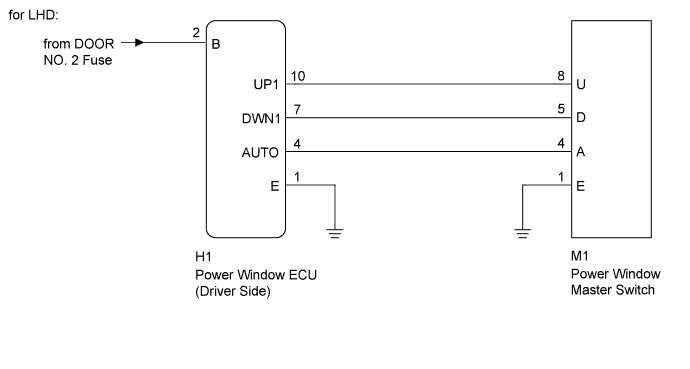

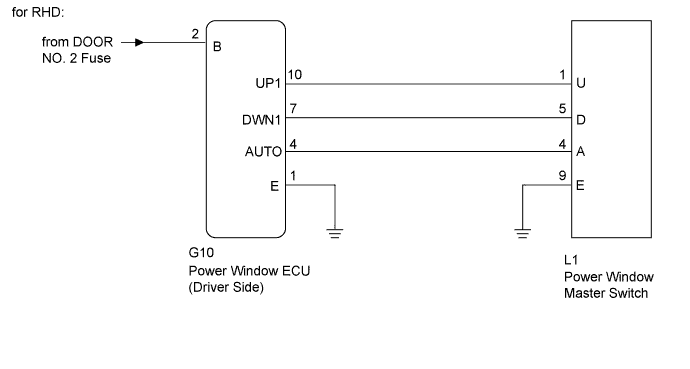
INSPECTION PROCEDURE
| 1. INSPECT POWER WINDOW MASTER SWITCH (DRIVER SWITCH) |

Measure the resistance according to the value(s) in the table below.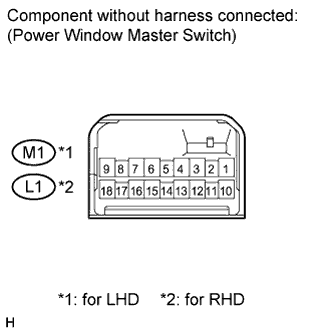
- Standard resistance:
- for LHD:
Tester Connection
Condition
Specified Condition
8 (U) - 1 (E) - 4 (A)
Auto UP
Below 1 Ω
8 (U) - 1 (E)
Manual UP
Below 1 Ω
5 (D) - 1 (E)
Manual DOWN
Below 1 Ω
4 (A) - 5 (D) - 1 (E)
Auto DOWN
Below 1 Ω
- for RHD:
Tester Connection
Condition
Specified Condition
1 (U) - 9 (E) - 4 (A)
Auto UP
Below 1 Ω
1 (U) - 9 (E)
Manual UP
Below 1 Ω
5 (D) - 9 (E)
Manual DOWN
Below 1 Ω
4 (A) - 5 (D) - 9 (E)
Auto DOWN
Below 1 Ω
|
|
||||

| OK | |
 |
| 2. CHECK HARNESS AND CONNECTOR (MASTER SWITCH - MOTOR (DRIVER SIDE)) |
for LHD:
Disconnect the M1 and H1 connectors.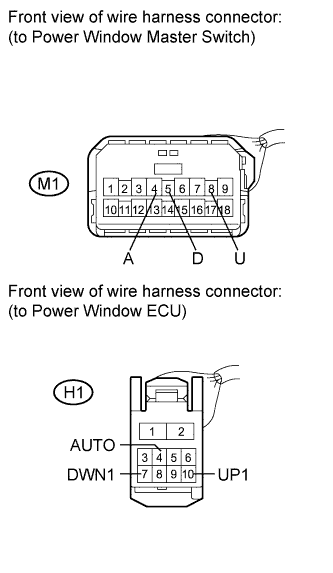
Measure the resistance according to the value(s) in the table below.
- Standard resistance:
Tester Connection
Condition
Specified Condition
M1-8 (U) - H1-10 (UP1)
Always
Below 1 Ω
M1-4 (A) - H1-4 (AUTO)
Always
Below 1 Ω
M1-5 (D) - H1-7 (DWN1)
Always
Below 1 Ω
M1-8 (U) - Body ground
Always
10 kΩ or higher
M1-4 (A) - Body ground
Always
10 kΩ or higher
M1-5 (D) - Body ground
Always
10 kΩ or higher
for RHD:
Disconnect the L1 and G10 connectors.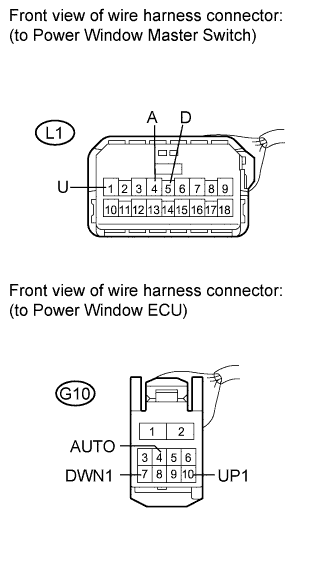
Measure the resistance according to the value(s) in the table below.
- Standard resistance:
Tester Connection
Condition
Specified Condition
L1-1 (U) - G10-10 (UP1)
Always
Below 1 Ω
L1-4 (A) - G10-4 (AUTO)
Always
Below 1 Ω
L1-5 (D) - G10-7 (DWN1)
Always
Below 1 Ω
L1-1 (U) - Body ground
Always
10 kΩ or higher
L1-4 (A) - Body ground
Always
10 kΩ or higher
L1-5 (D) - Body ground
Always
10 kΩ or higher
|
|
||||
| OK | |
|
| 3. INSPECT POWER WINDOW REGULATOR MOTOR ASSEMBLY (DRIVER SIDE) |
Remove the power window regulator motor assembly (Click here).
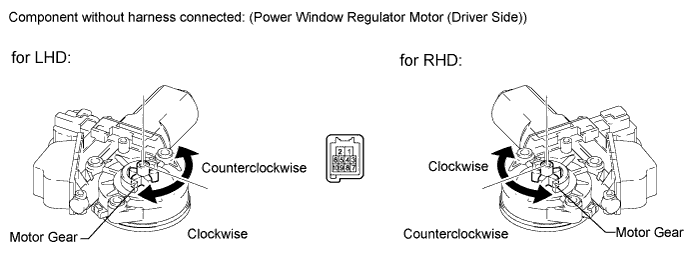
Apply battery voltage to the motor connector according to the table below.
- NOTICE:
- Do not apply battery voltage to any terminals except terminals 1, 2, 4, 7, 9 and 10.
- OK:
Switch Condition
Measurement Condition
Specified Condition
Manual Operation
Battery positive (+) → Terminal 2 (B), 9 (LIN)
Battery negative (-) → Terminal 1 (E), 7 (DWN1)
Motor gear rotates counterclockwise
Battery positive (+) → Terminal 2 (B), 9 (LIN)
Battery negative (-) → Terminal 1 (E), 10 (UP1)
Motor gear rotates clockwise
Auto Operation
Battery positive (+) → Terminal 2 (B), 9 (LIN)
Battery negative (-) → Terminal 1 (E), 4 (AUTO), 7 (DWN1)
Motor gear rotates counterclockwise
Battery positive (+) → Terminal 2 (B), 9 (LIN)
Battery negative (-) → Terminal 1 (E), 4 (AUTO), 10 (UP1)
Motor gear rotates clockwise
|
|
||||
| OK | ||
 |
||
| ||