Home › ENGINE › 2GR-FE ENGINE CONTROL SYSTEM › SFI SYSTEMStarter Signal Circuit
Circuit diagnosis · Vehicles built May 2007 – Jul 2008
Versions by build date: May 2007 – Jul 2008 Aug 2008 – Jun 2010 from Jul 2010
DESCRIPTION
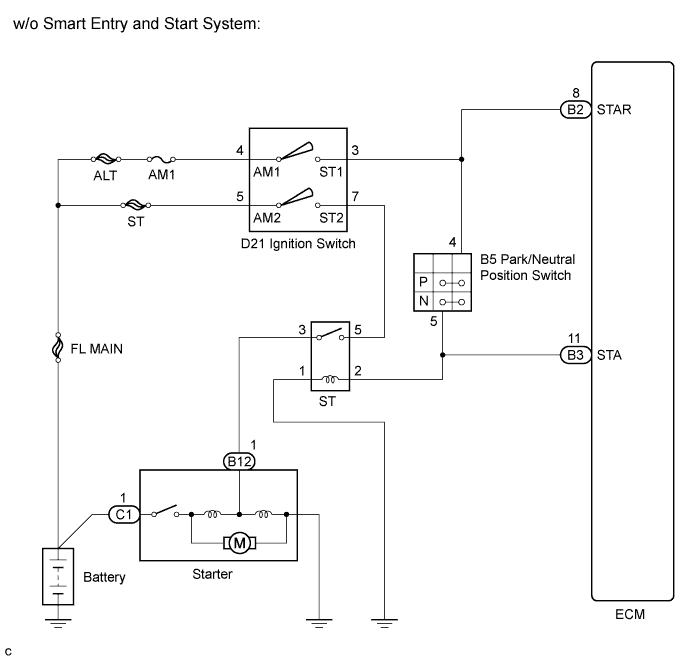
While the engine is being cranked, current flows from terminal ST1 of the ignition switch to the park/neutral position switch (for automatic transaxle) and also flows to terminal STA of the ECM (STA Signal). WIRING DIAGRAM
INSPECTION PROCEDURE
HINT:
This chart is based on the premise that the engine can crank normally. If the engine cannot crank normally, proceed to the problem symptoms table (Click here ).
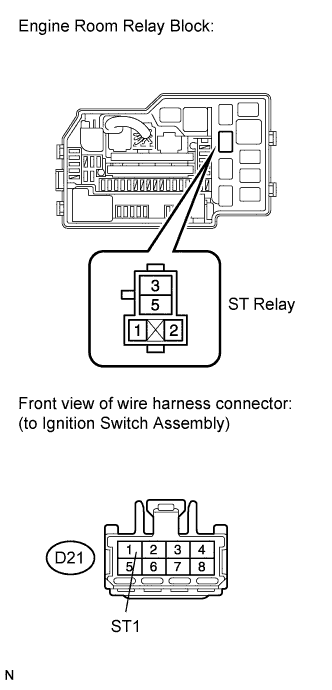
1. INSPECT TERMINAL VOLTAGE (ST RELAY TERMINAL)
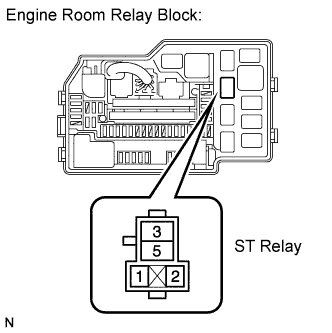
Remove the ST relay from the engine room relay block. Measure the voltage according to the value(s) in the table below.
Standard voltage:
Tester Connection
Condition
Specified Condition
ST relay terminal 1 - Body ground
Engine cranking
9 to 14 V
HINT:
The engine does not crank because the relay is not installed.
Reinstall the ST relay.
NG
OK
2. INSPECT ST RELAY
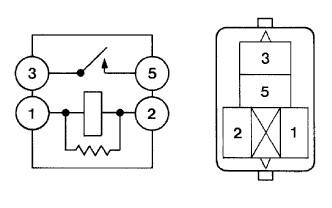
Remove the ST relay from the engine room relay block. Measure the resistance according to the value(s) in the table below.
Standard resistance:
Tester Connection
Condition
Specified Condition
3 - 5
When no battery voltage applied terminals 1 and 2
10 kΩ or higher
3 - 5
When battery voltage applied terminals 1 and 2
Below 1 Ω
Reinstall the ST relay.
NG
OK
3. CHECK HARNESS AND CONNECTOR (ST RELAY - BODY GROUND)
Remove the ST relay from the engine room relay block. Measure the resistance according to the value(s) in the table below.
Standard resistance:
Tester Connection
Condition
Specified Condition
ST relay terminal 2 - Body ground
Always
Below 1 Ω
Reinstall the ST relay.
NG
REPAIR OR REPLACE HARNESS OR CONNECTOR (ST RELAY - BODY GROUND)
OK
4. INSPECT TERMINAL VOLTAGE (ST RELAY TERMINAL)
Remove the ST relay from the engine room relay block. Measure the voltage according to the value(s) in the table below.
Standard voltage:
Tester Connection
Condition
Specified Condition
ST relay terminal 5 - Body ground
Cranking
9 to 14 V
Reinstall the ST relay.
NG
OK
5. CHECK HARNESS AND CONNECTOR (ST RELAY - STARTER)
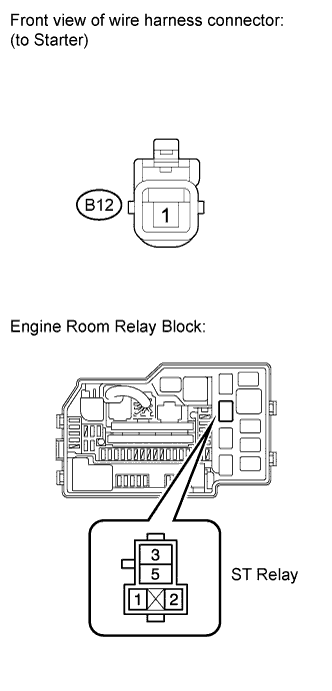
Remove the ST relay from the engine room relay block. Disconnect the starter connector.
Measure the resistance according to the value(s) in the table below.
Standard resistance:
Tester Connection
Condition
Specified Condition
ST relay terminal 3 - B12-1
Always
Below 1 Ω
Reconnect the starter connector.
Reinstall the ST relay.
NG
REPAIR OR REPLACE HARNESS OR CONNECTOR (ST RELAY - STARTER)
OK
REPAIR OR REPLACE STARTER ASSEMBLY
6. CHECK HARNESS AND CONNECTOR (ST RELAY - IGNITION SWITCH ASSEMBLY)
Remove the ST relay from engine room relay block. Disconnect the ignition switch assembly connector.
Measure the resistance according to the value(s) in the table below.
Standard resistance (Check for open):
Tester Connection
Condition
Specified Condition
ST relay terminal 5 - D21-2 (ST2)
Always
Below 1 Ω
Standard resistance (Check for short):
Tester Connection
Condition
Specified Condition
ST relay terminal 5 or D21-2 (ST2) - Body ground
Always
10 kΩ or higher
Reinstall the ST relay.
Reconnect the ignition switch assembly connector.
NG
REPAIR OR REPLACE HARNESS OR CONNECTOR (ST RELAY - IGNITION SWITCH ASSEMBLY)
OK
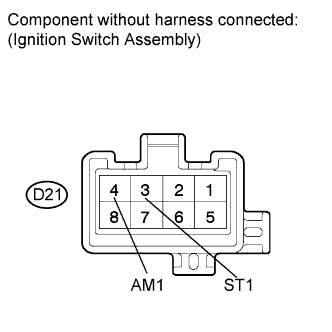
7. INSPECT IGNITION SWITCH ASSEMBLY
Disconnect the ignition switch assembly connector. Measure the resistance according to the value(s) in the table below.
Standard resistance:
Tester Connection
Ignition Switch Position
Specified Condition
All terminals
LOCK
10 kΩ or higher
D21-4 (AM1) - D21-3 (ST1)
START
Below 1 Ω
Reconnect the ignition switch assembly connector.
NG
OK
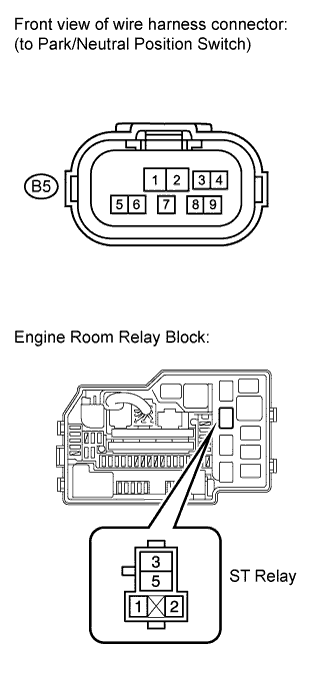
8. CHECK HARNESS AND CONNECTOR (ST RELAY - PARK/NEUTRAL POSITION SWITCH)
Remove the ST relay from the engine relay block. Disconnect the park/neutral position switch connector.
Measure the resistance according to the value(s) in the table below.
Standard resistance (Check for open):
Tester Connection
Condition
Specified Condition
ST relay terminal 2 - B5-5
Always
Below 1 Ω
Standard resistance (Check for short):
Tester Connection
Condition
Specified Condition
ST relay terminal 2 or B5-5 - Body ground
Always
10 kΩ or higher
Reinstall the ST relay.
Reconnect the park/neutral position switch connector.
NG
REPAIR OR REPLACE HARNESS OR CONNECTOR (ST RELAY - PARK/NEUTRAL POSITION SWITCH)
OK
9. INSPECT PARK/NEUTRAL POSITION SWITCH
Inspect the park/neutral position switch (U151E: Click here , U151F: Click here ).
Result:
Result
Proceed To
OK
A
NG (with U151E)
B
NG (with U151F)
C
B
C
A
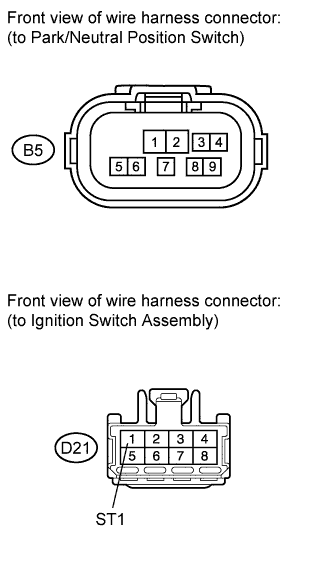
10. CHECK HARNESS AND CONNECTOR (PARK/NEUTRAL POSITION SWITCH - IGNITION SWITCH ASSEMBLY)
Disconnect the park/neutral position switch connector. Disconnect the ignition switch assembly connector.
Measure the resistance according to the value(s) in the table below.
Standard resistance (Check for open):
Tester Connection
Condition
Specified Condition
B5-4 - D21-3 (ST1)
Always
Below 1 Ω
Standard resistance (Check for short):
Tester Connection
Condition
Specified Condition
B5-4 or D21-3 (ST1) - Body ground
Always
10 kΩ or higher
Reconnect the park/neutral position switch connector.
Reconnect the ignition switch assembly connector.
NG
REPAIR OR REPLACE HARNESS OR CONNECTOR (PARK/NEUTRAL POSITION SWITCH - IGNITION SWITCH ASSEMBLY)
OK
11. INSPECT IGNITION SWITCH ASSEMBLY
Disconnect the ignition switch assembly connector. Measure the resistance according to the value(s) in the table below.
Standard resistance:
Tester Connection
Ignition Switch Position
Specified Condition
All terminals
LOCK
10 kΩ or higher
D21-4 (AM1) - D21-3 (ST1)
START
Below 1 Ω
Reconnect the ignition switch assembly connector.
NG
OK
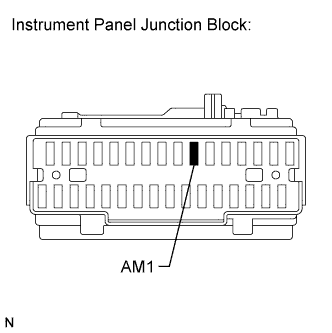
12. INSPECT FUSE (AM1 FUSE)
Remove the AM1 fuse from the instrument panel junction block. Measure the resistance according to the value(s) in the table below.
Standard resistance:
Tester Connection
Condition
Specified Condition
AM1 fuse
Always
Below 1 Ω
Reinstall the AM1 fuse.
NG
OK
REPAIR OR REPLACE HARNESS OR CONNECTOR (IGNITION SWITCH ASSEMBLY - BATTERY)