 |
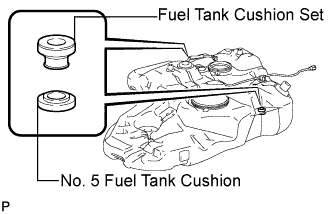
Install the fuel tank cushion sets and No. 5 fuel tank cushions.
FUEL TANK > INSTALLATION |
| 1. INSTALL FUEL TANK CUSHION SET |
|
Install the fuel tank cushion sets and No. 5 fuel tank cushions.
| 2. INSTALL FUEL TANK SIDE PLATE |
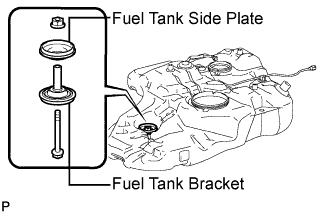 |
Install the fuel tank side plate and the fuel tank bracket with the bolt and nut.
| 3. INSTALL TANK SUCTION TUBE SUPPORT |
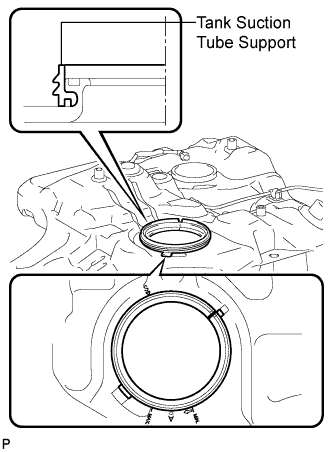 |
Install a new tank suction tube support as shown in the illustration.
| 4. INSTALL FUEL TANK OVER FILL CHECK VALVE ASSEMBLY |
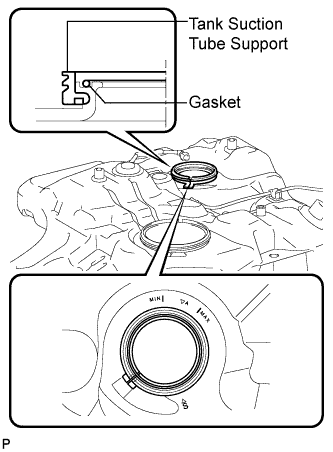 |
Install a new tank suction tube support and new gasket as shown in the illustration.
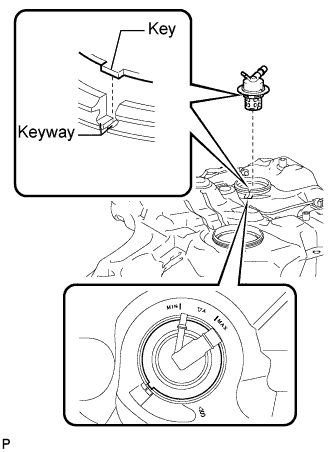 |
Attach the fuel tank over fill check valve assembly to the fuel tank.
Align the keyway of the fuel suction tube support with the key of the fuel tank over fill check valve assembly.
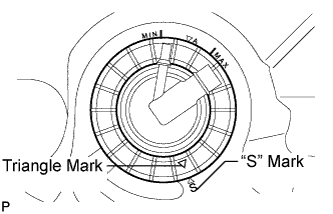 |
Align the triangle mark on a new fuel pump gauge retainer with the "S" mark, and attach the fuel pump gauge retainer.
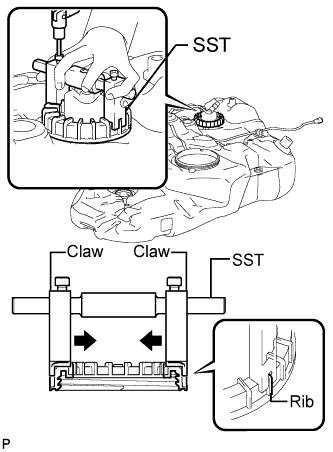 |
Using a 6 mm socket hexagon wrench, install SST to the fuel pump gauge retainer.
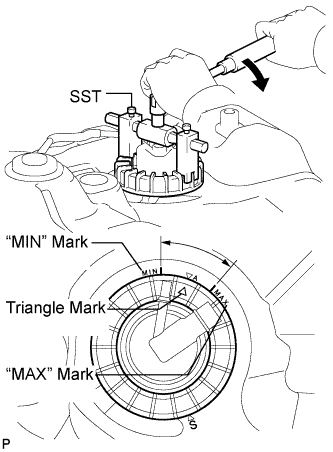 |
Rotate the fuel pump gauge retainer by hand, then tighten it one complete turn and another half turn using SST. The triangle mark on the fuel pump gauge retainer must be positioned between the "MIN" and "MAX" marks on the fuel tank.
| 5. INSTALL FUEL TANK VENT HOSE |
Connect the No. 1 evaporation vent tube.
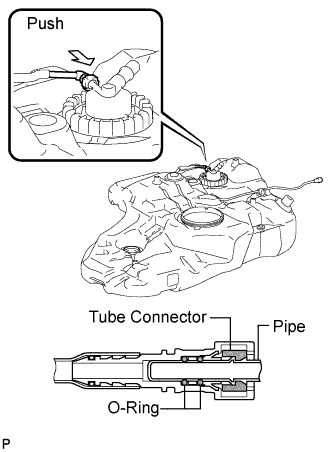 |
Align the axis of the connector with the axis of the pipe. Push the pipe into the connector until the connector makes a click sound. If the connection is too tight, apply a small amount of fresh engine oil to the tip of the pipe.
Connect the fuel tank vent hose.
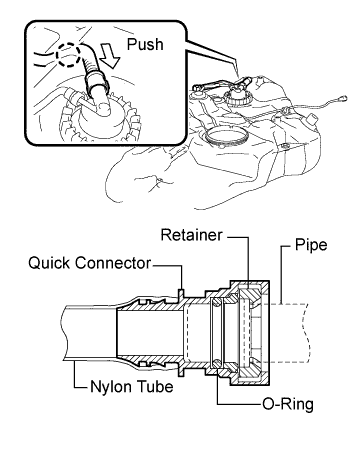 |
Align the axis of the connector with the axis of the pipe. Push the pipe into the connector until the connector makes a click sound. If the connection is too tight, apply a small amount of fresh engine oil to the tip of the pipe.
Install the fuel tank vent hose, and engage the claw.
| 6. INSTALL FUEL TANK TO FILLER PIPE HOSE |
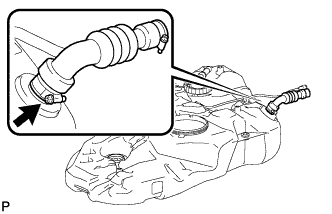 |
Install the fuel tank to filler pipe hose with the hose clamp.
| 7. INSTALL FUEL PUMP TUBE SUB-ASSEMBLY |
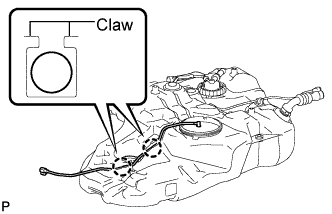 |
Install the fuel pump tube, and engage the 2 claws.
| 8. INSTALL NO. 1 FUEL TANK CUSHION |
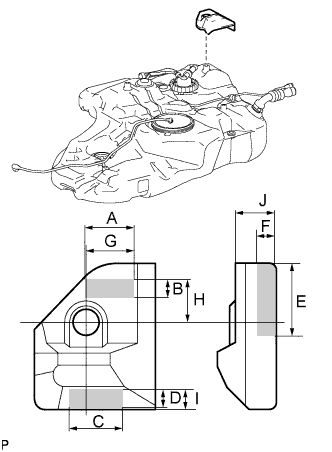 |
Apply new butyl tape to the positions of the No. 1 fuel tank cushion as shown in the illustration.
| Dimension | Length |
| A | 55 mm (2.17 in.) |
| B | 20 mm (0.79 in.) |
| C | 60 mm (2.36 in.) |
| D | 20 mm (0.79 in.) |
| E | 80 mm (3.15 in.) |
| F | 20 mm (0.79 in.) |
| G | 53.4 mm (2.10 in.) |
| H | 49.2 mm (1.94 in.) |
| I | 18.9 mm (0.74 in.) |
| J | 43.3 mm (1.70 in.) |
Install the No. 1 fuel tank cushion.
| 9. INSTALL REAR FUEL TANK SIDE PLATE |
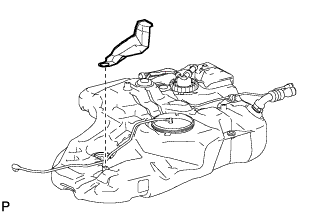 |
Install the rear fuel tank side plate.
| 10. INSTALL FUEL TANK ASSEMBLY |
Set the fuel tank onto a transmission jack.
Operating the transmission jack, install the fuel tank.
Tighten the 2 nuts.
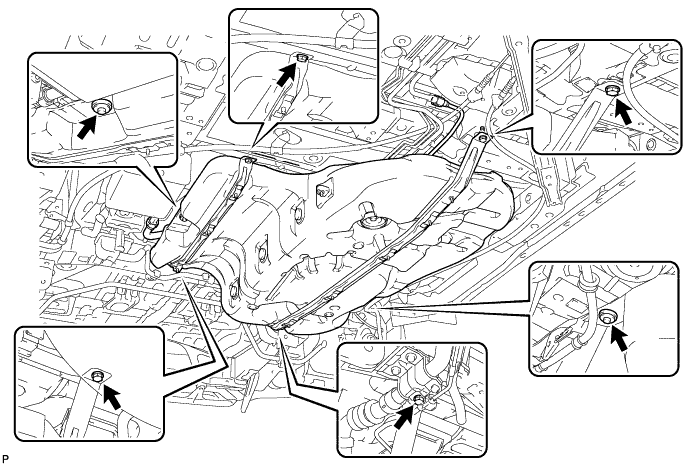
Install the 2 fuel tank bands with the 4 bolts.
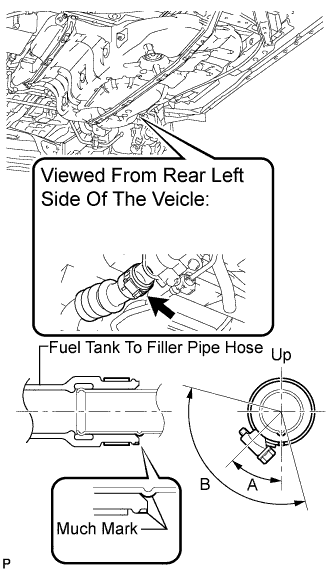 |
Align the matchmarks and install the fuel tank to filler pipe hose to the fuel tank.
Install the hose clamp within the range shown in the illustration.
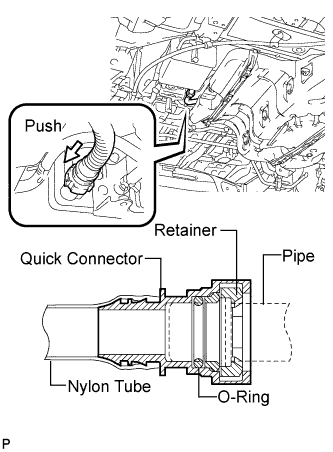 |
Connect the fuel tank vent hose.
Align the quick connector with the pipe, then push in the quick connector until the retainer makes a click sound to connect the charcoal canister fuel hose to the charcoal canister assembly.
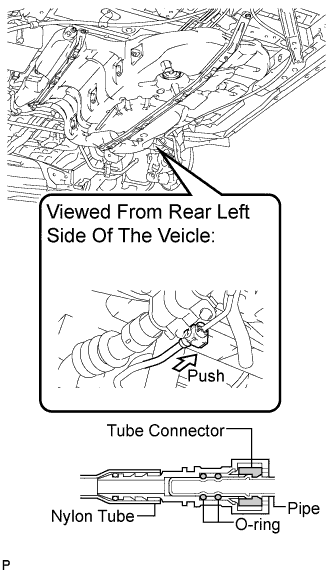 |
Connect the No. 3 fuel tank breather tube.
Push the quick connector to the pipe until it makes a click sound.
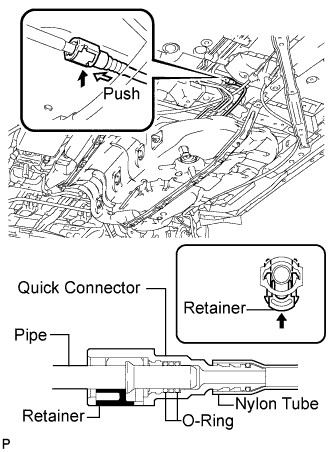 |
Connect the fuel pump tube.
Push the quick connector and push in the retainer to lock the claws.
| 11. INSTALL NO. 1 FUEL TANK PROTECTOR SUB-ASSEMBLY |
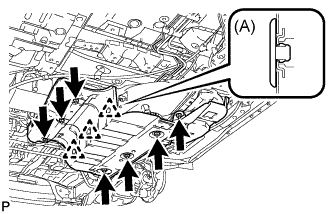 |
Install the No. 1 fuel tank protector sub-assembly with the 7 nuts.
Install 3 new clips (A).
| 12. TEMPORARILY INSTALL REAR SUSPENSION MEMBER (for 4WD) |
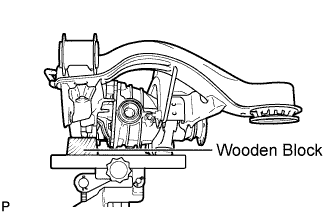 |
Support the rear suspension member with a jack using a wooden block.
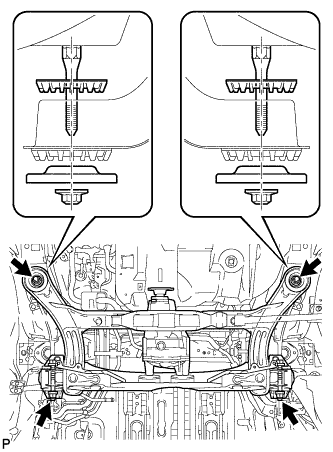 |
Raise the rear suspension member with a jack.
Temporarily install the rear suspension member, the 2 rear upper suspension member stoppers and rear lower suspension member stopper retainers with the 4 nuts and the 2 bolts.
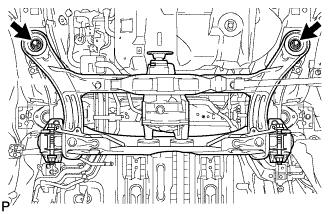 |
Fully tighten the 2 nuts.
| 13. FULLY TIGHTEN REAR SUSPENSION MEMBER (for 4WD) |
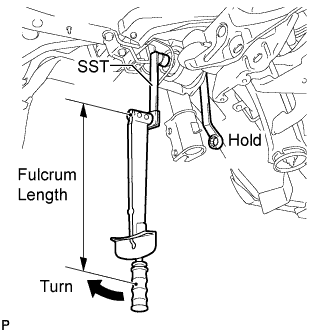 |
Using SST and a socket wrench (19 mm), fully tighten the nut (LH side).
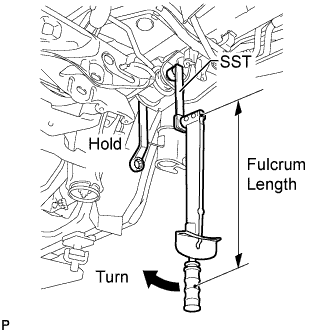 |
Using SST and a socket wrench (19 mm), fully tighten the nut (RH side).
| 14. INSTALL REAR DRIVE SHAFT SNAP RING LH (for 4WD) |
| 15. INSTALL REAR DRIVE SHAFT ASSEMBLY LH (for 4WD) |
| 16. INSTALL REAR DRIVE SHAFT SNAP RING RH (for 4WD) |
| 17. INSTALL REAR DRIVE SHAFT ASSEMBLY RH (for 4WD) |
| 18. INSTALL REAR DIFFERENTIAL DRAIN PLUG (for 4WD) |
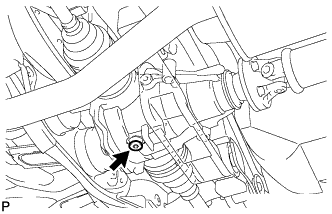 |
Using a hexagon wrench (10 mm), install the filler plug with a new gasket.
| 19. ADD DIFFERENTIAL OIL (for 4WD) |
Fill the rear differential carrier assembly with hypoid gear oil.
| 20. INSPECT DIFFERENTIAL OIL (for 4WD) |
| 21. INSTALL REAR DIFFERENTIAL FILLER PLUG (for 4WD) |
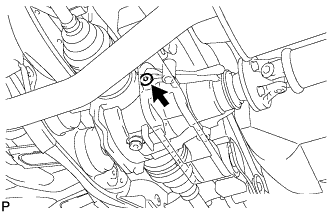 |
Using a hexagon wrench (10 mm), install the filler plug with a new gasket.
| 22. TEMPORARILY INSTALL REAR NO. 1 SUSPENSION ARM ASSEMBLY RH (for 4WD) |
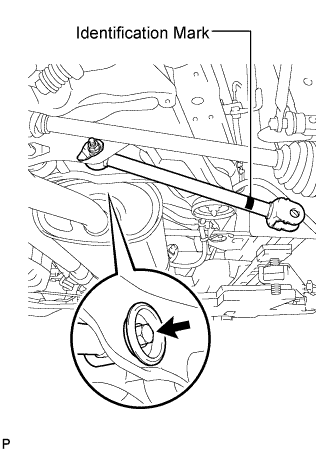 |
Temporarily install the rear No. 1 suspension arm assembly RH to the rear suspension member sub-assembly with the bolt and the nut.
| 23. TEMPORARILY INSTALL REAR NO. 2 SUSPENSION ARM ASSEMBLY LH (for 4WD) |
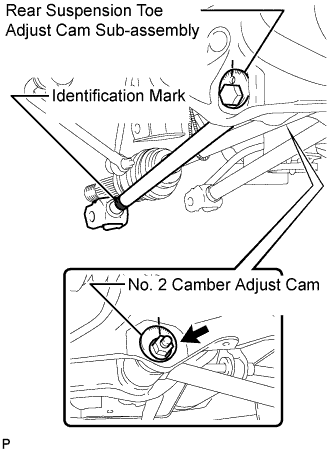 |
Temporarily install the rear No. 2 suspension arm assembly LH to the rear suspension member sub-assembly with the rear suspension toe adjust cam sub-assembly, the No. 2 camber adjust cam and the nut.
| 24. TEMPORARILY INSTALL REAR NO. 2 SUSPENSION ARM ASSEMBLY RH (for 4WD) |
| 25. INSTALL REAR AXLE CARRIER SUB-ASSEMBLY LH (for 4WD) |
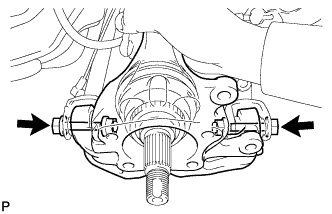 |
Temporarily install the the rear axle carrier sub-assembly with the 2 bolts and the 2 nuts.
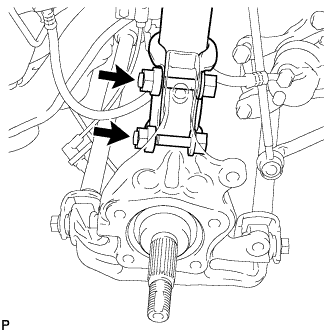 |
Install the rear axle carrier sub-assembly with the 2 bolts and the 2 nuts.
| 26. INSTALL REAR AXLE CARRIER SUB-ASSEMBLY RH (for 4WD) |
| 27. TEMPORARILY INSTALL REAR STRUT ROD ASSEMBLY LH (for 4WD) |
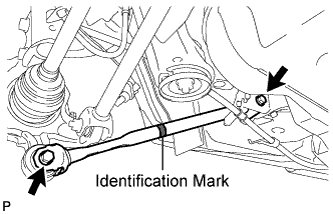 |
Check that the identification mark of the rear strut rod assembly is positioned on the inner side of the vehicle.
Temporarily install the rear strut rod assembly with the 2 bolts and the 2 nuts.
| 28. TEMPORARILY INSTALL REAR STRUT ROD ASSEMBLY RH (for 4WD) |
| 29. INSTALL REAR AXLE HUB AND BEARING ASSEMBLY LH (for 4WD) |
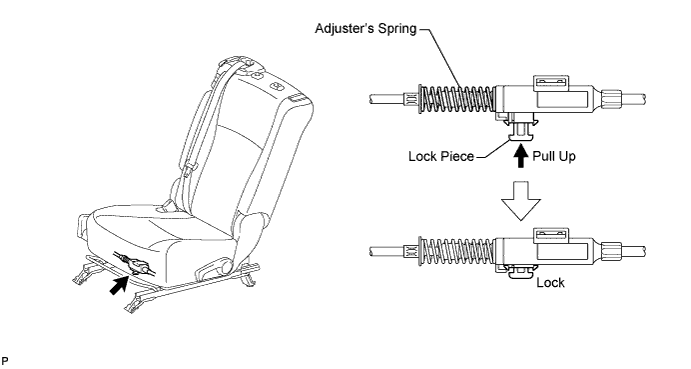
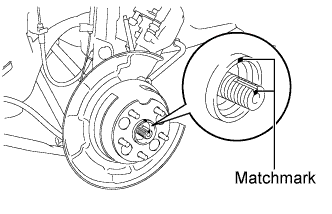 |
Align the matchmarks on the drive shaft and rear axle hub.
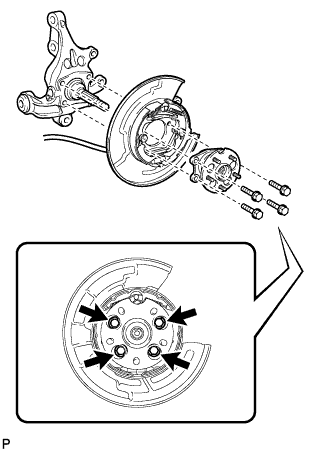 |
Install the parking brake assembly and the rear axle hub and bearing assembly with the 4 bolts.
| 30. INSTALL REAR AXLE HUB AND BEARING ASSEMBLY RH (for 4WD) |
| 31. INSTALL REAR DISC (for 4WD LH Side) |
| 32. INSTALL REAR DISC (for 4WD RH Side) |
| 33. INSTALL REAR DISC BRAKE CALIPER ASSEMBLY LH (for 4WD) |
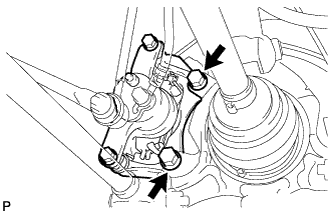 |
Install the rear disc brake caliper assembly with the 2 bolts.
| 34. INSTALL REAR DISC BRAKE CALIPER ASSEMBLY RH (for 4WD) |
| 35. TEMPORARILY INSTALL REAR AXLE SHAFT NUT LH (for 4WD) |
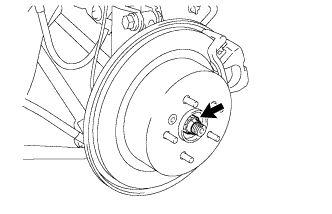 |
Clean the threaded parts on the rear drive shaft assembly and rear axle shaft nut using a non-residue solvent.
While applying the brakes, temporarily install a new rear axle shaft nut.
| 36. TEMPORARILY INSTALL REAR AXLE SHAFT NUT RH (for 4WD) |
| 37. INSTALL REAR SPEED SENSOR LH (for 4WD) |
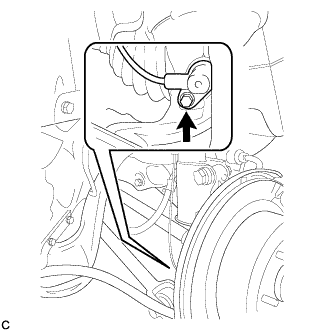 |
Install the rear speed sensor to the rear axle carrier sub-assembly with the bolt .
| 38. INSTALL REAR SPEED SENSOR RH (for 4WD) |
| 39. STABILIZE SUSPENSION (for 4WD) |
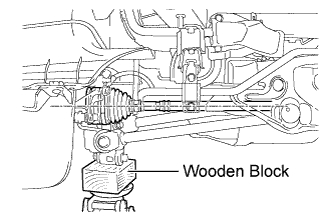 |
Jack up the rear axle carrier sub-assembly, placing a wooden block underneath to avoid damage. Apply load to the suspension so that the rear drive shaft assembly is positioned horizontally.
| 40. FULLY TIGHTEN REAR NO. 1 SUSPENSION ARM ASSEMBLY LH (for 4WD) |
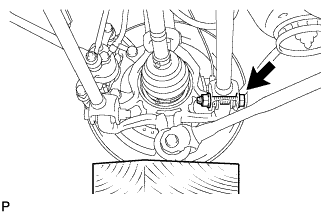 |
Fully tighten the rear No. 1 suspension arm assembly with the bolt and nut.
| 41. FULLY TIGHTEN REAR NO. 1 SUSPENSION ARM ASSEMBLY RH (for 4WD) |
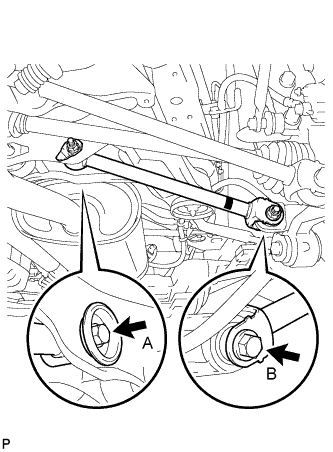 |
Fully tighten the 2 bolts.
| 42. FULLY TIGHTEN REAR NO. 2 SUSPENSION ARM ASSEMBLY LH (for 4WD) |
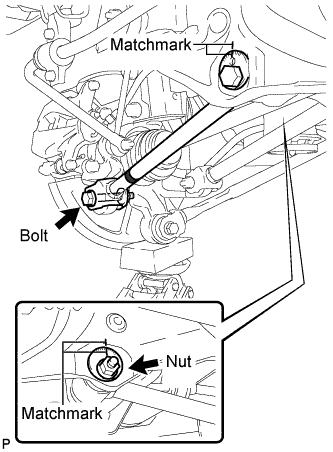 |
Align the matchmarks on the adjust cams and rear suspension member sub-assembly.
Fully tighten the nut.
Fully tighten the bolt.
| 43. FULLY TIGHTEN REAR NO. 2 SUSPENSION ARM ASSEMBLY RH (for 4WD) |
| 44. FULLY TIGHTEN REAR STRUT ROD ASSEMBLY LH (for 4WD) |
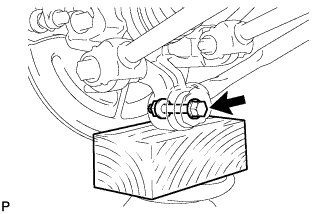 |
Fully tighten the bolt.
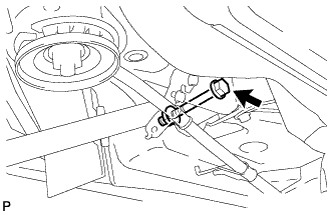 |
Fully tighten the bolt.
| 45. FULLY TIGHTEN REAR STRUT ROD ASSEMBLY RH (for 4WD) |
| 46. INSTALL NO. 3 PARKING BRAKE CABLE ASSEMBLY (for 4WD) |
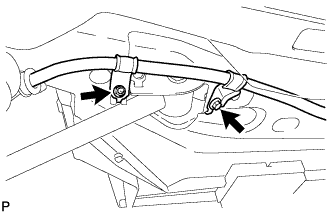 |
Install the No. 3 parking brake cable assembly with the bolt and the nut.
| 47. INSTALL NO. 2 PARKING BRAKE CABLE ASSEMBLY (for 4WD) |
| 48. SEPARATE REAR DISC BRAKE CALIPER ASSEMBLY LH (for 4WD) |
|
Remove the 2 bolts and separate the rear disc brake caliper assembly.
| 49. SEPARATE REAR DISC BRAKE CALIPER ASSEMBLY RH (for 4WD) |
| 50. REMOVE REAR DISC (for 4WD LH Side) |
| 51. REMOVE REAR DISC (for 4WD RH Side) |
| 52. INSPECT REAR AXLE HUB BEARING LOOSENESS (for 4WD LH Side) |
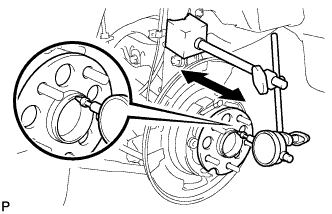 |
Using a dial indicator, check for looseness near the center of the rear axle hub and bearing assembly.
| 53. INSPECT REAR AXLE HUB BEARING LOOSENESS (for 4WD RH Side) |
| 54. INSPECT REAR AXLE HUB RUNOUT (for 4WD LH Side) |
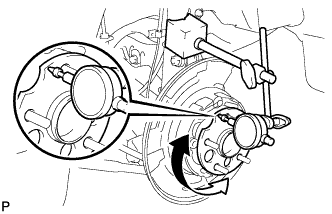 |
Using a dial indicator, check for runout on the surface of the rear axle hub and bearing assembly outside the rear axle hub bolt.
| 55. INSPECT REAR AXLE HUB RUNOUT (for 4WD RH Side) |
| 56. INSTALL REAR DISC (for 4WD LH Side) |
| 57. INSTALL REAR DISC (for 4WD RH Side) |
| 58. INSTALL REAR DISC BRAKE CALIPER ASSEMBLY LH (for 4WD) |
|
Install the rear disc brake caliper assembly with the 2 bolts.
| 59. INSTALL REAR DISC BRAKE CALIPER ASSEMBLY RH (for 4WD) |
| 60. INSTALL REAR AXLE SHAFT NUT LH (for 4WD) |
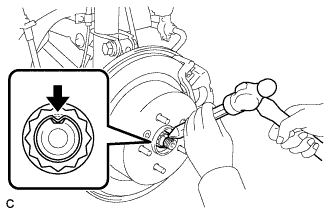 |
Using a chisel and a hammer, stake the rear axle shaft nut.
| 61. INSTALL REAR AXLE SHAFT NUT RH (for 4WD) |
| 62. INSTALL REAR WHEELS (for 4WD) |
| 63. INSTALL NO. 3 FRONT FLOOR HEAT INSULATOR |
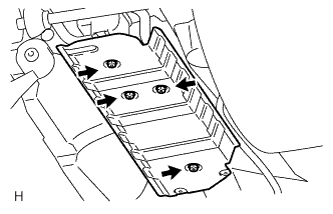 |
Install the No. 3 front floor heat insulator with the 4 bolts.
| 64. INSTALL NO. 4 EXHAUST PIPE SUPPORT BRACKET |
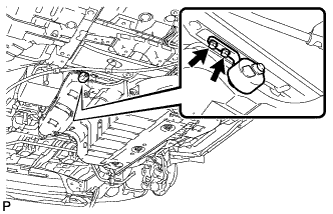 |
Install the No. 4 exhaust pipe support bracket with the 2 bolts.
| 65. INSTALL CENTER EXHAUST PIPE ASSEMBLY |
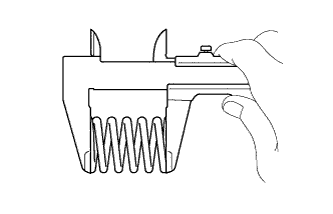 |
Using vernier calipers, measure the free length of the compression spring.
| Minimum | 41.5 mm (1.63 in.) |
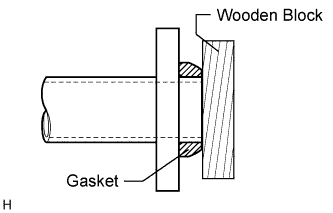 |
Using a plastic-faced hammer and wooden block, tap in a new gasket until its surface is flush with the front No. 3 exhaust pipe sub-assembly.
Connect the 3 exhaust pipe supports, and install the center exhaust pipe assembly.
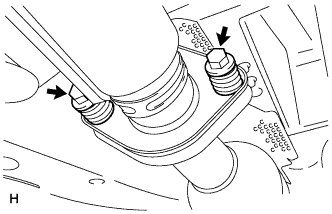 |
Install the 2 compression springs and 2 bolts.
| 66. INSTALL TAIL EXHAUST PIPE ASSEMBLY |
|
Using vernier calipers, measure the free length of the compression spring.
| Minimum | 40.5 mm (1.59 in.) |
|
Using a plastic-faced hammer and wooden block, tap in a new gasket until its surface is flush with the center exhaust pipe assembly.
Connect the exhaust pipe support, and install the tail exhaust pipe assembly.
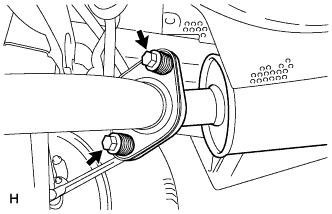 |
Install the 2 compression springs and 2 bolts.
| 67. TEMPORARILY TIGHTEN PROPELLER WITH CENTER BEARING SHAFT ASSEMBLY (for 4WD) |
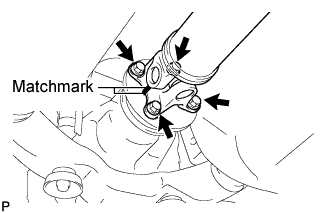 |
Align the matchmarks on the propeller shaft flange and differential companion flange, and connect the shaft with the 4 bolts, 4 washers and 4 nuts.
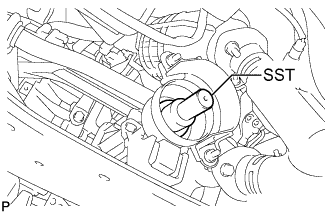 |
Remove SST from the transaxle.
Insert the yoke into the transaxle.
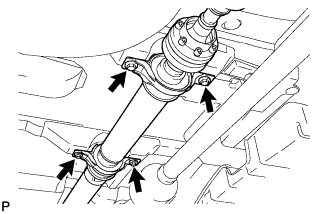 |
Install the 4 adjusting shims and propeller shaft with center bearing, and temporarily tighten the 4 bolts.
|
Tighten the 4 bolts.
| 68. FULLY TIGHTEN PROPELLER WITH CENTER BEARING SHAFT ASSEMBLY (for 4WD) |
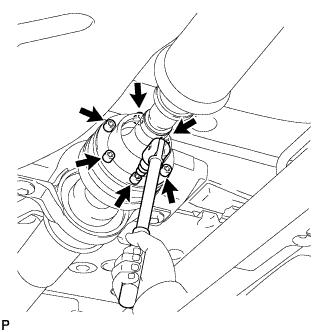 |
Remove the piece of cloth from the joint.
Using a hexagon wrench (6 mm), tighten the 6 bolts.
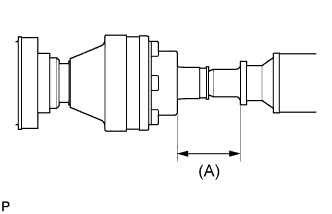 |
With the vehicle unloaded, adjust the dimension between the rear side of the cover and shaft as shown in the illustration.
Under the same condition as above, adjust the front and rear dimensions between the edge surface of the center support bearing and the edge surface of the cushion respectively as shown, and then tighten the bolts.
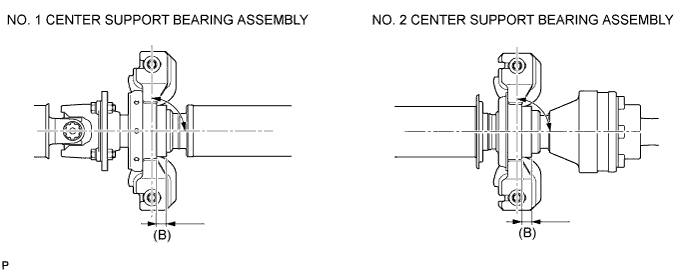
Check that the center line of the bracket is at the right angle in the shaft axial direction.
If any vibration or noise occurs, perform joint angle check as follows and replace the adjusting shim with a proper one.
Turn the propeller shaft several times by hand to stabilize the center support bearings.
Using a jack, raise and lower the differential to stabilize the differential mounting cushion.
Remove the transfer dynamic damper.
Using SST, measure the transfer installation angle (A) and front propeller shaft installation angle (B).
Using SST, measure the rear propeller shaft installation angle (C) and rear differential shaft installation angle (D).
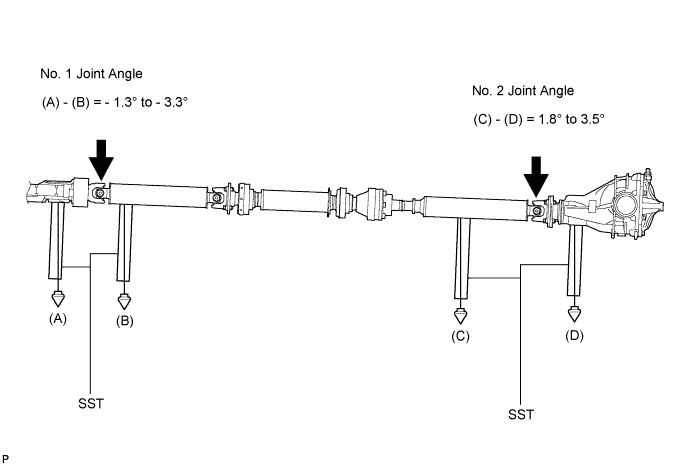
| Thickness mm (in.) | Thickness mm (in.) |
| 3.2 (0.126) | 11.0 (0.433) |
| 4.5 (0.177) | 13.5 (0.531) |
| 6.5 (0.256) | 15.5 (0.610) |
| 9.0 (0.354) | 17.5 (0.689) |
Install the transfer dynamic damper.
| 69. INSTALL FRONT CENTER FLOOR COVER |
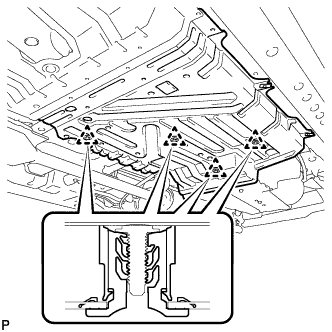 |
Engage the 4 clips to install the center front floor cover.
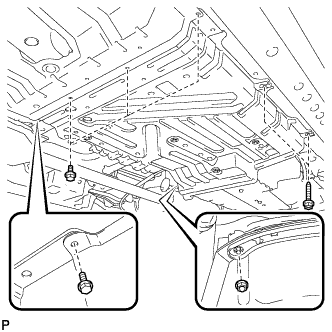 |
Install the 4 bolts, 2 screws, and the nut.
| 70. INSTALL FUEL SUCTION TUBE ASSEMBLY WITH PUMP AND GAUGE |
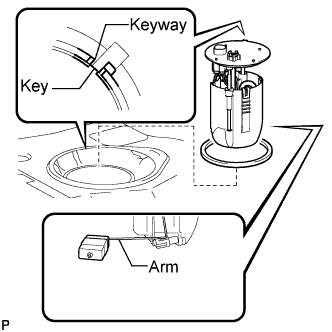 |
Install a new gasket to the fuel tank.
Attach the fuel suction tube with pump and gauge to the fuel tank.
Align the keyway of the fuel suction tube support with the key of the fuel suction tube with pump and gauge.
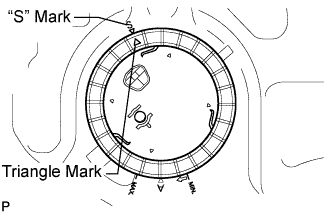 |
Align the triangle mark on a new fuel pump gauge retainer with the "S" mark on the fuel tank while pushing down the fuel suction tube with pump and gauge, and attach the fuel pump gauge retainer.
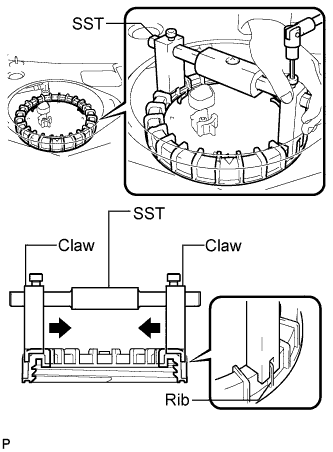 |
Using a 6 mm socket hexagon wrench, install SST to the fuel pump gauge retainer.
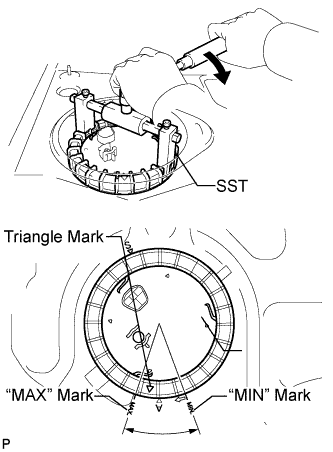 |
Rotate the fuel pump gauge retainer by hand, then tighten it one complete turn and another half turn using SST. The triangle mark on the fuel pump gauge retainer must be positioned between the "MIN" and "MAX" marks on the fuel tank.
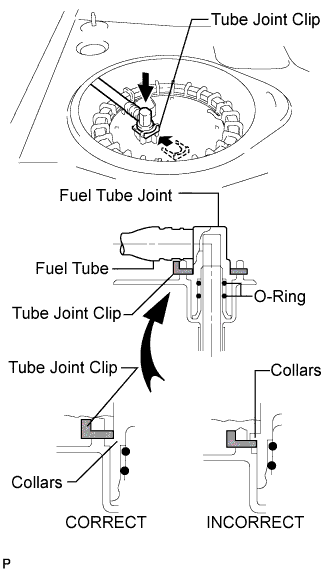 |
Install the fuel pump tube and the tube joint clip.
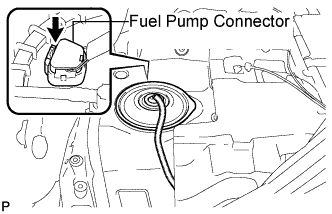
Connect the fuel pump connector.
| 71. CONNECT CABLE TO NEGATIVE BATTERY TERMINAL |
| 72. INSPECT FOR FUEL LEAK |
Check fuel pump operation.
Connect Techstream to the DLC3.
Turn the ignition switch on (IG) and turn the tester main switch on.
Select the following menu items: DIAGNOSIS / ENHANCED OBD II / ACTIVE TEST / FUEL PUMP / SPD.
Check for pressure in the fuel inlet tube from the fuel line. Check that sounds of fuel flowing from the fuel tank can be heard. If no sounds can be heard, check the integration relay, fuel pump, ECM and wiring connectors.
Check for fuel leaks.
Check that there are no fuel leaks from the fuel system after doing any maintenance or repairs. If there is a fuel leak, repair or replace parts as necessary.
Turn the ignition switch off.
Disconnect Techstream from the DLC3.
| 73. DISCONNECT CABLE FROM NEGATIVE BATTERY TERMINAL |
| 74. INSTALL REAR FLOOR SERVICE HOLE COVER |
 |
Install new butyl tape to the rear floor service hole cover.
Install the rear floor service hole cover.
Install the front floor carpet.
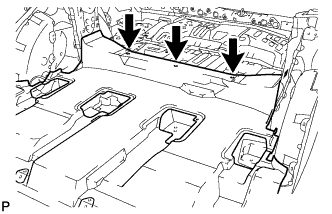 |
Install the front floor carpet with the 3 clips. (w/ rear No. 2 seat)
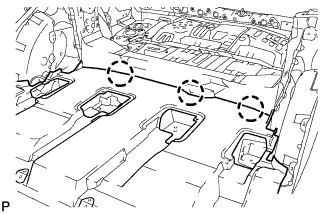 |
Engage the 3 claws to install the front floor carpet. (w/o rear No. 2 seat)
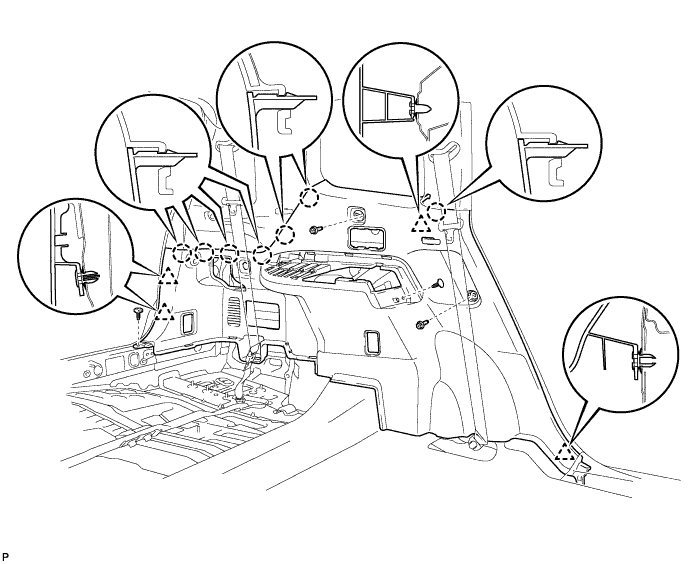
| 75. INSTALL DECK TRIM SIDE PANEL ASSEMBLY LH |
Engage the 4 clips and the 7 claws.
Install the 2 clips.
Install the deck trim side panel assembly LH with the 2 bolts.
| 76. INSTALL REAR NO. 1 SEAT OUTER BELT ASSEMBLY LH |
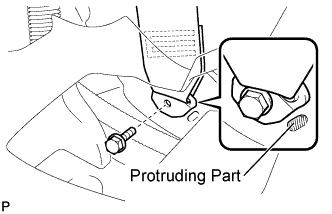 |
Connect the floor anchor end of the rear No. 1 seat outer belt assembly and install the bolt.
| 77. INSTALL FRONT DECK SIDE TRIM COVER LH |
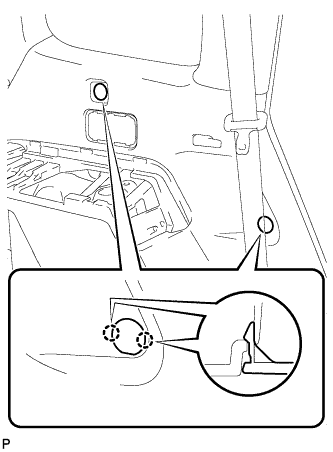 |
Engage the 4 claws and install the 2 front deck side trim covers LH.
| 78. INSTALL NO. 2 DECK SIDE TRIM HOOK |
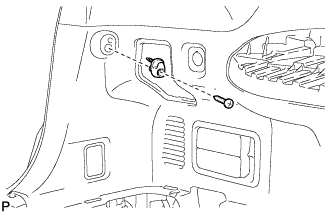 |
Install the No. 2 deck side trim hook with the screw.
| 79. INSTALL ROPE HOOK ASSEMBLY (for LH Side) |
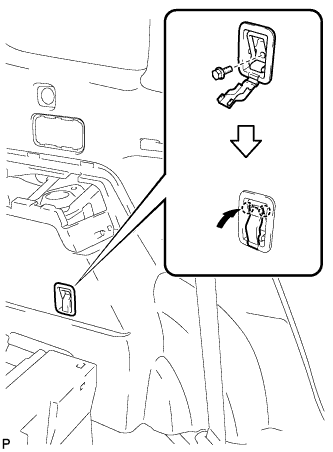 |
for Front Side:
Install the rope hook assembly with the bolt.
Engage the 2 claws.
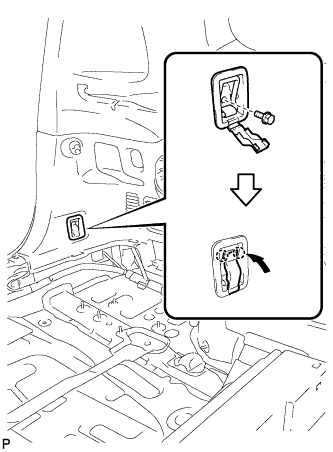 |
for Rear Side:
Install the rope hook assembly with the bolt.
Engage the 2 claws.
| 80. INSTALL REAR DECK TRIM COVER (w/o Remote Folding Function) |
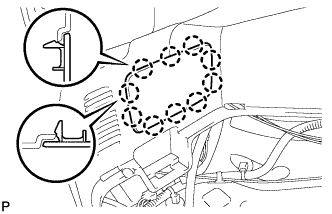 |
Engage the 10 claws and install the rear deck trim cover.
| 81. INSTALL RECLINING REMOTE CONTROL LEVER BEZEL LH (w/ Remote Folding Function) |
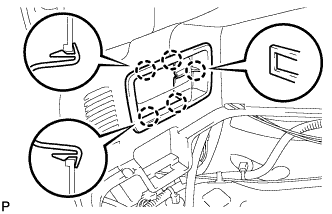 |
Engage the 5 claws and install the reclining remote control bezel LH.
| 82. INSTALL REAR POWER OUTLET SOCKET COVER |
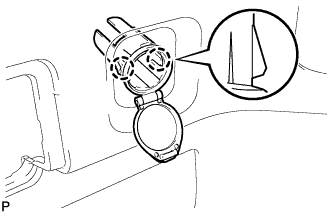 |
Engage the 2 claws and install the rear power outlet socket cover.
| 83. INSTALL REAR POWER POINT SOCKET ASSEMBLY |
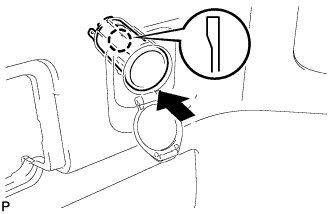 |
Engage the claw and install the rear power point socket assembly.
Connect the connector.
| 84. INSTALL REAR COMBINATION LIGHT SERVICE COVER LH |
|
Engage the claw and install the rear power point socket assembly.
Connect the connector.
| 85. INSTALL SIDE TRIM COVER LH (w/o Rear Seat Entertainment System) |
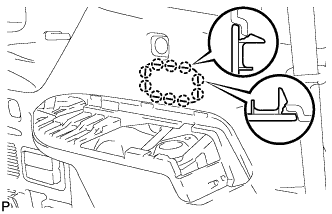 |
Engage the 10 claws and install the side trim cover LH.
| 86. INSTALL POWER OUTLET SOCKET BEZEL (w/ Rear Seat Entertainment System) |
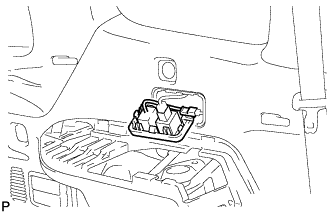 |
Connect each connector.
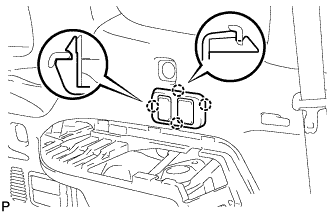 |
Engage the 4 claws and install the power outlet socket bezel.
| 87. INSTALL DECK SIDE TRIM COVER LH |
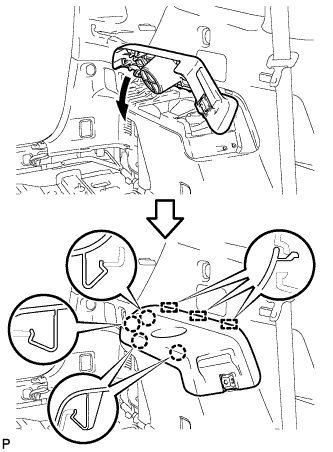 |
Engage the 3 guides and 4 claws as shown in the illustration.
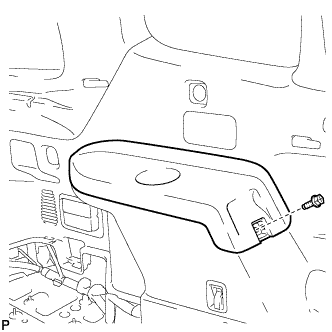 |
Install the deck side trim LH with the bolt.
| 88. INSTALL DECK SIDE TRIM COVER LH |
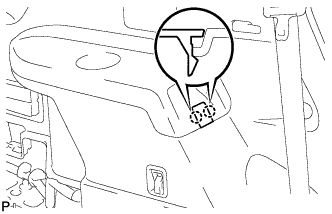 |
Engage the 2 claws and install the deck side trim cover LH.
| 89. INSTALL REAR FLOOR FINISH PLATE |
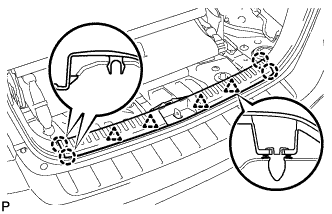 |
Engage the 4 clips and the 4 claws, and install the rear floor finish plate.
| 90. INSTALL REAR NO. 2 SEAT ASSEMBLY (w/ Rear No. 2 Seat) |
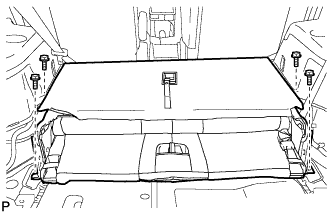 |
Install the rear No. 2 seat assembly with the 4 bolts.
| 91. CONNECT REAR SEAT LAP TYPE BELT ASSEMBLY LH |
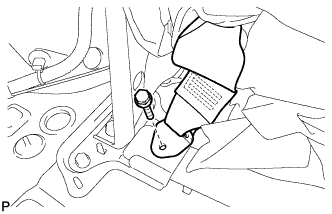 |
Install the rear seat lap type belt assembly LH with the bolt.
| 92. CONNECT REAR SEAT LAP TYPE BELT ASSEMBLY RH (w/ Rear No. 2 Seat) |
Install the rear seat lap type belt assembly RH with the bolt.
| 93. INSTALL REAR NO. 2 SEAT INNER BELT ASSEMBLY (w/ Rear No. 2 Seat) |
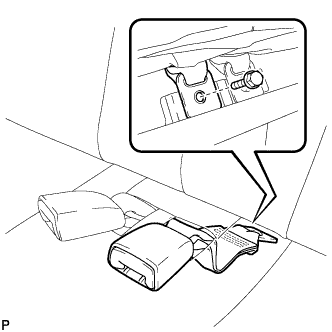 |
Install the rear No. 2 seat inner belt assembly with the bolt.
| 94. INSTALL REAR DECK FLOOR BOX (w/o Rear No. 2 Seat) |
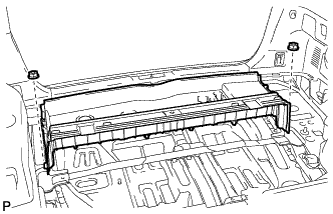 |
Install the rear deck floor box with the 2 nuts.
| 95. INSTALL DECK FLOOR BOARD ASSEMBLY (w/o Rear No. 2 Seat) |
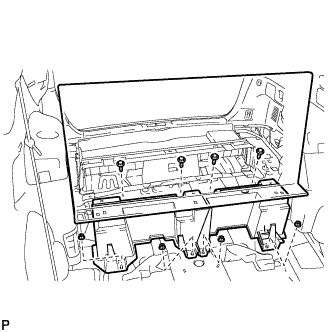 |
Install the rear deck floor board assembly with the 4 nuts and 4 bolts.
| 96. INSTALL REAR MAT |
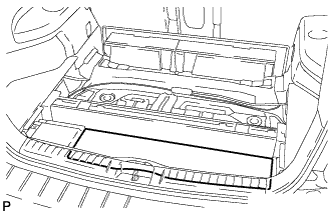 |
Install the rear mat.
| 97. INSTALL DECK FLOOR BOARD ASSEMBLY |
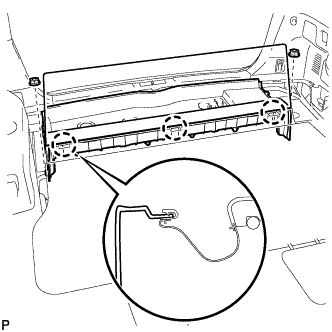 |
Install the 2 nuts and the deck floor board assembly.
Engage the 3 claws.
| 98. INSTALL DECK SIDE TRIM BOX LH |
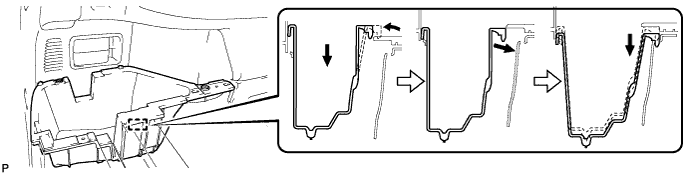
Install the deck side trim box LH as shown in the illustration.
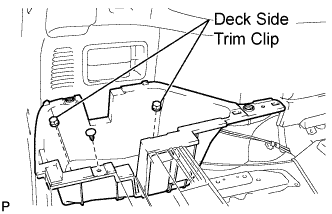 |
Install the 2 deck side trim clip and the clips.
| 99. INSTALL REAR SEAT SIDE COVER LH (w/ Rear No. 2 Seat) |
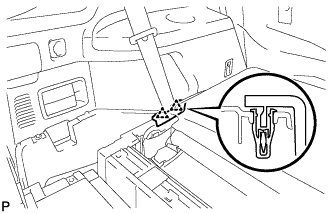 |
Engage the 2 clips and install the rear seat side cover LH.
| 100. INSTALL DECK SIDE TRIM BOX RH |
Install the deck side trim box RH as shown in the illustration.
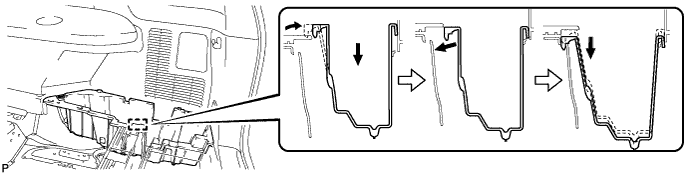
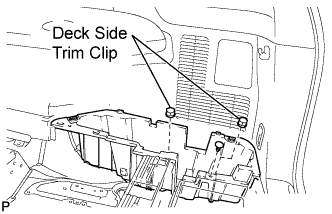 |
Install the 2 deck side trim clip and the clip.
| 101. INSTALL JACK CARRIER ASSEMBLY |
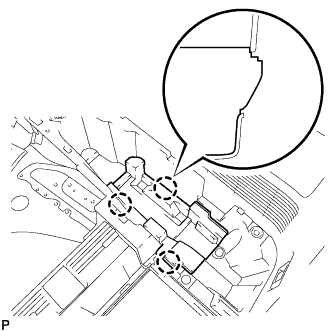 |
Engage the 3 claws, and install the jack carrier assembly.
| 102. INSTALL JACK ASSEMBLY |
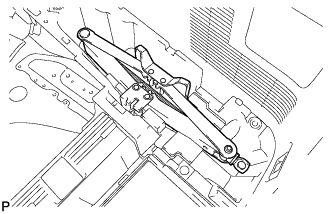 |
Install the jack assembly.
| 103. INSTALL JACK CARRIER CUSHION |
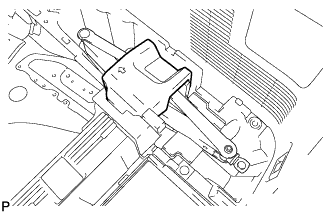 |
Install the jack carrier cushion.
| 104. INSTALL JACK CARRIER SUPPORT |
| 105. INSTALL REAR SEAT SIDE COVER RH (w/ Rear No. 2 Seat) |
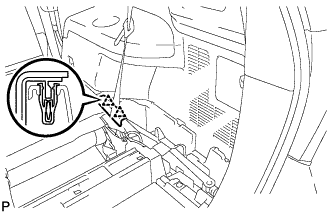 |
Engage the 2 clips and install the rear seat side cover RH.
| 106. INSTALL REAR NO. 1 FLOOR BOARD (w/o Rear No. 2 Seat) |
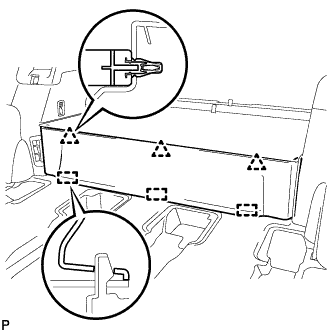 |
Engage the 3 guides and 3 clips and install the rear No. 1 floor board.
| 107. INSTALL TONNEAU COVER ASSEMBLY |
| 108. INSTALL NO. 2 DECK BOARD SUB-ASSEMBLY |
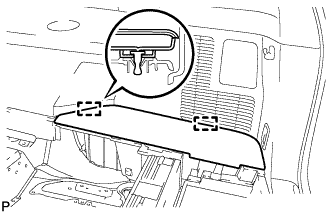 |
Engage the 2 guides and install the No. 2 deck board sub-assembly.
| 109. INSTALL NO. 3 DECK BOARD SUB-ASSEMBLY |
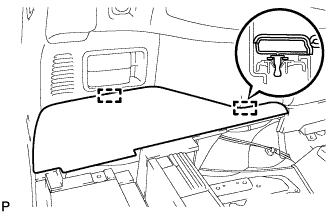 |
Engage the 2 guides and install the No. 3 deck board sub-assembly.
| 110. INSTALL DECK BOARD ASSEMBLY |
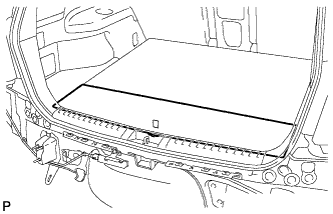 |
Install the deck board sub-assembly.
| 111. INSTALL REAR DOOR OPENING TRIM WEATHERSTRIP LH |
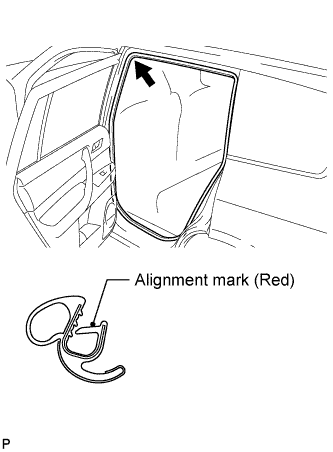 |
Align the alignment mark (red) on the weatherstrip with the protruding portion on the body indicated by the arrow in the illustration, and install the rear door opening trim weatherstrip LH.
| 112. INSTALL REAR DOOR SCUFF PLATE LH |
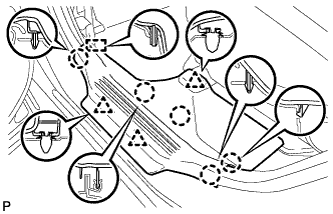 |
Engage the guide, 3 clips and 5 claws, and install the rear door scuff plate LH.
| 113. INSTALL REAR NO. 1 SEAT ASSEMBLY RH |
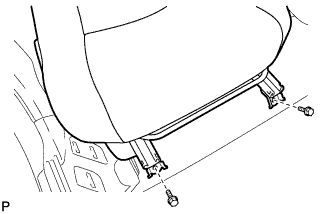 |
Temporarily install the 2 bolts on the front side of the seat.
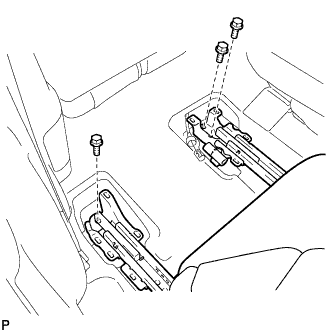 |
Temporarily Install the 3 bolts on the rear side of the seat.
Install the rear No. 1 seat assembly with the 5 bolts.
| 114. CONNECT REAR NO. 1 SEAT LOCK CABLE ASSEMBLY (w/ Remote Folding Function) |
| 115. INSPECT REAR NO. 1 SEAT LOCK CABLE ASSEMBLY (for RH Side) |
Check that the left and right adjusters lock simultaneously when sliding the seat.
If the left and right adjusters do not lock simultaneously, adjust by loosening the bolts securing the seat.
| 116. INSTALL REAR SEAT LEG SIDE COVER RH |
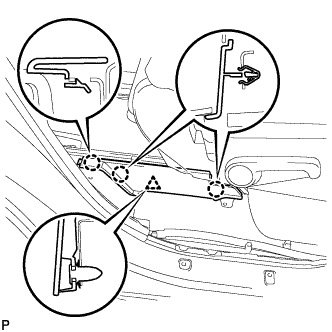 |
Engage the clip.
Engage the 3 claws and install the rear seat leg side cover.
| 117. INSTALL REAR INNER TRACK BRACKET COVER RH |
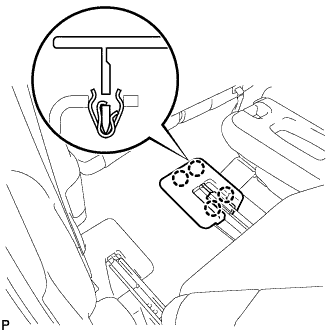 |
Engage the 4 claws and install the rear inner track bracket cover.
| 118. INSTALL REAR OUTER TRACK BRACKET COVER RH |
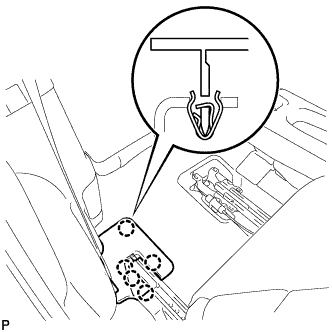 |
Engage the 5 claws and install the rear outer track bracket cover.
| 119. INSTALL SEAT TRACK BRACKET COVER RH |
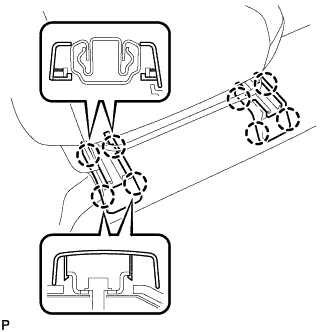 |
Engage the 8 claws and install the 2 seat track bracket covers.
| 120. INSTALL REAR SEAT HEADREST ASSEMBLY (for RH Side) |
| 121. INSTALL REAR NO. 1 SEAT ASSEMBLY LH |
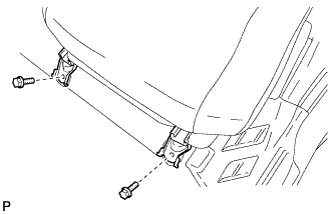 |
Temporarily install the 2 bolts on the front side of the seat.
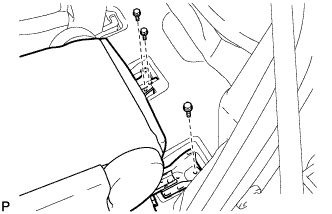 |
Temporarily install the 3 bolts on the rear side of the seat.
Install the rear No. 1 seat assembly with the 5 bolts.
| 122. INSTALL REAR NO. 1 SEAT LOCK CABLE ASSEMBLY (w/ Remote Folding Function) |
Remove the rear seat reclining control cable from the carpet hole.
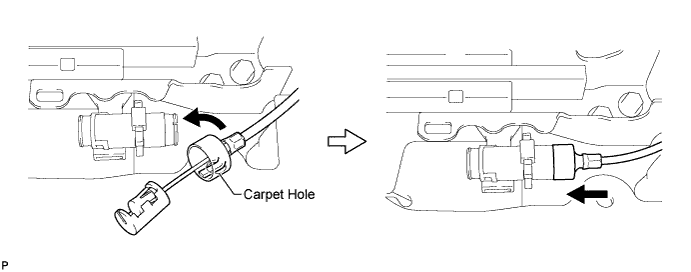
Connect the rear seat reclining control cable as shown in the illustration.
Connect the rear No. 1 seat lock cable assembly as shown in the illustration.
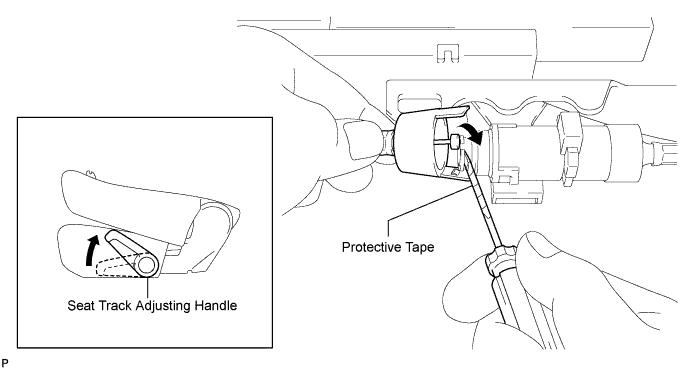
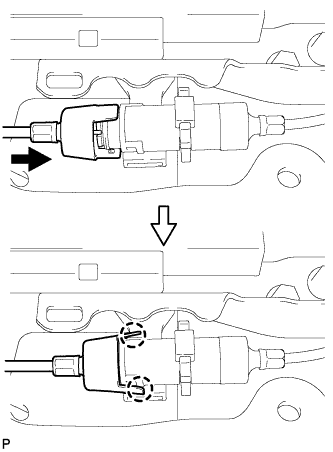 |
Engage the 2 claws and connect the rear No. 1 seat lock cable assembly as shown in the illustration.
Return the seatback to the upright position.
Pull up the adjuster's lock piece to lock it as shown in the illustration.
| 123. INSPECT REAR SEAT SLIDE ADJUSTER LOCK (for LH Side) |
Check that the left and right adjusters lock simultaneously when sliding the seat.
If the left and right adjusters do not lock simultaneously, adjust by loosening the bolts securing the seat.
| 124. INSTALL REAR SEAT LEG SIDE COVER LH |
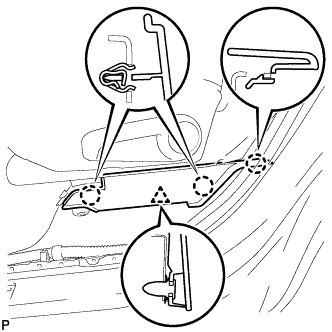 |
Engage the clip.
Engage the 3 claws and install the rear seat leg side cover.
| 125. INSTALL REAR INNER SEAT TRACK BRACKET COVER LH |
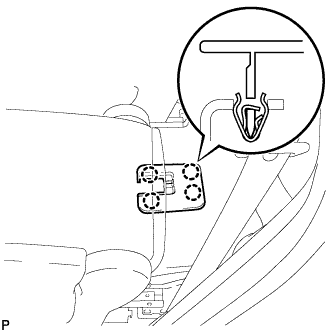 |
Engage the 4 claws and install the rear inner track bracket cover.
| 126. INSTALL REAR OUTER TRACK BRACKET COVER LH |
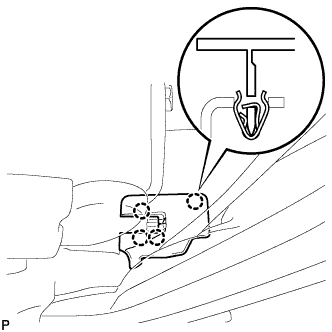 |
Engage the 4 claws and install the rear outer track bracket cover.
| 127. INSTALL SEAT TRACK BRACKET COVER LH |
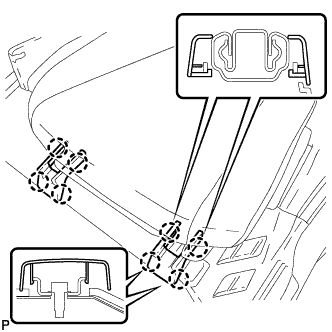 |
Engage the 8 claws and install the 2 rear seat track bracket covers.
| 128. INSTALL REAR SEAT HEADREST ASSEMBLY (for LH Side) |
| 129. INSTALL REAR CENTER SEAT ASSEMBLY |
| 130. CONNECT CABLE TO NEGATIVE BATTERY TERMINAL |
| 131. INSPECT SRS WARNING LIGHT |
Inspect the SRS warning light (Click here).
| 132. INSPECT EXHAUST GAS LEAK |
| 133. INSPECT AND ADJUST TRANSFER OIL (for 4WD) |
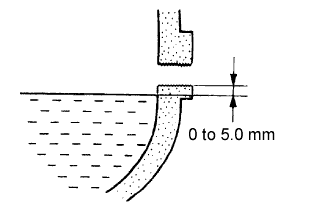 |
Remove the No. 1 transfer case plug and gasket.
Check the oil level is within 0 to 5 mm (0 to 0.20 in.) below the lowest end of the hole for the No. 1 transfer case plug.
When the oil level is too low, check for oil leakage.
Tighten the No. 1 transfer case plug with a new gasket.
| 134. INSPECT REAR WHEEL ALIGNMENT (for 4WD) |
| 135. CHECK FOR SPEED SENSOR SIGNAL (for 4WD) |