Home › SUSPENSION & AXLE › AXLE › REAR AXLE HUB (for 2WD)

REAR AXLE HUB (for 2WD) > INSTALLATION

for Preparation Click here


1. INSTALL REAR AXLE CARRIER SUB-ASSEMBLY


    C167789
  1. Temporarily install the rear axle carrier sub-assembly with the 2 bolts and the 2 nuts.


    C167787
  1. Install the rear axle carrier sub-assembly with the 2 bolts and the 2 nuts.

    Torque:
    290 N*m{ 2956 kgf*cm , 213 ft.*lbf }


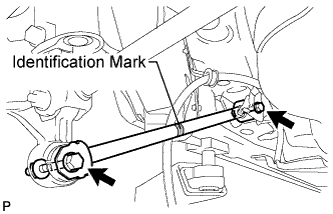
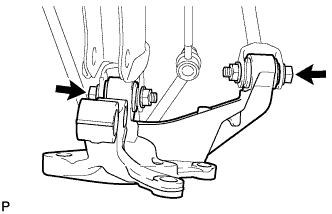
2. TEMPORARILY INSTALL REAR STRUT ROD ASSEMBLY


    C167803E01
  1. Check that the identification mark of the rear strut rod assembly is positioned on the inner side of the vehicle.

  1. Temporarily install the rear strut rod assembly with the 2 bolts and the 2 nuts.

    NOTICE:
    Since stopper nuts are used, temporarily tighten the bolts.


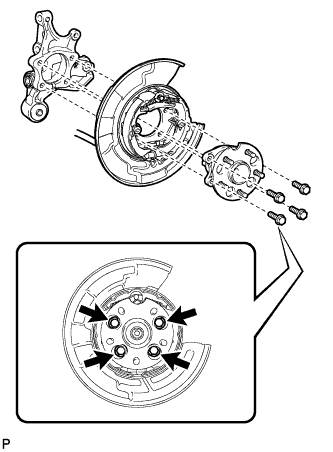
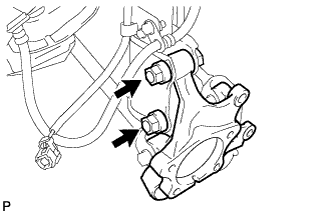
3. INSTALL REAR AXLE HUB AND BEARING ASSEMBLY


    C167786
  1. Install the parking brake assembly and the rear axle hub and bearing assembly with the 4 bolts.

    Torque:
    75 N*m{ 764 kgf*cm , 55 ft.*lbf }

    NOTICE:
    Do not twist the No. 3 parking brake cable assembly when installing it.


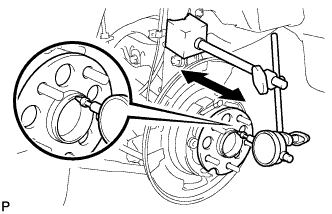
4. INSPECT REAR AXLE HUB BEARING LOOSENESS


    C165994
  1. Using a dial indicator, check for looseness near the center of the axle hub.

    Maximum looseness:
    0 mm (0 in.)

    NOTICE:
    Ensure that the dial indicator is set perpendicular to the measurement surface.

    If the looseness exceeds the maximum, replace the rear axle hub and bearing assembly.


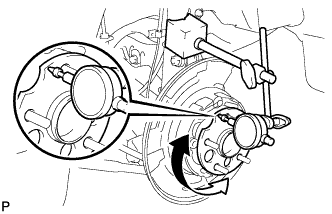
5. INSPECT REAR AXLE HUB RUNOUT


    C165995
  1. Using a dial indicator, check for runout on the surface of the axle hub outside the hub bolt.

    Maximum runout:
    0.08 mm (0.0031 in.)

    NOTICE:
    Ensure that the dial indicator is set perpendicular to the measurement surface.

    If the runout exceeds the maximum, replace the rear axle hub and bearing assembly.


6. INSTALL REAR SPEED SENSOR WIRE


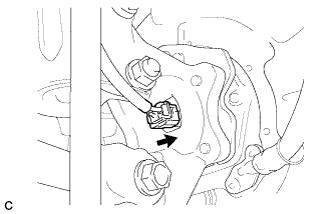
    C167421
  1. Connect the connector to the rear speed sensor.


7. INSTALL REAR DISC


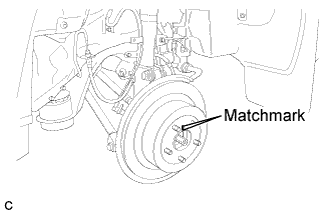
    C166438E01
  1. Put matchmarks on the rear disc and the axle hub.


    D028126
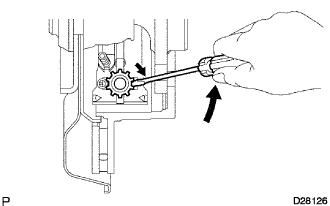
  1. Release the parking brake and remove the rear disc.

    HINT:
    If the disc cannot be removed easily, turn and press firmly the shoe adjuster until the wheel comes free.


8. INSTALL REAR DISC BRAKE CALIPER ASSEMBLY


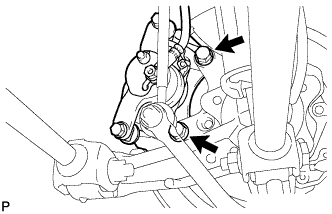
    C167785
  1. Install the rear disc brake caliper assembly with the 2 bolts.

    Torque:
    78 N*m{ 795 kgf*cm , 57 ft.*lbf }


9. INSTALL REAR FLEXIBLE HOSE


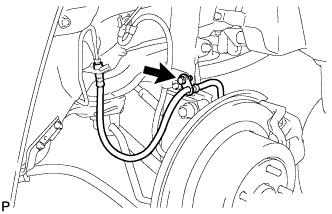
    C167792
  1. Install the rear flexible hose to the rear shock absorber with coil spring with the bolt.

    Torque:
    19 N*m{ 194 kgf*cm , 14 ft.*lbf }

    NOTICE:
    Do not twist the rear flexible hose when installing it.


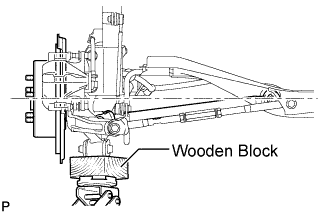
10. STABILIZE SUSPENSION


    C167817E01
  1. Jack up the rear axle carrier, placing a wooden block underneath to avoid damage. Apply load to the suspension so that the installed bolt of the rear No. 1 suspension arm (inner side) is horizontally aligned with the center of the rear axle hub.

    CAUTION:
    Do not jack up the rear axle carrier sub-assembly too high as the vehicle may fall.

    NOTICE:
    Do not bend the brake dust cover.

    HINT:
    1. If the rear drive shaft assembly cannot be positioned horizontally as shown in the illustration even when the rear axle carrier sub-assembly is jacked up, apply additional load to the vehicle such as by having a person sit in the rear seat.
    2. Use the same procedures for the RH side and LH side.


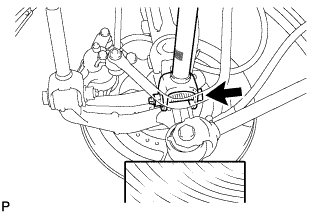
11. FULLY TIGHTEN REAR NO. 1 SUSPENSION ARM ASSEMBLY


    C167790
  1. Fully tighten the bolt.

    Torque:
    112 N*m{ 1141 kgf*cm , 82 ft.*lbf }

    NOTICE:
    1. Since a stopper nut is used, fully tighten the bolt.
    2. The final torque must be applied under standard vehicle height conditions.


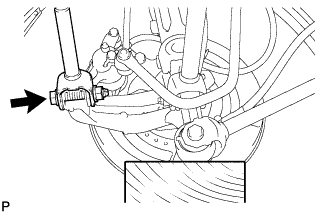
12. FULLY TIGHTEN REAR NO. 2 SUSPENSION ARM ASSEMBLY


    C167791
  1. Fully tighten the bolt.

    Torque:
    112 N*m{ 1141 kgf*cm , 82 ft.*lbf }

    NOTICE:
    1. Since a stopper nut is used, fully tighten the bolt.
    2. The final torque must be applied under standard vehicle height conditions.


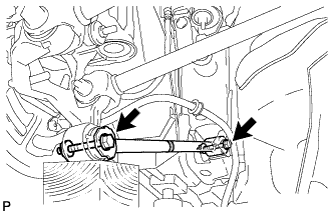
13. FULLY TIGHTEN REAR STRUT ROD ASSEMBLY


    C167818
  1. Fully tighten the 2 bolts.

    Torque:
    80 N*m{ 815 kgf*cm , 59 ft.*lbf }

    NOTICE:
    1. Since stopper nuts are used, fully tighten the bolts.
    2. The final torque must be applied under standard vehicle height conditions.


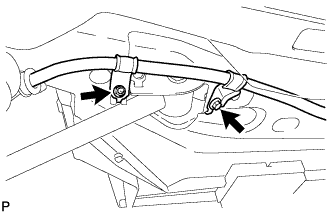
14. INSTALL NO. 3 PARKING BRAKE CABLE ASSEMBLY


    C165998
  1. Install the No. 3 parking brake cable assembly with the bolt and the nut.

    Torque:
    Bolt:
    39 N*m{ 397 kgf*cm , 29 ft.*lbf }
    Nut:
    6.0 N*m{ 61 kgf*cm , 53 in.*lbf }

    NOTICE:
    Do not twist the No. 3 parking brake cable assembly when installing it.


15. INSTALL REAR WHEEL

Torque:
103 N*m{ 1050 kgf*cm , 76 ft.*lbf }


16. CONNECT CABLE TO NEGATIVE BATTERY TERMINAL

NOTICE:
When disconnecting the cable, some systems need to be initialized after the cable is reconnected (Click here).


17. INSPECT AND ADJUST REAR WHEEL ALIGNMENT

HINT:
Click here


18. CHECK FOR SPEED SENSOR SIGNAL

HINT:
Click here