Home › ENGINE › 3MZ-FE STARTING › SMART KEY SYSTEM

DTC    B2282    Vehicle Speed Signal Malfunction

DTC    B2283    Vehicle Speed Sensor Malfunction

for Preparation Click here


DESCRIPTION

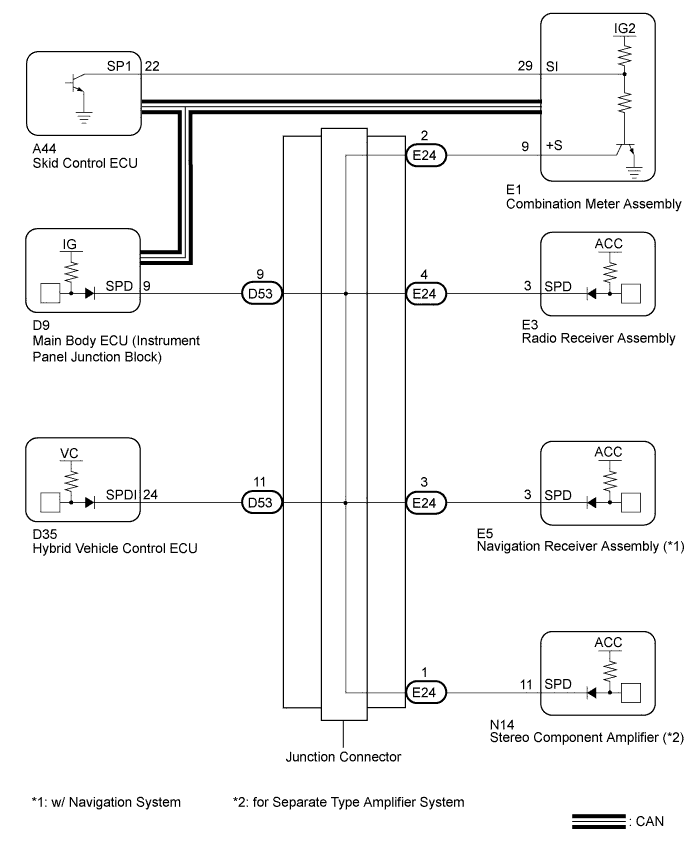
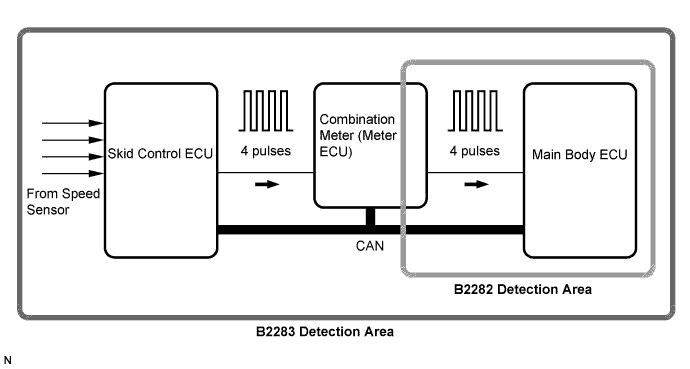
The skid control ECU converts these signals into 4-pulse signals and sends them to the combination meter. After this signal is converted into a more precise rectangular waveform by the waveform shaping circuit inside the combination meter, it is then transmitted to the main body ECU (instrument panel junction block). The main body ECU (instrument panel junction block) determines the vehicle speed based on the frequency of these pulse signals.
The main body ECU (instrument panel junction block) and the combination meter are connected by a cable and the CAN. DTC B2282 is output when the cable information and CAN information are inconsistent.

HINT:
When the main body ECU (instrument panel junction block) is replaced with a new one and the negative (-) battery terminal is connected, the power source mode becomes the IG-ON mode. When the battery is removed and reinstalled, the power source mode that was selected when the battery was removed is restored.
After the main body ECU (instrument panel junction block) is replaced, perform the registration procedures for the engine immobiliser system (Click here).


DTC No.
DTC Detection Condition
Trouble Area
B2282
Cable information and CAN information between the main body ECU (instrument panel junction block) and the combination meter are inconsistent
  1. CAN communication system
  2. Combination meter system
  3. Main body ECU (instrument panel junction block)
  4. Wire harness or connector
B2283
When either of conditions below is met:
  1. Over-deceleration in vehicle speed
  2. Vehicle speed and engine speed do not match
  1. DTC B2282 detection area
  2. Combination meter
  3. Speed sensor
  4. Skid control ECU
  5. Main body ECU (instrument panel junction block)
  6. Wire harness or connector

B138069E01


WIRING DIAGRAM


B184284E01

HINT:
  1. A voltage of 12 V or 5 V is output from each ECU and then input to the combination meter. The signal is changed to a pulse signal at the transistor in the combination meter. Each ECU controls the respective system based on the pulse signal.
  2. If a short occurs in an ECU, all systems in the diagram above will not operate normally.


INSPECTION PROCEDURE

1.CHECK CAN COMMUNICATION SYSTEM
  1. Check for CAN communication system DTCs (Click here).

    HINT:
    If the DTCs for the CAN communication system malfunction are output, inspect those DTCs first.

    Result:
    Result
    Proceed to
    CAN communication DTC is not output
    A
    CAN communication DTC is output
    B


B
GO TO CAN COMMUNICATION SYSTEM (Click here)
A


2.CHECK SPEEDOMETER OPERATION
  1. Connect Techstream to the DLC3.

  1. Turn the power switch on (IG).

  1. Enter the following menus: Body Electrical / Combination Meter / Data List.

  1. Check the values by referring to the values in the table below.

    Combination Meter: 
    Tester Display
    Measurement Item/Range
    Normal Condition
    Diagnostic Note
    Vehicle Speed Meter
    Vehicle speed/Min.: 0 km/h (0mph), Max.: 255 km/h (158 mph)
    Almost same as actual speed (When driving)
    -

    OK:
    Vehicle speed displayed on the tester is almost the same as the actual vehicle speed measured using a speedometer tester (calibrated chassis dynamometer).


NG
GO TO METER / GAUGE SYSTEM (Click here)
OK


3.READ VALUE USING TECHSTREAM (VEHICLE SPEED SIGNAL)
  1. Connect Techstream to the DLC3.

  1. Turn the power switch on (IG).

  1. read the DATA LIST according to the displays on the tester screen.

    Body: 
    Tester Display
    Measurement Item/Range
    Normal Condition
    Diagnostic Note
    Vehicle Speed Signal
    Vehicle speed signal / STOP or RUN
    Stop: Vehicle is stopped
    Run: Vehicle is running
    -

OK:
"Stop" (Vehicle is stopped) and "Run" (Vehicle is running) appear on the screen.


NG
Go to step 4
OK

REPLACE MAIN BODY ECU (INSTRUMENT PANEL JUNCTION BLOCK) 

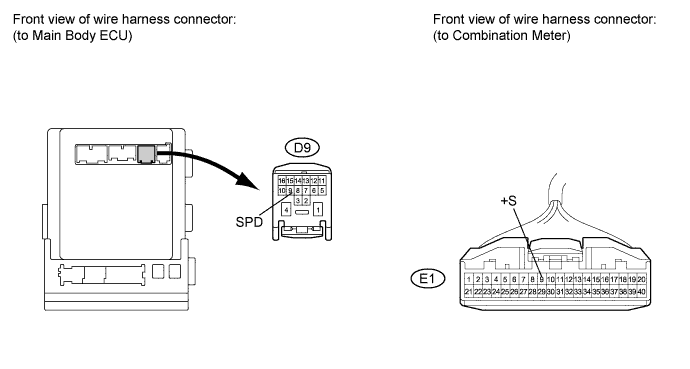
4.CHECK HARNESS AND CONNECTOR (COMBINATION METER - MAIN BODY ECU)


  1. Disconnect the E1 meter connector.


    B177340E04

  1. Disconnect the D9 ECU connector.

  1. Measure the resistance according to the value(s) in the table below.

    Standard resistance:
    Tester Connection
    Condition
    Specified Condition
    D9-9 (SPD) - E1-9 (+S)
    Always
    Below 1 Ω


NG
Go to step 6
OK


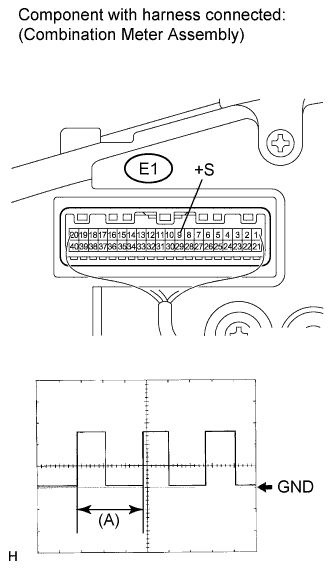
5.INSPECT COMBINATION METER ASSEMBLY


    E152386E01
  1. Check the output waveform.

    1. Remove the combination meter with the connector(s) still connected (Click here).

    2. Connect the oscilloscope to terminals E1-9 (+S) and body ground.

    3. Turn the power switch on (IG).

    4. Turn the wheel slowly.

    5. Check the signal waveform according to the condition(s) in the table below.
      Item
      Condition
      Tool setting
      5 V/DIV., 20 ms./DIV
      Vehicle condition
      Driving at approx. 20 km/h

      OK:
      The waveform is displayed as shown in the illustration.

      HINT:
      When the system is functioning normally, one wheel revolution generates 4 pulses. As the vehicle speed increases, the width indicated by (A) in the illustration narrows.


NG
GO TO METER / GAUGE SYSTEM (Click here)
OK

REPLACE MAIN BODY ECU (INSTRUMENT PANEL JUNCTION BLOCK) 

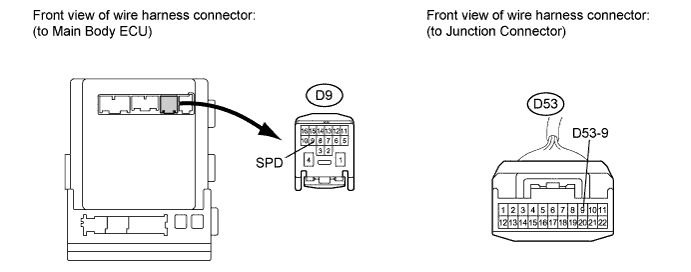
6.CHECK HARNESS AND CONNECTOR (MAIN BODY ECU - JUNCTION CONNECTOR)


  1. Disconnect the D53 connector.


    B177529E05

  1. Measure the resistance according to the value(s) in the table below.

    Standard resistance:
    Tester Connection
    Condition
    Specified Condition
    D9-9 (SPD) - D53-9
    Always
    Below 1 Ω


NG
REPAIR OR REPLACE HARNESS OR CONNECTOR (MAIN BODY ECU - JUNCTION CONNECTOR)
OK

REPLACE JUNCTION CONNECTOR