| B |  |
| GO TO DTC CHART (Click here) |
DTC P0A78-504 Drive Motor "A" Inverter Performance |
| DTC No. | INF Code | DTC Detection Condition | Trouble Area |
| P0A78 | 504 | Motor inverter overvoltage signal detection (overvoltage by hybrid vehicle transaxle assembly malfunction) |
|
| Related DTCs | P0A78 (INF 504): Motor inverter / OVH detection (Over Voltage High malfunction) |
| Required sensors / components | Motor inverter |
| Frequency of operation | Continuous |
| Duration | TMC's intellectual property |
| MIL operation | Immediately |
| Sequence of operation | None |
| The monitor will run whenever the DTCs listed are not present | TMC's intellectual property |
| Other conditions belong to TMC's intellectual property | - |
| Motor inverter | Overvoltage |
| Motor inverter | DTC P0A78 (INF 504) is not detected |
| 1.CHECK DTC OUTPUT (HV) |
Connect the Techstream to the DLC3.
Turn the power switch on (IG).
Select the following menu items: Powertrain / Hybrid Control / Trouble Codes.
Check if DTCs are output.
| Result | Proceed to |
| P0A78-504 only is output. | A |
| Any of the following DTCs are also output. | B |
| DTC No. | Relevant Diagnosis |
| P0A3F-243 | Drive Motor "A" Position Sensor Circuit |
| P0A40-500 | Drive Motor "A" Position Sensor Circuit Range / Performance |
| P0A41-245 | Drive Motor "A" Position Sensor Circuit Low |
| P0A45-669 | Drive Motor "B" Position Sensor Circuit |
| P0A46-671 | Drive Motor "B" Position Sensor Circuit Range / Performance |
| P0A47-670 | Drive Motor "B" Position Sensor Circuit Low |
| P0A4B-253 | Generator Position Sensor Circuit |
| P0A4C-513 | Generator Position Sensor Circuit Range / Performance |
| P0A4D-255 | Generator Position Sensor Circuit Low |
| P0A78-266, 280 | Drive Motor "A" Inverter Performance |
| P0A94-558, 559, 588, 589 | DC / DC Converter Performance |
| P0A95-123 | High Voltage Fuse |
| P0ADB-227 | Hybrid Battery Positive Contactor Control Circuit Low |
| P0ADC-226 | Hybrid Battery Positive Contactor Control Circuit High |
| P0ADF-229 | Hybrid Battery Negative Contactor Control Circuit Low |
| P0AE0-228 | Hybrid Battery Negative Contactor Control Circuit High |
| P3004-803 | Power Cable Malfunction |
|
| ||||
| A | |
 |
| 2.CHECK CONNECTOR CONNECTION CONDITION (MG ECU CONNECTOR) |
Turn the power switch off.
Remove the service plug grip (Click here).
Remove the inverter cover (Click here).
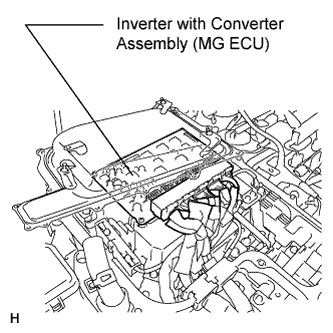 |
Check the connections of the MG ECU connectors.
|
| ||||
| OK | |
|
| 3.INSPECT HV RELAY ASSEMBLY (SMR2) |
Check that the service plug grip is not installed.
Remove the HV relay assembly from the vehicle (Click here).
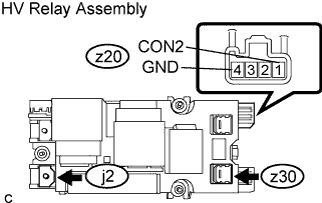 |
Measure the resistance according to the value(s) in the table below.
| Tester Condition | Condition | Specified Condition |
| z30-1 - j2-1 | Power switch off (Auxiliary battery voltage is applied between terminals z20-1 (CON2) and z20-4 (GND)) | Below 1 Ω |
Measure the resistance according to the value(s) in the table below.
| Tester Condition | Condition | Specified Condition |
| z20-1 (CON2) - z20-4 (GND) | Power switch off (-31 to 176°F (-35 to 80°C)) | 20 to 60 Ω |
|
| ||||
| OK | |
|
| 4.INSPECT HV RELAY ASSEMBLY (SMR3) |
Check that the service plug grip is not installed.
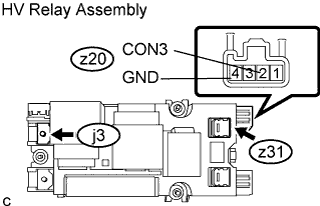 |
Measure the resistance according to the value(s) in the table below.
| Tester Condition | Condition | Specified Condition |
| z31-1 - j3-1 | Power switch off (Auxiliary battery voltage is applied between terminals z20-2 (CON3) and z20-4 (GND)) | Below 1 Ω |
Measure the resistance according to the value(s) in the table below.
| Tester Condition | Condition | Specified Condition |
| z20-2 (CON3) - z20-4 (GND) | Power switch off (-31 to 176°F (-35 to 80°C)) | 20 to 60 Ω |
|
| ||||
| OK | |
|
| 5.CONFIRM INFORMATION (EXCLUSIVE INFORMATION 4) |
Connect the Techstream to the DLC3.
Turn the power switch on (IG).
Check for HV system DTCs.
Display freeze frame data corresponding to DTC P0A78 and select the information.
Select INF code 504 and read Exclusive Information 4.
| Displayed item in exclusive information 4 | Proceed to |
| -63 to 64 | A |
| 65 to 128 | B |
|
| ||||
| A | |
|
| 6.CHECK HARNESS AND CONNECTOR (MG ECU - MOTOR RESOLVER) |
Turn the power switch off.
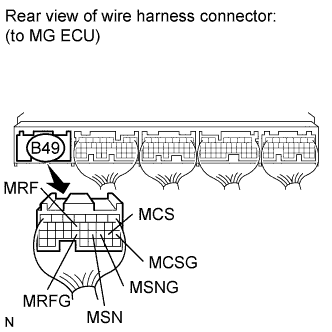 |
Disconnect the B49 connector from the MG ECU.
Turn the power switch on (IG).
Measure the voltage according to the value(s) in the table below.
| Tester Connection | Switch Condition | Specified Condition |
| B49-13 (MRF) - Body ground | Power switch on (IG) | Below 1 V |
| B49-23 (MRFG) - Body ground | Power switch on (IG) | Below 1 V |
| B49-21 (MSN) - Body ground | Power switch on (IG) | Below 1 V |
| B49-20 (MSNG) - Body ground | Power switch on (IG) | Below 1 V |
| B49-19 (MCS) - Body ground | Power switch on (IG) | Below 1 V |
| B49-18 (MCSG) - Body ground | Power switch on (IG) | Below 1 V |
Turn the power switch off.
Measure the resistance according to the value(s) in the table below.
| Tester Connection | Switch Condition | Specified Condition |
| B49-13 (MRF) - B49-23 (MRFG) | Power switch off | 7.65 to 10.2 Ω |
| B49-21 (MSN) - B49-20 (MSNG) | Power switch off | 12.6 to 16.8 Ω |
| B49-19 (MCS) - B49-18 (MCSG) | Power switch off | 12.6 to 16.8 Ω |
Measure the resistance according to the value(s) in the table below.
| Tester Connection | Switch Condition | Specified Condition |
| B49-13 (MRF) or B49-23 (MRFG) - Body ground and other terminals | Power switch off | 10 kΩ or higher |
| B49-21 (MSN) or B49-20 (MSNG) - Body ground and other terminals | Power switch off | 10 kΩ or higher |
| B49-19 (MCS) or B49-18 (MCSG) - Body ground and other terminals | Power switch off | 10 kΩ or higher |
|
| ||||
| OK | |
|
| 7.CHECK HARNESS AND CONNECTOR (MG ECU - GENERATOR RESOLVER) |
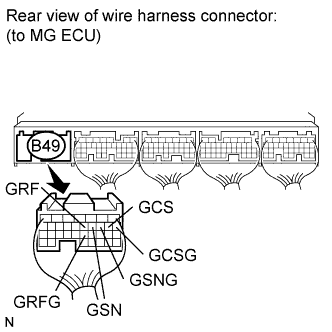 |
Turn the power switch on (IG).
Measure the voltage according to the value(s) in the table below.
| Tester Connection | Switch Condition | Specified Condition |
| B49-12 (GRF) - Body ground | Power switch on (IG) | Below 1 V |
| B49-22 (GRFG) - Body ground | Power switch on (IG) | Below 1 V |
| B49-11 (GSN) - Body ground | Power switch on (IG) | Below 1 V |
| B49-10 (GSNG) - Body ground | Power switch on (IG) | Below 1 V |
| B49-9 (GCS) - Body ground | Power switch on (IG) | Below 1 V |
| B49-8 (GCSG) - Body ground | Power switch on (IG) | Below 1 V |
Turn the power switch off.
Measure the resistance according to the value(s) in the table below.
| Tester Connection | Switch Condition | Specified Condition |
| B49-12 (GRF) - B49-22 (GRFG) | Power switch off | 7.65 to 10.2 Ω |
| B49-11 (GSN) - B49-10 (GSNG) | Power switch off | 12.6 to 16.8 Ω |
| B49-9 (GCS) - B49-8 (GCSG) | Power switch off | 12.6 to 16.8 Ω |
Measure the resistance according to the value(s) in the table below.
| Tester Connection | Switch Condition | Specified Condition |
| B49-12 (GRF) or B49-22 (GRFG) - Body ground and other terminals | Power switch off | 10 kΩ or higher |
| B49-11 (GSN) or B49-10 (GSNG) - Body ground and other terminals | Power switch off | 10 kΩ or higher |
| B49-9 (GCS) or B49-8 (GCSG) - Body ground and other terminals | Power switch off | 10 kΩ or higher |
|
| ||||
| OK | |
|
| 8.CHECK CONNECTOR CONNECTION CONDITION (MOTOR RESOLVER CONNECTOR) |
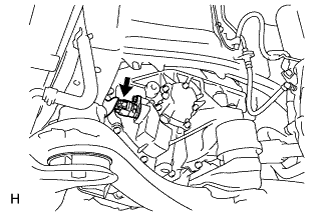 |
Check the connection of the motor resolver connector.
|
| ||||
| OK | |
|
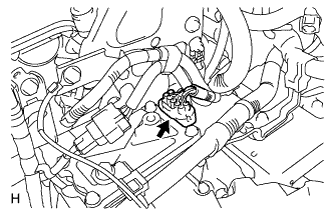
| 9.CHECK CONNECTOR CONNECTION CONDITION (GENERATOR RESOLVER CONNECTOR) |
 |
Remove the inverter with converter assembly (Click here).
Check the connection of the generator resolver connector.
|
| ||||
| OK | ||
 | ||
| ||
| 10.CHECK HARNESS AND CONNECTOR (MG ECU - REAR MOTOR RESOLVER) |
Turn the power switch off.
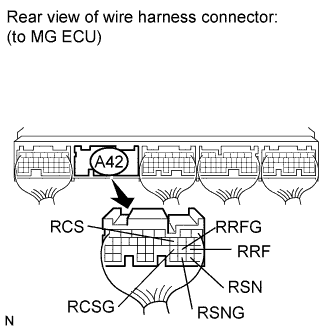 |
Disconnect the A42 connector from the MG ECU.
Turn the power switch on (IG).
Measure the voltage according to the value(s) in the table below.
| Tester Connection | Switch Condition | Specified Condition |
| A42-21 (RRF) - Body ground | Power switch on (IG) | Below 1 V |
| A42-22 (RRFG) - Body ground | Power switch on (IG) | Below 1 V |
| A42-29 (RSN) - Body ground | Power switch on (IG) | Below 1 V |
| A42-30 (RSNG) - Body ground | Power switch on (IG) | Below 1 V |
| A42-11 (RCS) - Body ground | Power switch on (IG) | Below 1 V |
| A42-23 (RCSG) - Body ground | Power switch on (IG) | Below 1 V |
Turn the power switch off.
Measure the resistance according to the value(s) in the table below.
| Tester Connection | Switch Condition | Specified Condition |
| A42-21 (RRF) - A42-22 (RRFG) | Power switch off | 7.65 to 10.2 Ω |
| A42-29 (RSN) - A42-30 (RSNG) | Power switch off | 12.6 to 16.8 Ω |
| A42-11 (RCS) - A42-23 (RCSG) | Power switch off | 12.6 to 16.8 Ω |
Measure the resistance according to the value(s) in the table below.
| Tester Connection | Switch Condition | Specified Condition |
| A42-21 (RRF) or A42-22 (RRFG) - Body ground and other terminals | Power switch off | 10 kΩ or higher |
| A42-29 (RSN) or A42-30 (RSNG) - Body ground and other terminals | Power switch off | 10 kΩ or higher |
| A42-11 (RCS) or A42-23 (RCSG) - Body ground and other terminals | Power switch off | 10 kΩ or higher |
|
| ||||
| OK | |
|
| 11.CHECK CONNECTOR CONNECTION CONDITION (REAR MOTOR RESOLVER CONNECTOR) |
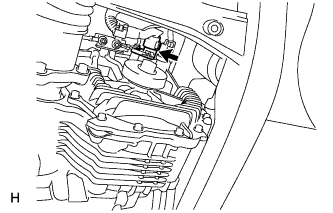 |
Check the connection of the rear motor resolver connector.
|
| ||||
| OK | ||
| ||
| ||
| 12.CHECK CONNECTOR CONNECTION CONDITION (MOTOR RESOLVER CONNECTOR) |
|
Check the connection of the motor resolver connector.
|
| ||||
| OK | |
|
| 13.CHECK MOTOR RESOLVER |
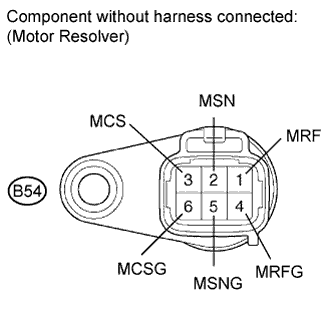 |
Disconnect the B54 motor resolver connector.
Measure the resistance according to the value(s) in the table below.
| Tester Connection | Switch Condition | Specified Condition |
| B54-1 (MRF) - B54-4 (MRFG) | Power switch off | 7.65 to 10.2 Ω |
| B54-2 (MSN) - B54-5 (MSNG) | Power switch off | 12.6 to 16.8 Ω |
| B54-3 (MCS) - B54-6 (MCSG) | Power switch off | 12.6 to 16.8 Ω |
Using a megohmmeter set to 500 V, measure the insulation resistance according to the value(s) in the table below.
| Tester Connection | Switch Condition | Specified Condition |
| B54-1 (MRF) - B54-2 (MSN) | Power switch off | 10 MΩ or higher |
| B54-1 (MRF) - B54-3 (MCS) | Power switch off | 10 MΩ or higher |
| B54-2 (MSN) - B54-3 (MCS) | Power switch off | 10 MΩ or higher |
| B54-4 (MRFG) - B54-5 (MSNG) | Power switch off | 10 MΩ or higher |
| B54-4 (MRFG) - B54-6 (MCSG) | Power switch off | 10 MΩ or higher |
| B54-5 (MSNG) - B54-6 (MCSG) | Power switch off | 10 MΩ or higher |
| Each terminal listed above - Transaxle housing | Power switch off | 10 MΩ or higher |
|
| ||||
| OK | ||
| ||
| ||
| 14.CHECK CONNECTOR CONNECTION CONDITION (GENERATOR RESOLVER CONNECTOR) |
|
Remove the inverter with converter assembly (Click here).
Check the connection of the generator resolver connector.
|
| ||||
| OK | |
|
| 15.CHECK GENERATOR RESOLVER |
Remove the inverter with converter assembly (Click here).
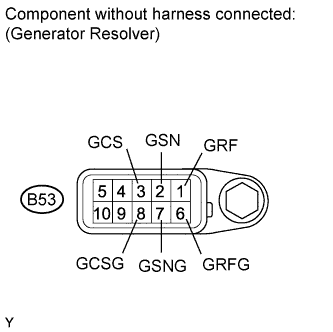 |
Disconnect the B53 generator resolver connector.
Measure the resistance according to the value(s) in the table below.
| Tester Connection | Switch Condition | Specified Condition |
| B53-1 (GRF) - B53-6 (GRFG) | Power switch off | 7.65 to 10.2 Ω |
| B53-2 (GSN) - B53-7 (GSNG) | Power switch off | 12.6 to 16.8 Ω |
| B53-3 (GCS) - B53-8 (GCSG) | Power switch off | 12.6 to 16.8 Ω |
Using a megohmmeter set to 500 V, measure the insulation resistance according to the value(s) in the table below.
| Tester Connection | Switch Condition | Specified Condition |
| B53-1 (GRF) - B53-2 (GSN) | Power switch off | 10 MΩ or higher |
| B53-1 (GRF) - B53-3 (GCS) | Power switch off | 10 MΩ or higher |
| B53-2 (GSN) - B53-3 (GCS) | Power switch off | 10 MΩ or higher |
| B53-6 (GRFG) - B53-7 (GSNG) | Power switch off | 10 MΩ or higher |
| B53-6 (GRFG) - B53-8 (GCSG) | Power switch off | 10 MΩ or higher |
| B53-7 (GSNG) - B53-8 (GCSG) | Power switch off | 10 MΩ or higher |
| Each terminal listed above - Transaxle housing | Power switch off | 10 MΩ or higher |
|
| ||||
| OK | ||
| ||
| ||
| 16.CHECK CONNECTOR CONNECTION CONDITION (REAR MOTOR RESOLVER CONNECTOR) |
|
Check the connection of the rear motor resolver connector.
|
| ||||
| OK | |
|
| 17.CHECK REAR MOTOR RESOLVER |
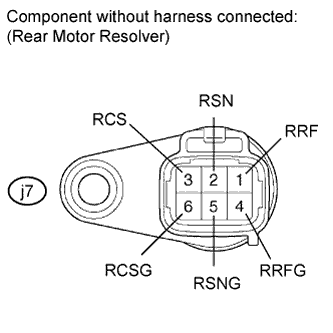 |
Disconnect the j7 rear motor resolver connector.
Measure the resistance according to the value(s) in the table below.
| Tester Connection | Switch Condition | Specified Condition |
| j7-1 (RRF) - j7-4 (RRFG) | Power switch off | 7.65 to 10.2 Ω |
| j7-2 (RSN) - j7-5 (RSNG) | Power switch off | 12.6 to 16.8 Ω |
| j7-3 (RCS) - j7-6 (RCSG) | Power switch off | 12.6 to 16.8 Ω |
Using a megohmmeter set to 500 V, measure the insulation resistance according to the value(s) in the table below.
| Tester Connection | Switch Condition | Specified Condition |
| j7-1 (RRF) - j7-2 (RSN) | Power switch off | 10 MΩ or higher |
| j7-1 (RRF) - j7-3 (RCS) | Power switch off | 10 MΩ or higher |
| j7-2 (RSN) - j7-3 (RCS) | Power switch off | 10 MΩ or higher |
| j7-4 (RRFG) - j7-5 (RSNG) | Power switch off | 10 MΩ or higher |
| j7-4 (RRFG) - j7-6 (RCSG) | Power switch off | 10 MΩ or higher |
| j7-5 (RSNG) - j7-6 (RCSG) | Power switch off | 10 MΩ or higher |
| Each terminal listed above - Transaxle housing | Power switch off | 10 MΩ or higher |
|
| ||||
| OK | ||
| ||
| ||
