Home › Vehicle Exterior › WINDOW / GLASS › WINDSHIELD DEICER SYSTEM
RM3160E _59 Vehicle Exterior _019717 WINDOW / GLASS _0106120 WINDSHIELD DEICER SYSTEM J

WINDOW / GLASS  WINDSHIELD DEICER SYSTEM  Windshield Deicer does not Operate  


DESCRIPTION

When the outer mirror heater switch assembly is operated, the operation signal is transmitted to the air conditioning amplifier assembly directly. When the air conditioning amplifier assembly receives the signal, it turns on the semiconductor pwr integration ECU to operate the windshield deicer system.

WIRING DIAGRAM
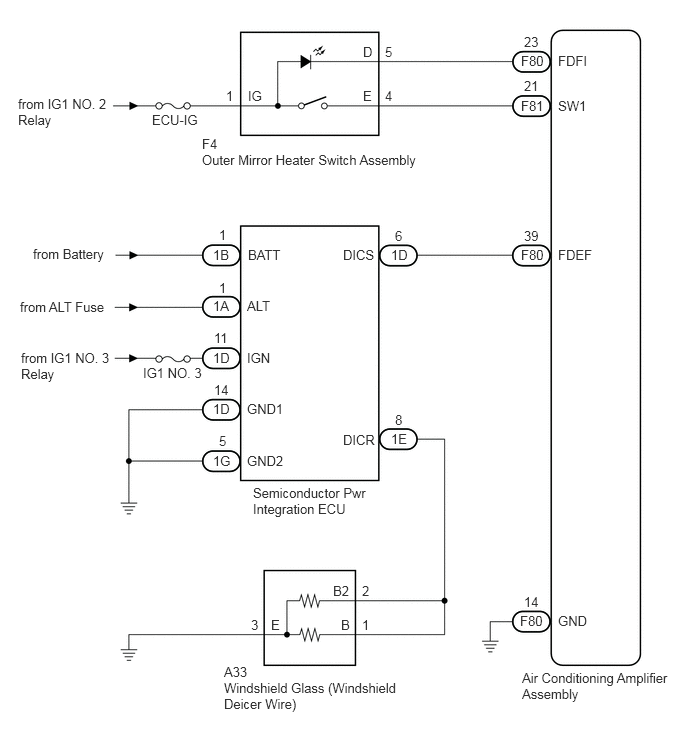
B364273E08
5.438,6.979 7,7.313 1.563,0.333 10 false Air Conditioning Amplifier Assembly 2.333,6.917 2.667,7.083 0.333,0.167 10 false A33 2.333,7.083 4.208,7.417 1.875,0.333 10 false Windshield Glass (Windshield Deicer Wire) 5.813,6.385 6.167,6.552 0.354,0.167 10 false GND 5.813,2.573 6.25,2.74 0.438,0.167 10 false FDEF 5.813,0.552 6.25,0.719 0.438,0.167 10 false FDFI 5.813,1.021 6.25,1.188 0.438,0.167 10 false SW1 5.427,0.552 5.75,0.719 0.323,0.167 10 false F80 5.427,1.021 5.75,1.188 0.323,0.167 10 false F81 5.427,2.573 5.75,2.74 0.323,0.167 10 false F80 5.417,6.385 5.74,6.552 0.323,0.167 10 false F80 5.458,6.188 5.667,6.354 0.208,0.167 10 false 14 5.458,2.375 5.667,2.542 0.208,0.167 10 false 39 5.458,0.813 5.667,0.979 0.208,0.167 10 false 21 5.458,0.354 5.667,0.521 0.208,0.167 10 false 23 4.01,0.458 4.167,0.625 0.156,0.167 10 false 5 4.01,0.917 4.167,1.083 0.156,0.167 10 false 4 3.781,0.458 3.938,0.625 0.156,0.167 10 false D 3.781,0.917 3.938,1.083 0.156,0.167 10 false E 2.583,0.917 2.833,1.083 0.25,0.167 10 false IG 2.354,0.917 2.51,1.083 0.156,0.167 10 false 1 2.104,1.417 2.354,1.583 0.25,0.167 10 false F4 2.104,1.583 4.438,1.75 2.333,0.167 10 false Outer Mirror Heater Switch Assembly 1.583,1.167 2.167,1.333 0.583,0.167 10 false ECU-IG 0.188,1 1.167,1.333 0.979,0.333 10 false from IG1 NO. 2 Relay 4.073,2.573 4.333,2.74 0.26,0.167 10 false 1D 4.073,4.49 4.333,4.656 0.26,0.167 10 false 1E 3.771,6.073 3.917,6.24 0.146,0.167 10 false 2 3.771,6.427 3.917,6.594 0.146,0.167 10 false 1 3.469,6.073 3.698,6.24 0.229,0.167 10 false B2 3.552,6.427 3.708,6.594 0.156,0.167 10 false B 2.823,6.427 3,6.594 0.177,0.167 10 false E 2.615,6.427 2.792,6.594 0.177,0.167 10 false 3 4.115,2.375 4.25,2.542 0.135,0.167 10 false 6 4.115,4.292 4.25,4.458 0.135,0.167 10 false 8 3.573,4.5 4,4.667 0.427,0.167 10 false DICR 3.573,2.573 4,2.74 0.427,0.167 10 false DICS 0.344,2.563 1.188,2.729 0.844,0.167 10 false from Battery 0.208,3.115 1.167,3.281 0.958,0.167 10 false from ALT Fuse 0.219,3.646 1.177,4.125 0.958,0.479 10 false from IG1 NO. 3 Relay 2.635,5.052 3.854,5.385 1.219,0.333 10 false Semiconductor Pwr Integration ECU 2.573,4.719 3,4.885 0.427,0.167 10 false GND2 2.573,4.177 3,4.344 0.427,0.167 10 false GND1 2.573,3.646 2.917,3.813 0.344,0.167 10 false IGN 2.573,3.104 2.917,3.271 0.344,0.167 10 false ALT 2.583,2.573 3,2.74 0.417,0.167 10 false BATT 2.219,2.573 2.5,2.74 0.281,0.167 10 false 1B 2.219,3.104 2.5,3.271 0.281,0.167 10 false 1A 2.219,3.646 2.5,3.813 0.281,0.167 10 false 1D 2.219,4.177 2.5,4.344 0.281,0.167 10 false 1D 2.219,4.719 2.5,4.885 0.281,0.167 10 false 1G 2.281,4.51 2.417,4.677 0.135,0.167 10 false 5 2.229,3.979 2.417,4.146 0.188,0.167 10 false 14 2.229,3.438 2.417,3.604 0.188,0.167 10 false 11 2.281,2.917 2.417,3.083 0.135,0.167 10 false 1 2.281,2.365 2.417,2.531 0.135,0.167 10 false 1 1.49,3.802 2.188,3.969 0.698,0.167 10 false IG1 NO. 3

CAUTION / NOTICE / HINT

NOTICE:
·

Inspect the fuses for circuits related to this system before performing the following procedure.

·

If the battery voltage is low, the windshield deicer system may not operate. In this case, check the Data List item "Battery Control Count (Body ECU)".

Click hereSteering>POWER ASSIST SYSTEMS>POWER STEERING SYSTEM>DATA LIST / ACTIVE TEST


PROCEDURE

1.PERFORM ACTIVE TEST USING GTS
a.

Connect the GTS to the DLC3.


b.

Turn the ignition switch to ON.


c.

Turn the GTS on.


d.

Enter the following menus: Body Electrical / Air Conditioner / Active Test.


e.

Perform the Active Test according to the display on the GTS.

Body Electrical > Air Conditioner > Active Test
Tester Display Measurement Item Control Range Diagnostic Note
Deicer Relay (Front) Windshield glass (windshield deicer wire) OFF or ON -
Body Electrical > Air Conditioner > Active Test
Tester Display
Deicer Relay (Front)
50004 121 38
OK:

The windshield deicer system operates normally.


Result:
Proceed to
OK
NG


OK

2.INSPECT OUTER MIRROR HEATER SWITCH ASSEMBLY

NG

5.CHECK SEMICONDUCTOR PWR INTEGRATION ECU
2.INSPECT OUTER MIRROR HEATER SWITCH ASSEMBLY
a.

Remove the outer mirror heater switch assembly.

Click hereVehicle Exterior>WINDOW / GLASS>WINDSHIELD DEICER SWITCH>REMOVAL


b.

Inspect the outer mirror heater switch assembly.

Click hereVehicle Exterior>WINDOW / GLASS>WINDSHIELD DEICER SWITCH>INSPECTION


Result:
Proceed to
OK
NG


OK

3.CHECK HARNESS AND CONNECTOR (OUTER MIRROR HEATER SWITCH ASSEMBLY - IG POWER SUPPLY)

NG

REPLACE OUTER MIRROR HEATER SWITCH ASSEMBLY

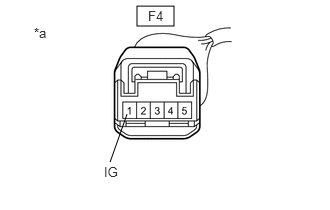
3.CHECK HARNESS AND CONNECTOR (OUTER MIRROR HEATER SWITCH ASSEMBLY - IG POWER SUPPLY)
a.
B263251C03
1.427,0.063 1.813,0.271 0.385,0.208 1.146,1.688 1.323,1.188 false 0.354,0.26 0.667,0.458 0.313,0.198 10 false *a 1.542,0.083 2,0.281 0.458,0.198 10 false F4 1.083,1.708 1.396,1.906 0.313,0.198 10 false IG
*a Front view of wire harness connector
(to Outer Mirror Heater Switch Assembly)


Measure the voltage according to the value(s) in the table below.

Standard Voltage:
Tester Connection Condition Specified Condition
F4-1 (IG) - Body ground Ignition switch off Below 1 V
F4-1 (IG) - Body ground Ignition switch ON 11 to 14 V


Result:
Proceed to
OK
NG


OK

4.CHECK HARNESS AND CONNECTOR (OUTER MIRROR HEATER SWITCH ASSEMBLY - AIR CONDITIONING AMPLIFIER ASSEMBLY)

NG

REPAIR OR REPLACE HARNESS OR CONNECTOR

4.CHECK HARNESS AND CONNECTOR (OUTER MIRROR HEATER SWITCH ASSEMBLY - AIR CONDITIONING AMPLIFIER ASSEMBLY)
a.

Disconnect the F80 and F81 air conditioning amplifier assembly connectors.


b.

Measure the resistance according to the value(s) in the table below.

Standard Resistance:
Tester Connection Condition Specified Condition
F4-5 (D) - F80-23 (FDFI) Always Below 1 Ω
F4-5 (D) or F80-23 (FDFI) - Body ground Always 10 kΩ or higher
F4-4 (E) - F81-21 (SW1) Always Below 1 Ω
F4-4 (E) or F81-21 (SW1) - Body ground Always 10 kΩ or higher


Result:
Proceed to
OK
NG


OK

REPLACE AIR CONDITIONING AMPLIFIER ASSEMBLY

NG

REPAIR OR REPLACE HARNESS OR CONNECTOR

5.CHECK SEMICONDUCTOR PWR INTEGRATION ECU
a.

Using a voltmeter, check the signal reading of the semiconductor pwr integration ECU.

Click herePower Source / Network>POWER DISTRIBUTION>INTEGRATION RELAY>ON-VEHICLE INSPECTION

OK:

Output signal reading is normal.


Result:
Proceed to
OK
NG


OK

6.CHECK HARNESS AND CONNECTOR (SEMICONDUCTOR PWR INTEGRATION ECU POWER SOURCE AND BODY GROUND)

NG

INSPECT SEMICONDUCTOR PWR INTEGRATION ECU (RESULTS OF SIGNAL READING CHECK)

6.CHECK HARNESS AND CONNECTOR (SEMICONDUCTOR PWR INTEGRATION ECU POWER SOURCE AND BODY GROUND)
a.

Remove the semiconductor pwr integration ECU from the No. 1 engine room relay block and No. 1 junction block assembly.

Click herePower Source / Network>POWER DISTRIBUTION>INTEGRATION RELAY>REMOVAL
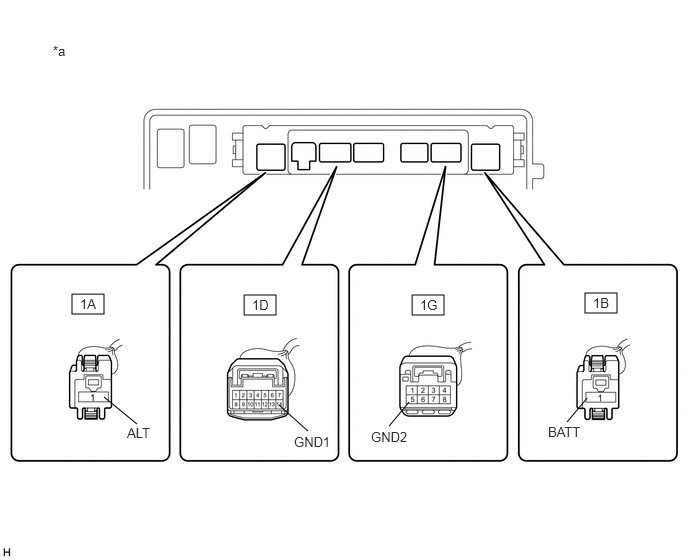
B352092C06
0.75,3.063 1.083,3.271 0.333,0.208 2.542,3.073 2.875,3.281 0.333,0.208 4.292,3.073 4.625,3.281 0.333,0.208 6.094,3.052 6.427,3.26 0.333,0.208 1.427,4.417 1.083,4.135 false 3.208,4.49 2.906,4.219 false 4.052,4.438 4.26,4.188 false 5.906,4.396 6.115,4.146 false 0.552,0.448 0.865,0.646 0.313,0.198 10 false *a 0.833,3.083 1.146,3.281 0.313,0.198 10 false 1A 4.375,3.094 4.688,3.292 0.313,0.198 10 false 1G 6.177,3.073 6.49,3.271 0.313,0.198 10 false 1B 2.625,3.094 2.938,3.292 0.313,0.198 10 false 1D 1.323,4.427 1.781,4.625 0.458,0.198 10 false ALT 3.063,4.521 3.677,4.719 0.615,0.198 10 false GND1 3.865,4.469 4.479,4.667 0.615,0.198 10 false GND2 5.708,4.417 6.323,4.615 0.615,0.198 10 false BATT
*a Component without semiconductor pwr integration ECU
(No. 1 Engine Room Relay Block and No. 1 Junction Block Assembly)
- -


b.

Measure the voltage according to the value(s) in the table below.

Standard Voltage:
Tester Connection Condition Specified Condition
1B-1 (BATT) - Body ground Always 11 to 14 V
1A-1 (ALT) - Body ground Always 11 to 14 V


c.

Measure the resistance according to the value(s) in the table below.

Standard Resistance:
Tester Connection Condition Specified Condition
1D-14 (GND1) - Body ground Always Below 1 Ω
1G-5 (GND2) - Body ground Always Below 1 Ω


Result:
Proceed to
OK
NG


OK

7.CHECK HARNESS AND CONNECTOR (AIR CONDITIONING AMPLIFIER ASSEMBLY - SEMICONDUCTOR PWR INTEGRATION ECU)

NG

REPAIR OR REPLACE HARNESS OR CONNECTOR

7.CHECK HARNESS AND CONNECTOR (AIR CONDITIONING AMPLIFIER ASSEMBLY - SEMICONDUCTOR PWR INTEGRATION ECU)
a.

Disconnect the F80 air conditioning amplifier assembly connector.


b.

Measure the resistance according to the value(s) in the table below.

Standard Resistance:
Tester Connection Condition Specified Condition
F80-39 (FDEF) - 1D-6 (DICS) Always Below 1 Ω
F80-39 (FDEF) or 1D-6 (DICS) - Body ground Always 10 kΩ or higher


Result:
Proceed to
OK
NG


OK

8.CHECK SEMICONDUCTOR PWR INTEGRATION ECU

NG

REPAIR OR REPLACE HARNESS OR CONNECTOR

8.CHECK SEMICONDUCTOR PWR INTEGRATION ECU
a.

Install the semiconductor pwr integration ECU.

Click herePower Source / Network>POWER DISTRIBUTION>INTEGRATION RELAY>INSTALLATION
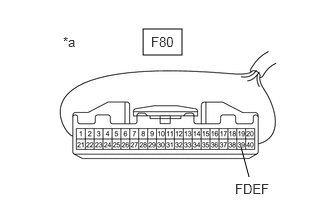

b.
B364280C04
1.49,0.302 1.896,0.573 0.406,0.271 2.594,1.844 2.51,1.531 false 0.656,0.354 0.969,0.552 0.313,0.198 10 false *a 1.573,0.354 2.031,0.552 0.458,0.198 10 false F80 2.448,1.885 3.063,2.083 0.615,0.198 10 false FDEF
*a Front view of wire harness connector(to Air Conditioning Amplifier Assembly)


Measure the voltage according to the value(s) in the table below.

Standard Voltage:
Tester Connection Condition Specified Condition
F80-39 (FDEF) - Body ground Ignition switch ON, outer mirror heater switch assembly off 11 to 14 V


Result:
Proceed to
OK
NG


OK

9.CHECK AIR CONDITIONING AMPLIFIER ASSEMBLY

NG

REPLACE SEMICONDUCTOR PWR INTEGRATION ECU

9.CHECK AIR CONDITIONING AMPLIFIER ASSEMBLY
a.

Reconnect the F80 air conditioning amplifier assembly connector.
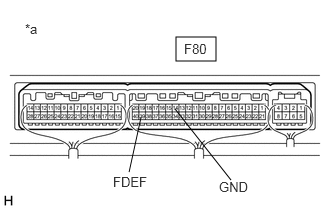

b.
E285437C07
1.833,0.385 2.25,0.635 0.417,0.25 1.344,1.792 1.469,1.219 false 2.406,1.875 1.823,1.135 false 0.26,0.219 0.573,0.417 0.313,0.198 10 false *a 1.917,0.427 2.375,0.625 0.458,0.198 10 false F80 1.177,1.813 1.583,1.99 0.406,0.177 10 false FDEF 2.281,1.865 2.74,2.063 0.458,0.198 10 false GND
*a Component with harness connected
(Air Conditioning Amplifier Assembly)


Measure the voltage according to the value(s) in the table below.

Standard Voltage:
Tester Connection Condition Specified Condition
F80-39 (FDEF) - F80-14 (GND) Ignition switch ON, outer mirror heater switch assembly on Below 2.2 V
F80-39 (FDEF) - F80-14 (GND) Ignition switch ON, outer mirror heater switch assembly off 11 to 14 V


Result:
Proceed to
OK
NG


OK

10.CHECK HARNESS AND CONNECTOR (SEMICONDUCTOR PWR INTEGRATION ECU - WINDSHIELD GLASS (WINDSHIELD DEICER WIRE))

NG

REPLACE AIR CONDITIONING AMPLIFIER ASSEMBLY

10.CHECK HARNESS AND CONNECTOR (SEMICONDUCTOR PWR INTEGRATION ECU - WINDSHIELD GLASS (WINDSHIELD DEICER WIRE))
a.

Disconnect the 1E semiconductor pwr integration ECU connector.
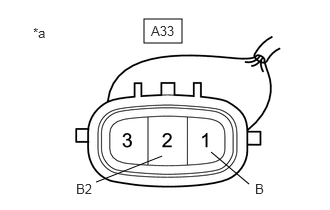

b.

Disconnect the A33 windshield glass (windshield deicer wire) connector.


c.

Measure the resistance according to the value(s) in the table below.

Standard Resistance:
Tester Connection Condition Specified Condition
1E-8 (DICR) - A33-2 (B2) Always Below 1 Ω
1E-8 (DICR) - A33-1 (B) Always Below 1 Ω


Result:
Proceed to
OK
NG


OK

11.CHECK SEMICONDUCTOR PWR INTEGRATION ECU

NG

REPAIR OR REPLACE HARNESS OR CONNECTOR

11.CHECK SEMICONDUCTOR PWR INTEGRATION ECU
a.

Reconnect the 1E semiconductor pwr integration ECU connector.


b.
B352093C03
1.5,0.198 1.896,0.448 0.396,0.25 2.594,1.917 2.198,1.583 false 1,1.896 1.688,1.625 false 0.344,0.26 0.656,0.458 0.313,0.198 10 false *a 1.573,0.24 2.031,0.438 0.458,0.198 10 false A33 2.656,1.885 2.969,2.083 0.313,0.198 10 false B 0.792,1.885 1.01,2.083 0.219,0.198 10 false B2
*a Front view of wire harness connector
(to Windshield Glass (Windshield Deicer Wire))


Measure the voltage according to the value(s) in the table below.

Standard Voltage:
Tester Connection Condition Specified Condition
A33-2 (B2) - Body ground Ignition switch ON, outer mirror heater switch assembly off Below 1 V
A33-2 (B2) - Body ground Ignition switch ON, outer mirror heater switch assembly on 11 to 14 V
A33-1 (B) - Body ground Ignition switch ON, outer mirror heater switch assembly off Below 1 V
A33-1 (B) - Body ground Ignition switch ON, outer mirror heater switch assembly on 11 to 14 V


Result:
Proceed to
OK
NG


OK

12.CHECK HARNESS AND CONNECTOR (WINDSHIELD GLASS (WINDSHIELD DEICER WIRE) - BODY GROUND)

NG

REPLACE SEMICONDUCTOR PWR INTEGRATION ECU

12.CHECK HARNESS AND CONNECTOR (WINDSHIELD GLASS (WINDSHIELD DEICER WIRE) - BODY GROUND)
a.

Measure the resistance according to the value(s) in the table below.

Standard Resistance:
Tester Connection Condition Specified Condition
A33-3 (E) - Body ground Always Below 1 Ω


Result:
Proceed to
OK
NG


OK

REPLACE WINDSHIELD GLASS (WINDSHIELD DEICER WIRE)

NG

REPAIR OR REPLACE HARNESS OR CONNECTOR