INTERIOR PANELS / TRIM ROOF HEADLINING REMOVAL
PROCEDURE

 58410B
1.REMOVE DECK BOARD ASSEMBLY
Remove the deck board assembly.
58409A
2.REMOVE NO. 3 DECK BOARD SUB-ASSEMBLY
Remove the No. 3 deck board sub-assembly.
64910J
3.REMOVE TONNEAU COVER ASSEMBLY
Remove the tonneau cover assembly.
64742C
4.REMOVE DECK SIDE TRIM BOX LH
Fold the rear No. 2 seatback assembly LH forward.
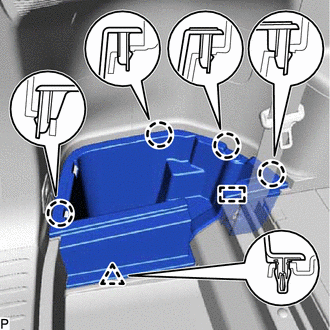
Disengage the 4 claws, clip and guide to remove the deck side trim box LH.
64993
5.REMOVE REAR DECK FLOOR BOX
Fold the rear No. 2 seatback assembly RH forward.
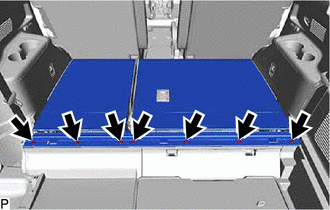
Using a clip remover, remove the 7 clips.
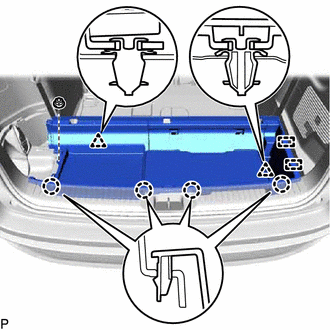
Remove the nut.
Disengage the 4 claws, 2 clips and 2 guides to remove the rear deck floor box.
58387B
6.REMOVE REAR FLOOR FINISH PLATE
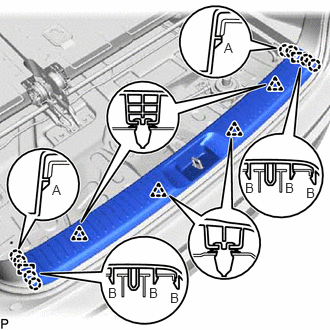
Disengage the 2 claws (A).
Disengage the 6 claws (B) and 2 guides.
Disengage the 4 clips to remove the rear floor finish plate.
7.REMOVE REAR NO. 2 SEAT ASSEMBLY
67914
8.REMOVE FRONT DOOR SCUFF PLATE LH
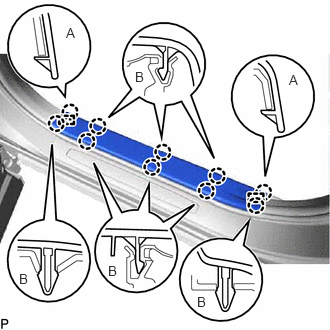
Disengage the 2 claws (A).
Disengage the 8 claws (B) and 2 guides to remove the front door scuff plate LH.
62112A
9.REMOVE COWL SIDE TRIM SUB-ASSEMBLY LH
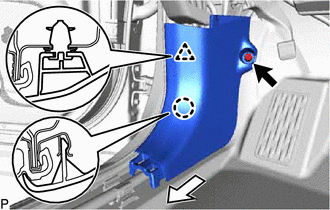
Remove the clip.
Disengage the claw and clip to remove the cowl side trim sub-assembly LH as shown in the illustration.
10.REMOVE FRONT DOOR OPENING TRIM WEATHERSTRIP LH
Remove the front door opening trim weatherstrip LH.
62212
11.REMOVE FRONT PILLAR GARNISH LH
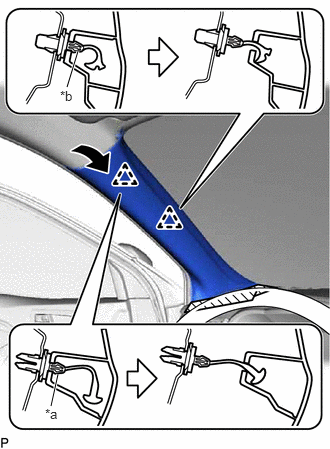
| *a | Front Pillar Garnish Clip (A) |
| *b | Front Pillar Garnish Clip (B) |

|
Protective Tape |
Apply protective tape around the front pillar garnish LH as shown in the illustration.
Pull the upper part of the front pillar garnish LH toward the inside of the cabin and disengage the front pillar garnish LH from the base of the 2 front pillar garnish clips.
- HINT:
-
Let the front pillar garnish LH hang from the 2 front pillar garnish clips.
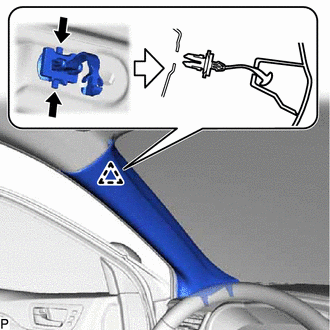
While pushing the tabs on the front pillar garnish clip (A) in the direction indicated by the arrow shown in the illustration, disengage the front pillar garnish clip (A).
- NOTICE:
-
A front pillar garnish clip (A) is reusable if it is not damaged.
| *a | Protective Tape |
| *b | 90° |
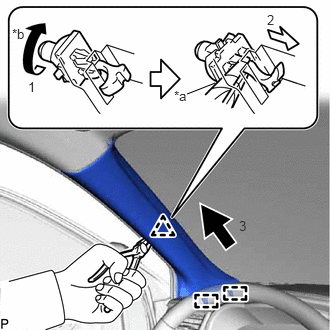
Using needle-nose pliers with the tips wrapped with protective tape, rotate the front pillar garnish clip (B) 90° in the direction indicated by the arrow (1) shown in the illustration.
Pull the front pillar garnish LH in the direction indicated by the arrow (2) shown in the illustration to disengage it from the front pillar garnish clip (B).
- NOTICE:
- ·
A front pillar garnish clip (B) is reusable if it is not removed from the vehicle and is not damaged.
·Replace the front pillar garnish clip (B) with a new one if it is removed from the vehicle.
Pull the front pillar garnish LH in the direction indicated by the arrow (3) shown in the illustration to disengage the 2 guides to remove the front pillar garnish LH.
| *1 | Curtain Shield Airbag Assembly LH |
| *a | Protective Cover |
| *b | Adhesive Tape |
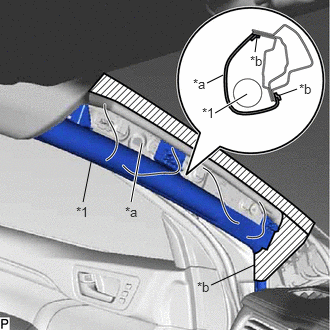
Protect the curtain shield airbag assembly LH.
Cover the curtain shield airbag assembly LH with a piece of cloth or nylon and secure the edges of the cover with tape as shown in the illustration.
- NOTICE:
-
Cover the curtain shield airbag assembly LH with a protective cover as soon as the front pillar garnish LH is removed.
72138M
12.REMOVE REAR OUTER SEAT TRACK BRACKET COVER LH
67918A
13.REMOVE REAR DOOR SCUFF PLATE LH
Lift up the rear seat adjusting handle and move the rear No. 1 seat assembly LH to the foremost position.
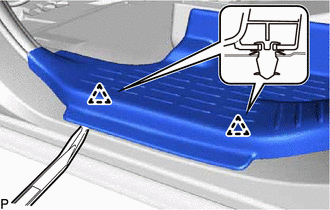
Using a moulding remover, disengage the 2 clips.
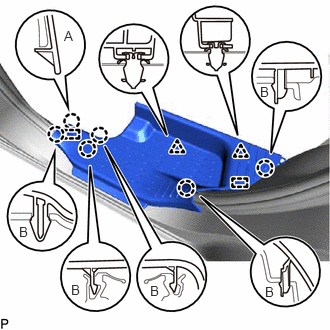
Disengage the claw (A).
Disengage the 5 claws (B), 2 clips and 2 guides to remove the rear door scuff plate LH.
14.REMOVE REAR DOOR OPENING TRIM WEATHERSTRIP LH
Remove the rear door opening trim weatherstrip LH.
62414A
15.REMOVE LOWER CENTER PILLAR GARNISH LH
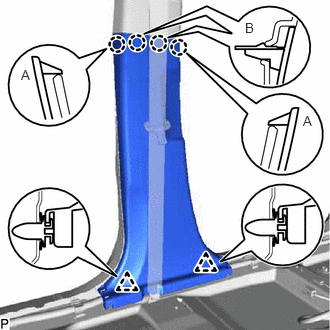
Disengage the 2 claws (A).
Disengage the 2 claws (B) and 2 clips to remove the lower center pillar garnish LH.
73220
16.DISCONNECT FRONT SEAT OUTER BELT ASSEMBLY LH
62412
17.REMOVE CENTER PILLAR GARNISH LH
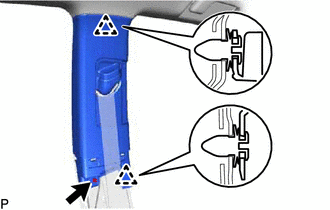
Remove the screw.
Disengage the 2 clips.
Pass the anchor of the front seat outer belt assembly LH through the center pillar garnish LH and remove the center pillar garnish LH.
67913
18.REMOVE FRONT DOOR SCUFF PLATE RH
- HINT:
-
Use the same procedure as for the LH side.
62111A
19.REMOVE COWL SIDE TRIM SUB-ASSEMBLY RH
- HINT:
-
Use the same procedure as for the LH side.
20.REMOVE FRONT DOOR OPENING TRIM WEATHERSTRIP RH
- HINT:
-
Use the same procedure as for the LH side.
62211
21.REMOVE FRONT PILLAR GARNISH RH
- HINT:
-
Use the same procedure as for the LH side.
72137S
22.REMOVE REAR OUTER SEAT TRACK BRACKET COVER RH
- HINT:
-
Use the same procedure as for the LH side.
67917A
23.REMOVE REAR DOOR SCUFF PLATE RH
- HINT:
-
Use the same procedure as for the LH side.
24.REMOVE REAR DOOR OPENING TRIM WEATHERSTRIP RH
- HINT:
-
Use the same procedure as for the LH side.
62413A
25.REMOVE LOWER CENTER PILLAR GARNISH RH
- HINT:
-
Use the same procedure as for the LH side.
73210
26.DISCONNECT FRONT SEAT OUTER BELT ASSEMBLY RH
- HINT:
-
Use the same procedure as for the LH side.
62411
27.REMOVE CENTER PILLAR GARNISH RH
- HINT:
-
Use the same procedure as for the LH side.
64713F
28.REMOVE FRONT DECK SIDE TRIM COVER LH
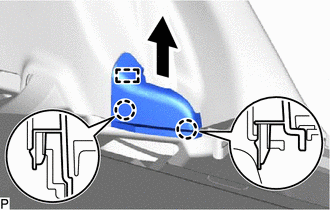
Disengage the 2 claws and guide to remove the front deck side trim cover LH as shown in the illustration.
73370C
29.DISCONNECT REAR NO. 1 SEAT OUTER BELT ASSEMBLY LH
64715E
30.REMOVE NO. 2 DECK SIDE TRIM COVER
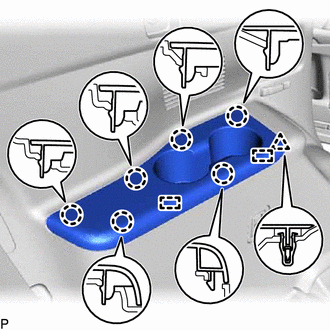
Disengage the 6 claws, clip and 2 guides to remove the No. 2 deck side trim cover.
64735
31.REMOVE DECK TRIM SIDE SERVICE HOLE COVER
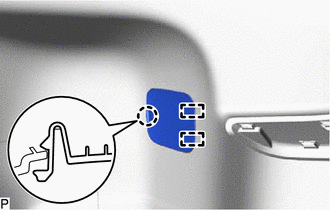
Disengage the claw and 2 guides to remove the deck trim side service hole cover.
73570
32.DISCONNECT REAR NO. 2 SEAT OUTER BELT ASSEMBLY LH
64974
33.REMOVE DECK TRIM POCKET COVER (for LH Side)
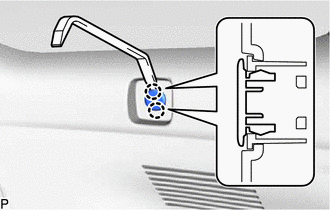
Using a moulding remover, disengage the 2 claws to remove the deck trim pocket cover.
64725F
34.REMOVE NO. 1 LUGGAGE COMPARTMENT TRIM HOOK (for LH Side)
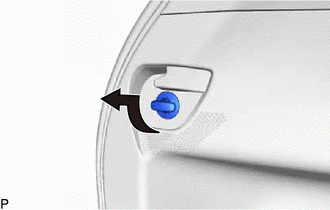
Turn the No. 1 luggage compartment trim hook as shown in the illustration to remove it.
66311
35.REMOVE ROPE HOOK (for LH Side)
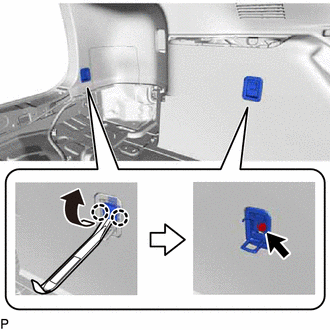
Using a moulding remover, disengage the 4 claws as shown in the illustration.
Remove the 2 bolts and 2 rope hooks.
64740C
36.REMOVE DECK TRIM SIDE PANEL ASSEMBLY LH
Remove the 3 bolts.
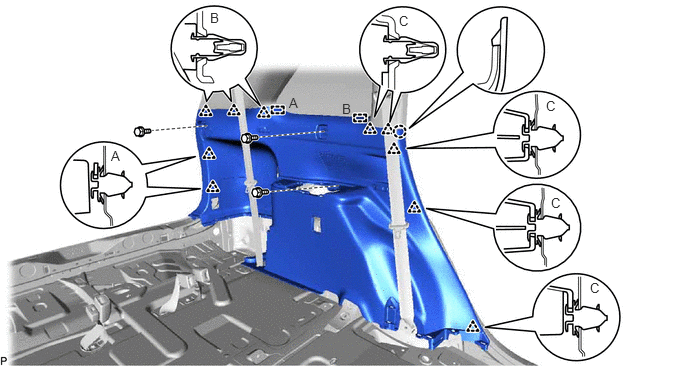
Disengage the 2 clips (A).
Disengage the 3 clips (B) and guide (A).
- HINT:
-
Disengage the clips (B) and guide (A) from the rear side of the deck trim side panel assembly LH.
Disengage the claw.
Disengage the 5 clips (C) and guide (B) to remove the deck trim side panel assembly LH.
- HINT:
-
Disengage the clips (C) and guide (B) from the upper side of the deck trim side panel assembly LH.
62639A
37.REMOVE QUARTER PILLAR GARNISH LH
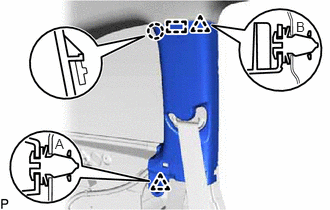
Disengage the clip (A).
Disengage the claw.
Disengage the clip (B) and guide.
Pass the anchor of the rear No. 1 seat outer belt assembly LH through the quarter pillar garnish LH and remove the quarter pillar garnish LH.
62480A
38.REMOVE INNER ROOF SIDE GARNISH ASSEMBLY LH
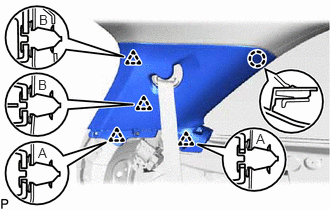
Disengage the 2 clips (A).
Disengage the 2 clips (B) and claw.
Pass the anchor of the rear No. 2 seat outer belt assembly LH through the inner roof side garnish assembly LH and remove the inner roof side garnish assembly LH.
64712F
39.REMOVE FRONT DECK SIDE TRIM COVER RH
- HINT:
-
Use the same procedure as for the LH side.
73360C
40.DISCONNECT REAR NO. 1 SEAT OUTER BELT ASSEMBLY RH
- HINT:
-
Use the same procedure as for the LH side.
64714H
41.REMOVE NO. 1 DECK SIDE TRIM COVER
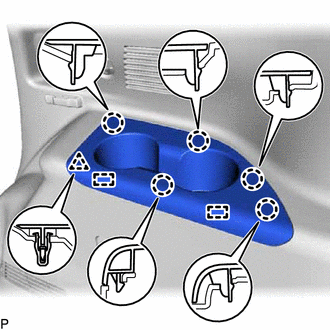
Disengage the 5 claws, clip and 2 guides to remove the No. 1 deck side trim cover.
73297E
42.REMOVE DECK TRIM SIDE BELT HOLE COVER RH
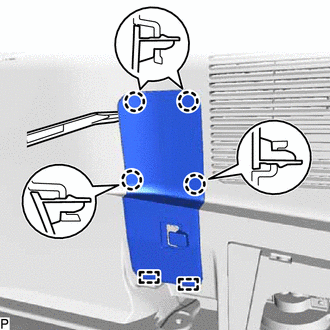
Using a moulding remover, disengage the 4 claws and 2 guides to remove the deck trim side belt hole cover RH.
73560
43.DISCONNECT REAR NO. 2 SEAT OUTER BELT ASSEMBLY RH
- HINT:
-
Use the same procedure as for the LH side.
62627D
44.REMOVE SIDE TRIM COVER RH (w/o Rear Automatic Air Conditioning System)
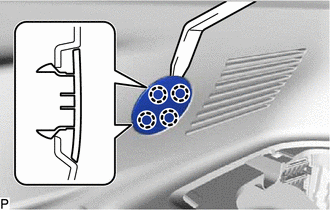
Using a moulding remover, disengage the 4 claws to remove the side trim cover RH.
88625T
45.REMOVE COOLER (NO. 2 ROOM TEMP. SENSOR) THERMISTOR (w/ Rear Automatic Air Conditioning System)
81330
46.REMOVE NO. 1 LUGGAGE COMPARTMENT LIGHT ASSEMBLY
64974
47.REMOVE DECK TRIM POCKET COVER (for RH Side)
- HINT:
-
Use the same procedure as for the LH side.
64725F
48.REMOVE NO. 1 LUGGAGE COMPARTMENT TRIM HOOK (for RH Side)
- HINT:
-
Use the same procedure as for the LH side.
66311
49.REMOVE ROPE HOOK (for RH Side)
- HINT:
-
Use the same procedure as for the LH side.
64730B
50.REMOVE DECK TRIM SIDE PANEL ASSEMBLY RH
Remove the 3 bolts.
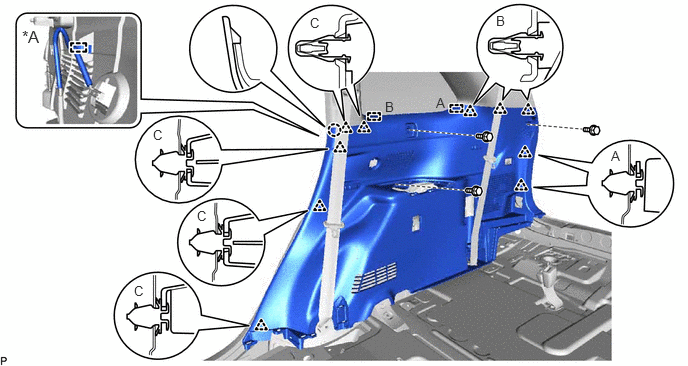
| *A | w/ Rear Automatic Air Conditioning System | - | - |
Disengage the 2 clips (A).
Disengage the 3 clips (B) and guide (A).
- HINT:
-
Disengage the clips (B) and guide (A) from the rear side of the deck trim side panel assembly RH.
Disengage the claw.
w/o Rear Automatic Air Conditioning System:
Disengage the 5 clips (C) and guide (B) to remove the deck trim side panel assembly RH.
- HINT:
-
Disengage the clips (C) and guide (B) from the upper side of the deck trim side panel assembly RH.
w/ Rear Automatic Air Conditioning System:
Disengage the 5 clips (C) and guide (B) to disconnect the deck trim side panel assembly RH.
- HINT:
-
Disengage the clips (C) and guide (B) from the upper side of the deck trim side panel assembly RH.
Disengage the clamp to remove the deck trim side panel assembly RH.
62638A
51.REMOVE QUARTER PILLAR GARNISH RH
- HINT:
-
Use the same procedure as for the LH side.
62470A
52.REMOVE INNER ROOF SIDE GARNISH ASSEMBLY RH
- HINT:
-
Use the same procedure as for the LH side.
87834
53.REMOVE INNER REAR VIEW MIRROR STAY HOLDER COVER (w/ EC Mirror)
89943
54.REMOVE RAIN SENSOR COVER (w/ Rain Sensor)
89943
55.REMOVE RAIN SENSOR COVER (w/ Lane Departure Alert System)
86466
56.REMOVE LANE DEPARTURE WARNING CAMERA COVER NO.1 (w/ Lane Departure Alert System)
81260A
57.REMOVE MAP LIGHT ASSEMBLY
86295
58.REMOVE TELEVISION BASE (w/ Rear Seat Entertainment System)
86680A
59.REMOVE TELEVISION DISPLAY ASSEMBLY (w/ Rear Seat Entertainment System)
60.REMOVE COOLER PLATE
88576C
61.REMOVE NO. 1 COOLER AIR DUCT
74610A
62.REMOVE ASSIST GRIP SUB-ASSEMBLY
- HINT:
-
Use the same procedure for all assist grip sub-assemblies.
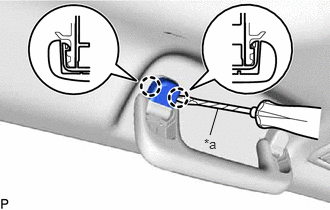
| *a | Protective Tape |
Using a screwdriver, disengage the 2 claws and remove the assist grip cover LH.
- NOTICE:
-
Do not forcibly pry the assist grip cover LH to prevent it from being deformed.
- HINT:
- ·
Tape the screwdriver tip before use.
·Use the same procedure for the RH side and LH side.
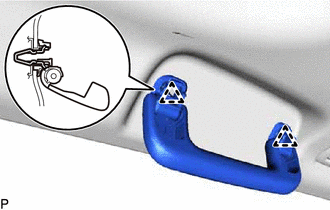
Disengage the 2 clips and remove the assist grip.
Remove the 2 clips from the vehicle body.
74620B
63.REMOVE REAR ASSIST GRIP ASSEMBLY
- HINT:
-
Use the same procedure as for the assist grip sub-assembly.
74325
64.REMOVE VISOR BRACKET COVER (for LH Side)
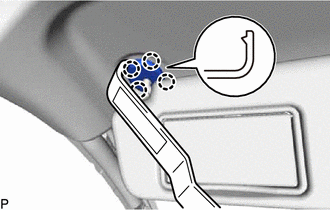
Using a moulding remover, disengage the 4 claws and remove the visor bracket cover.
74320
65.REMOVE VISOR ASSEMBLY LH
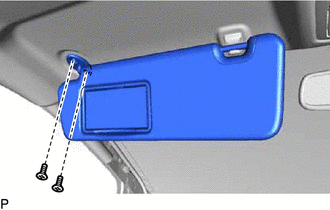
for "TORX" Screw:
Using a T25 "TORX" socket wrench, remove the 2 screws and visor assembly LH.
except "TORX" Screw:
Remove the 2 screws and visor assembly LH.
74325
66.REMOVE VISOR BRACKET COVER (for RH Side)
- HINT:
-
Use the same procedure as for the LH side.
74310
67.REMOVE VISOR ASSEMBLY RH
- HINT:
-
Use the same procedure as for the LH side.
74348
68.REMOVE VISOR HOLDER
- HINT:
-
Use the same procedure for the LH side and RH side.
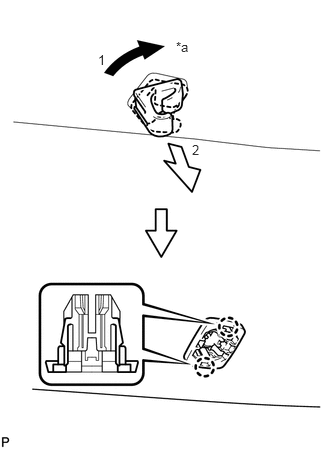
| *a | 45° |
Turn the visor holder approximately 45° and pull it out as indicated by the arrows, in the order shown in the illustration.
Disengage the 2 claws to remove the visor holder.
62452C
69.DISCONNECT REAR ROOF SIDE RAIL GARNISH LH
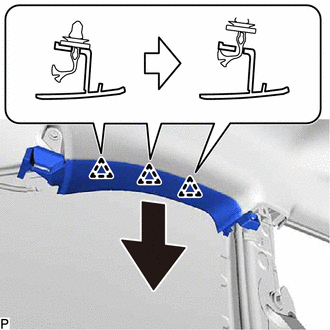
Disengage the 3 clips to disconnect the rear roof side rail garnish LH as shown in the illustration.
62451C
70.DISCONNECT REAR ROOF SIDE RAIL GARNISH RH
- HINT:
-
Use the same procedure as for the LH side.
63310
71.REMOVE ROOF HEADLINING ASSEMBLY
for Windshield Glass Side:
Disconnect each connector.
for Front Pillar LH Side (w/o Rear Seat Entertainment System):
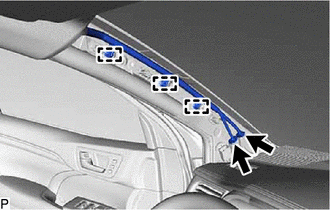
Disengage the 3 clamps.
Disconnect the 2 connectors.
for Front Pillar LH Side (w/ Rear Seat Entertainment System):
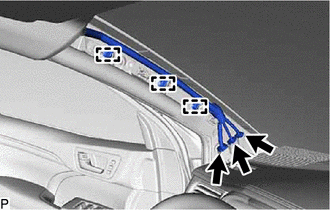
Disengage the 3 clamps.
Disconnect the 3 connectors.
for Front Pillar RH Side:
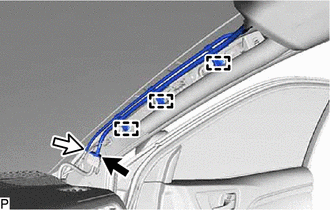
Disengage the 3 clamps.
Disconnect the connector.
Disconnect the rear washer hose assembly.
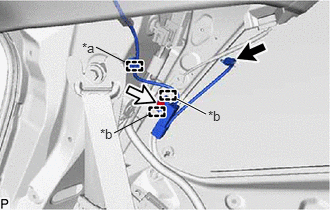
| *a | Clamp |
| *b | Guide |
for Rear Pillar LH Side (w/o DAB Function):
Disconnect the connector.
Remove the bolt.
Disengage the clamp and 2 guides.
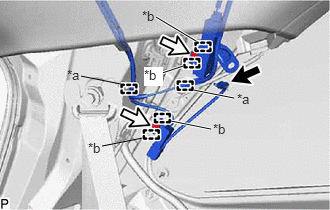
| *a | Clamp |
| *b | Guide |
for Rear Pillar LH Side (w/ DAB Function):
Disconnect the connector.
Remove the 2 bolts.
Disengage the 2 clamps and 4 guides.
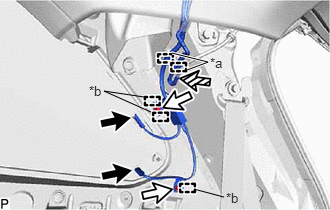
| *a | Clamp |
| *b | Guide |
for Rear Pillar RH Side:
Disconnect the 2 connectors.
Remove the 2 bolts.
Disengage the 2 clamps and 3 guides.
Disconnect the rear washer hose assembly.
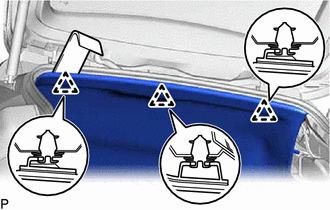
for Rear Side:
Using a moulding remover, disengage the 3 clips.
for Roof Side (for Normal Roof):
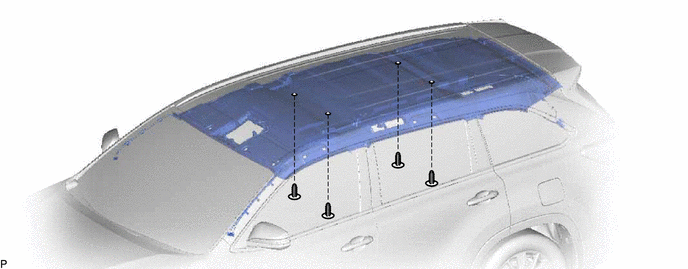
Remove the 4 clips.
for Roof Side (for Sliding Roof):
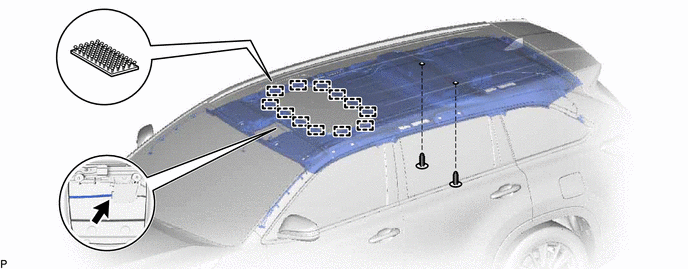
Disconnect the connector from the sliding roof drive gear sub-assembly.
Disengage the 12 fasteners.
Remove the 2 clips.
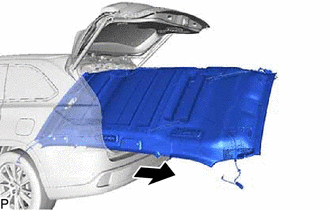
Remove the roof headlining assembly from the vehicle through the back door as shown in the illustration.
- NOTICE:
-
Do not damage the roof headlining assembly or body interior.