1AR-FE INTAKE / EXHAUST EXHAUST MANIFOLD INSTALLATION
PROCEDURE

 25586
1.INSTALL NO. 1 MANIFOLD CONVERTER INSULATOR
Install the No. 1 manifold converter insulator to the exhaust manifold converter sub-assembly (TWC: Front Catalyst) with the 4 bolts.
- Torque:
- 13.5 N*m (138 kgf*cm, 10 ft.*lbf)
17168
2.INSTALL NO. 2 EXHAUST MANIFOLD HEAT INSULATOR
Install the No. 2 exhaust manifold heat insulator to the exhaust manifold converter sub-assembly (TWC: Front Catalyst) with the 2 bolts.
- Torque:
- 13.5 N*m (138 kgf*cm, 10 ft.*lbf)
25051
3.INSTALL EXHAUST MANIFOLD CONVERTER SUB-ASSEMBLY (TWC: Front Catalyst)
Install a new exhaust manifold to head gasket to the cylinder head sub-assembly.
Temporarily install the exhaust manifold converter sub-assembly (TWC: Front Catalyst) with the 5 nuts.
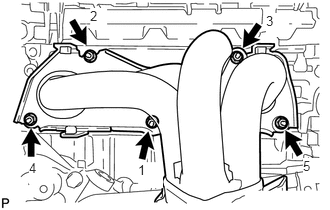
Tighten the 5 nuts in the order shown in the illustration.
- Torque:
- 35 N*m (357 kgf*cm, 26 ft.*lbf)
89467B
4.INSTALL AIR FUEL RATIO SENSOR
17167
5.INSTALL NO. 1 EXHAUST MANIFOLD HEAT INSULATOR
Install the No. 1 exhaust manifold heat insulator to the exhaust manifold converter sub-assembly (TWC: Front Catalyst) with the 4 bolts.
- Torque:
- 12 N*m (122 kgf*cm, 9 ft.*lbf)
17139
6.INSTALL NO. 2 MANIFOLD STAY
Install the No. 2 manifold stay to the exhaust manifold converter sub-assembly (TWC: Front Catalyst) and stiffening crankcase assembly with the bolt and nut.
- Torque:
- 43 N*m (438 kgf*cm, 32 ft.*lbf)
17118
7.INSTALL MANIFOLD STAY
Install the manifold stay to the exhaust manifold converter sub-assembly (TWC: Front Catalyst) and stiffening crankcase assembly with the bolt and nut.
- Torque:
- 43 N*m (438 kgf*cm, 32 ft.*lbf)
17410
8.INSTALL FRONT EXHAUST PIPE ASSEMBLY
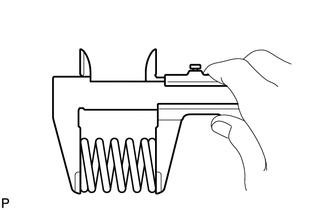
Using a vernier caliper, measure the free length of the 2 compression springs.
| Minimum | 41.5 mm (1.63 in.) |
If the free length is less than minimum, replace the compression spring.
Temporarily install a new gasket to the exhaust manifold converter sub-assembly (TWC: Front Catalyst).
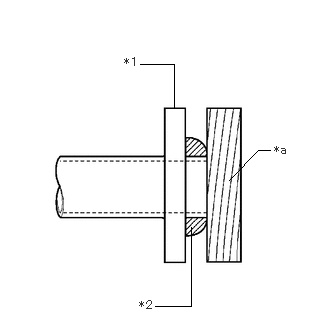
| *1 | Exhaust Manifold Converter Sub-assembly (TWC: Front Catalyst) |
| *2 | Gasket |
| *a | Wooden Block |
Using a plastic hammer and wooden block, tap in the gasket until its surface is flush with the exhaust manifold converter sub-assembly (TWC: Front Catalyst).
- NOTICE:
- ·
Be sure to install the gasket in the correct direction.
·Do not reuse the gasket.
·Do not damage the gasket.
·Do not push in the gasket by using the exhaust pipe when connecting it.
Install a new gasket to the front exhaust pipe assembly.
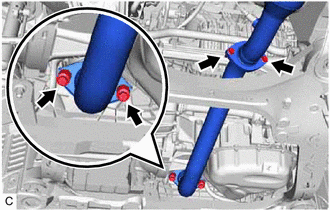
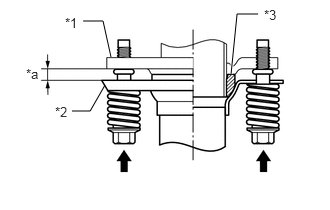
Install the front exhaust pipe assembly with the 2 compression springs and 4 bolts.
- Torque:
- 43 N*m (438 kgf*cm, 32 ft.*lbf)
- HINT:
-
 0.865,0.219 1.073,0.219 1.073,0.219 1.156,0.594 false 0.75,1.156 0.938,1.156 0.938,1.156 1.094,0.885 false 2.688,0.146 2.469,0.146 2.469,0.146 2.406,0.771 true 0.677,0.156 0.99,0.313 0.313,0.156 10 false *1 0.573,1.083 0.885,1.24 0.313,0.156 10 false *2 2.75,0.073 3.063,0.229 0.313,0.156 10 false *3 0.271,0.688 0.583,0.844 0.313,0.156 10 false *a
*1 Exhaust Manifold Converter Sub-assembly (TWC: Front Catalyst) *2 Front Exhaust Pipe Assembly *3 Gasket *a Space between Flanges: 8.5 mm (0.335 in.)
-
After installation, check that the space between the flanges of the exhaust manifold converter sub-assembly (TWC: Front Catalyst) and front exhaust pipe assembly is consistent front-to-rear and left-to-right.
58166
9.INSTALL FRONT FLOOR COVER LH
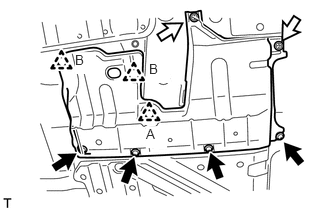

|
Bolt |

|
Screw |
Connect the 2 clips (B) to install the front floor cover LH.
Install the clip (A), 2 screws and 4 bolts to the front floor cover LH.
51442
10.INSTALL NO. 2 ENGINE UNDER COVER
51441
11.INSTALL NO. 1 ENGINE UNDER COVER
12.INSPECT FOR EXHAUST GAS LEAK