SUPPLEMENTAL RESTRAINT SYSTEMS STEERING PAD INSTALLATION
PROCEDURE

 45130
1.INSTALL HORN BUTTON ASSEMBLY
Check that the ignition switch is off.
Check that the cable is disconnected from the negative (-) auxiliary battery terminal.
- CAUTION:
-
Wait at least 90 seconds after disconnecting the cable from the negative (-) auxiliary battery terminal to disable the SRS system.
When using a new spiral cable sub-assembly:
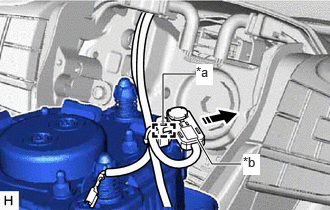
| *a | Wire Harness Clamp |
| *b | Airbag Connector |

|
Remove in this Direction |
Engage the wire harness clamp and disconnect the airbag connector as shown in the illustration.
- HINT:
-
Be sure to engage the wire harness clamp until it is locked.
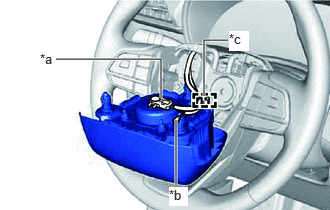
| *a | Airbag Connector |
| *b | Horn Connector |
| *c | Wire Harness Clamp |
When reusing a spiral cable sub-assembly or spiral cable with sensor sub-assembly:
Engage the wire harness clamp.
- HINT:
-
Be sure to engage the wire harness clamp until it is locked.
Connect the airbag connector to the horn button assembly.
- NOTICE:
-
When connecting any airbag connector, take care not to damage the airbag wire harness.
- HINT:
-
Refer to How to Connect or Disconnect Airbag Connector.
Connect the horn connector to the horn button assembly.
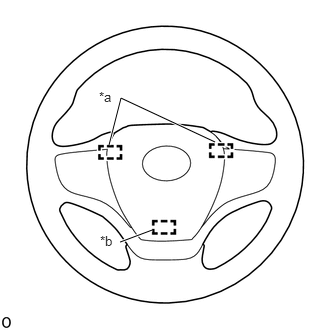
| *a | Upper Pin |
| *b | Lower Pin |
Push the horn button assembly to engage the 3 pins carefully and install the horn button assembly.
- NOTICE:
- ·
Make sure that the pins are securely inserted into the steering wheel assembly holes.
·Make sure to engage the 2 upper pins first.
·Make sure that the horn button assembly is securely installed.
45187
2.INSTALL LOWER NO. 3 STEERING WHEEL COVER
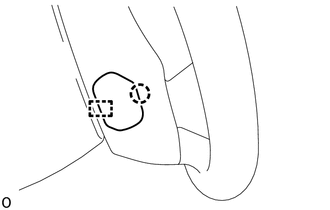
Insert the guide and engage the claw to install the lower No. 3 steering wheel cover.
45186
3.INSTALL LOWER NO. 2 STEERING WHEEL COVER
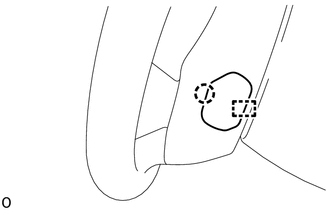
Insert the guide and engage the claw to install the lower No. 2 steering wheel cover.
4.CONNECT CABLE TO NEGATIVE AUXILIARY BATTERY TERMINAL
for 2GR-FKS: Click hereGeneral>MAINTENANCE>2GR-FKS BATTERY>INSTALLATION
for A25A-FXS, A25B-FXS: Click hereGeneral>MAINTENANCE>A25A-FXS, A25B-FXS AUXILIARY BATTERY>INSTALLATION
- NOTICE:
-
When disconnecting the cable, some systems need to be initialized after the cable is reconnected.
-
Click hereGeneral>INTRODUCTION>REPAIR INSTRUCTION>INITIALIZATION
58441L
5.INSTALL BATTERY SERVICE HOLE COVER (for HV Model)
45130
6.INSPECT HORN BUTTON ASSEMBLY
Make sure that the horn sounds.
If the horn does not sound, inspect the horn system.
Click hereVehicle Exterior>HORN>HORN SYSTEM>PROBLEM SYMPTOMS TABLE
7. PERFORM DIAGNOSTIC SYSTEM CHECK
8.INSPECT SRS WARNING LIGHT