INTERIOR PANELS / TRIM INSTRUMENT PANEL SAFETY PAD INSTALLATION
PROCEDURE

 1.INSTALL INSTRUMENT PANEL SAFETY PAD SUB-ASSEMBLY
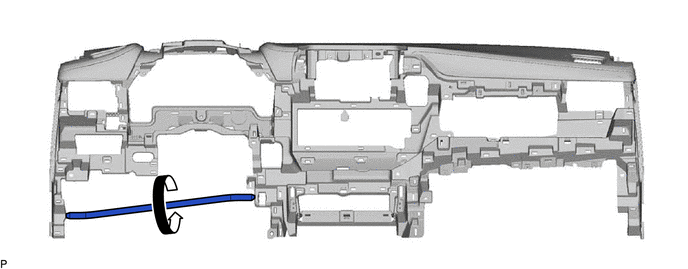
When installing a new instrument panel safety pad sub-assembly:
Immediately before installing the instrument panel safety pad sub-assembly, twist and cut off the portion as shown in the illustration.
Engage the 5 guides to temporarily install the instrument panel safety pad sub-assembly as shown in the illustration.
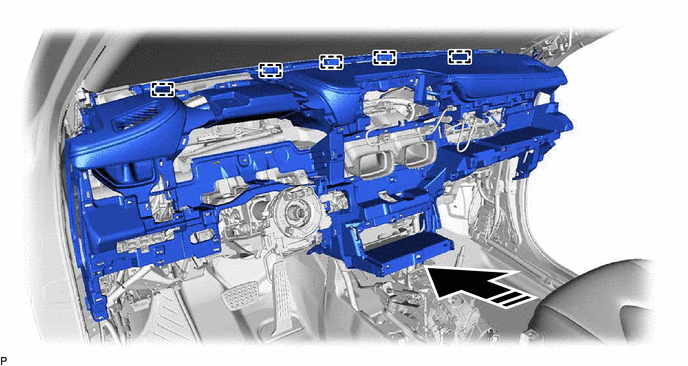

|
Install in this Direction | - | - |
- NOTICE:
- ·
Do not damage the instrument panel safety pad sub-assembly.
·Do not allow the wire harnesses to interfere with the surrounding parts.
Install the instrument panel safety pad sub-assembly with the 5 bolts <A>, 2 bolts <E> and nut <C>.
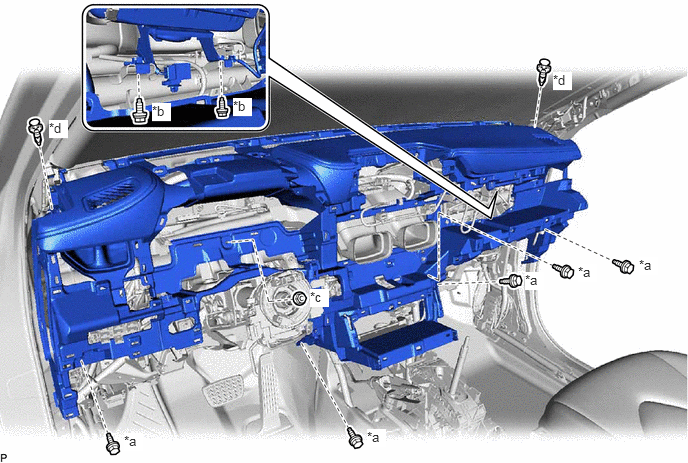
| *a | Bolt <A> | *b | Bolt <E> |
| *c | Nut <C> | *d | Clip |
- Torque:
- Bolt <E> : 20 N*m (204 kgf*cm, 15 ft.*lbf)
Install the 2 clips.
for LHD:
Engage each clamp.
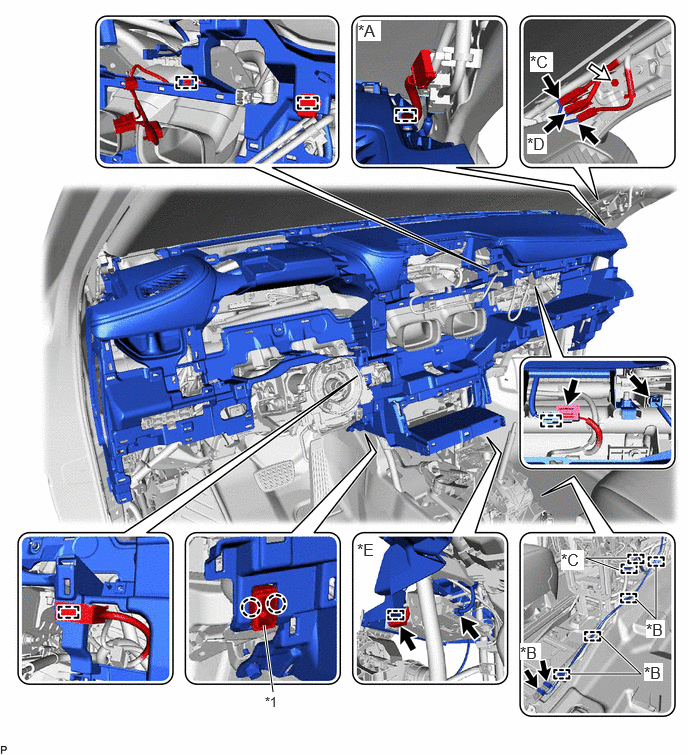
| *A | for 11 Speakers | *B | for 12.3 Inch Display |
| *C | w/ Rear Seat Entertainment System | *D | w/ Telematics Transceiver |
| *E | w/ Navigation System | - | - |
| *1 | Cooler (Room Temp. Sensor) Thermistor | - | - |
Connect the airbag connector.
- HINT:
-
Refer to How to Connect or Disconnect Airbag Connector.
Connect each connector.
Install the bolt <F>.
- Torque:
- 12.5 N*m (127 kgf*cm, 9 ft.*lbf)
Engage the 2 claws to connect the cooler (room temp. sensor) thermistor.
for RHD:
Engage each clamp.
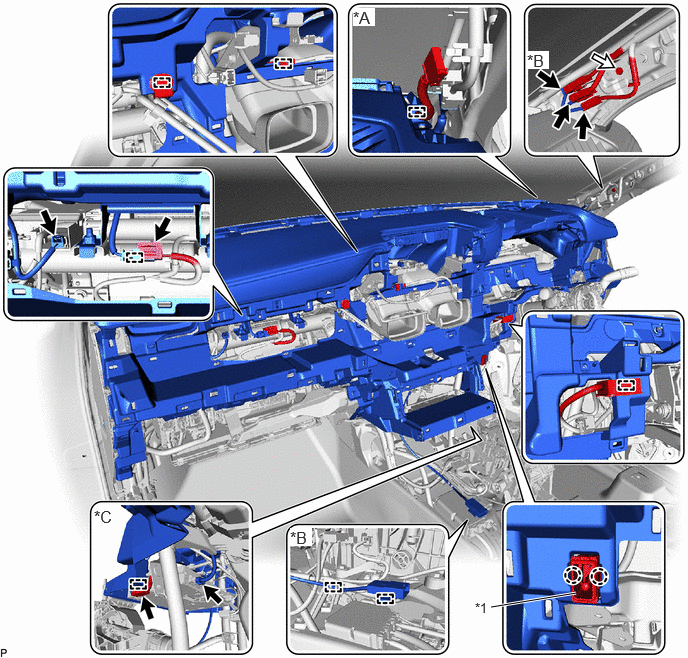
| *A | for 11 Speakers | *B | w/ Rear Seat Entertainment System |
| *C | w/ Navigation System | - | - |
| *1 | Cooler (Room Temp. Sensor) Thermistor | - | - |
Connect the airbag connector.
- HINT:
-
Refer to How to Connect or Disconnect Airbag Connector.
Connect each connector.
Install the bolt <F>.
- Torque:
- 12.5 N*m (127 kgf*cm, 9 ft.*lbf)
Engage the 2 claws to connect the cooler (room temp. sensor) thermistor.
86740
2.INSTALL TELEMATICS TRANSCEIVER (w/ Telematics Transceiver)
for ERA-GLONASS:
Click hereAudio / Visual / Telematics>TELEMATICS>TELEMATICS TRANSCEIVER>INSTALLATION
3.INSTALL TELEMATICS TRANSCEIVER WITH BRACKET (w/ Telematics Transceiver)
for eCall:
Click hereAudio / Visual / Telematics>TELEMATICS>TELEMATICS TRANSCEIVER>INSTALLATION
55471A
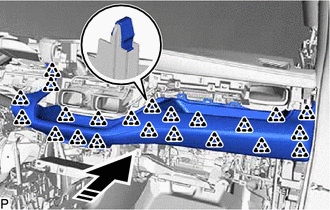
4.INSTALL INSTRUMENT CLUSTER FINISH PANEL ORNAMENT
Connect the connector.
|
|
Install in this Direction |
Engage the 22 clips as shown in the illustration to install the instrument cluster finish panel ornament.
58816B
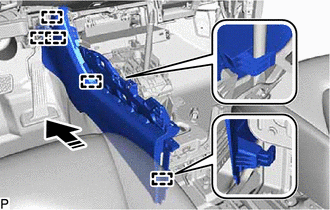
5.INSTALL FRONT CONSOLE BOX INSERT
|
|
Install in this Direction |
Engage the 5 guides as shown in the illustration.
|
|
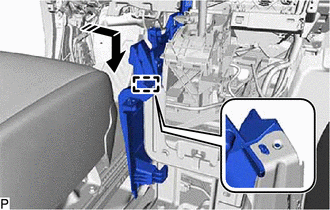
Install in this Direction |
Engage the guide as shown in the illustration.
Install the front console box insert with the 2 screws <D>.
58817A
6.INSTALL FRONT NO. 2 CONSOLE BOX INSERT
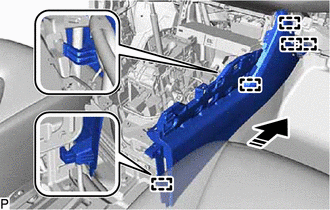
|
|
Install in this Direction |
Engage the 5 guides as shown in the illustration.
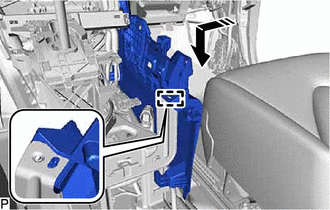
|
|
Install in this Direction |
Engage the guide as shown in the illustration.
Install the front No. 2 console box insert with the 2 screws <D>.
55434F
7.INSTALL LOWER CENTER INSTRUMENT PANEL FINISH PANEL
Connect each connector.
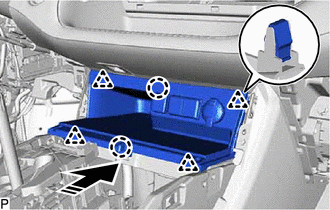
|
|
Install in this Direction |
Engage the 4 clips and 2 claws as shown in the illustration to install the lower center instrument panel finish panel.
55981
8.INSTALL NO. 1 DEFROSTER NOZZLE GARNISH
Connect the connector.
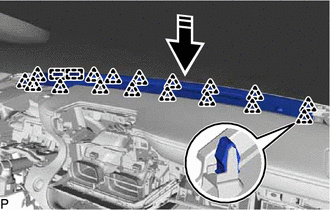
|
|
Install in this Direction |
Engage the 2 guides and 17 clips as shown in the illustration to install the No. 1 defroster nozzle garnish.
86160P
9.INSTALL FRONT NO. 2 SPEAKER ASSEMBLY (for RH Side)
55473B
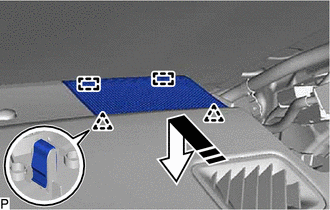
10.INSTALL NO. 2 INSTRUMENT PANEL SPEAKER PANEL
|
|
Install in this Direction |
Engage the 2 guides and 2 clips as shown in the illustration to install the No. 2 instrument panel speaker panel.
62211U
11.INSTALL FRONT PILLAR GARNISH ASSEMBLY RH
- HINT:
-
Use the same procedure as for the LH side.
-
Click hereVehicle Interior>INTERIOR PANELS / TRIM>ROOF HEADLINING>INSTALLATION
86160P
12.INSTALL FRONT NO. 2 SPEAKER ASSEMBLY (for LH Side)
55472C
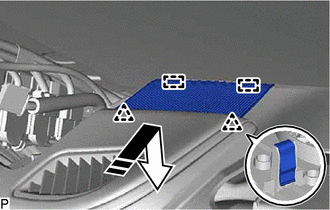
13.INSTALL NO. 1 INSTRUMENT PANEL SPEAKER PANEL
|
|
Install in this Direction |
Engage the 2 guides and 2 clips as shown in the illustration to install the No. 1 instrument panel speaker panel.
62212B
14.INSTALL FRONT PILLAR GARNISH ASSEMBLY LH
55303B
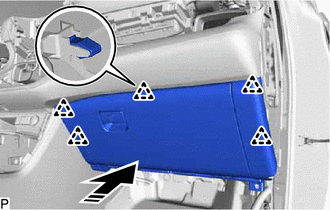
15.INSTALL LOWER INSTRUMENT PANEL SUB-ASSEMBLY
Engage the clamp.
Connect the connector.
|
|
Install in this Direction |
Engage the 5 clips as shown in the illustration.
Install the 2 bolts <A>.
Open the glove compartment door sub-assembly.
Install the lower instrument panel sub-assembly with the 3 screws <D>.
Close the glove compartment door sub-assembly.
55607
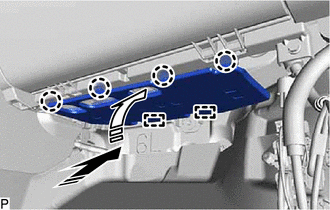
16.INSTALL NO. 2 INSTRUMENT PANEL UNDER COVER SUB-ASSEMBLY
|
|
Install in this Direction (1) |

|
Install in this Direction (2) |
Engage the 2 guides and 4 claws as shown in the illustration to install the No. 2 instrument panel under cover sub-assembly.
55435A
17.INSTALL INSTRUMENT PANEL FINISH END PANEL RH
w/ Airbag Cut Off Switch:
Connect the connector.
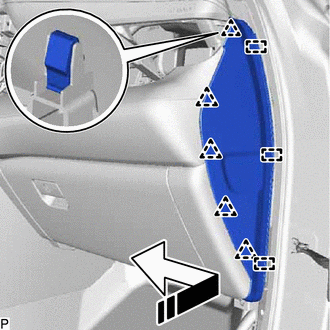
|
|
Install in this Direction |
Engage the 3 guides and 5 clips as shown in the illustration to install the instrument panel finish end panel RH.
62311B
18.INSTALL FRONT DOOR OPENING TRIM WEATHERSTRIP RH
- HINT:
-
Use the same procedure as for the LH side.
-
Click hereVehicle Exterior>DOOR / HATCH>FRONT DOOR OPENING TRIM WEATHERSTRIP>INSTALLATION
62111A
19.INSTALL COWL SIDE TRIM SUB-ASSEMBLY RH
- HINT:
-
Use the same procedure as for the LH side.
-
Click hereVehicle Interior>INTERIOR PANELS / TRIM>ROOF HEADLINING>INSTALLATION
67913
20.INSTALL FRONT DOOR SCUFF PLATE RH
- HINT:
-
Use the same procedure as for the LH side.
-
Click hereVehicle Interior>INTERIOR PANELS / TRIM>ROOF HEADLINING>INSTALLATION
21.INSTALL RADIO RECEIVER ASSEMBLY WITH BRACKET (for 12.3 Inch Display)
55420A
22.INSTALL CENTER INSTRUMENT CLUSTER FINISH PANEL ASSEMBLY
w/ Interior Illumination:
Engage the clamp.
Connect the 2 connectors.
Engage the clamp.
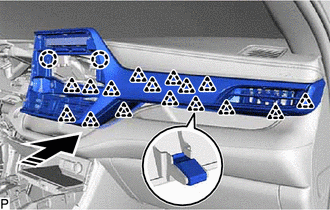
|
|
Install in this Direction |
Engage the 16 clips and 2 claws as shown in the illustration.
Connect the connector.
Install the center instrument cluster finish panel assembly with the 2 screws <B>.
23.INSTALL RADIO AND DISPLAY ASSEMBLY WITH AIR CONDITIONING CONTROL (for 8 Inch Display)
24.INSTALL MULTI-DISPLAY WITH AIR CONDITIONING CONTROL (for 12.3 Inch Display)
55405B
25.INSTALL CENTER INSTRUMENT CLUSTER FINISH PANEL SUB-ASSEMBLY
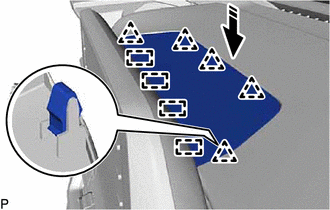
|
|
Install in this Direction |
Engage the 4 guides and 5 clips as shown in the illustration to install the center instrument cluster finish panel sub-assembly.
73900
26.INSTALL LOWER NO. 1 INSTRUMENT PANEL AIRBAG ASSEMBLY
55446A
27.INSTALL NO. 1 SWITCH HOLE BASE
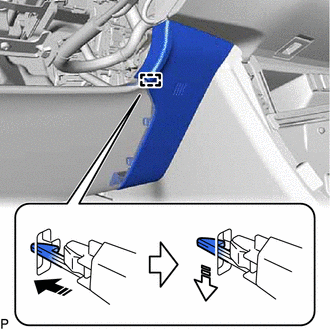
|
|
Install in this Direction (1) |
|
|
Install in this Direction (2) |
Engage the hook as shown in the illustration.
|
|
Install in this Direction |
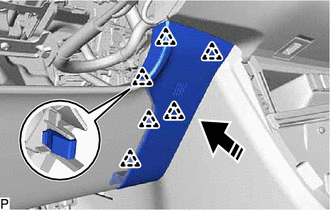
Engage the 6 clips as shown in the illustration to install the No. 1 switch hole base.
55045
28.INSTALL LOWER INSTRUMENT PANEL FINISH PANEL SUB-ASSEMBLY
Connect the connector.
|
|
Install in this Direction |
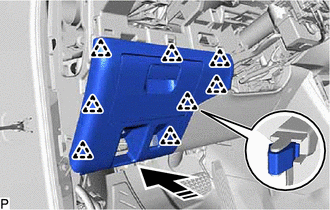
Engage the 8 clips as shown in the illustration to install the lower instrument panel finish panel sub-assembly.
53601
29.CONNECT HOOD LOCK CONTROL LEVER SUB-ASSEMBLY
Engage the 2 guides and claw to connect the hood lock control lever sub-assembly.
55606
30.INSTALL NO. 1 INSTRUMENT PANEL UNDER COVER SUB-ASSEMBLY
Engage the 2 claws to connect the DLC3.
|
|
Install in this Direction (1) |
|
|
Install in this Direction (2) |
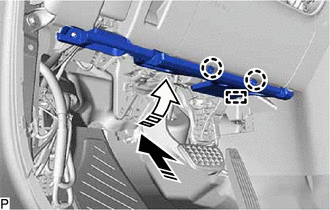
Engage the guide and 2 claws as shown in the illustration.
Install the No. 1 instrument panel under cover sub-assembly with the 3 screws <D>.
84650
31.INSTALL WINDSHIELD WIPER SWITCH ASSEMBLY
84329
32.INSTALL TURN SIGNAL SWITCH
45286B
33.INSTALL UPPER STEERING COLUMN COVER
45287
34.INSTALL LOWER STEERING COLUMN COVER
35.INSTALL STEERING WHEEL ASSEMBLY
45130
36.INSTALL HORN BUTTON ASSEMBLY
83100
37.INSTALL COMBINATION METER ASSEMBLY
55410C
38.INSTALL INSTRUMENT CLUSTER FINISH PANEL ASSEMBLY
|
|
Install in this Direction |
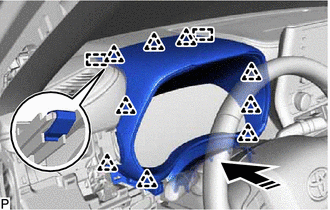
Engage the 2 guides and 9 clips as shown in the illustration.
Engage the 4 clips and 2 claws to install the instrument cluster finish panel assembly.
84975
39.INSTALL TRIP SWITCH
55044C
40.INSTALL INSTRUMENT PANEL FINISH PANEL SUB-ASSEMBLY
Connect each connector.
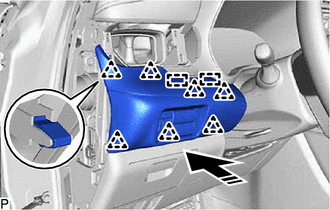
|
|
Install in this Direction |
Engage the 2 guides and 7 clips as shown in the illustration to install the instrument panel finish panel sub-assembly.
55650
41.INSTALL NO. 1 INSTRUMENT PANEL REGISTER ASSEMBLY
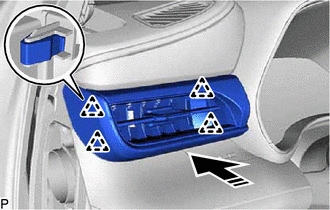
|
|
Install in this Direction |
Engage the 4 clips as shown in the illustration to install the No. 1 instrument panel register assembly.
55436A
42.INSTALL INSTRUMENT PANEL FINISH END PANEL LH
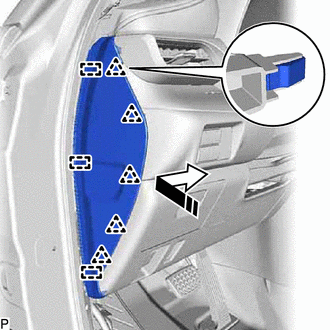
|
|
Install in this Direction |
Engage the 3 guides and 5 clips as shown in the illustration to install the instrument panel finish end panel LH.
62312B
43.INSTALL FRONT DOOR OPENING TRIM WEATHERSTRIP LH
62112A
44.INSTALL COWL SIDE TRIM SUB-ASSEMBLY LH
67914
45.INSTALL FRONT DOOR SCUFF PLATE LH
46.INSTALL CONSOLE BOX ASSEMBLY