2GR-FKS INTAKE / EXHAUST INTAKE MANIFOLD REMOVAL
CAUTION / NOTICE / HINT
The necessary procedures (adjustment, calibration, initialization or registration) that must be performed after parts are removed and installed, or replaced during intake manifold removal/installation are shown below.
| Replaced Part or Performed Procedure | Necessary Procedure | Effect/Inoperative Function when Necessary Procedure not Performed | Link |
|---|---|---|---|
|
*1: Learning can also be performed using the GTS. Click here( |
|||
| Battery terminal is disconnected/reconnected | Idle the engine for approximately 5 to 60 minutes or drive the vehicle until stop and start control is permitted | Stop and Start System | ( ) |
| Perform steering sensor zero point calibration | Lane Control System | ()
|
|
| Parking Support Brake System*1 | |||
| Pre-collision System | |||
| Memorize steering angle neutral point | Parking Assist Monitor System | ()
|
|
| Panoramic View Monitor System | ()
|
||
| Initialize back door lock | Power Door Lock Control System | ()
|
|
| Reset back door close position | Power Back Door System | ()
|
|
·
Replacement of fuel injector assembly ·
Replacement of fuel pressure sensor (fuel delivery pipe with sensor assembly) ·
Replacement of throttle body with motor assembly ·
Cleaning the deposits from the throttle body with motor assembly |
Perform Inspection After Repair | ·
Poor idle, etc. ·
Engine start function, etc. |
()
|
- NOTICE:
-
After the ignition switch is turned off, the radio and display receiver assembly or the radio receiver assembly records various types of memory and settings. As a result, after turning the ignition switch off, make sure to wait at least 120 seconds before disconnecting the cable from the negative (-) auxiliary battery terminal.
PROCEDURE

 1. PRECAUTION
- NOTICE:
-
After turning the ignition switch off, waiting time may be required before disconnecting the cable from the negative (-) battery terminal. Therefore, make sure to read the disconnecting the cable from the negative (-) battery terminal notices before proceeding with work.
-
Click hereGeneral>INTRODUCTION>REPAIR INSTRUCTION>PRECAUTION
2. DISCHARGE FUEL SYSTEM PRESSURE
3.DISCONNECT CABLE FROM NEGATIVE BATTERY TERMINAL
- NOTICE:
-
When disconnecting the cable, some systems need to be initialized after the cable is reconnected.
-
Click hereGeneral>INTRODUCTION>REPAIR INSTRUCTION>PRECAUTION
4.REMOVE WINDSHIELD WIPER MOTOR AND LINK ASSEMBLY
53808A
5.REMOVE FENDER SPLASH SHIELD SUB-ASSEMBLY REAR LH
53807A
6.REMOVE FENDER SPLASH SHIELD SUB-ASSEMBLY REAR RH
- HINT:
-
Perform the same procedure as for the LH side.
53892C
7.REMOVE FRONT FENDER SPLASH SHIELD SEAL FRONT LH
53891C
8.REMOVE FRONT FENDER SPLASH SHEILD SEAL FRONT RH
- HINT:
-
Perform the same procedure as for the LH side.
9.REMOVE FRONT UPPER SUSPENSION TO COWL BRACE SUB-ASSEMBLY LH
53607B
10.REMOVE FRONT UPPER SUSPENSION TO COWL BRACE SUB-ASSEMBLY RH
- HINT:
-
Perform the same procedure as for the LH side.
55704B
11.REMOVE COWL VENTILATOR PANEL SUB-ASSEMBLY (for LHD)
55704B
12.REMOVE COWL VENTILATOR PANEL SUB-ASSEMBLY (for RHD)
22030
13.REMOVE THROTTLE BODY WITH MOTOR ASSEMBLY
11209
14.REMOVE V-BANK COVER SUB-ASSEMBLY
12261
15.DISCONNECT VENTILATION HOSE
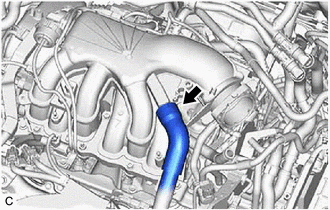
Slide the clip and disconnect the ventilation hose from the intake air surge tank assembly.
25860
16.DISCONNECT PURGE VALVE (PURGE VSV)
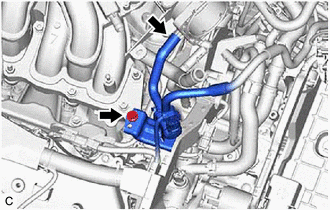
Disconnect the No. 1 fuel vapor feed hose from the intake air surge tank assembly.
Remove the bolt and disconnect the purge valve (purge VSV) from the intake air surge tank assembly.
17126
17.REMOVE NO. 2 SURGE TANK STAY
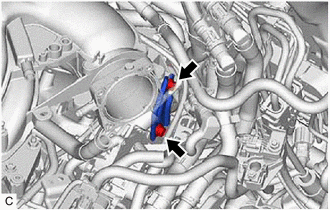
Remove the 2 bolts and No. 2 surge tank stay from the intake air surge tank assembly and camshaft housing RH.
17190
18.REMOVE INTAKE AIR SURGE TANK ASSEMBLY
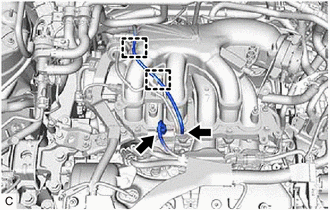
Disconnect the No. 1 vacuum switching valve assembly (for ACIS) connector.
Disengage the 2 clamps to disconnect the vacuum hose sub-assembly from the intake air surge tank assembly.
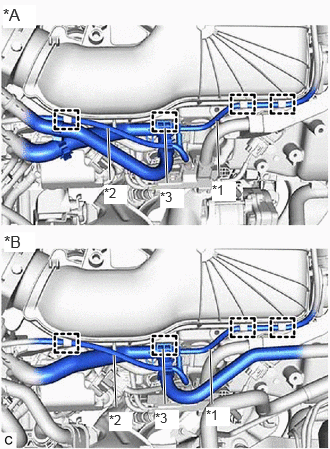
| *A | for LHD |
| *B | for RHD |
| *1 | Vacuum Hose Sub-assembly |
| *2 | Vacuum Hose |
| *3 | No. 2 Air Tube |
Disengage the 2 clamps to disconnect the vacuum hose sub-assembly from the intake air surge tank assembly.
Disengage the clamp to disconnect the vacuum hose from the intake air surge tank assembly.
Disengage the clamp to disconnect the No. 2 air tube from the intake air surge tank assembly.
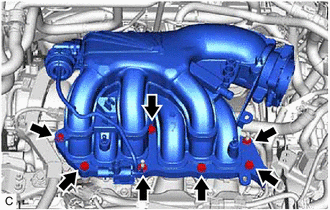
Remove the 5 bolts, 2 nuts and intake air surge tank assembly from the intake manifold.
17176
19.REMOVE AIR SURGE TANK TO INTAKE MANIFOLD GASKET
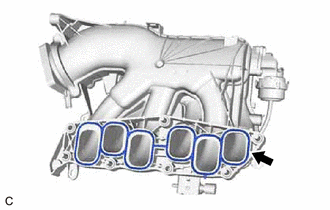
Remove the air surge tank to intake manifold gasket from the intake air surge tank assembly.
11254
20.REMOVE NO. 1 V-BANK COVER BRACKET
- HINT:
-
Perform this procedure only when replacement of the No. 1 V-bank cover bracket is necessary.
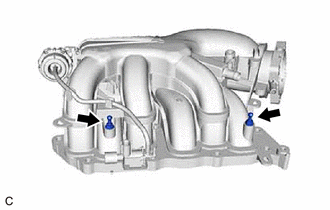
Remove the 2 No. 1 V-bank cover brackets from the intake air surge tank assembly.
12327A
21.REMOVE NO. 2 ENGINE MOUNTING STAY RH
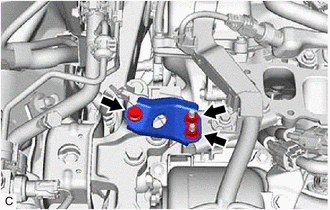
Remove the bolt, 2 nuts and No. 2 engine mounting stay RH from the engine mounting insulator sub-assembly RH and rear engine mounting stay RH.
12327
22.REMOVE REAR ENGINE MOUNTING STAY RH
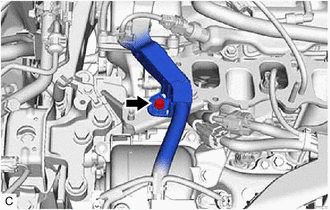
Remove the bolt and disconnect the engine wire from the rear engine mounting stay RH.
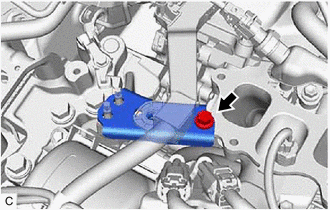
Remove the bolt and rear engine mounting stay RH from the intake manifold.
23.DISCONNECT FUEL TUBE SUB-ASSEMBLY
23800
24.REMOVE FUEL DELIVERY PIPE WITH SENSOR ASSEMBLY
23807V
25.REMOVE NO. 1 DELIVERY PIPE SPACER
23291
26.REMOVE INJECTOR VIBRATION INSULATOR
17111
27.REMOVE INTAKE MANIFOLD
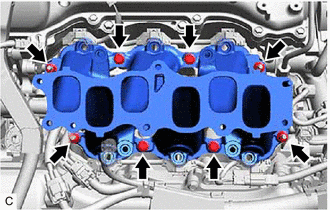
Remove the 4 bolts, 4 nuts and intake manifold from the cylinder head sub-assembly.
17177
28.REMOVE NO. 1 INTAKE MANIFOLD TO HEAD GASKET
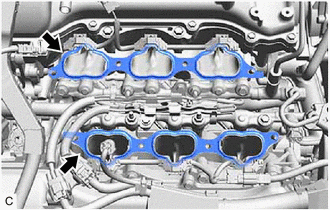
Remove the 2 No. 1 intake manifold to head gaskets from each cylinder head sub-assembly.
29.REMOVE STUD BOLT
- HINT:
-
If a stud bolt is deformed or the threads are damaged, replace it.
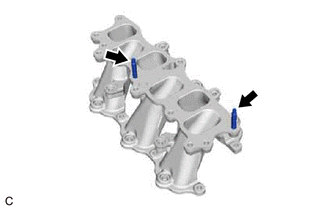
Using an E8 "TORX" socket wrench, remove the 2 stud bolts from the intake manifold.