NETWORKING LIN COMMUNICATION SYSTEM B2325 LIN Communication Bus Malfunction
DESCRIPTION
If the main body ECU (multiplex network body ECU) detects a communication error with an ECU connected to the door bus lines for 8 seconds or more, DTC B2325 will be stored.
| DTC No. | Detection Item | DTC Detection Condition | Trouble Area |
|---|---|---|---|
| B2325 | LIN Communication Bus Malfunction | The main body ECU (multiplex network body ECU) detects a communication error with an ECU connected to the door bus lines for 8 seconds or more. | ·
Main body ECU (multiplex network body ECU) ·
Instrument panel junction block assembly ·
Multiplex network master switch assembly ·
Power window regulator motor assembly (driver door) ·
Power window regulator motor assembly (front passenger door) ·
Power window regulator motor assembly (rear LH door) ·
Power window regulator motor assembly (rear RH door) ·
Sliding roof ECU (sliding roof drive gear assembly)*1*2 ·
Roof sunshade ECU (sliding roof drive gear assembly)*2 ·
Kick door control sensor*3 ·
Wire harness or connector |
*1: w/ Sliding Roof System
*2: w/ Panoramic Moon Roof System
*3: w/ Hands Free Power Back Door
WIRING DIAGRAM
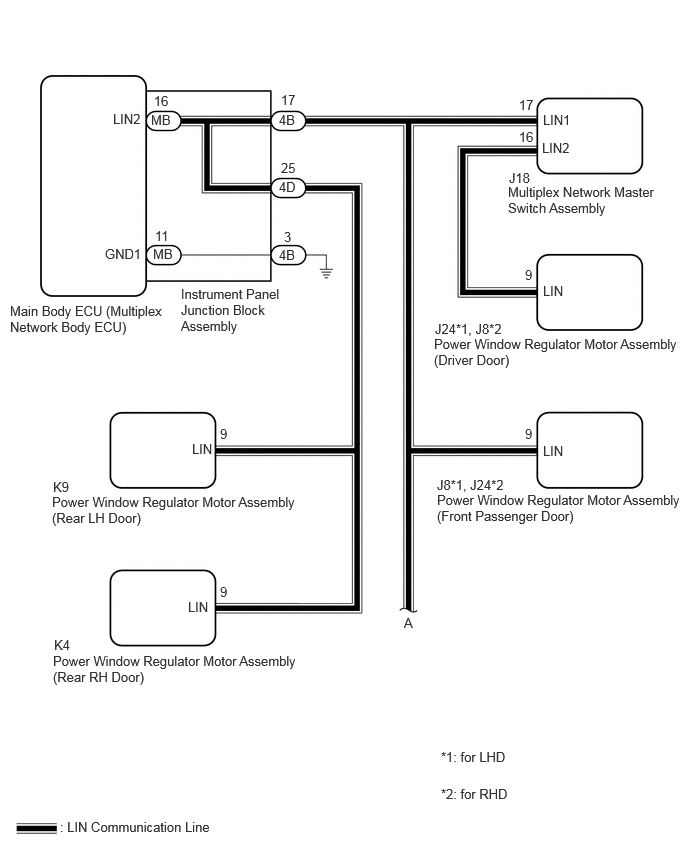
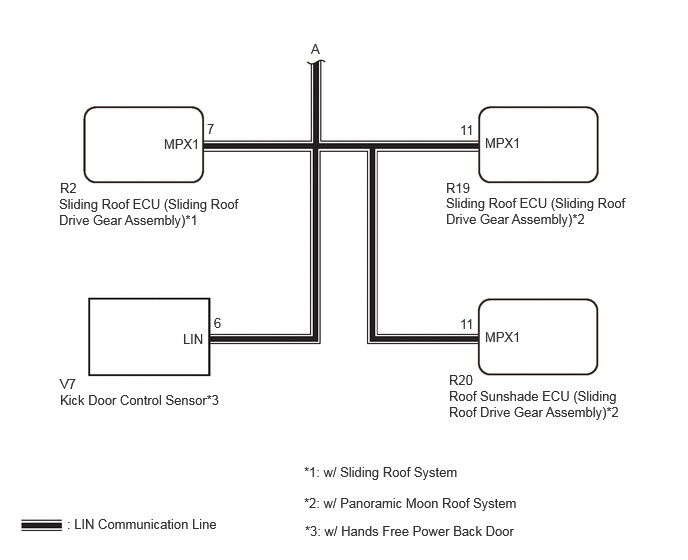
CAUTION / NOTICE / HINT
- NOTICE:
- ·
When a power window regulator motor assembly is replaced or removed and reinstalled, it is necessary to perform initialization.
Click hereVehicle Exterior>WINDOW / GLASS>POWER WINDOW CONTROL SYSTEM>INITIALIZATION
·When the sliding roof ECU (sliding roof drive gear assembly) is replaced or removed and reinstalled, it is necessary to perform initialization.*
w/ Sliding Roof System: Click hereVehicle Exterior>SLIDING ROOF / CONVERTIBLE>SLIDING ROOF SYSTEM>INITIALIZATION
w/ Panoramic Moon Roof System: Click hereVehicle Exterior>SLIDING ROOF / CONVERTIBLE>PANORAMIC MOON ROOF SYSTEM>INITIALIZATION
*: w/ Sliding Roof System or Panoramic Moon Roof System
·When the roof sunshade ECU (sliding roof drive gear assembly) is replaced or removed and reinstalled, it is necessary to perform initialization.*
Click hereVehicle Exterior>SLIDING ROOF / CONVERTIBLE>PANORAMIC MOON ROOF SYSTEM>INITIALIZATION
*: w/ Panoramic Moon Roof System
·Before replacing the main body ECU (multiplex network body ECU), refer to Service Bulletin.
·The vehicle battery supplies power to the main body ECU (multiplex network body ECU) via the door control battery. Therefore, before performing this troubleshooting procedure, make sure to perform an on-vehicle inspection to confirm that the main body ECU (multiplex network body ECU) power source circuit is normal.*
Click hereVehicle Interior>DOOR LOCK>POWER DOOR LOCK CONTROL SYSTEM>ON-VEHICLE INSPECTION
*: w/ Door Control Battery
PROCEDURE
Disconnect the J24*1 or J8*2 power window regulator motor assembly (driver door) connector.
*1: for LHD
*2: for RHD
Clear the DTCs.
- Body Electrical > Main Body > Clear DTCs
- 50002 123
After 10 seconds have elapsed, check if the same DTC is output again.
- Body Electrical > Main Body > Trouble Codes
- 50001 123
- Result:
Result Proceed to DTC B2325 is output A DTC B2325 is not output B
A
B
Disconnect the J18 multiplex network master switch assembly connector.
Clear the DTCs.
- Body Electrical > Main Body > Clear DTCs
- 50002 123
After 10 seconds have elapsed, check if the same DTC is output again.
- Body Electrical > Main Body > Trouble Codes
- 50001 123
- Result:
Result Proceed to DTC B2325 is output A DTC B2325 is not output B
A
B
Disconnect the J8*1 or J24*2 power window regulator motor assembly (front passenger door) connector.
*1: for LHD
*2: for RHD
Clear the DTCs.
- Body Electrical > Main Body > Clear DTCs
- 50002 123
After 10 seconds have elapsed, check if the same DTC is output again.
- Body Electrical > Main Body > Trouble Codes
- 50001 123
- Result:
Result Proceed to DTC B2325 is output A DTC B2325 is not output B
A
B
Disconnect the K4 power window regulator motor assembly (rear RH door) connector.
Clear the DTCs.
- Body Electrical > Main Body > Clear DTCs
- 50002 123
After 10 seconds have elapsed, check if the same DTC is output again.
- Body Electrical > Main Body > Trouble Codes
- 50001 123
- Result:
Result Proceed to DTC B2325 is output A DTC B2325 is not output B
A
B
Disconnect the K9 power window regulator motor assembly (rear LH door) connector.
Clear the DTCs.
- Body Electrical > Main Body > Clear DTCs
- 50002 123
After 10 seconds have elapsed, check if the same DTC is output again.
- Body Electrical > Main Body > Trouble Codes
- 50001 123
- Result:
Result Proceed to DTC B2325 is output A DTC B2325 is not output B
A
B
Check the vehicle specification.
- Result:
Result Proceed to w/ Sliding Roof System or Panoramic Moon Roof System A w/o Sliding Roof System and Panoramic Moon Roof System B
A
B
Disconnect the R2*1 or R19*2 sliding roof ECU (sliding roof drive gear assembly) connector.
*1: w/ Sliding Roof System
*2: w/ Panoramic Moon Roof System
Clear the DTCs.
- Body Electrical > Main Body > Clear DTCs
- 50002 123
After 10 seconds have elapsed, check if the DTC is output.
- Body Electrical > Main Body > Trouble Codes
- 50001 123
- Result:
Result Proceed to DTC B2325 is output (w/ Panoramic Moon Roof System) A DTC B2325 is output (w/o Panoramic Moon Roof System) B DTC B2325 is not output C
A
B
C
w/ Sliding Roof System: Click hereVehicle Exterior>SLIDING ROOF / CONVERTIBLE>SLIDING ROOF HOUSING (for Moon Roof)>DISASSEMBLY
w/ Panoramic Moon Roof System: Click hereVehicle Exterior>SLIDING ROOF / CONVERTIBLE>SLIDING ROOF HOUSING (for Panoramic Moon Roof)>DISASSEMBLY
Disconnect the R20 roof sunshade ECU (sliding roof drive gear assembly) connector.
Clear the DTCs.
- Body Electrical > Main Body > Clear DTCs
- 50002 123
After 10 seconds have elapsed, check if the DTC is output.
- Body Electrical > Main Body > Trouble Codes
- 50001 123
- Result:
Result Proceed to DTC B2325 is output A DTC B2325 is not output B
A
B
Check the vehicle specification.
- Result:
Result Proceed to w/ Hands Free Power Back Door A w/o Hands Free Power Back Door B
A
B
Disconnect the V7 kick door control sensor connector.
Clear the DTCs.
- Body Electrical > Main Body > Clear DTCs
- 50002 123
After 10 seconds have elapsed, check if the DTC is output.
- Body Electrical > Main Body > Trouble Codes
- 50001 123
- Result:
Result Proceed to DTC B2325 is output A DTC B2325 is not output B
A
B
Disconnect the 4B and 4D instrument panel junction block assembly connector.
Measure the resistance according to the value(s) in the table below.
- Standard Resistance:
Tester Connection Condition Specified Condition 4B-17 - Body ground Always 10 kΩ or higher 4B-17 - Other terminals Always 10 kΩ or higher 4D-25 - Body ground Always 10 kΩ or higher 4D-25 - Other terminals Always 10 kΩ or higher
- Result:
Proceed to OK NG
OK
NG
Remove the instrument panel junction block assembly.
Click herePower Source / Network>POWER DISTRIBUTION>MAIN BODY ECU>REMOVAL
Remove the main body ECU (multiplex network body ECU) from the instrument panel junction block assembly.
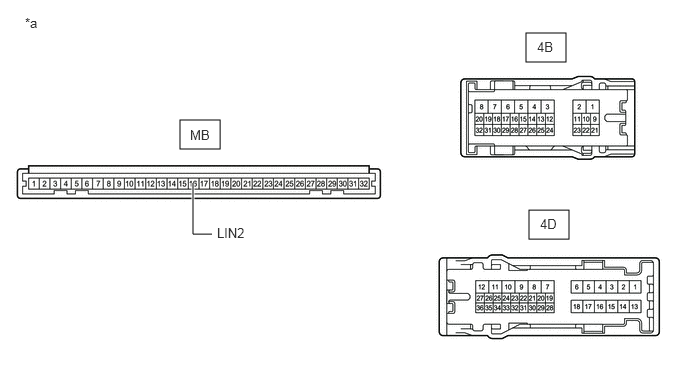
| *a | Component without harness connected
(Instrument Panel Junction Block Assembly) |
- | - |
Measure the resistance according to the value(s) in the table below.
- HINT:
-
This inspection is to check the LIN communication line in the instrument panel junction block assembly that connects the wire harness to the built-in main body ECU (multiplex network body ECU).
- Standard Resistance:
Tester Connection Condition Specified Condition 4B-17 or 4D-25 - 4B-3 Always 10 kΩ or higher MB-16 (LIN2) - Other terminals Always 10 kΩ or higher
- Result:
Proceed to OK NG
OK
NG
Install the main body ECU (multiplex network body ECU) to the instrument panel junction block assembly.
Connect all instrument panel junction block assembly connectors other than 4B and 4D.
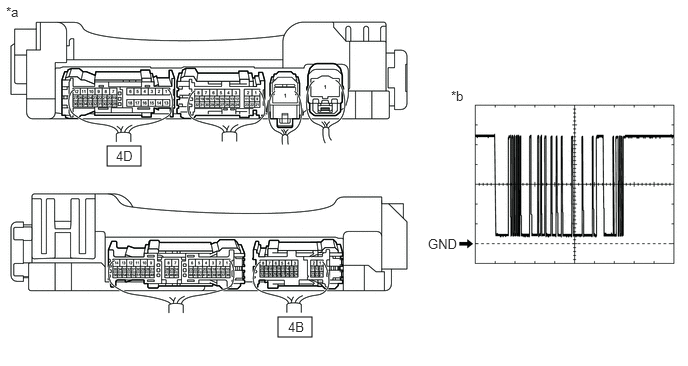
| *a | Component with harness connected
(Instrument Panel Junction Block Assembly) |
*b | Waveform |
Using a GTS, check the waveform.
- HINT:
-
This inspection is to check the LIN communication line in the instrument panel junction block assembly that connects the wire harness to the built-in main body ECU (multiplex network body ECU).
- OK:
Tester Connection Condition Tool Setting Specified Condition 4B-17 - Body ground Ignition switch ON 2 V/DIV., 200 ms/DIV. Pulse generation
(See waveform)4D-25 - Body ground Ignition switch ON 2 V/DIV., 200 ms/DIV. Pulse generation
(See waveform)
- Result:
Proceed to OK NG
OK
Click hereGeneral>INTRODUCTION>HOW TO TROUBLESHOOT ECU CONTROLLED SYSTEMS>HOW TO PROCEED WITH TROUBLESHOOTING
NG
Measure the resistance according to the value(s) in the table below.
- Standard Resistance:
Tester Connection Condition Specified Condition J18-16 (LIN2) - Body ground Always 10 kΩ or higher J18-16 (LIN2) - Other terminals Always 10 kΩ or higher
- Result:
Proceed to OK NG
OK
NG