BRAKE CONTROL / DYNAMIC CONTROL SYSTEMS ELECTRONICALLY CONTROLLED BRAKE SYSTEM(for HV Model) C14C9A2 Electronic Brake Booster Control Module "A" System Voltage Low
DESCRIPTION
Refer to DTC C110E14.
| DTC No. | Detection Item | DTC Detection Condition | Trouble Area | Note |
|---|---|---|---|---|
| C14C9A2 | Electronic Brake Booster Control Module "A" System Voltage Low | The voltage of terminal +BI1 is less than 7.3 V and the pump motor is being driven, the output of the pump motor is excessively low for 1 second or more. | ·
Improperly connected connector, deformation or corrosion of terminals ·
Wire harness and connector ·
No. 1 skid control ECU (brake booster with master cylinder assembly) |
Output ECU: No. 1 skid control ECU (brake booster with master cylinder assembly) |
WIRING DIAGRAM
Refer to DTC C110E14.
CAUTION / NOTICE / HINT
- NOTICE:
- ·
Inspect the fuses for circuits related to this system before performing the following procedure.
·Before performing troubleshooting, make sure to confirm that the auxiliary battery voltage is normal.
Click hereGeneral>INTRODUCTION>HOW TO TROUBLESHOOT ECU CONTROLLED SYSTEMS>HOW TO PROCEED WITH TROUBLESHOOTING
·After replacing the No. 1 skid control ECU (brake booster with master cylinder assembly), perform "Calibration".
PROCEDURE
Check the DTCs that are output.
- Chassis > Brake Booster > Trouble Codes
- 50001 466
- Chassis > Brake/EPB > Trouble Codes
- 50001 435
- Result:
Result Proceed to Only DTC C14C9A2 is output. A DTCs other than C14C9A2 are output. B
A
B
Drive the pump motor by performing the Active Test.
- HINT:
- ·
The pump motor can be driven by performing the Active Test for ECB* solenoid (SLA).
*: Electronically Controlled Brake System
·Perform the Active Test with the current set to maximum.
Monitor the value of Data List item BI1 Voltage when the pump motor is being driven.
- Chassis > Brake Booster > Active Test
-
Tester Display Measurement Item Control Range Restrict Condition Diagnostic Note ECB Solenoid (SLA) Linear solenoid addition valve (SLA) Solenoid Start (Activate)
Solenoid SLA
(It is possible to set the current)Vehicle condition:
·Vehicle stopped
·Shift lever is in P
·Apply the parking brake
ECB: Electronically Controlled Brake System
- Chassis > Brake Booster > Data List
-
Tester Display Measurement Item Range Normal Condition Diagnostic Note BI Voltage +BI1 voltage value Min.: 0.000 V
Max.: 20.000 V- Changes in proportion to auxiliary battery voltage
- Chassis > Brake Booster > Active Test
-
Active Test Display ECB Solenoid (SLA) -
Data List Display BI Voltage - 50004 466 43 294
- Result:
Result Proceed to BI1 voltage is 11 to 14 V. A BI1 voltage is below 11 V. B
A
Click hereGeneral>INTRODUCTION>HOW TO TROUBLESHOOT ECU CONTROLLED SYSTEMS>HOW TO PROCEED WITH TROUBLESHOOTING
B
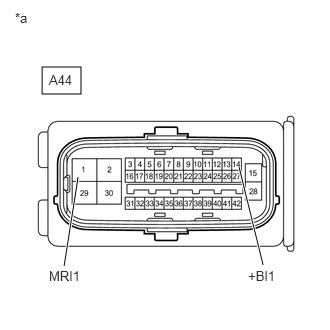
| *a | Front view of wire harness connector
(to No. 1 Skid Control ECU (Brake Booster with Master Cylinder Assembly)) |
Turn the ignition switch off.
Make sure that there is no looseness at the locking part and the connecting part of the connector.
- OK:
The connector is securely connected.
Disconnect the A44 No. 1 skid control ECU (brake booster with master cylinder assembly) connector.
Check both the connector case and the terminals for deformation and corrosion.
- OK:
No deformation or corrosion.
Measure the voltage according to the value(s) in the table below.
- Standard Voltage:
Tester Connection Condition Specified Condition A44-14 (+BI1) - Body ground Always 11 to 14 V A44-1 (MRI1) - Body ground Always 11 to 14 V
- Result:
Result Proceed to 11 to 14 V. A Below 11 V. B
A
for LHD: Click hereBrake>BRAKE SYSTEM (OTHER)>BRAKE BOOSTER (for HV Model LHD)>REMOVAL
for RHD: Click hereBrake>BRAKE SYSTEM (OTHER)>BRAKE BOOSTER (for HV Model RHD)>REMOVAL
B