STEERING COLUMN STEERING COLUMN ASSEMBLY REMOVAL
CAUTION / NOTICE / HINT
The necessary procedures (adjustment, calibration, initialization or registration) that must be performed after parts are removed and installed, or replaced during steering column assembly removal/installation are shown below.
| Replaced Part or Performed Procedure | Necessary Procedure | Effect/Inoperative Function when Necessary Procedure not Performed | Link |
|---|---|---|---|
|
*1: Learning can also be performed using the GTS. Click here( |
|||
| Removal/installation of the turn signal switch assembly with spiral cable sub-assembly | Steering angle setting | Parking Assist Monitor System | ( ) |
| Adjust steering angle | Panoramic View Monitor System | ()
|
|
| Steering angle neutral point | Parking Assist Monitor System | ()
|
|
| Parking Support Brake System | ()
|
||
| Panoramic View Monitor System | ()
|
||
| Steering lock ECU (steering lock actuator or upper bracket assembly) | Code registration | ·
Wireless Door Lock Control System ·
Entry and Start System (for Entry function) ·
Entry and Start System (for Start function) ·
Engine start function |
See Service Bulletin for the registration method |
| Disconnect cable from negative auxiliary battery terminal | Idle the engine for approximately 5 to 60 minutes or drive the vehicle until stop and start control is permitted | Stop and Start System | ()
|
| Perform steering sensor zero point calibration | Lane Control System | ()
|
|
| Parking Support Brake System*1 | |||
| Pre-collision System | |||
| Memorize steering angle neutral point | Parking Assist Monitor System | ()
|
|
| Panoramic View Monitor System | ()
|
||
| Initialize back door lock | Power Door Lock Control System | ()
|
|
| Reset back door close position | Power Back Door System | ()
|
|
| Replaced Part or Performed Procedure | Necessary Procedure | Effect/Inoperative Function when Necessary Procedure not Performed | Link |
|---|---|---|---|
|
*1: Learning can also be performed using the GTS. Click here( |
|||
| Removal/installation of the turn signal switch assembly with spiral cable sub-assembly | Steering angle setting | Parking Assist Monitor System | ()
|
| Adjust steering angle | Panoramic View Monitor System | ()
|
|
| Steering angle neutral point | Parking Assist Monitor System | ()
|
|
| Parking Support Brake System | ()
|
||
| Panoramic View Monitor System | ()
|
||
| Steering lock ECU (steering lock actuator or upper bracket assembly) | Code registration | ·
Wireless Door Lock Control System ·
Entry and Start System (for Entry function) ·
Entry and Start System (for start function) ·
Hybrid control system cannot be started |
See Service Bulletin for the registration method |
| Disconnect cable from negative auxiliary battery terminal | Perform steering sensor zero point calibration | Lane Control System | ()
|
| Parking Support Brake System*1 | |||
| Pre-collision System | |||
| Memorize steering angle neutral point | Parking Assist Monitor System | ()
|
|
| Panoramic View Monitor System | ()
|
||
| Initialize back door lock | Power Door Lock Control System | ()
|
|
| Reset back door close position | Power Back Door System | ()
|
|
- NOTICE:
- for Gasoline Model:·
After the ignition switch is turned off, the radio and display receiver assembly or the radio receiver assembly records various types of memory and settings. As a result, after turning the ignition switch off, make sure to wait at least 120 seconds before disconnecting the cable from the negative (-) auxiliary battery terminal.
- for HV Model:·
After the ignition switch is turned off, the radio and display receiver assembly or the radio receiver assembly records various types of memory and settings. As a result, after turning the ignition switch off, make sure to wait at least 120 seconds before disconnecting the cable from the negative (-) auxiliary battery terminal.
PROCEDURE

 1. PRECAUTION
2. ALIGN FRONT WHEELS FACING STRAIGHT AHEAD
45130
3.REMOVE HORN BUTTON ASSEMBLY
4.REMOVE STEERING WHEEL ASSEMBLY
45287
5.REMOVE LOWER STEERING COLUMN COVER
- NOTICE:
-
Removing the lower steering column cover in the incorrect order will cause the parts to break.
Release the tilt and telescopic lever and fully extend and lower the steering column assembly.
Lock the tilt and telescopic lever.
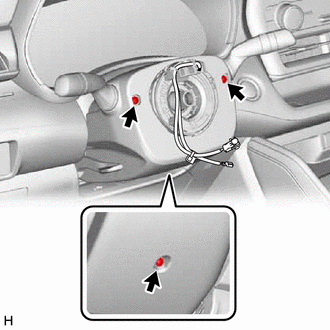
Remove the 3 screws.
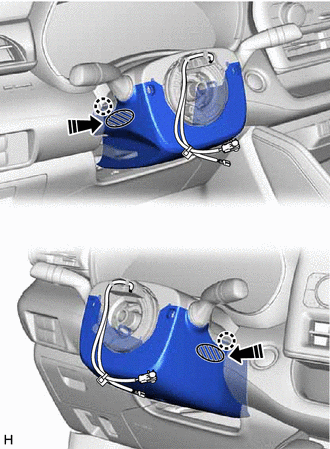

|
Push Area |

|
Push in this direction |
While pressing the push area shown in the illustration to disengage the 2 claws, slightly lower the lower steering column cover.
45286B
6.REMOVE UPPER STEERING COLUMN COVER
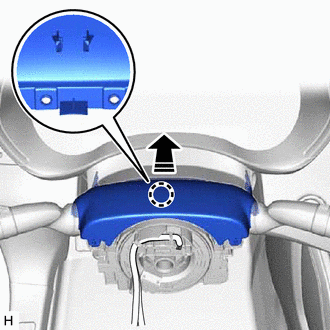
|
|
Separate in this direction |
Disengage the claw and separate the upper steering column cover.
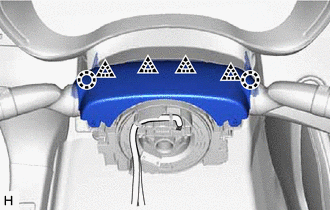
Disengage the 2 claws and 4 clips to remove the upper steering column cover.
7.REMOVE TURN SIGNAL SWITCH ASSEMBLY WITH SPIRAL CABLE SUB-ASSEMBLY
- NOTICE:
- ·
Do not remove/install the spiral cable with sensor sub-assembly with the auxiliary battery connected and the ignition switch ON.
·Do not rotate the spiral cable with sensor sub-assembly without the steering wheel assembly installed, with the auxiliary battery connected and the ignition switch ON.
·Ensure that the steering wheel assembly is installed and aligned straight when inspecting the steering sensor.
Disconnect each connector from the turn signal switch assembly with spiral cable sub-assembly.
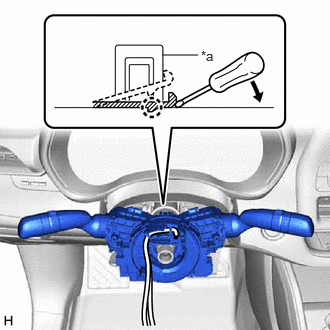
| *a | Clamp |
Using pliers, expand the clamp.
While holding the clamp expanded, raise the claw using a screwdriver to disengage it, and then remove the turn signal switch assembly with spiral cable sub-assembly from the steering column assembly.
73900
8.REMOVE LOWER NO. 1 INSTRUMENT PANEL AIRBAG ASSEMBLY
9.REMOVE FRONT WHEEL LH (for LHD)
10.REMOVE FRONT WHEEL RH (for RHD)
45220
11.SEPARATE STEERING INTERMEDIATE SHAFT ASSEMBLY
45253
12.REMOVE STEERING COLUMN HOLE COVER
Turn back the floor carpet.
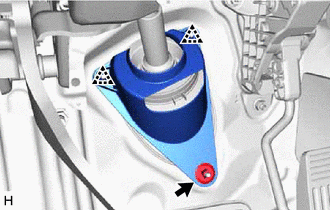
Remove the clip.
Disengage the 2 clips to remove the steering column hole cover.
45220
13.REMOVE STEERING INTERMEDIATE SHAFT ASSEMBLY
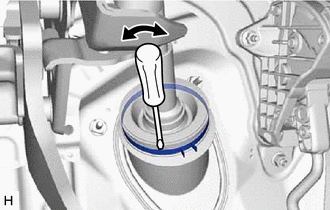
Using a screwdriver, loosen the clamp as shown in the illustration.
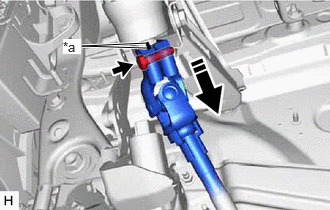
| *a | Matchmark |
|
|
Slide in this direction |
Remove the bolt and slide the steering intermediate shaft assembly.
- NOTICE:
-
Do not remove the steering intermediate shaft assembly from the steering column assembly.
Put matchmarks on the steering intermediate shaft assembly and steering column assembly.
Remove the steering intermediate shaft assembly from the steering column assembly.
45250
14.REMOVE STEERING COLUMN ASSEMBLY
Disconnect each connector and disengage each wire harness clamp from the steering column assembly.
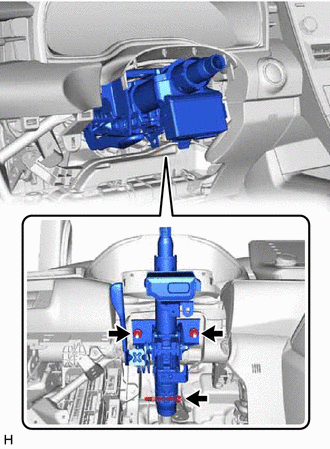
Remove the bolt, 2 nuts and steering column assembly.