Sub-radiator
Intercooler · Vehicles built Up to Oct 2008
Versions by build date: Up to Oct 2008 From Oct 2008
COMPONENTS
ON-VEHICLE CLEANING
1. INSPECT FINS BLOCKAGE
(a) Check the sub-radiator is not blocked with leaves, dirt, or insects. Clean the hose connections.
If the fins are blocked, wash them with water or a steam cleaner.
NOTICE:
• If the distance between the steam cleaner and sub-radiator is too close, the fins may be damaged.
• Keep the following injection distance.
• If the fins are bent, carefully straighten them.
• Never apply water directly onto the electronic components.
-
(b) Dry the fins with compressed air.
-
REMOVAL
1. DISCONNECT CABLE FROM NEGATIVE BATTERY TERMINAL
CAUTION:
Wait at least 90 seconds after disconnecting the cable from the negative (-) battery terminal to prevent airbag and seatbelt pretensioner activation.
HINT:
Obtain the audio system PIN from the vehicle owner, if applicable. Otherwise the audio system will be inoperable when the battery cable is reconnected.
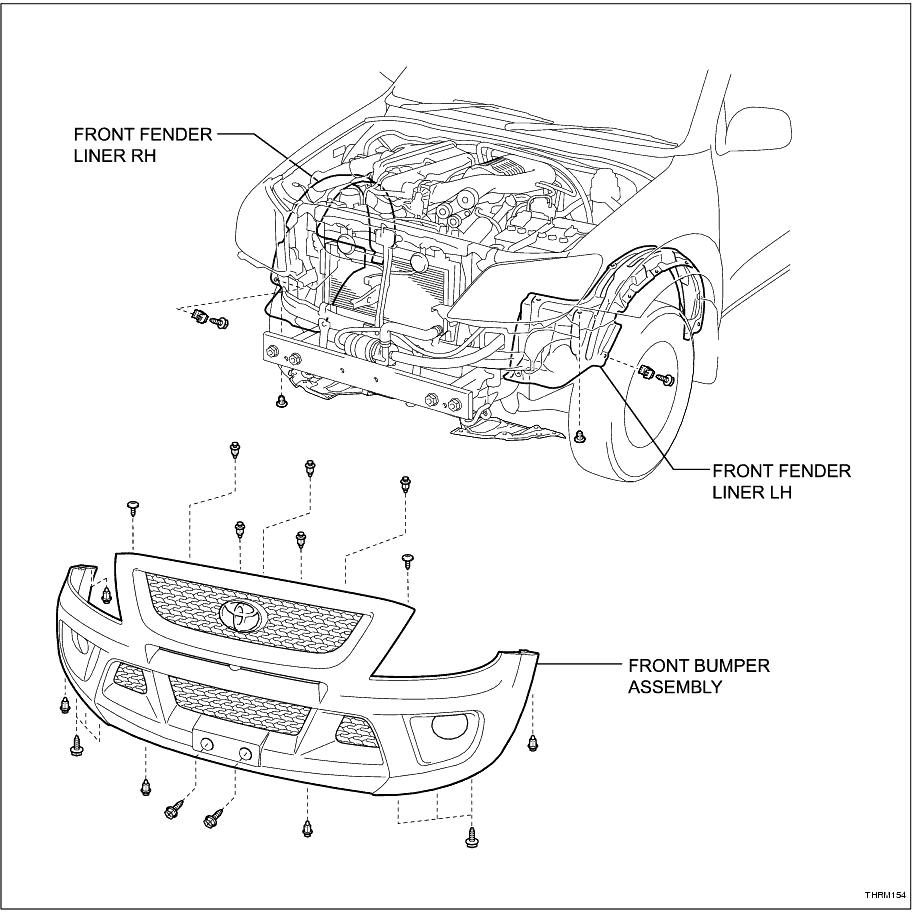
2. REMOVE FRONT FENDER LINER LH (
Click Here
)
3. REMOVE FRONT FENDER LINER RH
HINT:
Use the same procedures described for the LH side.
4. REMOVE FRONT BUMPER ASSEMBLY (
Click Here
)
5. DRAIN COOLANT (
Click Here
)
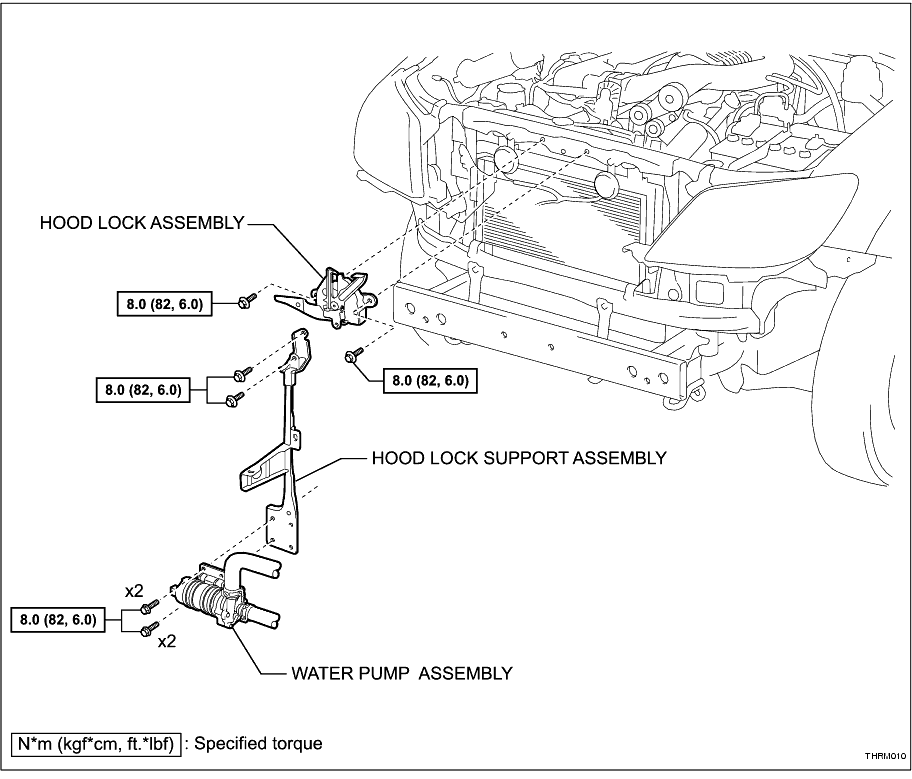
6. REMOVE WATER PUMP ASSEMBLY (
Click Here
)
7. REMOVE HOOD LOCK ASSEMBLY (
Click Here
)
8. REMOVE HOOD LOCK SUPPORT ASSEMBLY (
Click Here
)
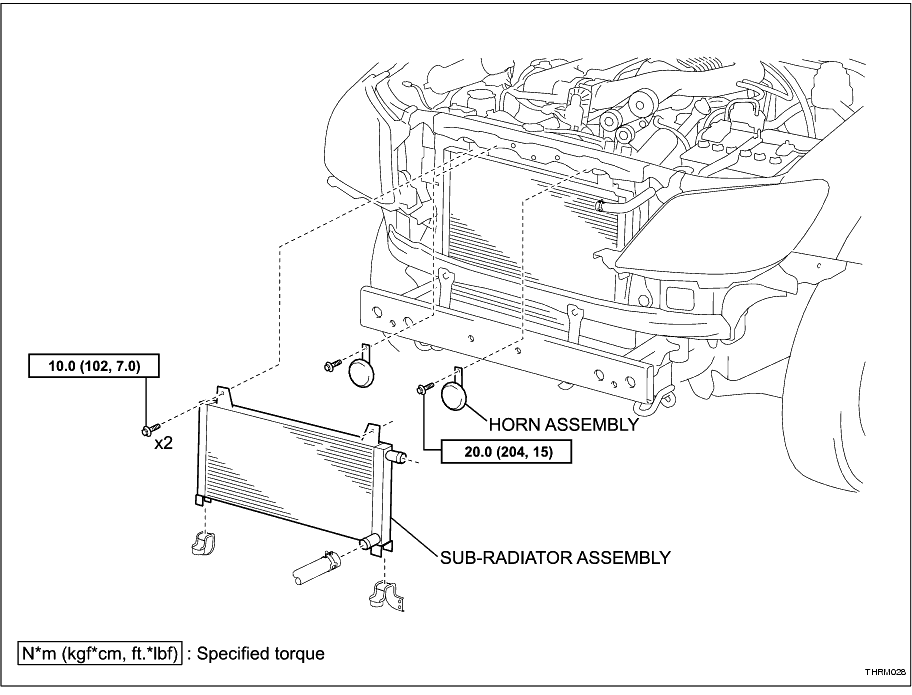
9. REMOVE LOW PITCHED HORN
(a) Disconnect the connector.
-
(b) Remove bolt and the horn.
-
10. REMOVE HIGH PITCHED HORN
HINT:
Use the same procedure as the low pitched horn.
11. DISCONNECT SUB-RADIATOR INLET HOSE
12. DISCONNECT SUB-RADIATOR OUTLET HOSE
13. REMOVE SUB-RADIATOR
(a) Remove the 2 bolts and radiator.
-
INSTALLATION
1. PREPARE SUB-RADIATOR
HINT:
If the air conditioning condenser has been replaced, new mounting holes will be required.
(a) Place a sheet of cardboard in front of the condenser to protect the fins.
-
(b) Temporarily mount the sub-radiator in its correct position and mark the 2 mounting hole locations on the condenser.
-
(c) Remove the sub-radiator and drill 7 mm holes in 2 places.
-
(d) Remove the cardboard sheet and clean up all drilling swarf.
-
2. INSTALL SUB-RADIATOR
(a) Install the sub-radiator with the 2 bolts.
Torque:
10 N*m
(102 kgf*cm,
7.0 ft.*lbf)
-
3. CONNECT SUB-RADIATOR INLET HOSE
4. CONNECT SUB-RADIATOR OUTLET HOSE
5. INSTALL LOW PITCHED HORN
(a) Connect the connector.
-
(b) Install the horn with the bolt.
Torque:
20 N*m
(204 kgf*cm,
15 ft.*lbf)
-
6. INSTALL HIGH PITCHED HORN
HINT:
Use the same procedure as the low pitched horn.
7. INSTALL HOOD LOCK SUPPORT ASSEMBLY (
Click Here
)
8. INSTALL HOOD LOCK ASSEMBLY (
Click Here
)
9. INSTALL WATER PUMP ASSEMBLY (
Click Here
)
10. ADD COOLANT (
Click Here
)
11. CHECK FOR COOLANT LEAKS
(a) Check for engine coolant leaks (
Click Here
)
-
12. INSTALL FRONT BUMPER ASSEMBLY (
Click Here
)
13. INSTALL FRONT FENDER LINER LH (
Click Here
)
14. INSTALL FRONT FENDER LINER RH
HINT:
Use the same procedures described for the LH side.
15. CONNECT CABLE TO NEGATIVE BATTERY TERMINAL
16. PERFORM INITIALISATION
(a) Enter the audio system PIN, if applicable. Refer to Section 1-8 "Audio System" in the TRD Hilux Driver's Manual for programming information.
-
(b) Calibrate the multi-information display compass. Refer to Section 1-10 "Other Equipment" in the TRD Hilux Driver's Manual for calibrating information.
-