 |
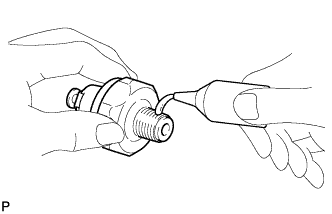
Clean the threads of the oil pressure switch, and apply adhesive to them.
- Adhesive:
- Toyota Genuine Adhesive 1344, Three Bond 1344 or equivalent
ENGINE ASSEMBLY > INSTALLATION |
| 1. INSTALL WIRE HARNESS CLAMP BRACKET |
Install the bolt and wire harness clamp bracket.
| 2. INSTALL ENGINE OIL PRESSURE SWITCH ASSEMBLY |
|
Clean the threads of the oil pressure switch, and apply adhesive to them.
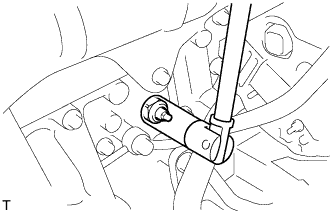 |
Using a 24 mm deep socket wrench, install the oil pressure switch.
| 3. INSTALL OIL FILTER BRACKET SUB-ASSEMBLY |
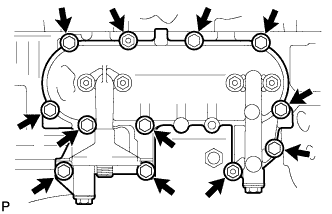 |
Install a new gasket and oil filter bracket with the 10 bolts and 2 nuts.
| 4. INSTALL OIL FILTER SUB-ASSEMBLY |
Check and clean the oil filter installation surface.
Apply clean engine oil to the gasket of a new oil filter.
Install the oil filter, and tighten it by hand until the gasket contacts the installation surface.
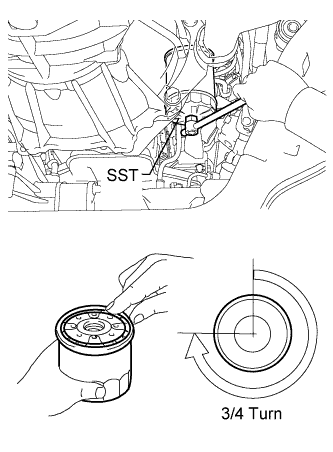 |
Using SST, tighten it by an additional 3/4 turn to seat the filter.
| 5. INSTALL EXHAUST MANIFOLD |
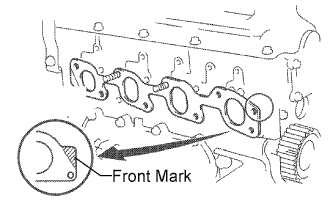 |
Install a new gasket to the cylinder head.
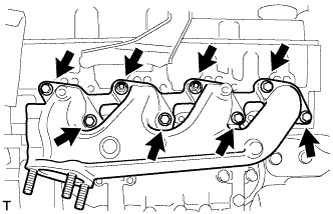 |
Install the exhaust manifold with the 6 bolts and 2 new nuts. Uniformly tighten the bolts and nuts in several steps.
| 6. INSTALL NO. 1 EXHAUST MANIFOLD HEAT INSULATOR |
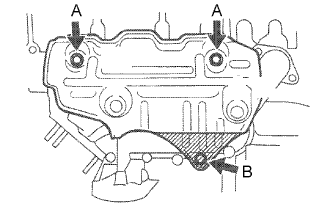 |
Install the heat insulator with the 3 bolts.
| 7. INSTALL OIL DIPSTICK GUIDE |
Apply clean engine oil to a new O-ring.
Install the O-ring to the guide.
Install the guide with the 2 bolts.
| 8. INSTALL OIL DIPSTICK SUB-ASSEMBLY |
Install the dipstick to the guide.
| 9. INSTALL NO. 1 FRONT ENGINE MOUNTING BRACKET RH |
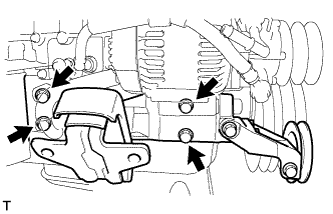 |
Install the engine mounting bracket with the 4 bolts.
| 10. INSTALL GENERATOR ASSEMBLY |
Install the generator assembly (Click here).
| 11. INSTALL PUMP BRACKET |
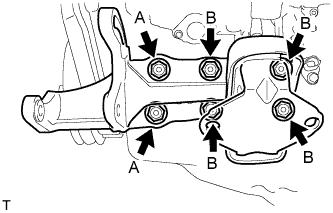 |
Install the pump bracket with the 6 bolts.
| 12. INSTALL CYLINDER BLOCK WATER DRAIN COCK SUB-ASSEMBLY |
Clean the threads of the water drain cock, and apply adhesive to them.
Install the water drain cock.
| 13. INSTALL WATER BY-PASS HOSE UNION |
Clean the threads of the water by-pass hose union, and apply adhesive to them.
Install the water by-pass hose union.
| 14. INSTALL INTAKE MANIFOLD |
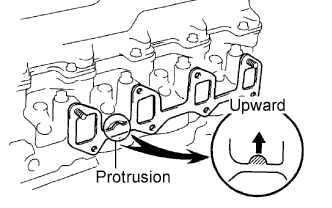 |
Install a new gasket to the cylinder head with the protrusion facing upward.
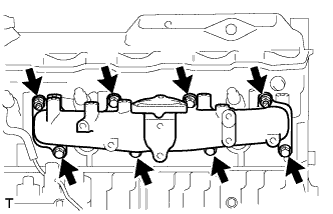 |
Install the intake manifold with the 6 bolts and 2 nuts. Uniformly tighten the bolts and nuts in several steps.
| 15. INSTALL WATER OUTLET HOUSING |
Install a new gasket to the cylinder head.
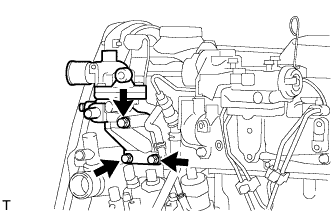 |
Install the outlet hosing with the 3 bolts
| 16. INSTALL ENGINE COOLANT TEMPERATURE SENSOR |
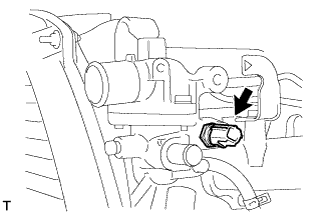 |
Using a 17 mm deep socket wrench, install the sensor.
| 17. INSTALL CRANKSHAFT POSITION SENSOR |
Apply clean engine oil to a new O-ring.
Install the O-ring to the sensor.
Install the sensor with the bolt.
| 18. INSTALL INJECTION PUMP ASSEMBLY |
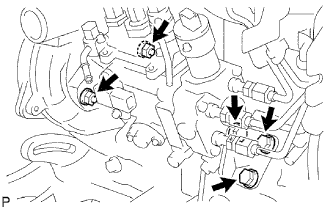 |
Install the injection pump to the timing gear case, and temporarily tighten the 2 nuts.
Install the injection pump stay to the injection pump rear end, and temporarily tighten the 3 bolts.
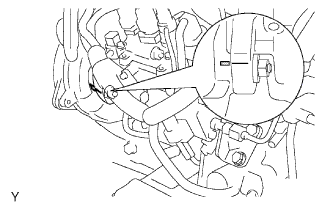 |
Rotate the pump body to align the marking of the pump flange and timing gear case.
Tighten the 2 nuts to install the injection pump.
Tighten the 3 bolts to install the injection pump stay.
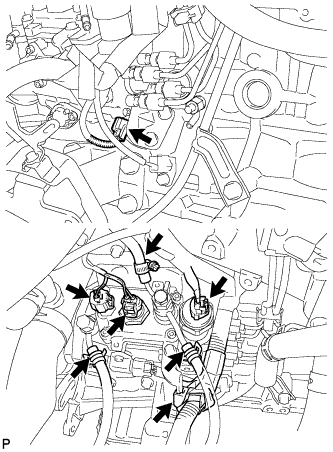 |
Connect the 3 fuel hoses.
Connect the engine speed sensor connector.
Connect the spill control valve connector.
Connect the correction unit connector.
Connect the timing control valve connector.
Connect the fuel temperature sensor connector.
Connect the engine wire clamp.
| 19. INSTALL INJECTION PUMP DRIVE PULLEY |
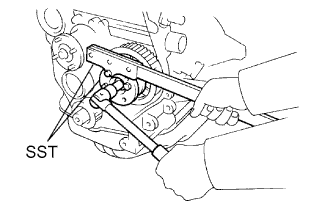 |
Using SST, install the injection pump drive pulley with the nut.
| 20. INSTALL GLOW PLUG ASSEMBLY |
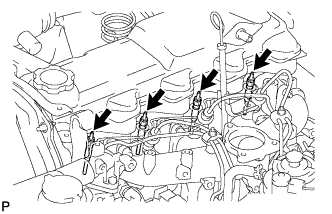 |
Using a 12 mm deep socket wrench, install the 4 glow plugs.
| 21. INSTALL NOZZLE HOLDER & NOZZLE SET |
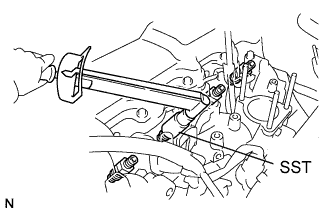 |
Place 4 new injection nozzle seat gaskets and 4 injection nozzle seats into the injection nozzle holes of the cylinder head.
Using SST, install the 4 nozzle holders and nozzle sets.
| 22. INSTALL NOZZLE LEAKAGE PIPE ASSEMBLY |
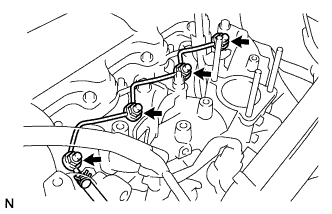 |
Install 4 new ring packing washers and the leakage pipe with the 4 nuts.
Connect the fuel hose to the leakage pipe.
| 23. INSTALL NO. 1 GLOW PLUG CONNECTOR |
Install the glow plug connector by uniformly tightening the 4 nuts.
Install the 4 screw grommets.
Install the wire harness with the nut.
| 24. INSTALL INJECTION PIPE SET |
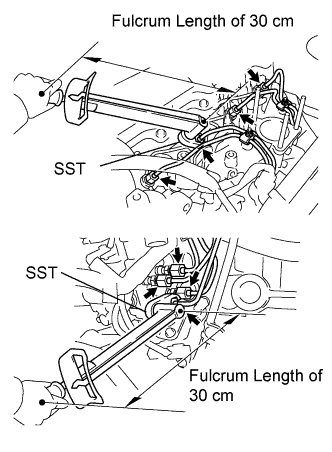 |
Connect the 2 lower clamps on the intake manifold.
Install the 4 injection pipes.
Secure the injection pipes with the 2 upper pipe clamps and 2 nuts.
| 25. INSTALL VENTURI ASSEMBLY |
Place a new gasket and the venturi on the intake manifold.
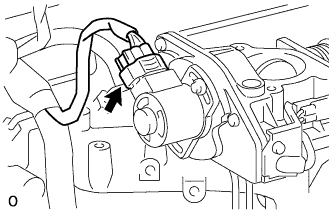 |
Connect the throttle control motor connector.
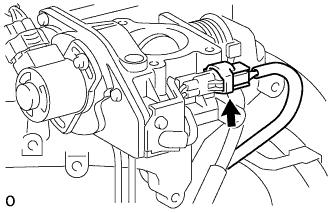 |
Connect the throttle open switch connector.
| 26. INSTALL INTAKE PIPE ASSEMBLY |
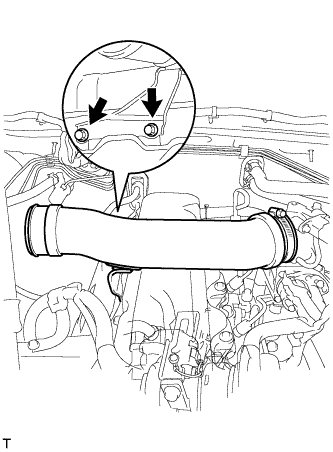 |
Install the intake pipe with the 2 bolts.
Tighten the intake pipe clamp.
| 27. INSTALL CRANKSHAFT TIMING PULLEY |
Align the pulley set key with the key groove of the timing pulley.
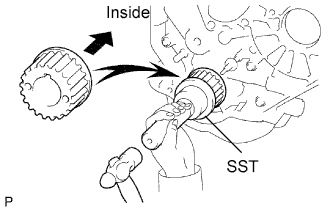 |
Using SST and a hammer, tap in the timing pulley with the flange side facing inward.
| 28. INSTALL TIMING BELT |
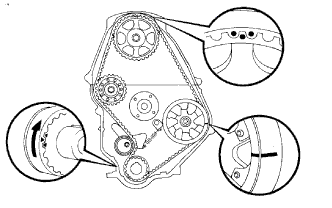 |
Remove any oil or water on each pulleys, and keep them clean.
Install the timing belt on the crankshaft timing and timing belt idlers.
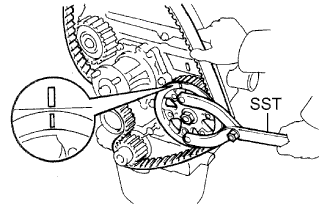 |
Using SST, slightly turn the injection pump drive pulley clockwise. Hang the timing belt on the pulley, and align the timing marks of the drive pulley and timing belt case.
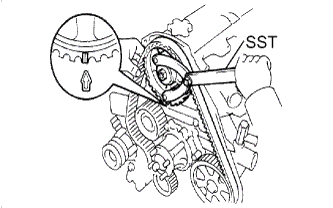 |
Using SST, slightly turn the camshaft timing pulley clockwise. Hang the timing belt on the timing pulley, and align the timing marks of the timing pulley and timing belt case.
Check that the timing belt has tension between the injection pump drive and camshaft timing pulleys.
Install the timing belt on the No. 2 timing belt idler.
| 29. INSTALL TIMING BELT COVER SUB-ASSEMBLY |
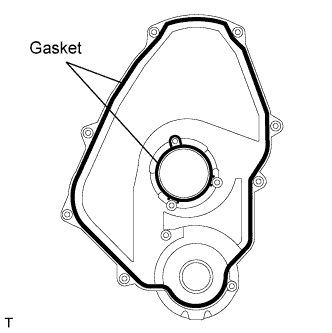 |
Install 2 new gaskets to the timing belt cover.
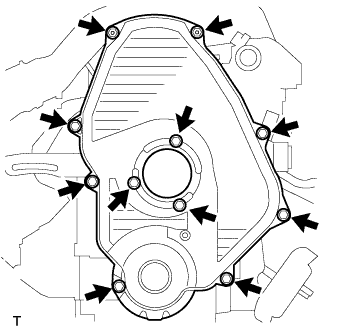 |
Install the timing belt cover with the 11 bolts.
| 30. INSTALL CRANKSHAFT PULLEY |
Align the pulley set key with the key groove of the pulley, and slide the pulley to the crankshaft.
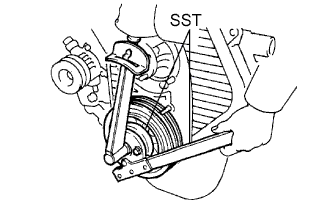 |
Using SST, install the pulley bolt.
| 31. INSTALL COMPRESSOR MOUNTING BRACKET (w/ Air Conditioning System) |
Temporarily install the compressor mounting bracket with the 4 bolts.
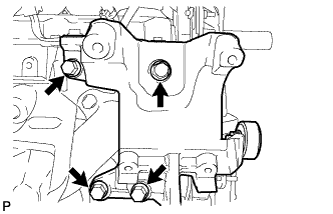 |
Using several steps, uniformly install and tighten the 4 bolts.
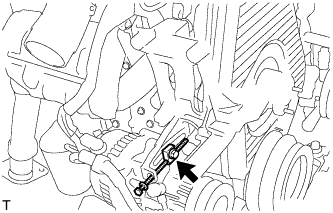 |
Temporarily install the spacer with the bolt.
| 32. INSTALL FAN BELT ADJUSTING BAR (w/o Air Conditioning System) |
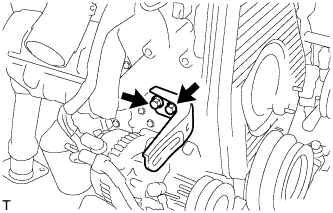 |
Install the fan belt adjusting bar with the 2 bolts.
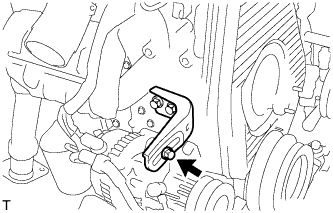 |
Temporarily install the bolt.
| 33. INSTALL ENGINE WIRE |
| 34. REMOVE ENGINE STAND |
| 35. INSTALL ENGINE ASSEMBLY |
Attach the chain block and engine sling device to the engine hangers.
Slowly lower the engine into the engine compartment.
Install the engine mounting bracket with the 4 bolts and 4 nuts.
Remove the No. 2 engine hanger.
| 36. INSTALL VANE PUMP ASSEMBLY |
Temporarily install the vane pump assembly with the 2 bolts.
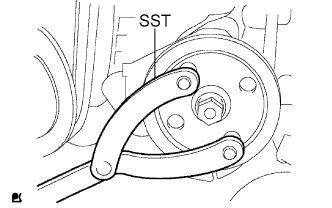 |
Install the pulley to the pump shaft.
Using SST, stop the pulley rotation and torque the nut.
| 37. INSTALL COMPRESSOR AND MAGNET CLUTCH (w/ Air Conditioning System) |
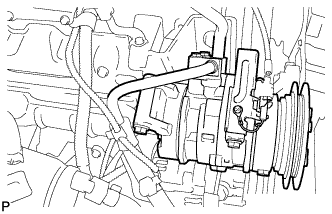 |
Install the compressor with the 4 bolts.
| 38. CONNECT HOSES AND CONNECTORS |
Connect the vacuum pump hose to the generator.
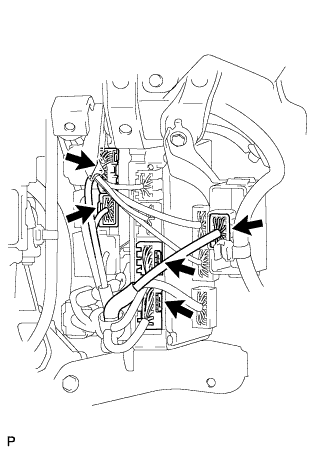 |
Connect the connectors as shown in the illustration.
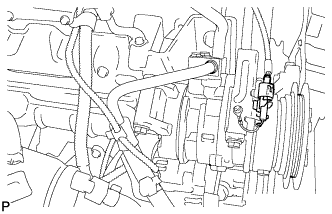 |
Connect the compressor connector.
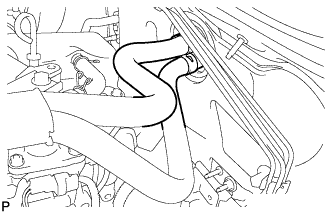 |
Connect the 2 water hoses.
Install the water hose clamp with the bolt.
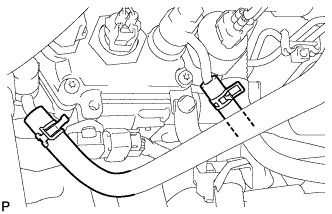 |
Connect the 2 fuel hoses.
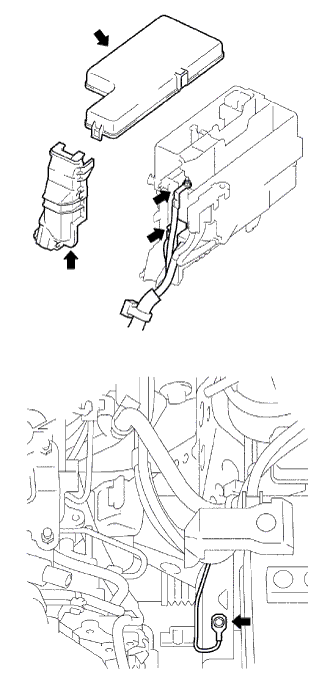 |
Install the ground cable with the bolt.
Connect the 2 engine room junction block connectors.
Install the engine room junction block wire with the nut.
Install the engine room relay block cover (side).
Install the engine room relay block cover (upper).
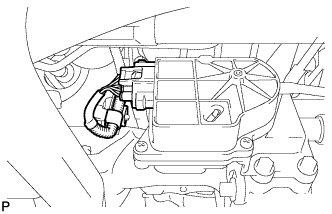 |
Connect the connector and clamp as shown in the illustration.
| 39. INSTALL REAR END PLATE |
Install the rear end plate with the 2 bolts.
| 40. INSTALL FLYWHEEL SUB-ASSEMBLY |
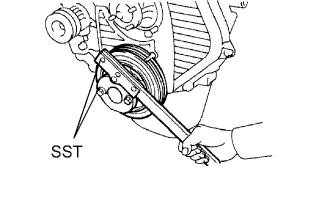 |
Using SST, hold the crankshaft.
Clean the bolts and bolt holes.
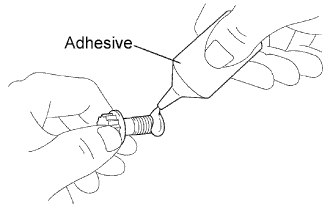 |
Apply adhesive to 2 or 3 threads of the bolts.
Install the flywheel on the crankshaft.
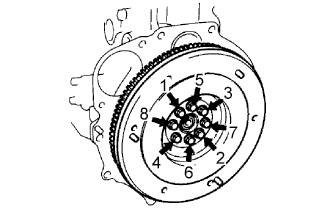 |
Install and uniformly tighten the 8 bolts in several steps, in the sequence shown.
| 41. INSTALL CLUTCH DISC ASSEMBLY |
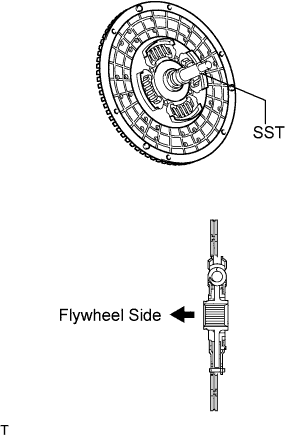 |
Insert SST into the clutch disc. Then insert the SST (together with the clutch disc) into the flywheel.
| 42. INSTALL CLUTCH COVER ASSEMBLY |
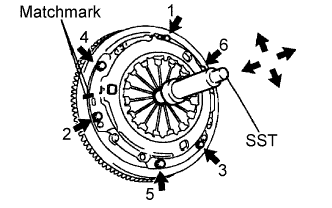 |
Align the matchmarks on the clutch cover and flywheel.
Tighten the 6 bolts as described below.
Determine the first bolt to be tightened by choosing the bolt closest to the knock pin.
Uniformly tighten the 6 bolts in diametrically opposite pairs relative to the position of the first bolt. Use the illustration as a reference.
Lightly move SST up and down, and right and left.
Check that the disc is in the center, and then tighten the bolts.
| 43. INSTALL TRANSMISSION ASSEMBLY |
2WD:
Install the transmission (Click here).
4WD:
Install the transmission (Click here).
| 44. INSTALL PROPELLER SHAFT ASSEMBLY |
Front side:
Install the propeller shaft (Click here).
Rear side:
Install the propeller shaft (Click here).
| 45. INSTALL FRONT EXHAUST PIPE ASSEMBLY |
Temporally install the pipe support and clamp with the bolt.
Install a new gasket to the exhaust manifold.
Install the front exhaust pipe to the exhaust manifold with the 3 nuts. Alternately tighten the bolts in several passes.
Install the stay to the transmission with the 2 bolts.
Install the clamp with the bolt.
| 46. INSTALL STARTER ASSEMBLY |
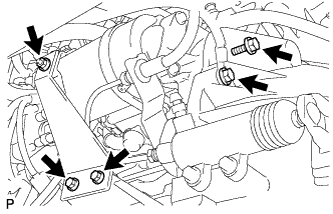 |
Install the starter with the 2 bolts and nut.
Install the stay with the 2 bolts.
Install the stay with the nut.
Connect the terminal 30 wire with the nut.
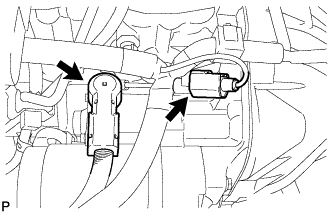 |
Install the terminal cap.
Connect the starter connector.
| 47. INSTALL RADIATOR ASSEMBLY |
Install the radiator (Click here).
| 48. CONNECT RADIATOR HOSE OUTLET |
| 49. CONNECT RADIATOR HOSE INLET |
| 50. INSTALL AIR CLEANER ASSEMBLY |
Install the cleaner with the 2 bolts.
Connect the connector to the IAT meter.
Connect the hose clamp.
| 51. INSTALL BATTERY AND BATTERY TRAY |
| 52. INSTALL BATTERY BRACKET |
Install the battery bracket with the bolt.
| 53. INSTALL HOOD SUB-ASSEMBLY |
Install the hood with the 4 bolts.
Connect the washer nozzle hose.
Adjust the hood.
| 54. ADD ENGINE OIL |
Add fresh engine oil.
| Item | Specified Condition |
| Drain and refill with oil filter change | 7.2 liters (7.6 US qts, 6.3 Imp. qts) |
| Drain and refill without oil filter change | 6.7 liters (7.1 US qts, 5.9 Imp. qts) |
| Dry fill | 8.4 liters (8.9 US qts, 7.4 Imp. qts) |
Reinstall the oil filler cap.
| 55. ADD ENGINE COOLANT |
Tighten the radiator drain cock plug by hand.
Tighten the cylinder block drain cock plug.
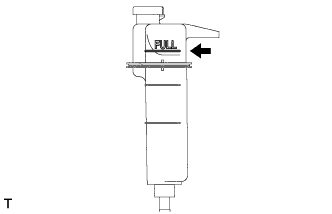 |
Fill the radiator with TOYOTA Super Long Life Coolant (SLLC) to the reservoir tank's FULL line.
Press the inlet and outlet radiator hoses several times by hand, and then check the level of the coolant.
If the coolant level drops below the FULL line, add TOYOTA SLLC to the FULL line.
Install the radiator reservoir cap.
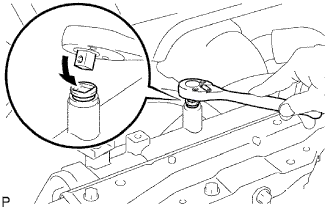 |
Using a wrench, install the vent plug.
Bleed air from the cooling system.
Warm up the engine until the thermostat opens. While the thermostat is open, circulate the coolant for several minutes.
Maintain the engine speed at 2,500 to 3,000 rpm.
Press the inlet and outlet radiator hoses several times by hand to bleed air.
Stop the engine and wait until the coolant cools down to ambient temperature.
|
After the coolant cools down, check that the coolant level is at the FULL line.
If the coolant level is below the low line, add TOYOTA SLLC to the FULL line.
| 56. ADD FUEL |
| 57. TIGHTEN FUEL TANK CAP ASSEMBLY |
| 58. BLEED AIR FROM FUEL SYSTEM |
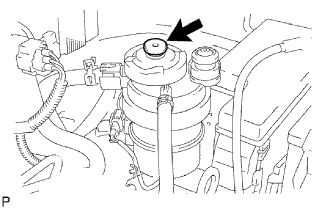 |
Using the hand pump, bleed air from the fuel system until pumping becomes difficult.
| 59. INSTALL FRONT WHEEL |
| 60. CONNECT CABLE TO NEGATIVE BATTERY TERMINAL |
| 61. PERFORM INITIALIZATION |
Perform initialization (Click here).
| 62. CHECK FOR FUEL LEAKS |
| 63. CHECK FOR ENGINE OIL LEAKS |
| 64. CHECK FOR ENGINE COOLANT LEAKS |
Check for engine coolant leaks (Click here).
| 65. CHECK TRANSMISSION OIL |
2WD:
Check transmission oil (Click here).
4WD:
Check transmission oil (Click here).
| 66. CHECK FOR EXHAUST GAS LEAKS |
| 67. INSPECT ENGINE IDLE SPEED |
Warm up the engine.
When using the intelligent tester:
Connect the intelligent tester to the DLC3.
Measure the idle speed.
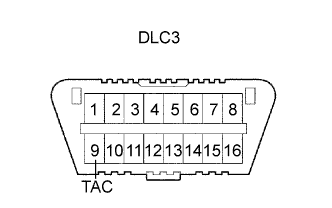 |
When not using the intelligent tester:
Using SST, connect the tachometer test probe to terminal 9 (TAC) of the DLC3.
Measure the idle speed.
| 68. INSPECT MAXIMUM ENGINE SPEED |
Start the engine.
Fully depress the accelerator pedal.
Measure the maximum speed.
| 69. INSTALL NO. 2 ENGINE UNDER COVER (for 4WD) |
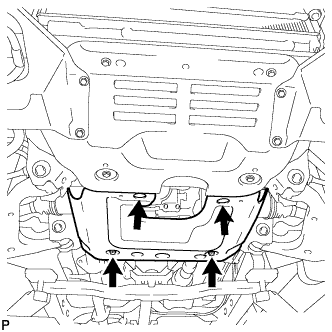 |
Install the under cover with the 4 bolts.
| 70. INSTALL NO. 1 ENGINE UNDER COVER (for 4WD) |
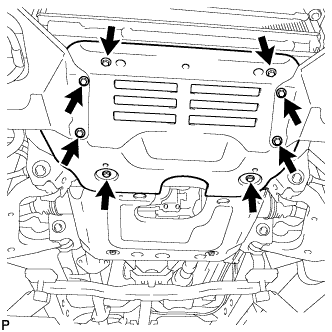 |
Install the under cover with the 8 bolts.