 |
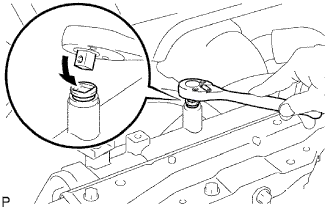
Drain the coolant by removing the reservoir cap and, using a wrench, remove the vent plug.
ENGINE ASSEMBLY > REMOVAL |
| 1. DISCONNECT CABLE FROM NEGATIVE BATTERY TERMINAL |
| 2. REMOVE HOOD SUB-ASSEMBLY |
Disconnect the washer nozzle hose.
Remove the 4 bolts and hood.
| 3. REMOVE NO. 1 ENGINE UNDER COVER (for 4WD) |
Remove the 4 bolts and No. 1 engine under cover.
| 4. REMOVE NO. 2 ENGINE UNDER COVER (for 4WD) |
Remove the 2 bolts and No. 2 engine under cover.
| 5. DRAIN ENGINE OIL |
Remove the oil filler cap.
Remove the oil drain plug, and drain the engine oil from the oil pan.
| 6. LOOSEN FUEL TANK CAP ASSEMBLY |
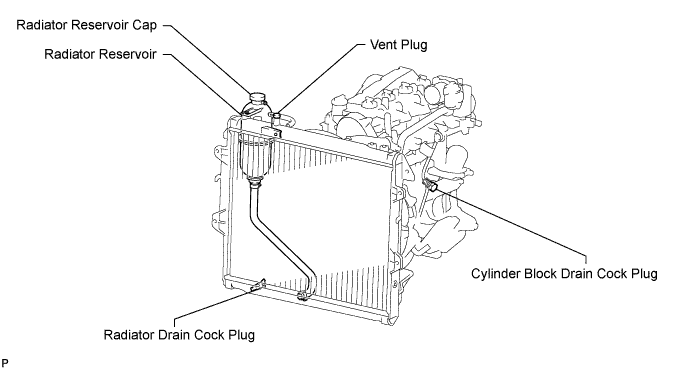
| 7. DRAIN ENGINE COOLANT |
|
Drain the coolant by removing the reservoir cap and, using a wrench, remove the vent plug.
Loosen the cylinder block drain cock plug and the radiator drain cock plug.
| 8. REMOVE BATTERY BRACKET |
| 9. REMOVE BATTERY AND BATTERY TRAY |
| 10. REMOVE AIR CLEANER ASSEMBLY |
for Ventilation Hose Type:
Disconnect the ventilation hose.
w/ Mass Air Flow Meter:
Disconnect the mass air flow meter sensor connector.
w/ Intake Air Temperature Sensor:
Disconnect the intake air temperature sensor connector.
Loosen the hose clamp.
Remove the 2 bolts and air cleaner.
| 11. REMOVE NO. 1 ENGINE COVER SUB-ASSEMBLY (w/ EGR Cooler) |
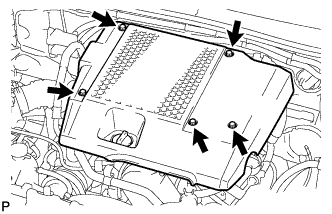 |
Remove the 3 bolts, 2 nut and engine cover.
| 12. REMOVE INTERCOOLER ASSEMBLY WITH INTAKE AIR CONNECTOR (w/ EGR Cooler) |
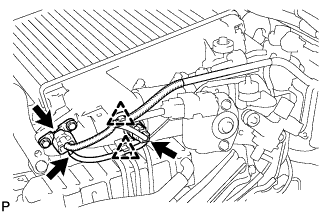 |
Detach the 2 clamps.
Disconnect the vacuum hose from the manifold absolute pressure sensor.
Disconnect the IAT sensor connector and manifold absolute diesel pressure sensor connector.
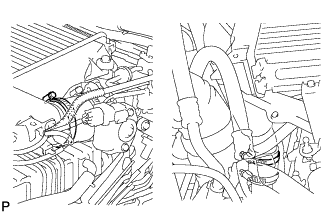 |
Loosen the 2 clamps.
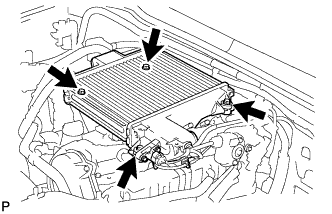 |
Remove the 4 bolts and intercooler.
| 13. REMOVE NO. 2 AIR CLEANER PIPE SUB-ASSEMBLY (w/o EGR Cooler) |
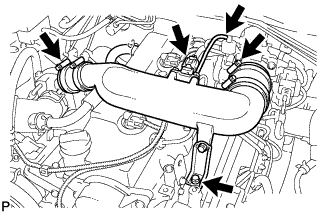 |
Disconnect the manifold absolute pressure sensor connector.
Disconnect the vacuum hose from the gas filter.
Loosen the 2 clamps.
Remove the bolt and disconnect the pipe together with the 2 air hoses.
| 14. REMOVE RADIATOR ASSEMBLY |
| 15. DISCONNECT HEATER HOSE |
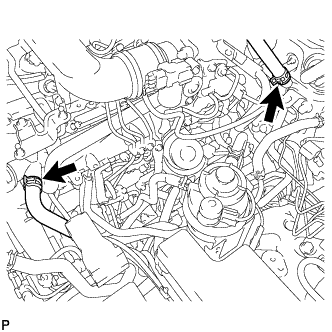 |
Disconnect the 2 heater hoses.
| 16. DISCONNECT PRESSURE FEED TUBE ASSEMBLY |
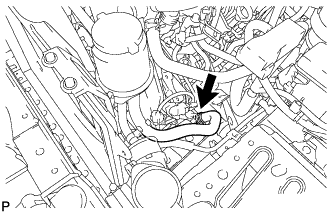 |
Disconnect the oil reservoir to pump hose.
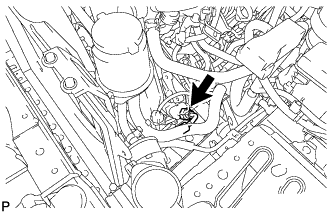 |
Disconnect the pressure feed tube.
| 17. DISCONNECT FUEL HOSE |
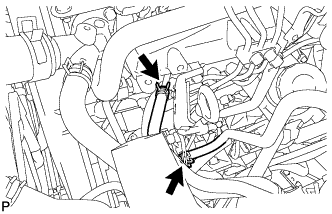 |
Disconnect the 2 fuel hoses.
| 18. DISCONNECT UNION TO CONNECTOR TUBE HOSE |
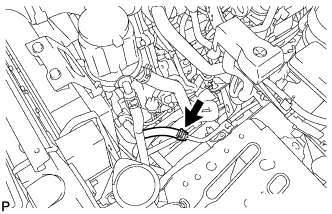 |
Disconnect the union to connector tube hose.
| 19. REMOVE GLOVE COMPARTMENT DOOR ASSEMBLY |
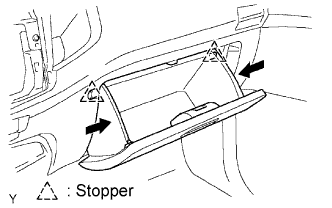 |
Push in the sides of the glove compartment door, as indicated by the arrows in the illustration. Then open the door to release it from the 2 stoppers. Open the door until it is horizontal.
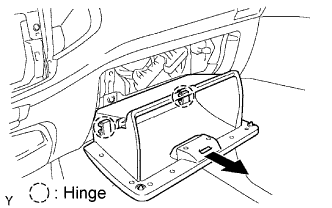 |
Pull the glove compartment door toward the rear of the vehicle to detach the 2 hinges and remove the glove compartment door.
| 20. DISCONNECT WIRE HARNESS |
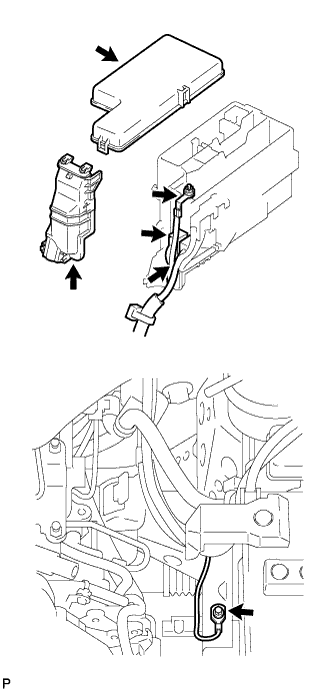 |
Remove the upper relay block cover.
Remove the side relay block cover.
Remove the nut and disconnect the engine room junction block wire.
Disconnect the 2 engine room junction block connectors.
Remove the bolt and disconnect the ground cable.
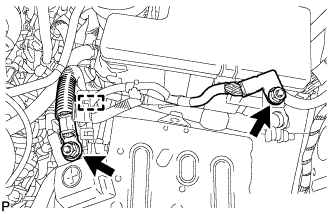 |
Remove the 2 nuts, detach the clamp and disconnect the wire harness.
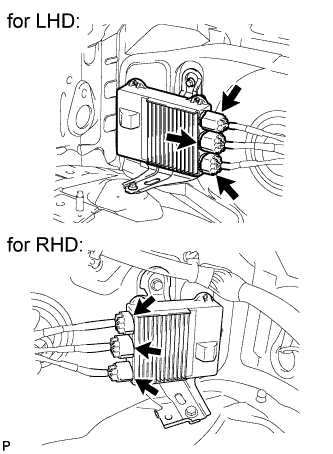 |
Disconnect the 3 EDU connectors.
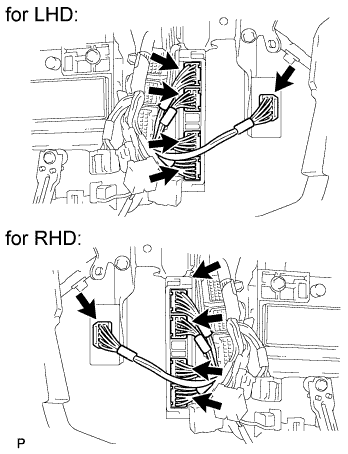 |
w/ A.D.D.
Disconnect the 4WD control ECU connector.
Disconnect the 4 ECM connectors.
| 21. DISCONNECT COOLER COMPRESSOR ASSEMBLY (w/ Air Conditioning System) |
Remove the 4 bolts and disconnect the cooler compressor.
| 22. REMOVE TRANSMISSION ASSEMBLY |
| 23. REMOVE CLUTCH COVER ASSEMBLY |
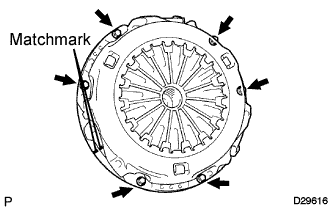 |
Place matchmarks on the clutch cover and flywheel.
Loosen each set bolt one turn at a time until spring tension is released.
Remove the 6 set bolts and pull off the clutch cover.
| 24. REMOVE CLUTCH DISC ASSEMBLY |
| 25. REMOVE FLYWHEEL SUB-ASSEMBLY |
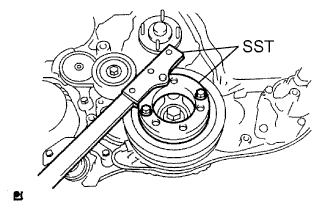 |
Using SST, hold the crankshaft pulley.
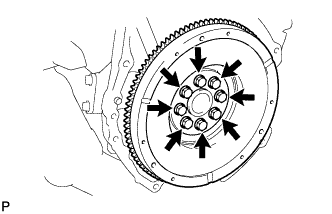 |
Remove the 8 bolts and flywheel.
| 26. REMOVE REAR END PLATE |
Remove the bolt and rear end plate.
| 27. REMOVE ENGINE ASSEMBLY |
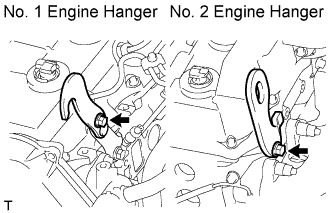 |
Install a No. 1 engine hanger and No. 2 engine hanger with 2 bolts as shown in the illustration.
| No. 1 Engine hanger | w/ EGR cooler | 12284-30060 |
| Bolt (91552-81014) | ||
| w/o EGR cooler | 12284-30020 | |
| Bolt (91552-81014) | ||
| No. 2 Engine hanger | 12282-67030 | |
| Bolt (91642-81030) | ||
Attach an engine sling device and hang the engine with a chain block.
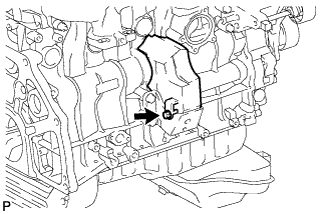 |
Remove the bolt and No. 2 cylinder block insulator.
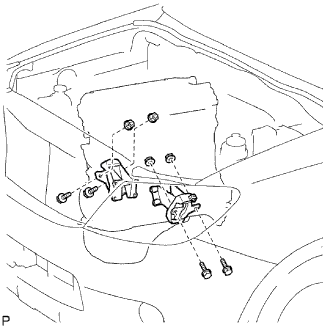 |
Remove the 4 bolts and 4 nuts.
Remove the engine by operating the engine sling device and chain block.
| 28. FIX ENGINE ON ENGINE STAND |
| 29. REMOVE ENGINE WIRE |
Remove the engine wire.
| 30. REMOVE NO. 1 TIMING BELT COVER |
Remove the bolt and water hose clamp.
Remove the wire harness clamp.
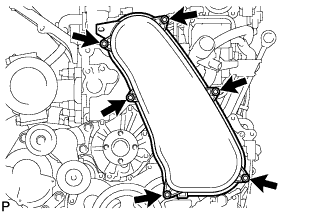 |
Remove the 6 bolts and timing belt cover.
| 31. REMOVE TIMING BELT |
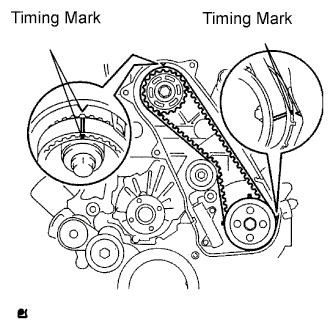 |
Turn the crankshaft clockwise and align the timing marks as shown in the illustration.
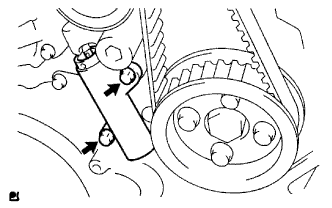 |
Uniformly loosen the 2 bolts and remove the timing belt tensioner.
Remove the timing belt.
Using a 10 mm hexagon wrench, remove the bolt, timing belt idler and washer.
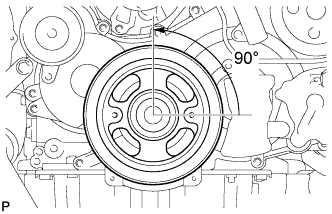 |
| 32. REMOVE NO. 1 TIMING BELT IDLER SUB-ASSEMBLY |
| 33. REMOVE NO. 1 TIMING BELT TENSIONER ASSEMBLY |
| 34. REMOVE CRANKSHAFT PULLEY |
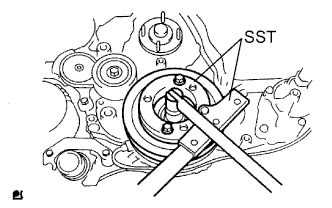 |
Using SST, remove the pulley bolt.
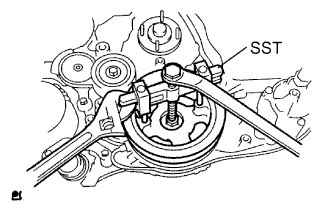 |
Using SST, remove the pulley.
| 35. REMOVE TURBOCHARGER SUB-ASSEMBLY (w/ EGR Cooler) |
| 36. REMOVE TURBOCHARGER SUB-ASSEMBLY (w/o EGR Cooler) |
| 37. REMOVE EXHAUST MANIFOLD |
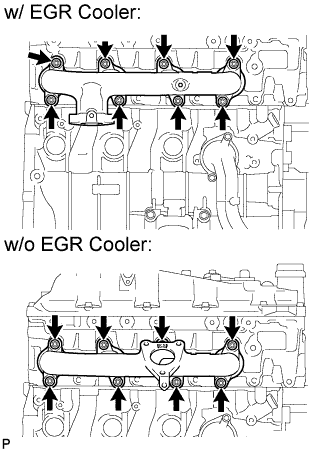 |
w/o EGR Cooler:
Remove the 8 nuts, 8 spacers and exhaust manifold.
w/ EGR Cooler:
Remove the 8 nuts, 8 spacers, 8 collars and exhaust manifold.
| 38. INSPECT EXHAUST MANIFOLD |
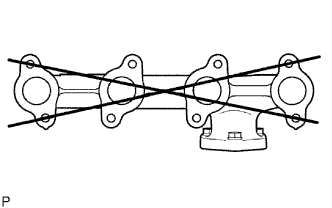 |
Using a precision straightedge and feeler gauge, measure the surface contacting the cylinder head for warpage.
| 39. REMOVE GENERATOR ASSEMBLY |
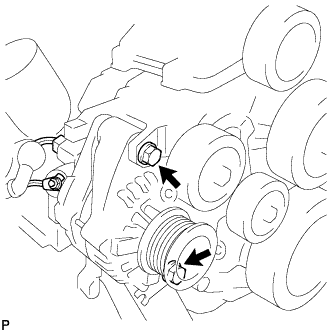 |
Remove the nut and generator wire.
Disconnect the generator connector.
Remove the 2 bolts and generator.
| 40. REMOVE GENERATOR BRACKET |
Remove the bolt and generator bracket.
| 41. REMOVE V-RIBBED BELT TENSIONER ASSEMBLY |
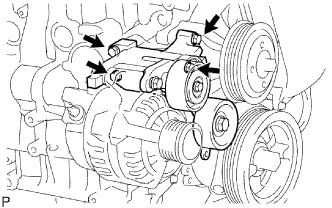 |
Remove the 4 bolts and V-ribbed belt tensioner.
| 42. REMOVE INTERCOOLER SUPPORT BRACKET (w/ EGR Cooler) |
Remove the 2 bolts and intercooler support bracket.
| 43. REMOVE NO. 2 INTERCOOLER SUPPORT BRACKET (w/ EGR Cooler) |
Remove the 2 bolts and No. 2 intercooler support bracket.
| 44. REMOVE NO. 1 COMPRESSOR MOUNTING BRACKET (w/ Air Conditioning System) |
Remove the 4 bolts and No. 1 compressor mounting bracket.
| 45. REMOVE VISCOUS HEATER WITH MAGNET CLUTCH ASSEMBLY (w/ Viscous Heater) |
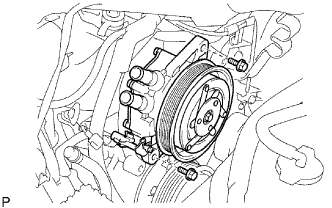 |
Disconnect the connector.
Remove the 2 bolts and viscous with magnet clutch heater assembly.
| 46. REMOVE NO. 1 VISCOUS HEATER BRACKET SUB-ASSEMBLY (w/ Viscous Heater) |
Remove the 4 bolts and No. 1 viscous heater bracket.
| 47. REMOVE WATER INLET |
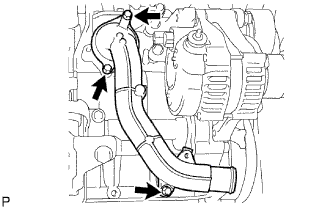 |
Remove the 3 bolts and water inlet.
| 48. REMOVE THERMOSTAT |
| 49. REMOVE WATER OUTLET |
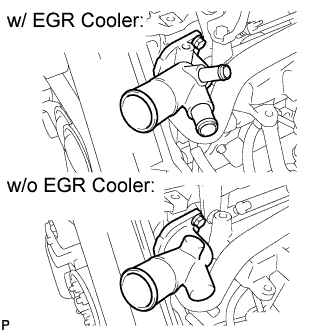 |
Remove the 2 bolts and water outlet.
| 50. REMOVE GLOW PLUG ASSEMBLY |
| 51. REMOVE MANIFOLD STAY (w/o EGR Cooler) |
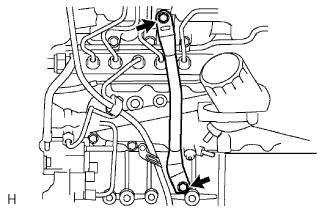 |
Remove the 2 bolts and manifold stay.
| 52. REMOVE OIL FILTER SUB-ASSEMBLY |
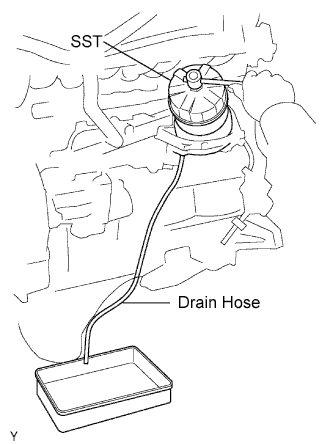 |
Using SST, remove the oil filter.
| 53. REMOVE INTAKE MANIFOLD (w/ EGR Cooler) |
| 54. REMOVE NO. 1, NO. 2 AND NO. 3 INJECTION PIPE SUB-ASSEMBLY (w/o EGR Cooler) |
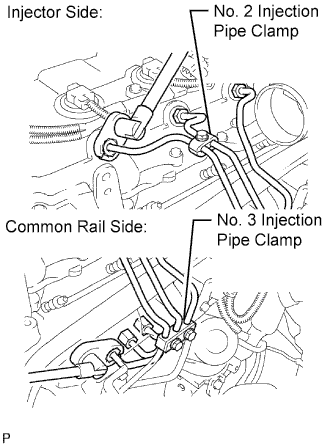 |
Remove the bolt and No. 2 injection pipe clamp.
Remove the 2 nuts and No. 3 injection pipe clamp.
Using a 17 mm union nut wrench, loosen the union nuts and remove the No. 1, No. 2 and No. 3 injection pipes.
| 55. REMOVE NO. 4 INJECTION PIPE SUB-ASSEMBLY (w/o EGR Cooler) |
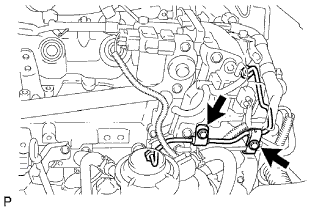 |
Remove the 2 bolts.
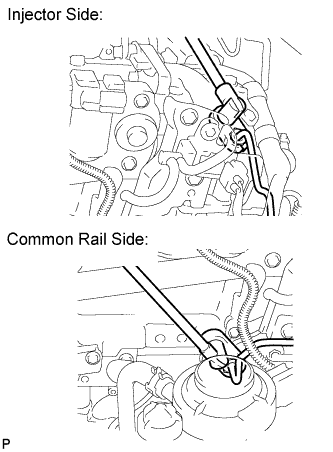 |
Using a 17 mm union nut wrench, loosen the union nuts and remove the No. 4 injection pipe.
| 56. REMOVE NO. 2 NOZZLE LEAKAGE PIPE ASSEMBLY (w/o EGR Cooler) |
Disconnect the 3 fuel hoses.
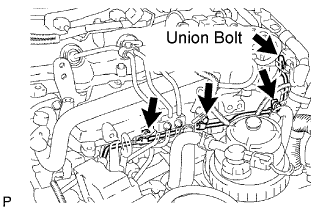 |
Remove the union bolt, 3 bolts, No. 2 nozzle leakage pipe and gasket.
| 57. REMOVE INTAKE MANIFOLD (w/o EGR Cooler) |
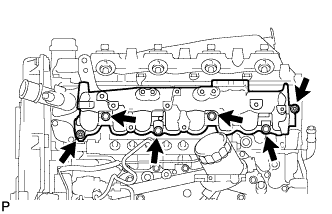 |
Remove the 4 bolts, 2 nuts, intake manifold and gasket.
| 58. INSPECT INTAKE MANIFOLD |
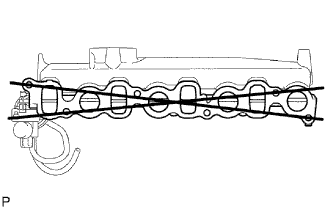 |
Using a precision straightedge and feeler gauge, measure the surface contacting the cylinder head for warpage.
| 59. REMOVE FUEL SUPPLY PUMP ASSEMBLY |
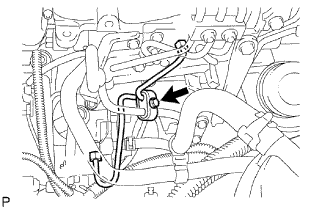 |
Remove the bolt and clamp.
Remove the 2 bolts and oil level gauge guide.
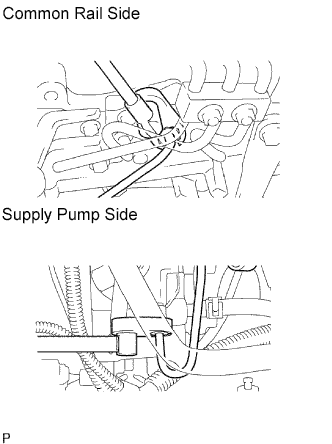 |
Using a 17 mm union nut wrench, loosen the union nuts and remove the fuel inlet pipe.
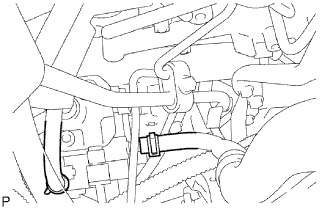 |
Disconnect the 2 fuel hoses.
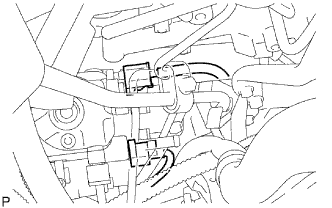 |
Disconnect the 2 connectors.
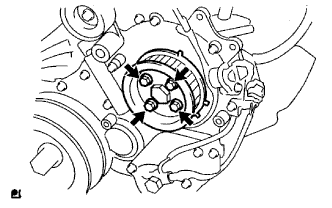 |
Remove the 4 bolts indicated by the arrows in the illustration.
Remove the No. 2 camshaft timing pulley flange and pump drive shaft pulley.
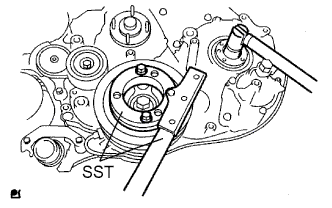 |
Remove the set nut and O-ring while holding the crankshaft pulley by using SST.
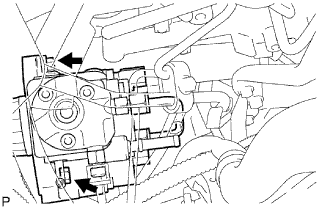 |
Loosen the 2 nuts.
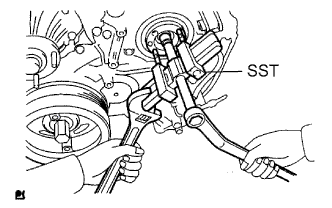 |
Using SST, disconnect the pump from the injection gear.
Remove the 2 nuts and pump.
Remove the O-ring.
| 60. REMOVE COMMON RAIL ASSEMBLY |
Disconnect the fuel pressure sensor connector and pressure discharge valve connector.
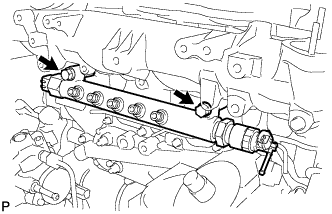 |
Remove the 2 bolts and common rail.
| 61. REMOVE OIL COOLER COVER SUB-ASSEMBLY |
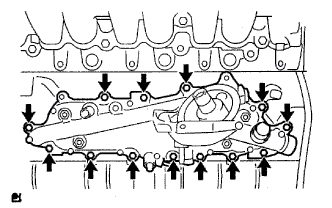 |
Disconnect the oil pressure switch connector and wire harness.
Remove the 13 bolts, 2 nuts and oil cooler cover.
| 62. REMOVE TIMING GEAR COVER INSULATOR (w/ EGR Cooler) |
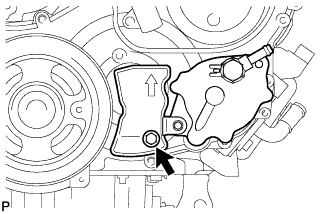 |
Remove the bolt and timing gear cover insulator.
| 63. REMOVE VACUUM PUMP ASSEMBLY |
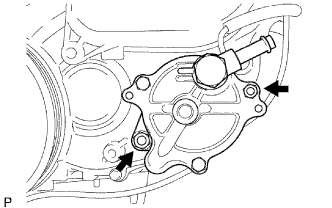 |
Remove the 2 nuts, vacuum pump and 2 O-rings.
| 64. REMOVE VANE PUMP ASSEMBLY |
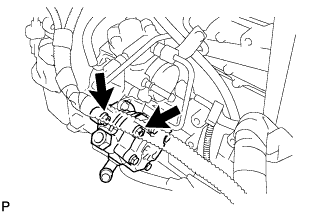 |
Remove the 2 nuts, vane pump and O-ring.
| 65. REMOVE CRANKSHAFT POSITION SENSOR |
Remove the bolt and crankshaft position sensor.
| 66. REMOVE CAMSHAFT POSITION SENSOR |
Remove the bolt and camshaft position sensor.
| 67. REMOVE ENGINE COOLANT TEMPERATURE SENSOR |
Using a 19 mm deep socket wrench, remove the engine coolant temperature sensor and gasket.
| 68. REMOVE FRONT ENGINE MOUNTING INSULATOR |
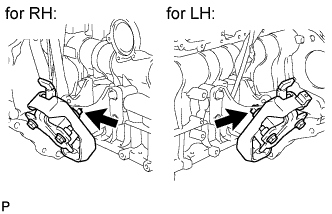 |
Remove the 2 nuts and 2 front engine mounting insulators.
| 69. REMOVE NO. 1 FRONT ENGINE MOUNTING BRACKET RH |
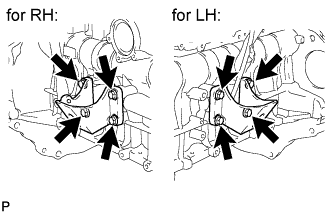 |
Remove the 4 bolts and No. 1 front engine mounting bracket.
| 70. REMOVE NO. 1 FRONT ENGINE MOUNTING BRACKET LH |
Remove the 4 bolts and No. 1 front engine mounting bracket.