INSTALLATION
Removal / installation · Vehicles built Aug 2012 – Jul 2013
Versions by build date: Jun 2011 – Jul 2012 Aug 2012 – Jul 2013 from Aug 2013
- HINT:
- Use the same procedure for RHD and LHD vehicles.
- The procedure listed below is for LHD vehicles.
- A bolt without a torque specification is shown in the standard bolt chart (Click here).
- Use the same procedure for RHD and LHD vehicles.
| 1. INSTALL LOWER INSTRUMENT PANEL SUB-ASSEMBLY |

for LHD:
Attach the 2 guides to install the lower instrument panel.
Connect the connectors and attach the clamps.
Connect the hood lock control cable, fuel lid lock control cable and DLC3.
Install the 2 bolts <C>, nut <D> and 3 screws <E>.
Install the 2 clips <B>.
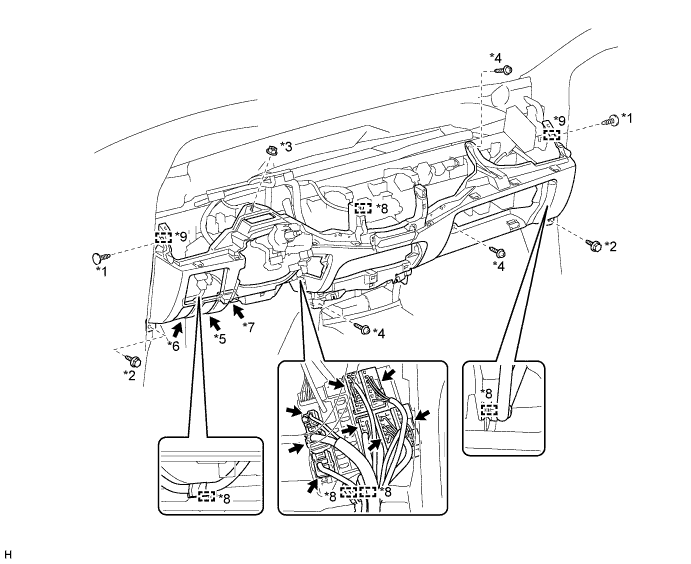

Text in Illustration *1
Clip <B>
*2
Bolt <C>
*3
Nut <D>
*4
Screw <E>
*5
Hood Lock Control Cable
*6
Fuel Lid Lock Control Cable
*7
DLC3
*8
Clamp
*9
Guide
-
-
for RHD:
Attach the 2 guides to install the lower instrument panel.
Connect the connectors and attach the clamps.
Connect the hood lock control cable, fuel lid lock control cable and DLC3.
Install the 2 bolts <C>, nut <D> and 3 screws <E>.
Install the 2 clips <B>.
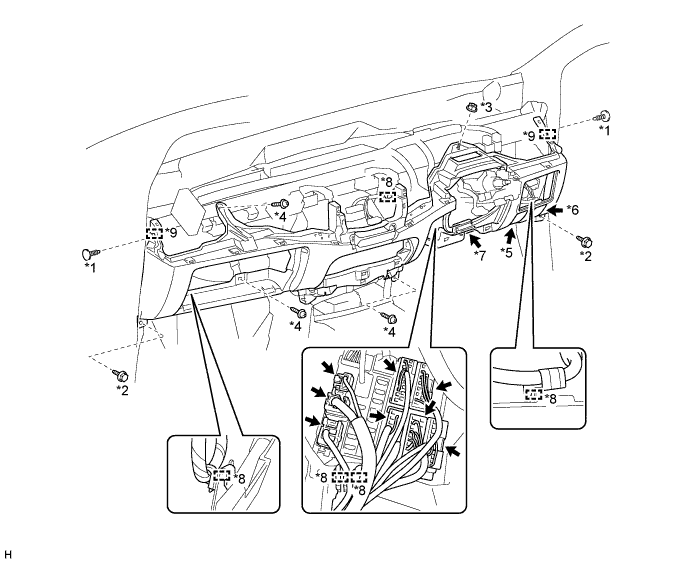
Text in Illustration *1
Clip <B>
*2
Bolt <C>
*3
Nut <D>
*4
Screw <E>
*5
Hood Lock Control Cable
*6
Fuel Lid Lock Control Cable
*7
DLC3
*8
Clamp
*9
Guide
-
-
| 2. INSTALL NO. 1 SWITCH HOLE BASE |
Attach the 5 claws to install the No. 1 switch hole base.
| 3. INSTALL SWITCH BASE |
Connect the connectors.
Attach the 8 claws to install the switch base.
| 4. INSTALL GLOVE COMPARTMENT DOOR ASSEMBLY (w/o Front Passenger Airbag) |
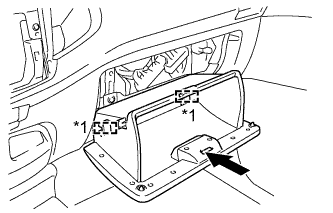 |
Attach the 2 hinges to install the glove compartment door.
Text in Illustration *1
Hinge
While pushing in the sides of the glove compartment door as indicated by the arrows in the illustration, close the door to engage it to the 2 stoppers.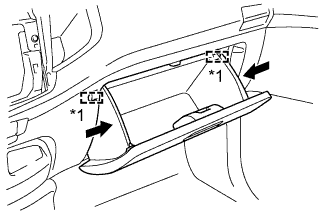
Text in Illustration *1
Stopper
| 5. INSTALL LOWER CENTER INSTRUMENT PANEL FINISH PANEL (w/o Console Box) |
Attach the 3 claws to install the lower center instrument panel finish panel.
Install the 2 clips <B>.
| 6. INSTALL AIR CONDITIONING CONTROL ASSEMBLY (for Manual Air Conditioning System) |
Connect the connector and install the air conditioning control assembly.
| 7. INSTALL NO. 1 INSTRUMENT PANEL BOX |
Connect the connectors and attach the clamp.
Install the No. 1 instrument panel box with the 6 screws <A>.
| 8. INSTALL LOWER INSTRUMENT PANEL FINISH PANEL SUB-ASSEMBLY |
Attach the 3 guides, 2 claws and 3 clips to install the lower instrument panel finish panel.
| 9. INSTALL NO. 3 HEATER TO REGISTER DUCT |
Attach the 4 claws to install the No. 3 heater to register duct.
Install the clip.
| 10. INSTALL NO. 1 HEATER TO REGISTER DUCT |
Attach the 3 claws to install the No. 1 heater to register duct.
Install the clip.
| 11. INSTALL NO. 2 HEATER TO REGISTER DUCT |
Install the No. 2 heater to register duct with the 3 clips.
| 12. INSTALL COWL SIDE TRIM BOARD LH |
Attach the 2 clips to install the cowl side trim board.
Install the clip.
Install the front door opening trim.
| 13. INSTALL COWL SIDE TRIM BOARD RH |
- HINT:
- Use the same procedure described for the LH side.
| 14. INSTALL FRONT DOOR SCUFF PLATE LH |
for Double Cab:
(Click here)
for Single Cab:
(Click here)
for Extra Cab:
(Click here)
| 15. INSTALL FRONT DOOR SCUFF PLATE RH |
- HINT:
- Use the same procedure described for the LH side.
| 16. INSTALL CONSOLE BOX ASSEMBLY (w/o Console Box) |
| 17. INSTALL HEADLIGHT DIMMER SWITCH ASSEMBLY |
| 18. INSTALL UPPER INSTRUMENT PANEL SUB-ASSEMBLY |
| 19. CONNECT CABLE TO NEGATIVE BATTERY TERMINAL (w/ Airbag System) |
- NOTICE:
- When disconnecting the cable, some systems need to be initialized after the cable is reconnected (Click here).
| 20. CHECK SRS WARNING LIGHT (w/ Airbag System) |