2014 Hilux · Service Manual ENGINE

REMOVAL

Removal / installation · Vehicles built Aug 2012 – Jul 2013

Versions by build date: Jun 2011 – Jul 2012 Aug 2012 – Jul 2013 from Aug 2013


1. PRECAUTION

NOTICE:
After turning the ignition switch off, waiting time may be required before disconnecting the cable from the battery terminal. Therefore, make sure to read the disconnecting the cable from the battery terminal notice before proceeding with work (Click here).


2. DISCONNECT CABLE FROM NEGATIVE BATTERY TERMINAL

NOTICE:
When disconnecting the cable, some systems need to be initialized after the cable is reconnected (Click here).


3. REMOVE INTERCOOLER ASSEMBLY
(Click here)

4. REMOVE NO. 1 ENGINE UNDER COVER (for 4WD and Pre-Runner)

5. REMOVE NO. 2 ENGINE UNDER COVER (for 4WD and Pre-Runner)

6. DRAIN ENGINE COOLANT (for Variable Nozzle Vane Turbocharger)

CAUTION:
Do not remove the radiator reservoir cap while the engine and radiator are still hot. Pressurized, hot engine coolant and steam may be released and cause serious burns.

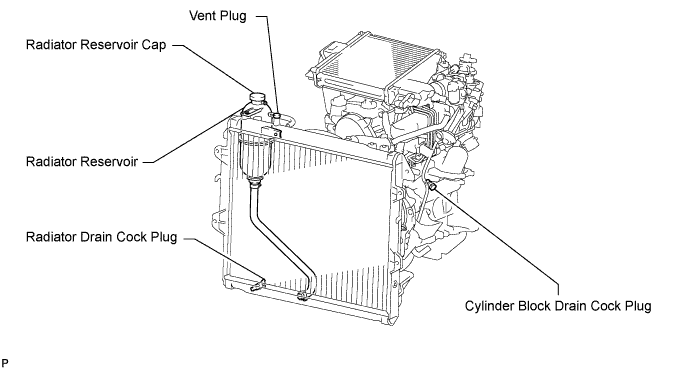
  1. Loosen the radiator drain cock plug.

    HINT:
    Collect the coolant in a container and dispose of it according to the regulations in your area.

  1. A099591E01
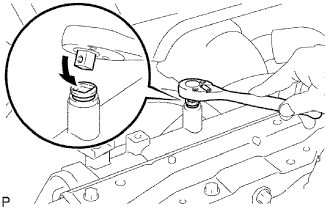
    Drain the coolant by removing the reservoir cap and, using a wrench, remove the vent plug.

  1. Loosen the cylinder block drain cock plug.

    A147246E01


7. REMOVE FRONT FENDER APRON SEAL UPPER
  1. Remove the 5 clips and front fender apron seal upper.


8. REMOVE FRONT FENDER SEAL
  1. Remove the 5 clips and front fender seal.


9. REMOVE FRONT EXHAUST PIPE ASSEMBLY
  1. Remove the 2 bolts and 2 compression springs.

  1. Disconnect the front pipe from the outlet pipe and remove the gasket.

  1. Remove the front pipe from the pipe support.


10. REMOVE AIR CLEANER ASSEMBLY
  1. w/o EGR Cooler:
    Disconnect the ventilation hose.

  1. w/ Mass Air Flow Meter:
    Disconnect the mass air flow meter sensor connector.

  1. w/ Intake Air Temperature Sensor:
    Disconnect the intake air temperature sensor connector.

  1. Loosen the hose clamp.

  1. Remove the 2 bolts and air cleaner.


11. REMOVE VENTILATION PIPE

  1. A289877
    for Waste Gate Type Turbocharger:
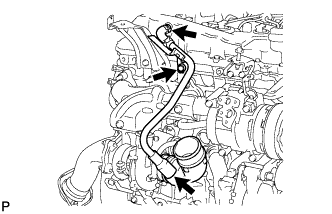
    Remove the bolt and ventilation pipe.

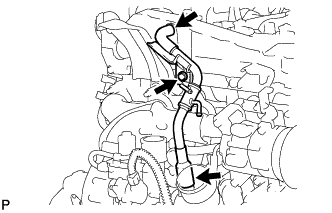
  1. for Variable Nozzle Vane Turbocharger:

    1. A288742
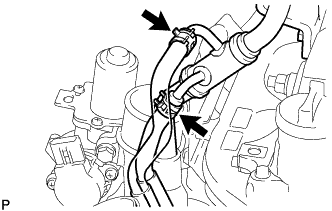
      Disconnect the No. 12 water by-pass hose and No. 13 water by-pass hose.

    2. A288745
      Remove the bolt and ventilation pipe.


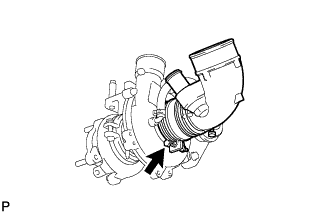
12. REMOVE COMPRESSOR INLET ELBOW (for Waste Gate Type Turbocharger)

  1. A289876
    Loosen the clamp, and then remove the compressor inlet elbow and air cleaner hose assembly from the turbocharger sub-assembly.

  1. Loosen the clamp, remove the air cleaner hose assembly from the compressor inlet elbow.

  1. Remove the No. 3 air cleaner hose from the turbo charger sub-assembly.


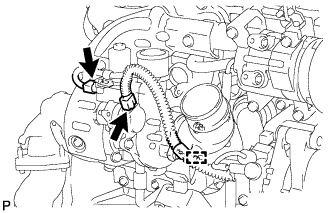
13. REMOVE COMPRESSOR INLET ELBOW (for Variable Nozzle Vane Turbocharger)

  1. A288737
    Disconnect the 2 connectors and detach the wire harness clamp.

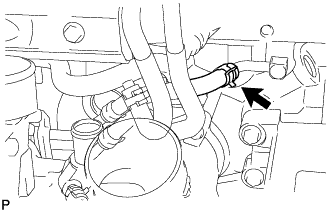
  1. A291249
    Disconnect the No. 1 turbo water hose.

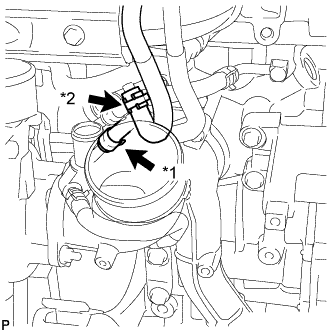
  1. A288735E01
    Disconnect the No. 2 water by-pass hose.
    Text in Illustration 
    *1
    No. 2 Water By-pass Hose
    *2
    No. 13 Water By-pass Hose

  1. Remove the No. 12 water by-pass hose and No. 13 water by-pass hose.

  1. Remove the 2 nuts, compressor inlet elbow and gasket.

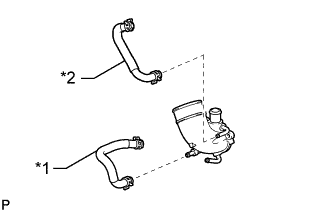
  1. A288733E01
    Remove the No. 7 water by-pass hose and No. 12 water by-pass hose.
    Text in Illustration 
    *1
    No. 7 Water By-pass Hose
    *2
    No. 12 Water By-pass Hose


14. REMOVE NO. 1 TURBO INSULATOR (for Variable Nozzle Vane Turbocharger)

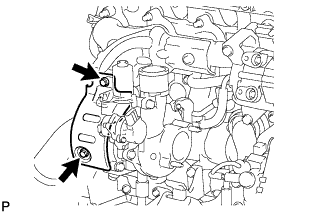
  1. A255740
    Remove the 2 bolts and No. 1 turbo insulator.


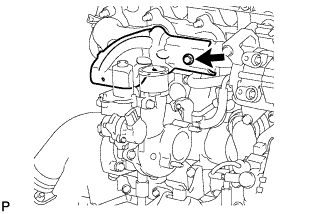
15. REMOVE NO. 1 EXHAUST MANIFOLD HEAT INSULATOR

  1. A148148
    for Waste Gate Type Turbocharger:
    Remove the 2 bolts and No. 1 exhaust manifold heat insulator.

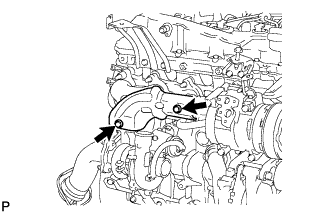
  1. A255741
    for Variable Nozzle Vane Turbocharger:
    Remove the bolt and No. 1 exhaust manifold heat insulator.


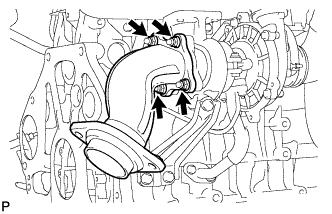
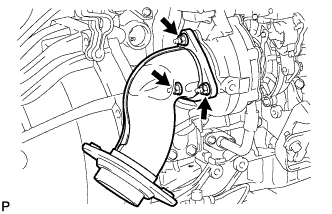
16. REMOVE TURBINE OUTLET ELBOW

  1. A148149
    for Waste Gate Type Turbocharger:
    Remove the 4 nuts, turbine outlet elbow and gasket.

  1. A211836
    for Variable Nozzle Vane Turbocharger:
    Remove the 3 nuts, turbine outlet elbow and gasket.


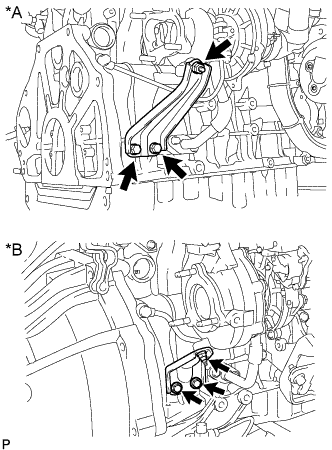
17. REMOVE TURBOCHARGER STAY

  1. A287044E01
    Remove the 2 bolts, nut and turbocharger stay.
    Text in Illustration 
    *A
    for Waste Gate Type Turbocharger
    *B
    for Variable Nozzle Vane Turbocharger


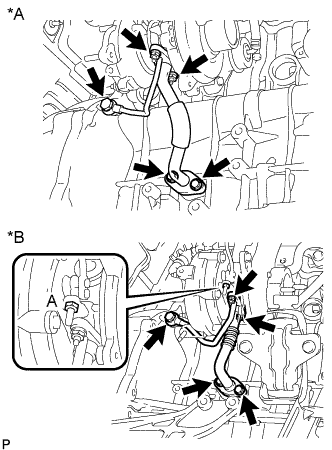
18. REMOVE TURBO OIL INLET PIPE SUB-ASSEMBLY

  1. A287045E01
    Remove the 2 bolts, 2 nuts, union bolt, turbo oil inlet pipe sub-assembly and 3 gaskets.
    Text in Illustration 
    *A
    for Waste Gate Type Turbocharger
    *B
    for Variable Nozzle Vane Turbocharger

    NOTICE:
    Do not loosen the nut labeled A.


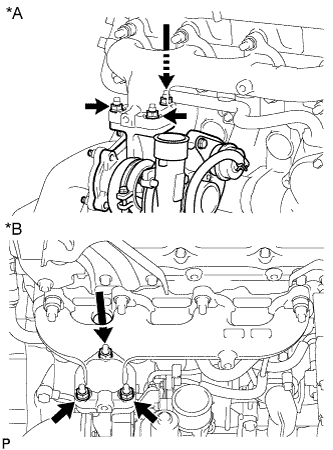
19. REMOVE TURBOCHARGER SUB-ASSEMBLY

  1. A287046E01
    Remove the 3 nuts, turbocharger sub-assembly and gasket.
    Text in Illustration 
    *A
    for Waste Gate Type Turbocharger
    *B
    for Variable Nozzle Vane Turbocharger


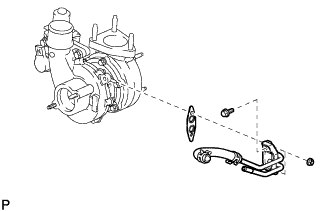
20. REMOVE NO. 1 TURBO WATER PIPE SUB-ASSEMBLY (for Variable Nozzle Vane Turbocharger)

  1. A288732
    Remove the bolt, 2 nuts, No. 1 turbo water pipe sub-assembly and gasket.

  1. Disconnect the No. 1 turbo water hose from the No. 1 turbo water pipe sub-assembly.

← REMOVAL (Jun 2011 – Jul 2012)REMOVAL (from Aug 2013) →