REASSEMBLY
Removal / installation · Vehicles built from Jun 2011
- NOTICE:
- When replacing the injectors (including shuffling the injectors between the cylinders), common rail or cylinder head, it is necessary to replace the injection pipes with new ones.
- When replacing the fuel supply pump, common rail, cylinder block, cylinder head, cylinder head gasket or timing gear case, it is necessary to replace the fuel inlet pipe with a new one.
- When replacing the injectors (including shuffling the injectors between the cylinders), common rail or cylinder head, it is necessary to replace the injection pipes with new ones.
| 1. INSTALL TURBO WATER HOSE UNION |

- NOTICE:
- If coolant leaks from a turbo water hose union or a turbo water hose union is corroded, replace the turbo water hose union.
Clean the cylinder block side hole and new turbo water hose union with non-residue solvent.
Apply adhesive onto the shaded area of a turbo water hose union as shown in the illustration.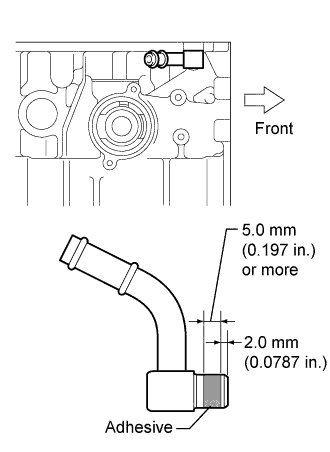

- Adhesive:
- Toyota Genuine Adhesive 1324, Three Bond 1324 or equivalent
- NOTICE:
- Install the turbo water hose union within 3 minutes after applying adhesive.
Set the turbo water hose union and tap it until the edge of the turbo water hose union fits against the chamfered part of the cylinder block as shown in the illustration.
| 2. INSTALL TIGHT PLUG |
Apply adhesive to the end of a new tight plug.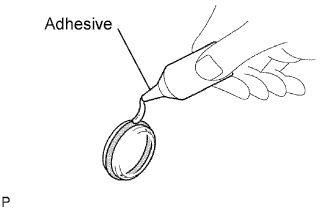
- Adhesive:
- Toyota Genuine Adhesive 1324, Three Bond 1324 or equivalent
- NOTICE:
- Do not start the engine for 1 hour after the installation.
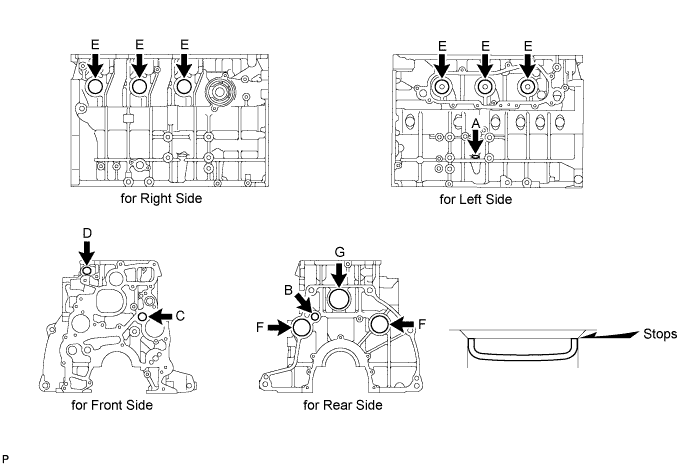
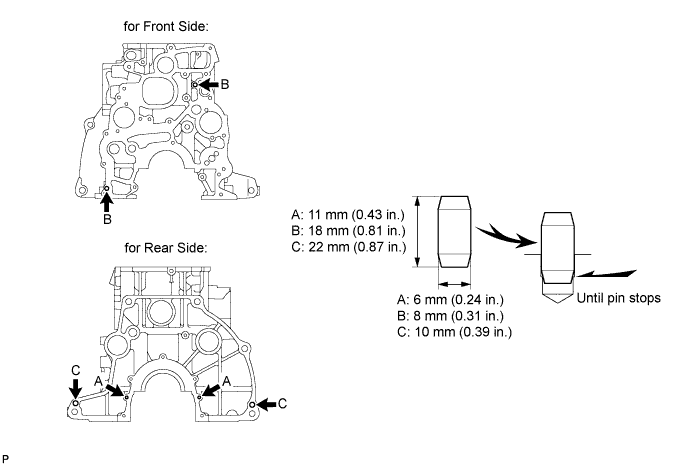
Position A:
Using a 14 mm steel bar and hammer, tap in the tight plug as shown in the illustration.
Other Positions:
Using SST and a hammer, tap in a new tight plug as shown in the illustration.
Position B- SST
- 09950-60010
(09951-00180)
09950-70010 (09951-07100)
- SST
- 09950-60010
(09951-00190)
09950-70010 (09951-07100)
- SST
- 09950-60010
(09951-00200)
09950-70010 (09951-07100)
- SST
- 09950-60010
(09951-00350)
09950-70010 (09951-07100)
- SST
- 09950-60010
(09951-00400, 09951-00450)
09950-70010 (09951-07100)
- SST
- 09950-60010
(09951-00450)
09950-70010 (09951-07100)
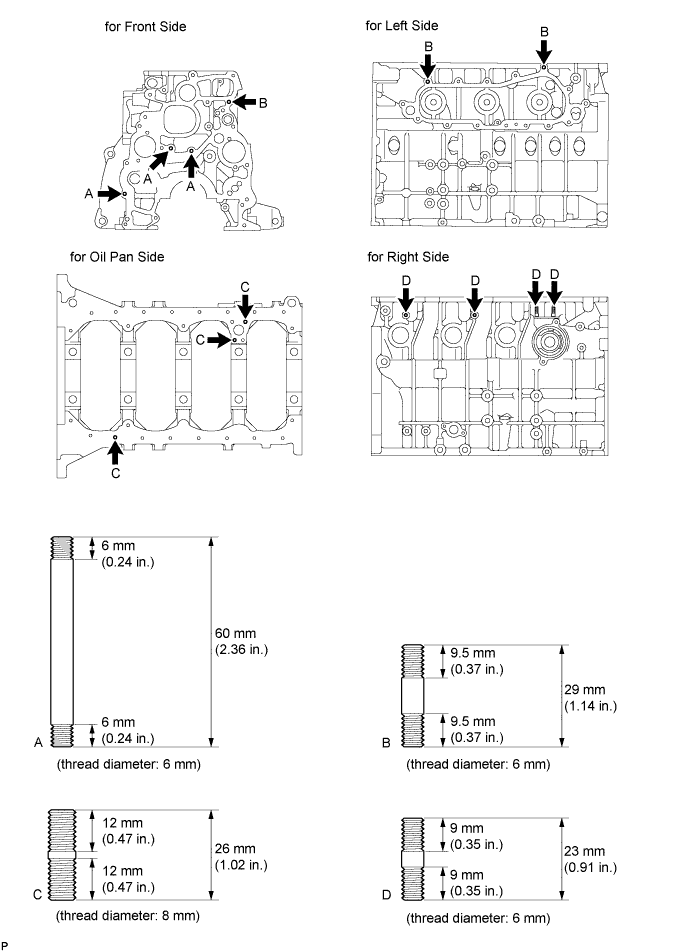
| 3. INSTALL STUD BOLT |
| 4. INSTALL STRAIGHT PIN |
| 5. INSTALL RING PIN |
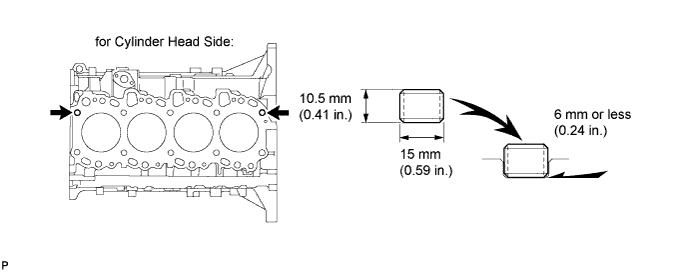
| 6. INSTALL NO. 1 STRAIGHT SCREW PLUG |
Install a new gasket and the screw plug.
- Torque:
- 25 N*m{ 255 kgf*cm , 18 ft.*lbf }
| 7. INSTALL NO. 1 OIL NOZZLE SUB-ASSEMBLY |
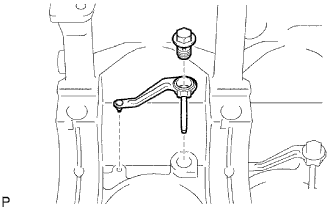 |
Align the pin of the oil nozzle with the pin hole of the cylinder block.
Install the 4 oil nozzles together with the check valves.
- Torque:
- 26 N*m{ 265 kgf*cm , 19 ft.*lbf }
| 8. INSTALL PISTON PIN |
Assemble the piston and connecting rod.
Using a small screwdriver, install a new snap ring on one side of the piston pin hole.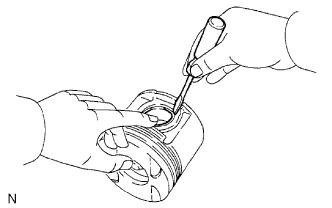
Gradually heat the piston to about 80°C (176°F).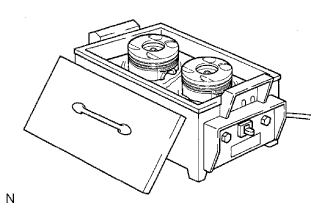
Coat the piston pin with engine oil.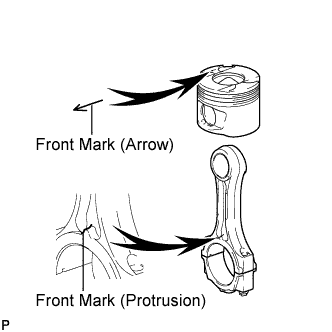
Align the front marks of the piston and connecting rod, and push in the piston pin with your thumb.
Check the fit between the piston and piston pin. Try to move the piston back and forth on the piston pin.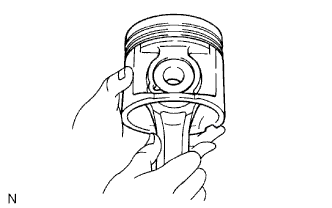
Using a small screwdriver, install a new snap ring on the other side of the piston pin hole.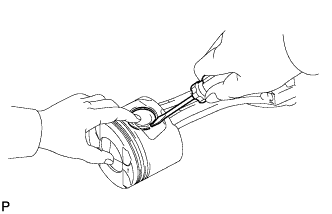
Install the piston rings.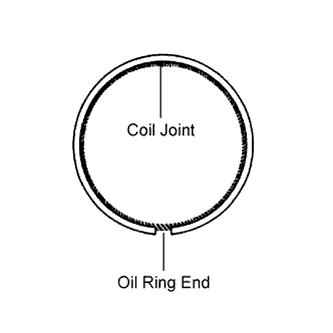
Install the coil and oil ring by hand.
- HINT:
- Face the end gap of the oil ring in the opposite direction of the coil joint.
Using a piston ring expander, install the No. 1 and No. 2 piston rings with the code mark facing upward.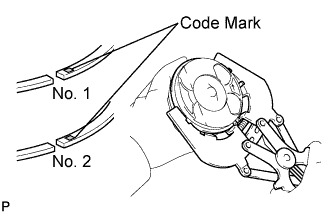
- Code mark:
Number
Mark
No. 1
w/ EGR Cooler
NAA
w/EGR System without EGR Cooler
NKD
w/o EGR System
NAB
No. 2
w/ EGR System
N
w/o EGR System
KD1
Position the piston rings so that the ring ends are as shown.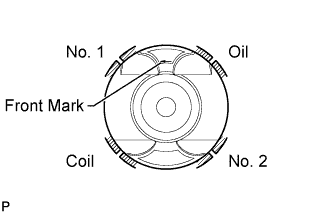
- NOTICE:
- Do not align the ring ends.
| 9. INSTALL CONNECTING ROD BEARING |
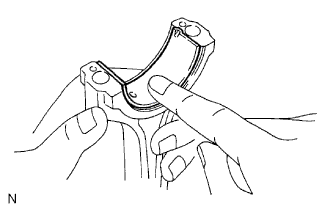 |
Align the bearing claw with the groove of the connecting rod or connecting cap.
Install the bearings to the connecting rod and connecting rod cap.
| 10. INSTALL CRANKSHAFT BEARING |
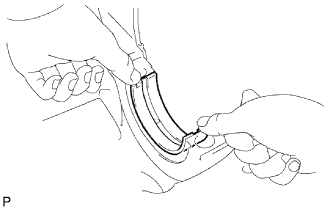 |
- HINT:
- Upper bearings have an oil groove and oil hole. Lower bearings do not.
Align the bearing claw with the claw groove of the cylinder block, and push in the 5 upper bearings.
Align the bearing claw with the claw groove of the crankshaft bearing cap, and push in the 5 lower bearings.
| 11. INSTALL CRANKSHAFT |
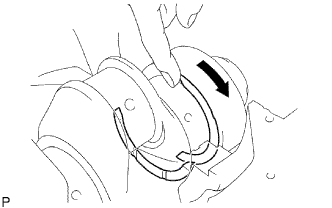 |
Place the crankshaft on the cylinder block.
Install the 2 upper thrust washers to the No. 5 journal position of the cylinder block.
Push the crankshaft toward the front (rear) side.
Install the 2 thrust washers with the oil grooves facing outward.
Install the 2 thrust washers on the No. 5 bearing cap with the grooves facing outward.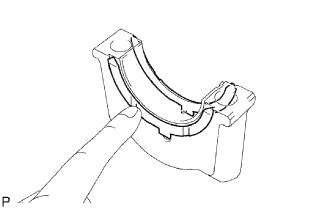
Install the 5 crankshaft bearing caps in their proper locations.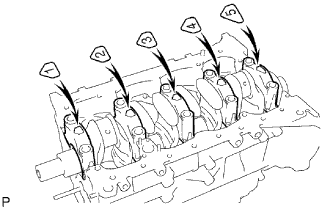
Install the crankshaft bearing cap bolts.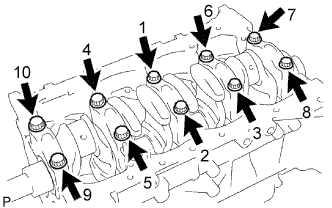
- HINT:
- The main bearing cap bolts are tightened in 2 progressive steps.
- If a main bearing cap bolt is broken or deformed, replace it.
- The main bearing cap bolts are tightened in 2 progressive steps.
Apply a light coat of engine oil to the threads and under the bolt heads of the main bearing caps.
Install and uniformly tighten the 10 bolts of the main bearing caps in several passes in the sequence shown in the illustration.
- Torque:
- 50 N*m{ 510 kgf*cm , 37 ft.*lbf }
Mark the front of the main bearing cap bolts with paint.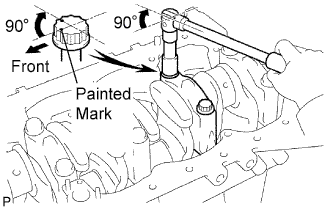
Retighten the main bearing cap bolts 90° in the numerical order shown above.
Check that the painted marks are now at a 90° angle to the front.
Check that the crankshaft turns smoothly.
Check the crankshaft thrust clearance.
| 12. INSTALL PISTON AND CONNECTING ROD |
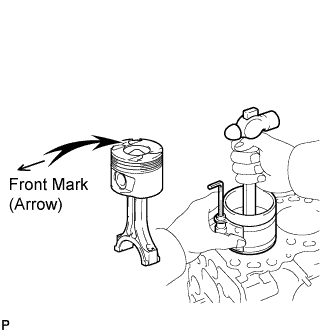 |
Using a piston ring compressor, push the correctly numbered piston and connecting rod assembly into the cylinder with the front mark of the piston facing forward.
Place the connecting rod cap on the connecting rod.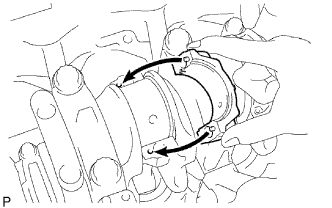
Match the numbered connecting rod cap with the connecting rod.
Align the pins of the connecting rod cap with the pin holes of the connecting rod, and install the connecting rod cap.
Check that the front mark of the connecting rod cap is facing forward.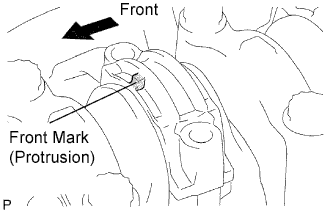
Install the connecting rod cap bolts.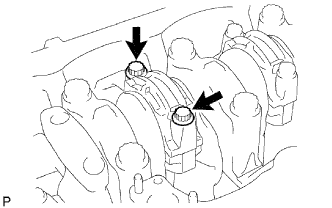
- HINT:
- The connecting rod cap bolts are tightened in 2 progressive steps.
- If any connecting rod bolt is broken or deformed, replace it.
- The connecting rod cap bolts are tightened in 2 progressive steps.
Apply a light of engine oil on the threads and under the heads of the connecting rod cap bolts.
Install and alternately tighten the bolts of the connecting rod cap in several passes.
- Torque:
- 35 N*m{ 357 kgf*cm , 26 ft.*lbf }
Mark the front of the connecting rod cap bolts with paint.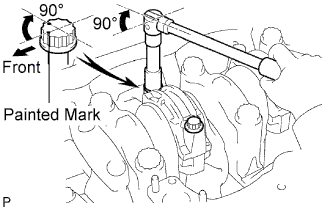
Retighten the connecting rod cap bolts 90° as shown.
Check that the painted marks are now at a 90° angle to the front.
Check that the crankshaft turns smoothly.
Check the connecting rod thrust clearance (Click here).
| 13. INSTALL CYLINDER BLOCK OIL ORIFICE |
| 14. INSTALL ENGINE REAR OIL SEAL RETAINER |
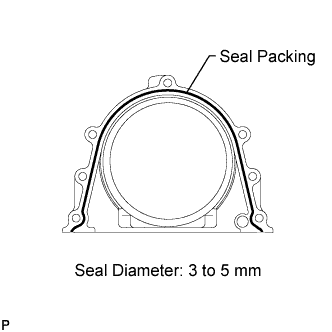 |
Remove any old packing (FIPG) material.
Apply seal packing to the specific places described in the illustration.
- Seal packing:
- Toyota Genuine Seal Packing Black, Three Bond 1207B or equivalent
- Standard seal diameter:
- 3 to 5 mm (0.12 to 0.20 in.)
- NOTICE:
- After applying FIPG, install the engine rear oil seal retainer within 3 minutes and tighten its bolts within 15 minutes.
Install the retainer with the 5 bolts. Alternately tighten the 5 bolts in several passes.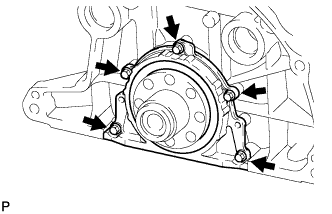
- Torque:
- 13 N*m{ 133 kgf*cm , 10 ft.*lbf }
| 15. INSTALL NO. 2 BALANCE SHAFT DRIVEN GEAR |
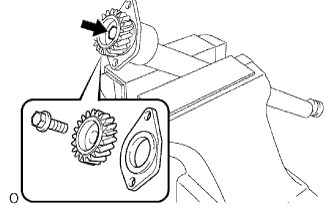 |
Mount the balance shaft between aluminum plates in a vise.
- NOTICE:
- Be careful not to damage the balance shaft.
Align the balance shaft knock pin with the knock pin hole. Then install the balance shaft thrust washer and balance shaft driven gear.
Install the bolt.
- Torque:
- 36 N*m{ 367 kgf*cm , 27 ft.*lbf }
| 16. INSTALL NO. 2 BALANCE SHAFT SUB-ASSEMBLY |
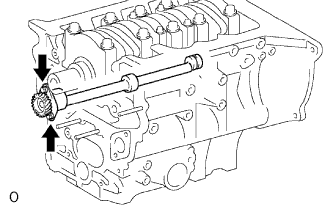 |
Install the balance shaft with the 2 bolts.
- Torque:
- 13 N*m{ 133 kgf*cm , 10 ft.*lbf }
| 17. INSTALL NO. 1 BALANCE SHAFT DRIVEN GEAR |
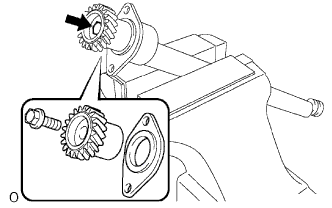 |
Mount the balance shaft between aluminum plates in a vise.
- NOTICE:
- Be careful not to damage the balance shaft.
Align the balance shaft knock pin with the knock pin hole. Then install the balance shaft thrust washer and balance shaft driven gear.
Install the bolt.
- Torque:
- 36 N*m{ 367 kgf*cm , 27 ft.*lbf }
| 18. INSTALL NO. 1 BALANCE SHAFT SUB-ASSEMBLY |
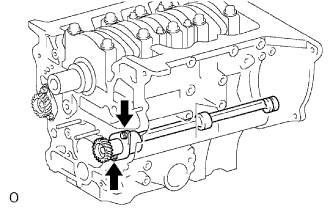 |
Install the balance shaft with the 2 bolts.
- Torque:
- 13 N*m{ 133 kgf*cm , 10 ft.*lbf }
| 19. INSTALL TIMING GEAR CASE ASSEMBLY |
Remove any old packing (FIPG) material.
Apply seal packing to the timing gear case as shown in the illustration.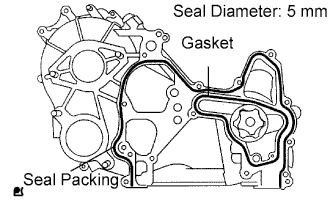
- Seal packing:
- Toyota Genuine Seal Packing Black, Three Bond 1207B or equivalent
- Standard seal diameter:
- 5 mm (0.20 in.)
- NOTICE:
- Install the timing gear case within 3 minutes and tighten its bolts within 15 minutes as soon as applying FIPG is completed.
Install a new gasket to the groove of the timing gear case.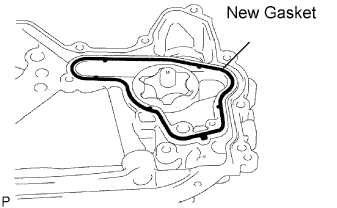
Install 2 new O-rings to the cylinder block groove of the timing gear case.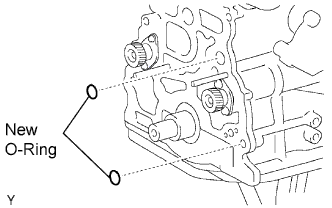
Align the "2" marks of the balance shaft driven gear No. 1 and oil pump drive gear.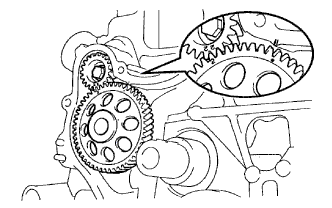
Align the mark on the oil pump drive gear with the mark on the timing gear case.
Install the timing gear case with the union bolt and 8 bolts.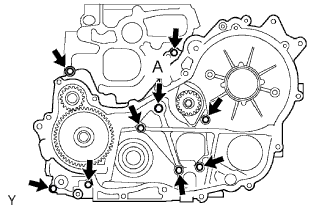
- Torque:
- 16 N*m{ 163 kgf*cm , 12 ft.*lbf } for union bolt (A)
- 13 N*m{ 133 kgf*cm , 10 ft.*lbf } for bolt
Remove the screw plug.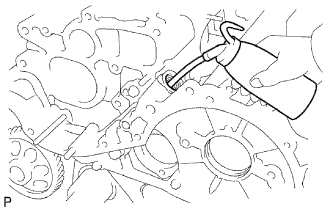
Pour in approximately 20 cc (0.12 cu in.) of engine oil into the oil pump.
Install a new gasket and the screw plug.
- Torque:
- 44 N*m{ 449 kgf*cm , 32 ft.*lbf }
| 20. INSTALL OIL STRAINER SUB-ASSEMBLY |
Install a new gasket and the oil strainer with the 2 bolts and 2 nuts.
- Torque:
- 8.0 N*m{ 82 kgf*cm , 71 in.*lbf }
| 21. INSTALL OIL PAN SUB-ASSEMBLY |
 |
Remove any old packing (FIPG) material.
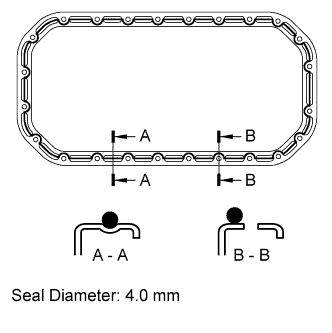
Apply seal packing to the oil pan as shown in the illustration.
- Seal packing:
- Toyota Genuine Seal Packing Black, Three Bond 1207B or equivalent
- Standard seal diameter:
- 4 mm (0.16 in.)
- NOTICE:
- Install the oil pan within 3 minutes and tighten its bolts within 15 minutes as soon as applying FIPG is completed.
Install the oil pan with the 22 bolts and 2 nuts.
- Torque:
- 12 N*m{ 122 kgf*cm , 9 ft.*lbf }
Install the oil level gauge sensor with the 4 bolts.
- Torque:
- 8.0 N*m{ 82 kgf*cm , 71 in.*lbf }
| 22. INSTALL CRANKSHAFT TIMING GEAR OR SPROCKET |
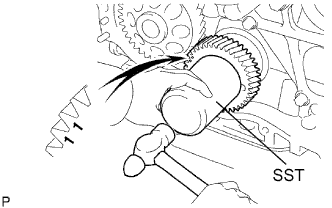 |
Face the crankshaft timing gear with timing mark 1 facing forward.
Align the set key on the crankshaft with the key groove of the crankshaft timing gear.
Using SST and a hammer, tap in the timing gear.
- SST
- 09223-00010
| 23. INSTALL SUPPLY PUMP GEAR |
Install the supply pump with the 2 nuts.
- Torque:
- 21 N*m{ 214 kgf*cm , 15 ft.*lbf }
Align the "3" marks of the balance shaft driven gear No. 2 and supply pump gear.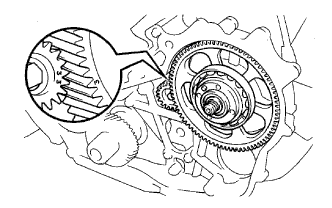
Install a new O-ring to the supply pump gear.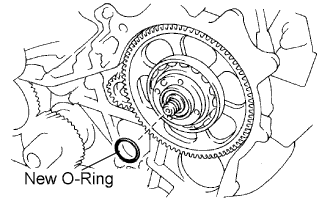
Install the supply pump gear set nut.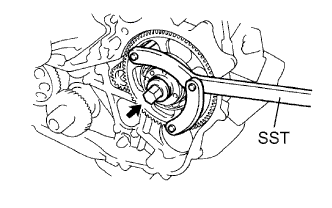
Using SST, tighten the nut.
- SST
- 09960-10010
(09962-01000, 09963-01000)
- Torque:
- 64 N*m{ 653 kgf*cm , 47 ft.*lbf }
| 24. INSTALL NO. 2 IDLE SUB GEAR |
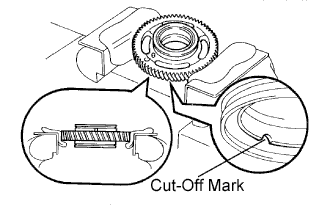 |
Mount the No.1 idle gear in a vise.
- HINT:
- The cut-off mark of the idle gear faces down.
- NOTICE:
- Be careful not to damage the gear.
Install the idle gear spring.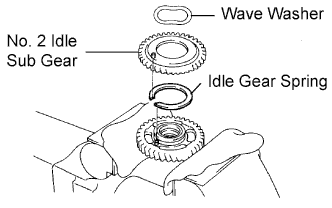
Install the No. 2 idle sub-gear.
Install the wave washer.
- HINT:
- Fit the pins on the gears to the spring ends.
Using snap ring pliers, install the snap ring.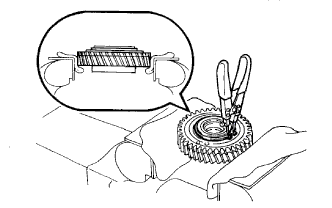
Using SST, align the holes of the No. 1 idle gear and No. 2 idle sub gear by turning the No. 2 idle sub gear clockwise, and install a service bolt.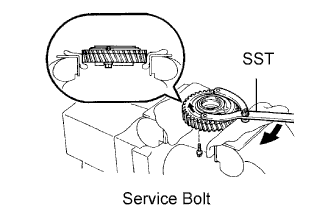
- SST
- 09960-10010
(09962-01000, 09963-00700)
Remove the No. 1 idle gear from the vise and turn it upside down.
| 25. INSTALL NO. 1 IDLE SUB GEAR |
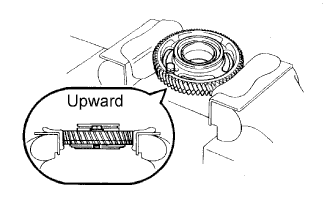 |
Mount the No. 1 idle gear and No. 2 idle sub gear in a vise.
- NOTICE:
- Be careful not to damage the gears.
Remove the service bolt.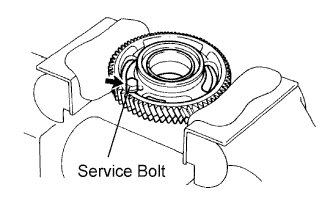
Install the idle gear spring.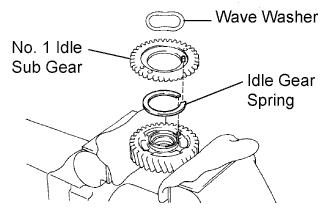
Install the No. 1 idle sub gear.
Install the wave washer.
- HINT:
- Fit the pins on the gears to the spring ends.
Using a snap ring pliers, install the snap ring.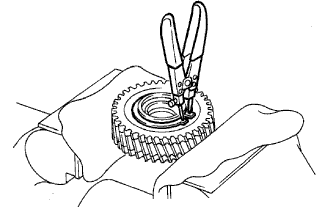
Using SST, align the holes of the No. 1 idler gear and No. 1 idle sub gear by turning the No. 1 idle sub gear clockwise, and install the service bolt.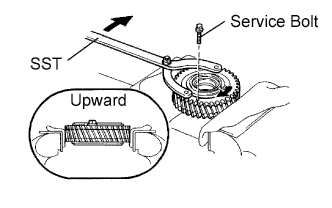
- SST
- 09960-10010
(09962-01000, 09963-00600)
| 26. INSTALL NO. 1 IDLE GEAR |
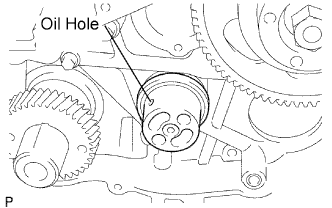 |
Install the gear shaft as shown in the illustration.
Align the "5" timing marks of the idle gear and crankshaft timing gear.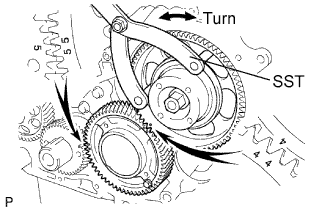
Using SST, turn the supply pump gear, and align the "4" timing marks of the idle gear and supply pump gear, and mesh the gears.
- SST
- 09960-10010
(09962-01000, 09963-01000)
Face the thrust plate with the protrusion facing forward.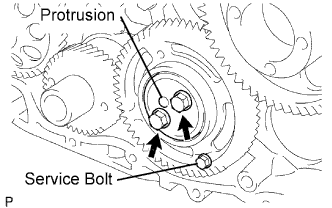
Align the bolt holes, and install the thrust plate with the 2 bolts.
- Torque:
- 50 N*m{ 510 kgf*cm , 37 ft.*lbf }
Remove the service bolt.
| 27. INSTALL NO. 1 CRANKSHAFT POSITION SENSOR PLATE |
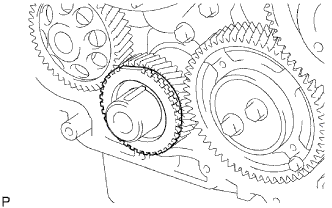 |
Align the set key with the key groove of the sensor plate.
Install the sensor plate, facing the cup side outward.
| 28. INSTALL TIMING GEAR CASE ASSEMBLY |
Remove any old packing (FIPG) material.
Apply seal packing to the timing gear cover as shown in the illustration.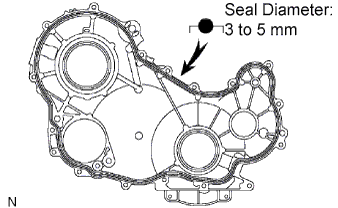
- Seal packing:
- Toyota Genuine Seal Packing Black, Three Bond 1207B or equivalent
- Standard seal diameter:
- 3 to 5 mm (0.12 to 0.20 in.)
- NOTICE:
- Install the timing gear case within 3 minutes and tighten its bolts within 15 minutes as soon as applying FIPG is completed.
Install a new O-ring to the timing gear case.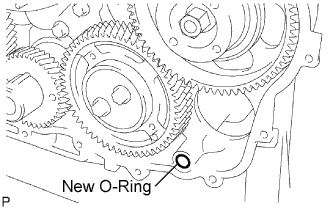
Install the timing gear cover with the 14 bolts and 2 nuts.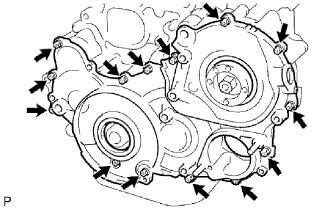
- Torque:
- 13 N*m{ 133 kgf*cm , 10 ft.*lbf }
| 29. INSTALL WATER PUMP ASSEMBLY |
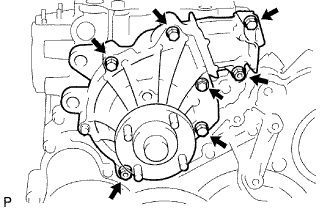 |
Install a new gasket and the water pump with the 5 bolts and 2 nuts.
- Torque:
- 13 N*m{ 133 kgf*cm , 10 ft.*lbf }
| 30. INSTALL CYLINDER HEAD GASKET |
Find where the piston head protrudes most by slowly turning the crankshaft clockwise and counterclockwise.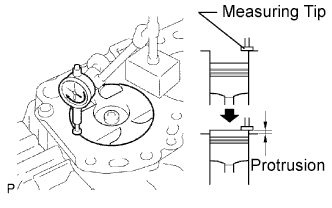
Measure the piston protrusion of each cylinder at 2 points as shown in the illustration.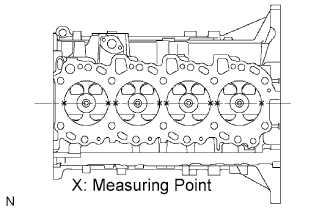
For the piston protrusion value of each cylinder, use the average of the 2 measurements of each cylinder.
- Piston protrusion:
- 0.005 to 0.255 mm (0.0002 to 0.0100 in.)
- HINT:
- When removing the piston and connecting rod assembly: If the protrusion is not as specified, remove the piston and connecting rod assembly and reinstall them.
Select a new cylinder head gasket.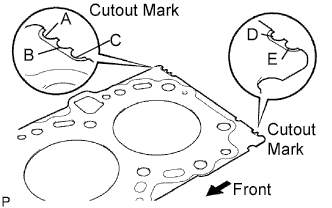
- HINT:
- New cylinder head gaskets are available in 5 sizes, and are marked A, B, C, D or E.
- New installed cylinder head gasket thickness:
Mark
Thickness
A
0.80 to 0.90 mm (0.0315 to 0.0354 in.)
B
0.85 to 0.95 mm (0.0335 to 0.0374 in.)
C
0.90 to 1.00 mm (0.0354 to 0.0394 in.)
D
0.95 to 1.05 mm (0.0374 to 0.0413 in.)
E
1.00 to 1.10 mm (0.0394 to 0.0433 in.)
Select the largest piston protrusion value from the measurements made. Then select a new appropriate gasket according to the table below.
- Use gasket size:
Gasket Size
Piston Protrusion
Use A
0.005 to 0.054 mm (0.0002 to 0.0021 in.)
Use B
0.055 to 0.104 mm (0.0022 to 0.0041 in.)
Use C
0.105 to 0.154 mm (0.0041 to 0.0061 in.)
Use D
0.155 to 0.204 mm (0.0061 to 0.0080 in.)
Use E
0.205 to 0.255 mm (0.0081 to 0.0100 in.)
Place the cylinder head on the cylinder block.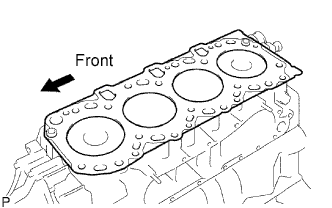
Place the cylinder head gasket on the cylinder block.
- NOTICE:
- Be careful of the installation direction.
| 31. INSTALL CYLINDER HEAD SUB-ASSEMBLY |
- HINT:
- The cylinder head bolts are tightened in 3 progressive steps.
- If any bolt is broken or deformed, replace it.
- The cylinder head bolts are tightened in 3 progressive steps.
Place the cylinder head on the cylinder head gasket.
Apply a light coat of engine oil on the threads and under the heads of the cylinder head bolts.
Install and uniformly tighten the 18 cylinder head bolts, in several passes in the sequence shown in the illustration.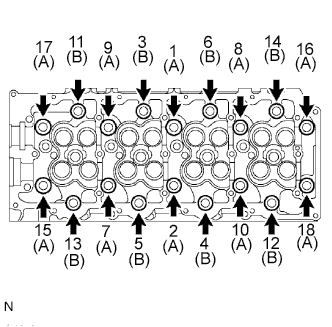
- Torque:
- 85 N*m{ 867 kgf*cm , 63 ft.*lbf }
- Bolt length A:
- 110 mm (4.33 in.)
- Bolt length B:
- 167 mm (6.57 in.)
Mark the front of the cylinder head bolts with paint.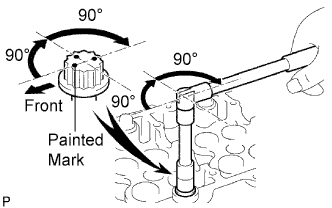
Further tighten the cylinder head bolts by 90° in the sequence shown in the illustration above.
Finally, tighten the cylinder head bolts by an additional 90°.
Check that the painted marks are now facing rearward.
| 32. INSTALL CAMSHAFT |
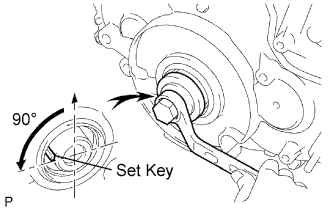 |
Using the crankshaft pulley bolt, set the No. 1 cylinder to 90° BTDC/compression.
- HINT:
- Set the No. 1 cylinder to 90° BTDC/compression to avoid interference with the piston top and valve head.
Install the camshaft.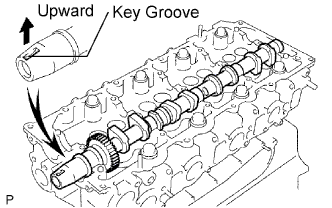
Apply MP grease to the thrust portion of the camshaft.
Place the camshaft on the cylinder head, facing the key groove upward.
Align the timing marks (1 dot mark) of the camshaft drive and driven main gears, and set the No. 2 camshaft in place.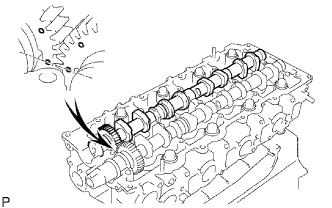
Remove any old packing (FIPG) material from the camshaft bearing cap.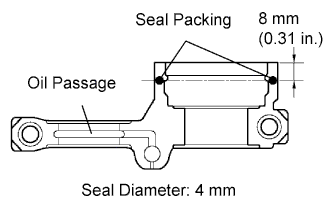
Apply seal packing to the specified areas shown in the illustration.
- Seal packing:
- Toyota Genuine Seal Packing Black, Three Bond 1207B or equivalent
- Standard seal diameter:
- 4 mm (0.16 in.)
- NOTICE:
- Do not allow FIPG to contact the oil passage of the bearing cap.
- After applying FIPG, install the camshaft bearing caps within 3 minutes and fasten the bolts within 15 minutes.
- Do not start the engine for at least 2 hours after the installation.
- Do not allow FIPG to contact the oil passage of the bearing cap.
Install the 5 bearing caps in their proper locations.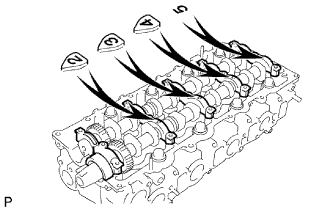
Apply a light coat of engine oil on the threads and under the heads of the bearing cap bolts.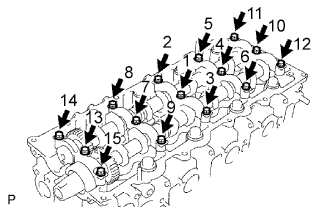
Install and uniformly tighten the 15 bearing cap bolts in several passes in the sequence shown in the illustration.
- Torque:
- 19 N*m{ 194 kgf*cm , 14 ft.*lbf }
Install the camshaft oil seal.
| 33. INSPECT VALVE CLEARANCE |
Remove the injector.
Remove the timing belt.
Remove the camshaft timing pulley.
Remove the No. 2 timing belt cover.
Remove the camshafts.
Remove the valve lifters.
Using a micrometer, measure the thickness of the removed lifter.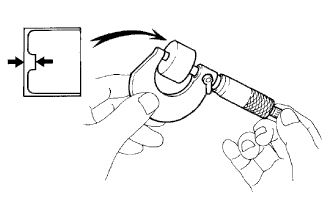
Calculate the thickness of a new lifter so that the valve clearance is within the specified range.
A
B
C
New lifter thickness
Used lifter thickness
Measured valve clearance
- New lifter thickness:
- Intake A = B + (C - 0.25 mm (0.0098 in.))
- Exhaust A = B + (C - 0.40 mm (0.00158 in.))
Select a new lifter with a thickness as close as possible to the calculated values.
- HINT:
- Valve lifters are available in 35 sizes in increments of 0.020 mm (0.0008 in.), from 5.060 mm (0.1992 in.) to 5.740 mm (0.2260 in.).
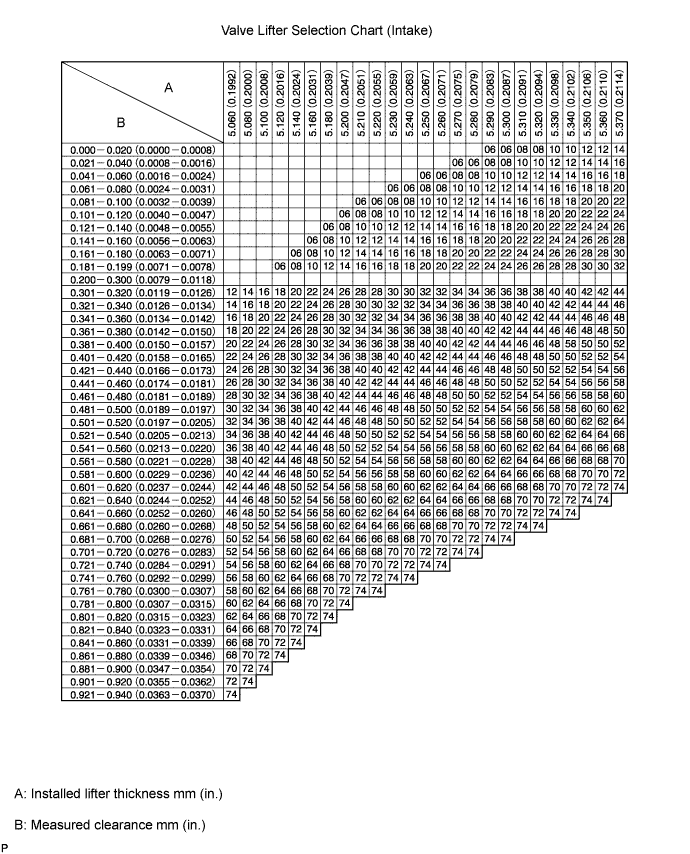
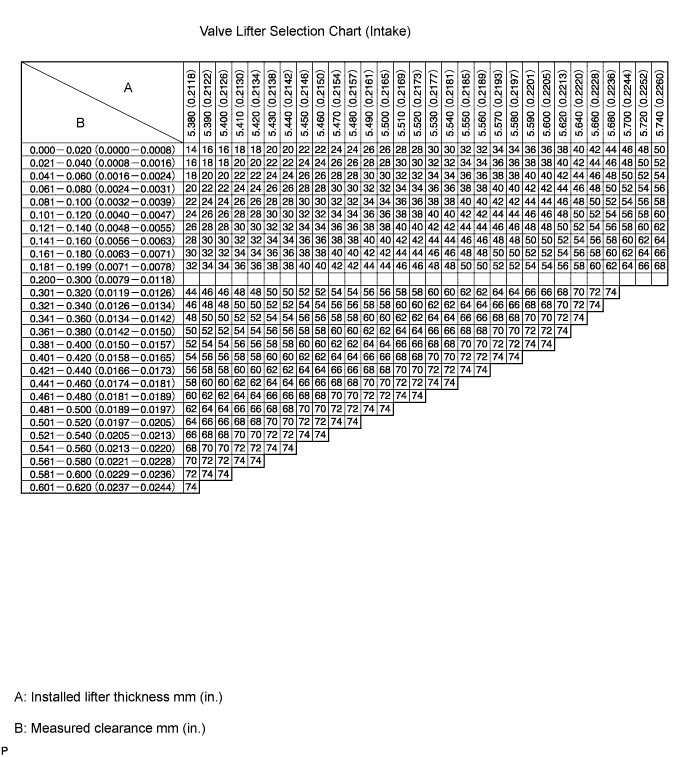
- Standard intake valve clearance (Cold):
- 0.20 to 0.30 mm (0.008 to 0.012 in.)
- EXAMPLE:
- A 5.250 mm (0.2067 in.) lifter is installed, and the measured clearance is 0.400 mm (0.0158 in.). Replace the 5.250 mm (0.2067 in.) lifter with a No. 40 lifter.
- New Lifter Thickness:
Lifter No.
Specified Condition
Lifter No.
Specified Condition
Lifter No.
Specified Condition
06
5.060 mm (0.1992 in.)
30
5.300 mm (0.2087 in.)
54
5.540 mm (0.2181 in.)
08
5.080 mm (0.2000 in.)
32
5.320 mm (0.2094 in.)
56
5.560 mm (0.2189 in.)
10
5.100 mm (0.2008 in.)
34
5.340 mm (0.2102 in.)
58
5.580 mm (0.2197 in.)
12
5.120 mm (0.2016 in.)
36
5.360 mm (0.2110 in.)
60
5.600 mm (0.2205 in.)
14
5.140 mm (0.2024 in.)
38
5.380 mm (0.2118 in.)
62
5.620 mm (0.2213 in.)
16
5.160 mm (0.2031 in.)
40
5.400 mm (0.2126 in.)
64
5.640 mm (0.2220 in.)
18
5.180 mm (0.2039 in.)
42
5.420 mm (0.2134 in.)
66
5.660 mm (0.2228 in.)
20
5.200 mm (0.2047 in.)
44
5.440 mm (0.2142 in.)
68
5.680 mm (0.2236 in.)
22
5.220 mm (0.2055 in.)
46
5.460 mm (0.2150 in.)
70
5.700 mm (0.2244 in.)
24
5.240 mm (0.2063 in.)
48
5.480 mm (0.2157 in.)
72
5.720 mm (0.2252 in.)
26
5.260 mm (0.2071 in.)
50
5.500 mm (0.2165 in.)
74
5.740 mm (0.2260 in.)
28
5.280 mm (0.2079 in.)
52
5.520 mm (0.2173 in.)
-
-
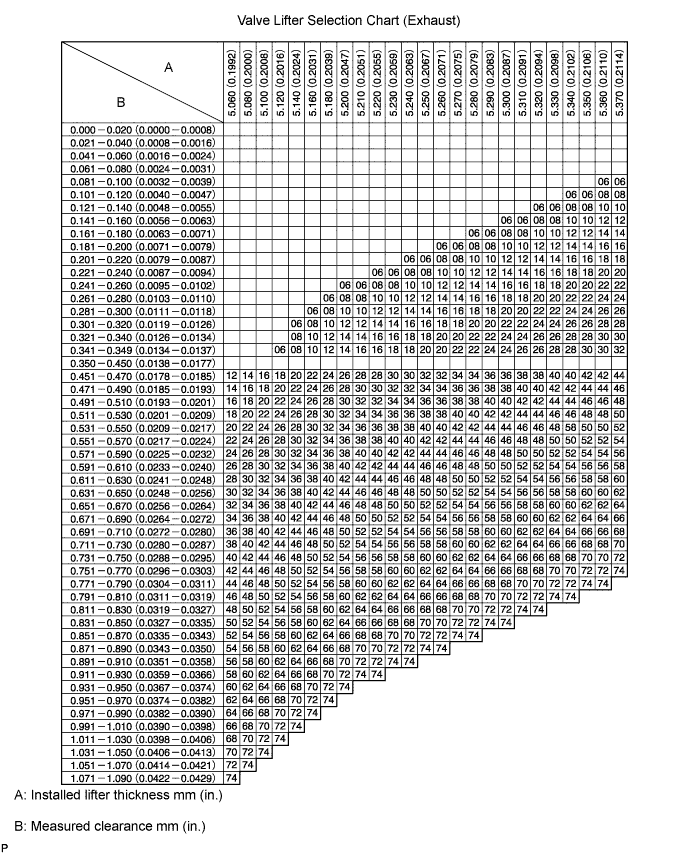
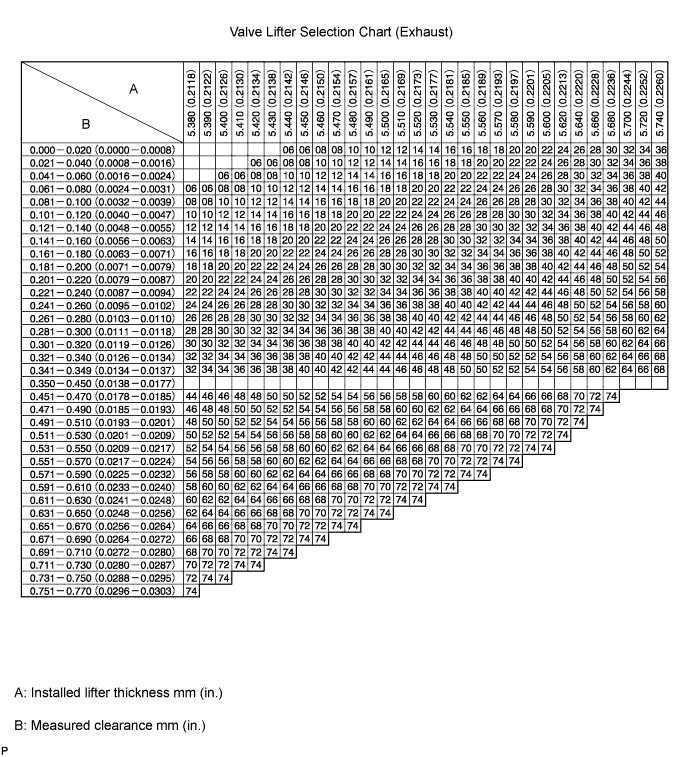
- Standard exhaust valve clearance (Cold):
- 0.35 to 0.45 mm (0.014 to 0.018 in.)
- EXAMPLE:
- A 5.340 mm (0.2102 in.) lifter is installed, and the measured clearance is 0.480 mm (0.0189 in.). Replace the 5.340 mm (0.2102 in.) lifter with a No. 42 lifter.
- New Lifter Thickness:
Lifter No.
Specified Condition
Lifter No.
Specified Condition
Lifter No.
Specified Condition
06
5.060 mm (0.1992 in.)
30
5.300 mm (0.2087 in.)
54
5.540 mm (0.2181 in.)
08
5.080 mm (0.2000 in.)
32
5.320 mm (0.2094 in.)
56
5.560 mm (0.2189 in.)
10
5.100 mm (0.2008 in.)
34
5.340 mm (0.2102 in.)
58
5.580 mm (0.2197 in.)
12
5.120 mm (0.2016 in.)
36
5.360 mm (0.2110 in.)
60
5.600 mm (0.2205 in.)
14
5.140 mm (0.2024 in.)
38
5.380 mm (0.2118 in.)
62
5.620 mm (0.2213 in.)
16
5.160 mm (0.2031 in.)
40
5.400 mm (0.2126 in.)
64
5.640 mm (0.2220 in.)
18
5.180 mm (0.2039 in.)
42
5.420 mm (0.2134 in.)
66
5.660 mm (0.2228 in.)
20
5.200 mm (0.2047 in.)
44
5.440 mm (0.2142 in.)
68
5.680 mm (0.2236 in.)
22
5.220 mm (0.2055 in.)
46
5.460 mm (0.2150 in.)
70
5.700 mm (0.2244 in.)
24
5.240 mm (0.2063 in.)
48
5.480 mm (0.2157 in.)
72
5.720 mm (0.2252 in.)
26
5.260 mm (0.2071 in.)
50
5.500 mm (0.2165 in.)
74
5.740 mm (0.2260 in.)
28
5.280 mm (0.2079 in.)
52
5.520 mm (0.2173 in.)
-
-
Install the selected valve lifter.
Install the camshaft.
Install the No. 2 timing belt cover.
Install the camshaft timing pulley.
Install the timing belt.
Install the fuel injector.
| 34. ADJUST VALVE CLEARANCE |
Remove the injector.
Remove the timing belt.
Remove the camshaft timing pulley.
Remove the No. 2 timing belt cover.
Remove the camshafts.
Remove the valve lifters.
Using a micrometer, measure the thickness of the removed lifter.
Calculate the thickness of a new lifter so that the valve clearance is within the specified range.
A
B
C
New lifter thickness
Used lifter thickness
Measured valve clearance
- New lifter thickness:
- Intake A = B + (C - 0.25 mm (0.0098 in.))
- Exhaust A = B + (C - 0.40 mm (0.00158 in.))
Select a new lifter with a thickness as close as possible to the calculated values.
- HINT:
- Valve lifters are available in 35 sizes in increments of 0.020 mm (0.0008 in.), from 5.060 mm (0.1992 in.) to 5.740 mm (0.2260 in.).
- Standard intake valve clearance (Cold):
- 0.20 to 0.30 mm (0.008 to 0.012 in.)
- EXAMPLE:
- A 5.250 mm (0.2067 in.) lifter is installed, and the measured clearance is 0.400 mm (0.0158 in.). Replace the 5.250 mm (0.2067 in.) lifter with a No. 40 lifter.
- New Lifter Thickness:
Lifter No.
Specified Condition
Lifter No.
Specified Condition
Lifter No.
Specified Condition
06
5.060 mm (0.1992 in.)
30
5.300 mm (0.2087 in.)
54
5.540 mm (0.2181 in.)
08
5.080 mm (0.2000 in.)
32
5.320 mm (0.2094 in.)
56
5.560 mm (0.2189 in.)
10
5.100 mm (0.2008 in.)
34
5.340 mm (0.2102 in.)
58
5.580 mm (0.2197 in.)
12
5.120 mm (0.2016 in.)
36
5.360 mm (0.2110 in.)
60
5.600 mm (0.2205 in.)
14
5.140 mm (0.2024 in.)
38
5.380 mm (0.2118 in.)
62
5.620 mm (0.2213 in.)
16
5.160 mm (0.2031 in.)
40
5.400 mm (0.2126 in.)
64
5.640 mm (0.2220 in.)
18
5.180 mm (0.2039 in.)
42
5.420 mm (0.2134 in.)
66
5.660 mm (0.2228 in.)
20
5.200 mm (0.2047 in.)
44
5.440 mm (0.2142 in.)
68
5.680 mm (0.2236 in.)
22
5.220 mm (0.2055 in.)
46
5.460 mm (0.2150 in.)
70
5.700 mm (0.2244 in.)
24
5.240 mm (0.2063 in.)
48
5.480 mm (0.2157 in.)
72
5.720 mm (0.2252 in.)
26
5.260 mm (0.2071 in.)
50
5.500 mm (0.2165 in.)
74
5.740 mm (0.2260 in.)
28
5.280 mm (0.2079 in.)
52
5.520 mm (0.2173 in.)
-
-
- Standard exhaust valve clearance (Cold):
- 0.35 to 0.45 mm (0.014 to 0.018 in.)
- EXAMPLE:
- A 5.340 mm (0.2102 in.) lifter is installed, and the measured clearance is 0.480 mm (0.0189 in.). Replace the 5.340 mm (0.2102 in.) lifter with a No. 42 lifter.
- New Lifter Thickness:
Lifter No.
Specified Condition
Lifter No.
Specified Condition
Lifter No.
Specified Condition
06
5.060 mm (0.1992 in.)
30
5.300 mm (0.2087 in.)
54
5.540 mm (0.2181 in.)
08
5.080 mm (0.2000 in.)
32
5.320 mm (0.2094 in.)
56
5.560 mm (0.2189 in.)
10
5.100 mm (0.2008 in.)
34
5.340 mm (0.2102 in.)
58
5.580 mm (0.2197 in.)
12
5.120 mm (0.2016 in.)
36
5.360 mm (0.2110 in.)
60
5.600 mm (0.2205 in.)
14
5.140 mm (0.2024 in.)
38
5.380 mm (0.2118 in.)
62
5.620 mm (0.2213 in.)
16
5.160 mm (0.2031 in.)
40
5.400 mm (0.2126 in.)
64
5.640 mm (0.2220 in.)
18
5.180 mm (0.2039 in.)
42
5.420 mm (0.2134 in.)
66
5.660 mm (0.2228 in.)
20
5.200 mm (0.2047 in.)
44
5.440 mm (0.2142 in.)
68
5.680 mm (0.2236 in.)
22
5.220 mm (0.2055 in.)
46
5.460 mm (0.2150 in.)
70
5.700 mm (0.2244 in.)
24
5.240 mm (0.2063 in.)
48
5.480 mm (0.2157 in.)
72
5.720 mm (0.2252 in.)
26
5.260 mm (0.2071 in.)
50
5.500 mm (0.2165 in.)
74
5.740 mm (0.2260 in.)
28
5.280 mm (0.2079 in.)
52
5.520 mm (0.2173 in.)
-
-
Install the selected valve lifter.
Install the camshaft.
Install the No. 2 timing belt cover.
Install the camshaft timing pulley.
Install the timing belt.
Install the fuel injector.
| 35. INSTALL INJECTOR ASSEMBLY |
- NOTICE:
- Be sure to install the injector, No. 1 nozzle holder clamp, washer and bolt in their original positions.
Install 4 new injection nozzle seats to the cylinder head.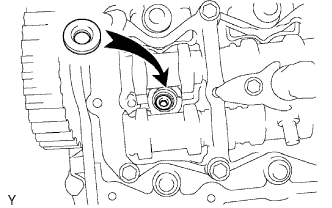
Apply a small amount of clean engine oil to 4 new O-rings.
Install an O-ring to each injector as shown in the illustration.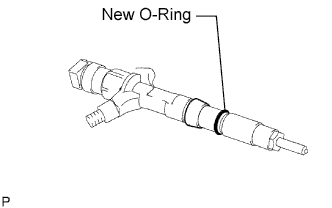
Insert the 4 injectors into the cylinder head.
- NOTICE:
- Insert the injector until it touches the injection nozzle seats surface.
- After installing the injector to the cylinder head, the O-ring may prevent the injector from fully seating. If so, pull out the injector and reinstall it.
- Always return an injector to the same place it was removed from.
- Insert the injector until it touches the injection nozzle seats surface.
For an injector that has been replaced with a new injector, register the injector compensation code (Click here).
Temporarily install 4 new washers and the 4 No. 1 nozzle holder clamps with the 4 bolts.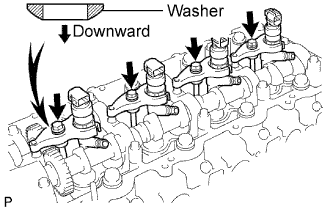
- HINT:
- Apply a small amount of engine oil to the threads and under the heads of the clamp bolts.
- NOTICE:
-
The fork portion of the nozzle holder clamp must be set to the injector.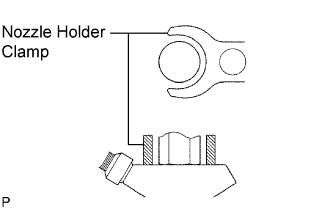
- Before tightening the bolts, check that the No. 1 nozzle holder clamp is set properly.
- To fasten the clamp bolts, first tighten them by hand until they cannot be turned further. Then, tighten the bolts to the specified torque at the following step.
- When tightening the bolts, pay attention not to tilt the bolt and the clamp.
- Do not reuse the washer.
- If the nozzle leakage pipe is accidentally tightened beyond the torque specification, it must be replaced.
-
Temporarily install the 4 injection pipes with the union nuts.
- HINT:
- To position the injectors, loosely tighten the union nut.
Check the nozzle leakage pipe. Check that there are no scratches or dents on the 5 union seal surfaces.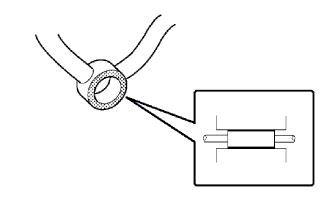
If scratches or dents are present, replace the nozzle leakage pipe.
Set the leakage pipe and 5 new gaskets in place.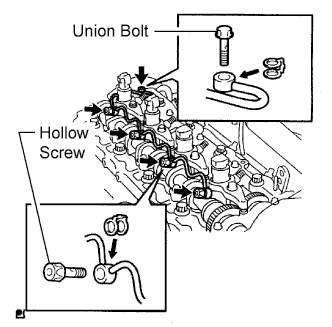
Apply a small amount of oil to the 4 injector hollow screws and union bolt.
Temporarily install the leakage pipe with the 4 injector hollow screws and union bolt.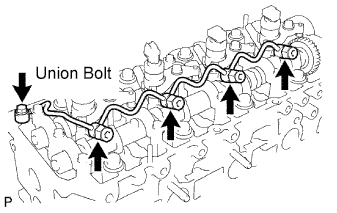
Tighten the 4 holder clamp bolts.
- Torque:
- 22 N*m{ 220 kgf*cm , 16 ft.*lbf }
Tighten the 4 injector hollow screws in order from 1 to 4.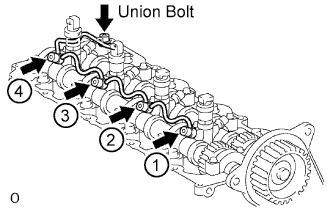
- Torque:
- 16 N*m{ 163 kgf*cm , 12 ft.*lbf }
- NOTICE:
- If an injector hollow screw is accidentally tightened beyond the torque specification, it must be replaced.
Tighten the union bolt.
- Torque:
- 13 N*m{ 127 kgf*cm , 9 ft.*lbf }
- NOTICE:
- If the union bolt is accidentally tightened beyond the torque specification, it must be replaced.
Remove the 4 injection pipes.
| 36. CHECK FOR FUEL LEAKS |
Check that there are no leaks from the nozzle leakage pipe connection.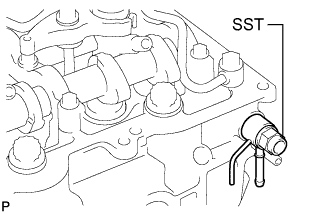
Install the gasket and No. 2 nozzle leakage pipe to the cylinder head with SST (check valve).
- Part No.:
- 23762-27010 (No. 2 nozzle leakage pipe)
- SST
- 09280-00010
- Torque:
- 21 N*m{ 214 kgf*cm , 15 ft.*lbf }
Apply a small amount of soapy water (or other fluid for detecting fuel leakage) on the nozzle leakage pipe connection.
Install SST (turbocharger pressure gauge) to the fuel return side of the leakage pipe, and maintain 100 kPa (1.0 kgf/cm2, 14.5 psi) of pressure for 60 seconds to check that no bubbles form.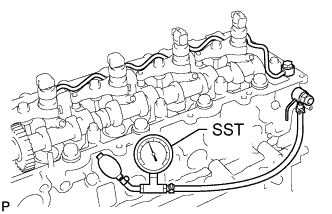
- SST
- 09992-00242
- NOTICE:
- Before checking the leakage, be sure to remove the ball and spring in the check valve.
After checking for fuel leaks, wipe off the soapy water from the leakage pipe connection.
Remove SST, No. 2 nozzle leakage pipe and gasket.
- NOTICE:
- Never reinstall the disassembled check valve on the engine.
| 37. INSTALL CYLINDER BLOCK INSULATOR (w/ EGR Cooler) |
Install the cylinder block insulator to the cylinder head.
| 38. INSTALL NO. 2 TIMING BELT COVER |
Apply seal packing (FIPG) to the specified areas shown in the illustration.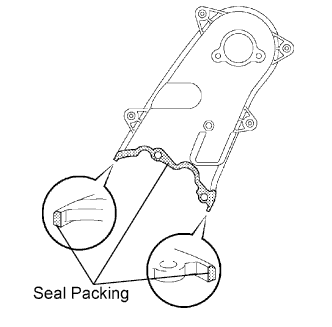
- Seal packing:
- Toyota Genuine Seal Packing Black, Three Bond 1207B or equivalent
- NOTICE:
- After applying FIPG, install the No. 2 timing belt cover within 3 minutes and tighten its bolts and nut within 15 minutes.
Install the No. 2 timing belt cover with the 4 bolts and nut.
- Torque:
- 10 N*m{ 102 kgf*cm , 7 ft.*lbf }
| 39. INSTALL CAMSHAFT TIMING PULLEY |
Install the camshaft timing pulley.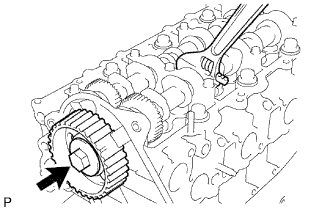
Fasten the bolt of the camshaft timing pulley by holding the camshaft with a wrench.
- Torque:
- 98 N*m{ 1000 kgf*cm , 72 ft.*lbf }
| 40. INSTALL CYLINDER HEAD COVER SUB-ASSEMBLY |
Install 4 new No. 3 cylinder head cover gaskets to the cylinder head cover in the directions shown in the illustration.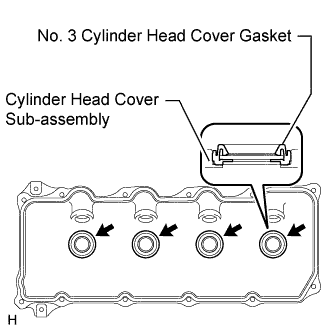
- NOTICE:
- Do not install the No. 3 cylinder head cover gaskets at an angle.
- Check that there is no foreign matter at the installation location of the No. 3 cylinder head cover gaskets.
- Do not install the No. 3 cylinder head cover gaskets at an angle.
Remove any old seal packing (FIPG) material from the cylinder head.
Apply seal packing to the specific areas shown in the illustration.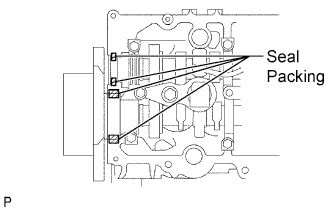
- Seal packing:
- Toyota Genuine Seal Packing Black, Three Bond 1207B or equivalent
- NOTICE:
- Remove any oil from the contact surface.
- Install the head cover within 3 minutes after applying seal packing.
- Do not start the engine for at least 2 hours after installing the seal packing.
- Remove any oil from the contact surface.
Install a new cylinder head cover gasket and the cylinder head cover with the 10 bolts and 2 nuts.
- Torque:
- 9.0 N*m{ 92 kgf*cm , 80 in.*lbf }
Install 4 new nozzle holder seals.
Connect the ventilation hose.
Connect the 4 connectors and install the 3 bolts.
- Torque:
- 13 N*m{ 127 kgf*cm , 9 ft.*lbf }
| 41. INSTALL NOZZLE HOLDER SEAL |
Install 4 new nozzle holder seals.
| 42. INSTALL OIL FILLER CAP SUB-ASSEMBLY |