Home › ENGINE › 1KD-FTV ENGINE CONTROL SYSTEM › ECD SYSTEM (w/ EGR Cooler)VC Output Circuit
Circuit diagnosis · Vehicles built Aug 2012 – Jul 2013
Versions by build date: Jun 2011 – Jul 2012 Aug 2012 – Jul 2013 Aug 2013 – Jul 2014 from Aug 2014
DESCRIPTION
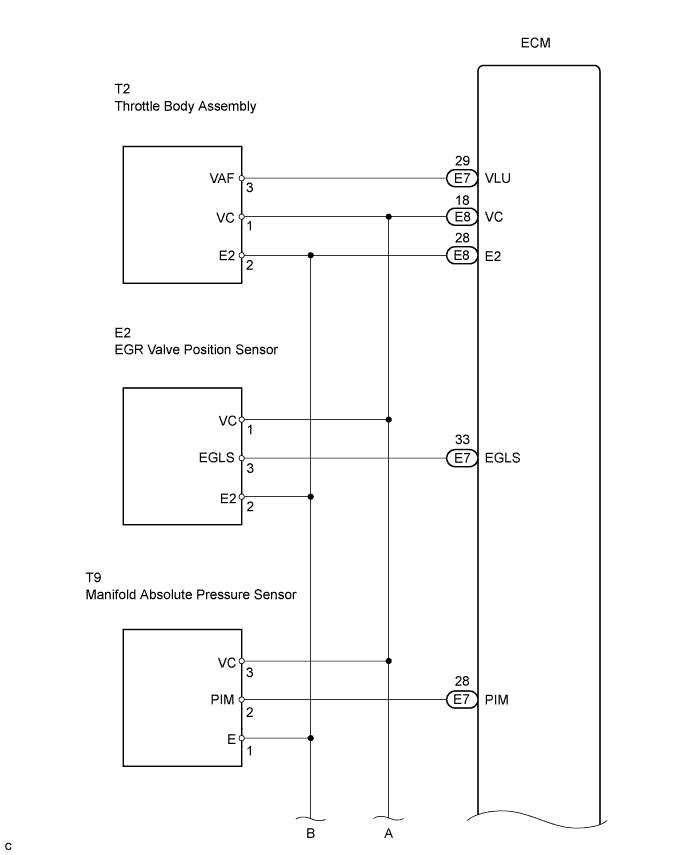
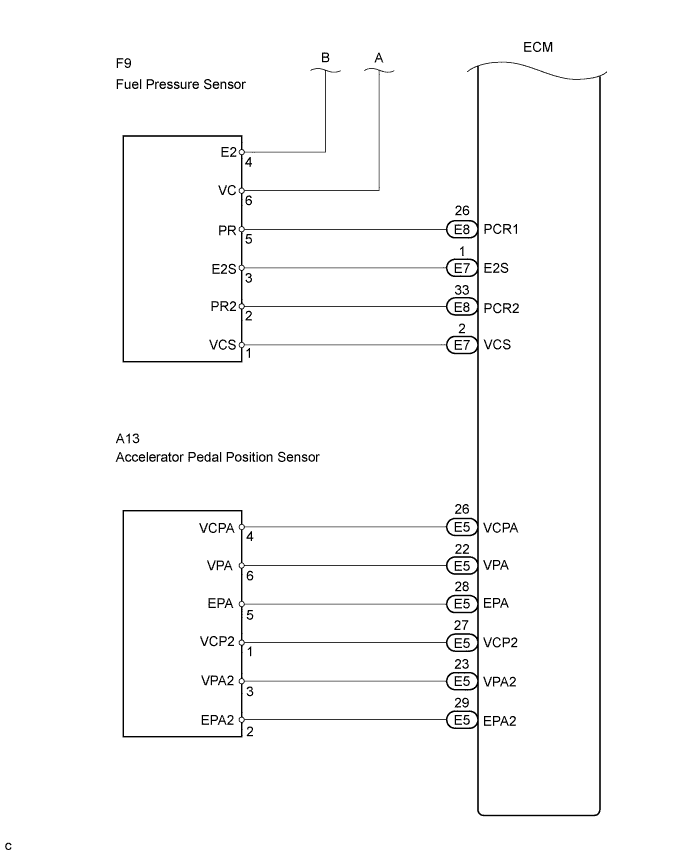
The VC voltage (5 V) is generated in the ECM. The voltage is used to supply power to the throttle body assembly, EGR valve position sensor, turbo pressure sensor, accelerator position sensor and fuel pressure sensor. WIRING DIAGRAM
INSPECTION PROCEDURE
NOTICE:
After replacing the ECM, the new ECM needs registration (Click here ) and initialization (Click here ).
1. CHECK MIL
Check that the Malfunction Indicator Lamp (MIL) lights up when turning the ignition switch ON.
OK:
MIL lights up
OK
NG
2. CHECK CONNECTION BETWEEN INTELLIGENT TESTER AND ECM
Connect the intelligent tester to the DLC3.
Turn the ignition switch ON and tester ON.
Check the communication between the intelligent tester and ECM.
Result:
Condition
Proceed to
Communication is not possible
A
Communication is possible
B
B
A
3. CHECK ECM (VC VOLTAGE)
Turn the ignition switch ON.
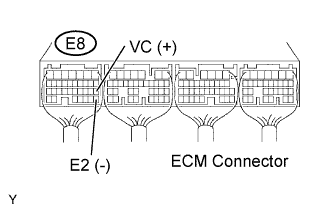
Measure the voltage of the ECM connector.
Result:
Tester Connection
Specified Condition
VC (E8-18) - E2 (E8-28)
Voltage is not 5 V
NEXT
4. CHECK MIL (THROTTLE POSITION SENSOR)
Disconnect the T2 throttle position sensor connector.
Turn the ignition switch ON.
Check the MIL.
Result:
Condition
Proceed to
MIL does not illuminate
A
MIL illuminates
B
Reconnect the throttle position sensor connector.
B
REPLACE DIESEL THROTTLE BODY ASSEMBLY (Click here )
A
5. CHECK MIL (MANIFOLD ABSOLUTE PRESSURE SENSOR)
Disconnect the T9 manifold absolute pressure sensor connector.
Turn the ignition switch ON.
Check the MIL.
Result:
Condition
Proceed to
MIL does not illuminate
A
MIL illuminates
B
Reconnect the manifold absolute pressure sensor connector.
B
REPLACE MANIFOLD ABSOLUTE PRESSURE SENSOR
A
6. CHECK MIL (ACCELERATOR PEDAL POSITION SENSOR)
Disconnect the A13 accelerator pedal position sensor connector.
Turn the ignition switch ON.
Check the MIL.
Result:
Condition
Proceed to
MIL does not illuminate
A
MIL illuminates
B
Reconnect the accelerator position sensor connector.
B
REPLACE ACCELERATOR PEDAL ROD ASSEMBLY (Click here )
A
7. CHECK MIL (EGR VALVE POSITION SENSOR)
Disconnect the E2 EGR valve position sensor connector.
Turn the ignition switch ON.
Check the MIL.
Result:
Condition
Proceed to
MIL does not illuminate
A
MIL illuminates
B
Disconnect the EGR valve position sensor connector.
B
REPLACE ELECTRIC EGR CONTROL VALVE ASSEMBLY (Click here )
A
8. CHECK MIL (FUEL PRESSURE SENSOR)
Disconnect the F9 fuel pressure sensor connector.
Turn the ignition switch ON.
Check the MIL.
Result:
Condition
Proceed to
MIL does not illuminate
A
MIL illuminates
B
Reconnect the fuel pressure sensor connector.
B
A
9. CHECK HARNESS AND CONNECTOR (ECM - BODY GROUND)
Disconnect the T2 throttle position sensor connector. Disconnect the T9 manifold absolute pressure sensor connector.
Disconnect the F9 fuel pressure sensor connector.
Disconnect the E2 EGR valve position sensor connector.
Disconnect the A13 accelerator pedal position sensor connector.
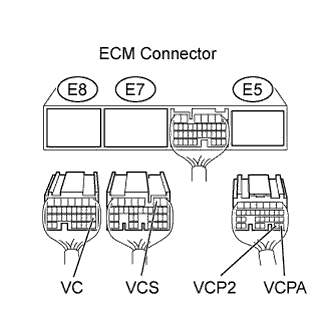
Disconnect the E8 ECM connector.
Measure the resistance of the wire harness connector.
Standard resistance (Check for short):
Tester Connection
Specified Condition
VC (E8-18) - Body ground
10 kΩ or higher
VCS (E7-2) - Body ground VCPA (E5-26) - Body ground VCP2 (E5-27) - Body ground
Reconnect the throttle position sensor connector.
Reconnect the manifold absolute pressure sensor connector.
Reconnect the fuel pressure sensor connector.
Reconnect the EGR valve position sensor connector.
Reconnect the accelerator pedal position sensor connector.
Reconnect the ECM connector.
NG
REPAIR OR REPLACE HARNESS OR CONNECTOR
OK