1GR-FE ENGINE MECHANICAL CAMSHAFT INSTALLATION
PROCEDURE

 1.INSPECT CAMSHAFT TIMING GEAR ASSEMBLY
2.INSTALL NO. 3 CAMSHAFT SUB-ASSEMBLY
- NOTICE:
-
As the thrust clearance of the camshaft is small, the camshaft must be kept level while it is being installed. If the camshaft is not kept level, the portion of the cylinder head which receives the shaft thrust may crack or be damaged, causing the camshaft to seize or break. To avoid this, the following steps should be carried out.
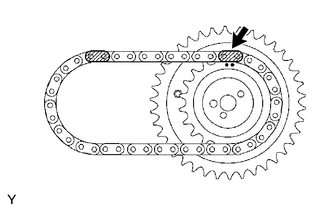
| *1 | Mark Link (Yellow) |
| *2 | Timing Mark |
Align the mark link with the timing mark (2-dot mark) of the camshaft timing gear as shown in the illustration.
Apply new engine oil to the thrust portions and journals of the camshaft.
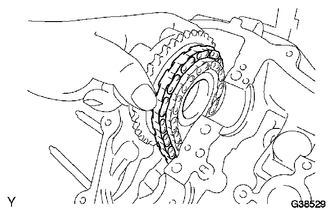
Temporarily put the chain on the No. 2 chain of the camshaft timing gear.
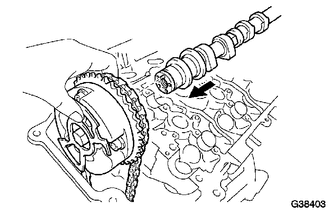
| *1 | Knock Pin |
Align the knock pin hole of the camshaft timing gear with the knock pin of the No. 3 camshaft and insert the No. 3 camshaft into the camshaft timing gear.
Temporarily install the camshaft timing gear set bolt.
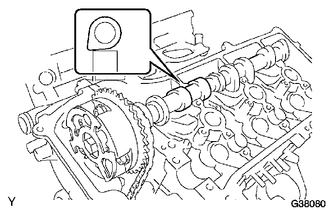
Set the No. 3 camshaft onto the cylinder head LH with the cam lobes of the No. 2 cylinder facing downward as shown in the illustration.
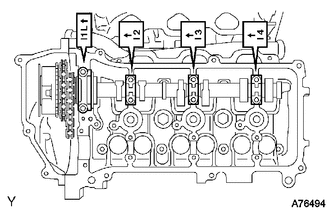
Set the 4 bearing caps in their proper locations.
Apply a light coat of engine oil to the threads and under the heads of the bearing cap bolts.
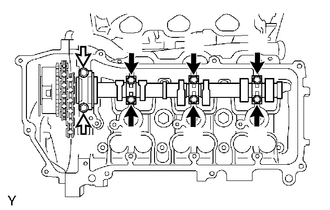

|
10 mm Head Bolt |

|
12 mm Head Bolt |
Using several steps, install the 8 bearing cap bolts uniformly in the sequence shown in the illustration.
- Torque:
- for 10 mm head bolt : 9.0 N*m (92 kgf*cm, 80 in.*lbf)
- for 12 mm head bolt : 24 N*m (245 kgf*cm, 18 ft.*lbf)
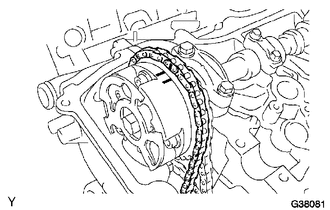
| *1 | Paint Mark |
| *2 | Timing Mark |
Set the paint mark of the chain between the timing marks of the camshaft timing gear.
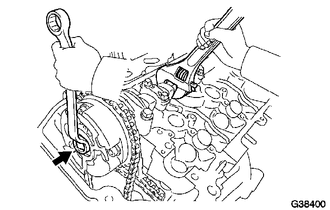
Hold the hexagonal portion of the No. 3 camshaft with a wrench and tighten the camshaft timing gear set bolt.
- Torque:
- 100 N*m (1020 kgf*cm, 74 ft.*lbf)
3.INSTALL NO. 3 CHAIN TENSIONER ASSEMBLY
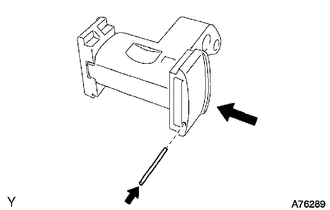
| *a | Push |
While pushing in the tensioner, insert a pin with a diameter of 1.0 mm (0.0394 in.) into the hole to fix the tensioner in place.
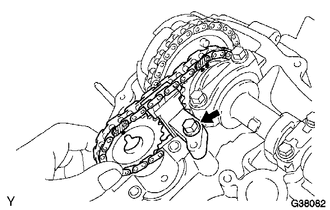
| *1 | Mark Link (Yellow) |
| *2 | Timing Mark |
Temporarily install the camshaft timing sprocket and No. 3 chain tensioner with the bolt and align the mark links with the timing marks (1-dot mark and 2-dot mark) of the camshaft timing gear and sprocket.
Tighten the No. 3 chain tensioner bolt.
- Torque:
- 21 N*m (214 kgf*cm, 15 ft.*lbf)
4.INSTALL NO. 4 CAMSHAFT SUB-ASSEMBLY
- NOTICE:
-
As the thrust clearance of the camshaft is small, the camshaft must be kept level while it is being installed. If the camshaft is not kept level, the portion of the cylinder head which receives the shaft thrust may crack or be damaged, causing the camshaft to seize or break. To avoid this, the following steps should be carried out.
Align the knock pin hole of the camshaft timing sprocket with the knock pin of the No. 4 camshaft and insert the No. 4 camshaft into the camshaft timing sprocket.
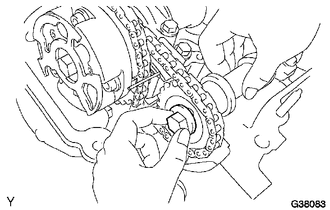
Temporarily install the camshaft timing sprocket set bolt.
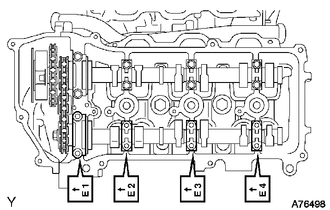
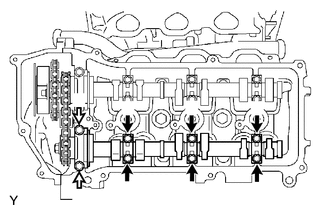
Set the 4 bearing caps in their proper locations.
Apply a light coat of engine oil to the threads of the bearing cap bolts.
|
|
10 mm Head Bolt |
|
|
12 mm Head Bolt |
Using several steps, install the 8 bearing cap bolts uniformly in the sequence shown in the illustration.
- Torque:
- for 10 mm head bolt : 9.0 N*m (92 kgf*cm, 80 in.*lbf)
- for 12 mm head bolt : 24 N*m (245 kgf*cm, 18 ft.*lbf)
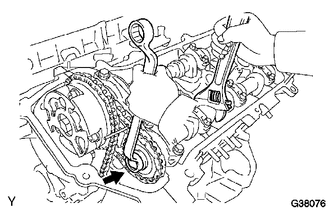
Hold the hexagonal portion of the No. 4 camshaft with a wrench and tighten the camshaft timing sprocket set bolt.
- Torque:
- 100 N*m (1020 kgf*cm, 74 ft.*lbf)
Remove the pin from the No. 3 chain tensioner
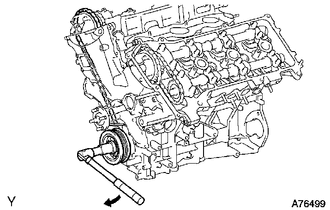
|
|
Slightly Turn |
Release the chain tension between the camshaft timing gear (RH bank) and crankshaft timing gear by turning the crankshaft pulley clockwise slightly.
5.INSTALL CAMSHAFT
- NOTICE:
-
As the thrust clearance of the camshaft is small, the camshaft must be kept level while it is being installed. If the camshaft is not kept level, the portion of the cylinder head which receives the shaft thrust may crack or be damaged, causing the camshaft to seize or break. To avoid this, the following steps should be carried out.
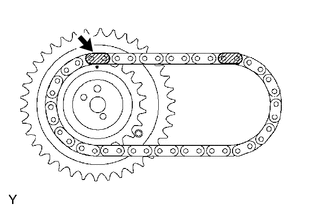
| *1 | Mark Link (Yellow) |
| *2 | Timing Mark |
Align the mark link with the timing mark (1-dot mark) of the camshaft timing gear as shown in the illustration.
Apply new engine oil to the thrust portions and journals of the camshaft.
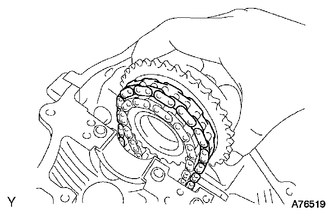
Temporarily put the chain on the No. 2 chain of the camshaft timing gear.
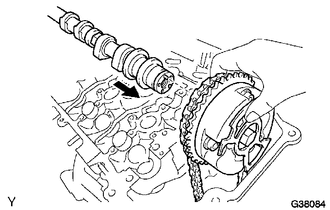
| *1 | Knock Pin |
Align the knock pin hole of the camshaft timing gear with the knock pin of the camshaft and insert the camshaft into the camshaft timing gear.
Temporarily install the camshaft timing gear set bolt.
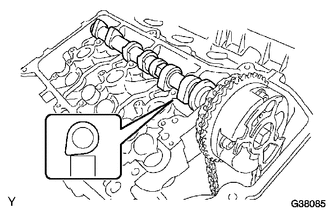
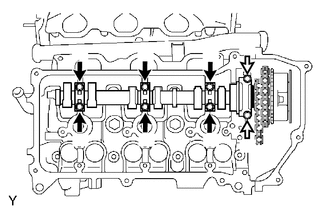
Set the camshaft onto the cylinder head RH with the cam lobes of the No. 1 cylinder facing downward as shown in the illustration.
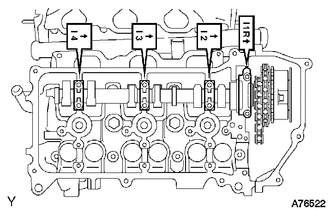
Set the 4 bearing caps in their proper locations.
Apply a light coat of engine oil to the threads and under the heads of the bearing cap bolts.
|
|
10 mm Head Bolt |
|
|
12 mm Head Bolt |
Using several steps, install the 8 bearing cap bolts uniformly in the sequence shown in the illustration.
- Torque:
- for 10 mm head bolt : 9.0 N*m (92 kgf*cm, 80 in.*lbf)
- for 12 mm head bolt : 24 N*m (245 kgf*cm, 18 ft.*lbf)
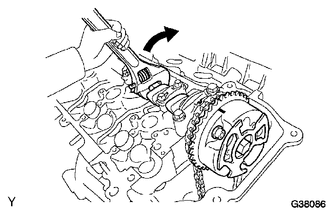
| *1 | Timing Mark |
Rotate the camshaft clockwise using a wrench so that the timing mark of the camshaft timing gear is aligned with the timing mark of the camshaft bearing cap.
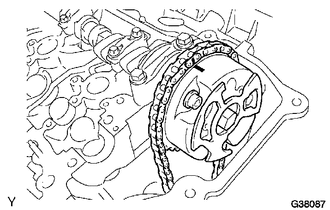
| *1 | Paint Mark |
| *2 | Timing Mark |
Align the paint mark of the chain with the timing mark of the camshaft timing gear.
Hold the hexagonal portion of the camshaft with a wrench and tighten the camshaft timing gear set bolt.
- Torque:
- 100 N*m (1020 kgf*cm, 74 ft.*lbf)
6.INSTALL NO. 2 CHAIN TENSIONER ASSEMBLY
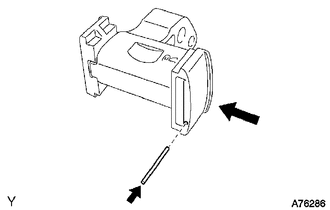
| *a | Push |
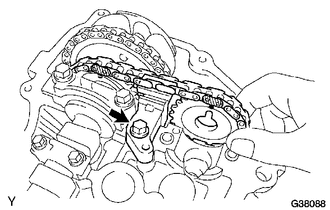
While pushing in the tensioner, insert a pin with a diameter of 1.0 mm (0.0394 in.) into the hole to fix the tensioner in place.
| *1 | Mark Link (Yellow) |
| *2 | Timing Mark |
Temporarily install the camshaft timing sprocket and No. 2 chain tensioner with the bolt and align the mark links with the timing marks (1-dot mark) of the camshaft timing gear and sprocket.
Tighten the No. 2 chain tensioner bolt.
- Torque:
- 21 N*m (214 kgf*cm, 15 ft.*lbf)
7.INSTALL NO. 2 CAMSHAFT
- NOTICE:
-
As the thrust clearance of the camshaft is small, the camshaft must be kept level while it is being installed. If the camshaft is not kept level, the portion of the cylinder head which receives the shaft thrust may crack or be damaged, causing the camshaft to seize or break. To avoid this, the following steps should be carried out.
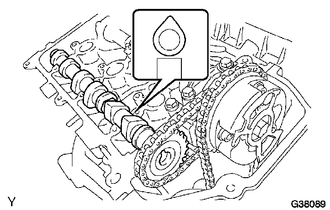
Set the No. 2 camshaft onto the cylinder head RH with the cam lobes of the No. 1 cylinder facing upward as shown in the illustration.
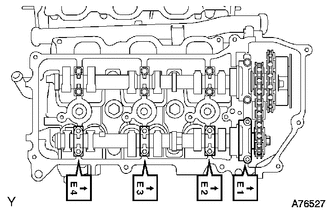
Set the 4 bearing caps in their proper locations.
Apply a light coat of engine oil to the threads and under the heads of the bearing cap bolts.
|
|
10 mm Head Bolt |
|
|
12 mm Head Bolt |
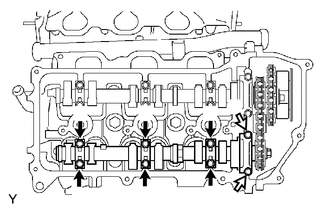
Using several steps, install the 8 bearing cap bolts uniformly in the sequence shown in the illustration.
- Torque:
- for 10 mm head bolt : 9.0 N*m (92 kgf*cm, 80 in.*lbf)
- for 12 mm head bolt : 24 N*m (245 kgf*cm, 18 ft.*lbf)
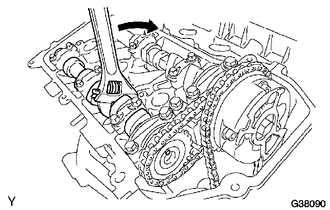
| *1 | Knock Pin |
Rotate the No. 2 camshaft clockwise using a wrench so that the knock pin of the No. 2 camshaft is aligned with the knock pin hole of the camshaft timing sprocket.
Hold the hexagonal portion of the No. 2 camshaft with a wrench and install the camshaft timing sprocket set bolt.
- Torque:
- 100 N*m (1020 kgf*cm, 74 ft.*lbf)
Remove the pin from the No. 2 chain tensioner.
8.INSTALL NO. 1 CHAIN TENSIONER ASSEMBLY
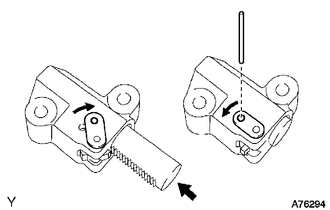
| *1 | Stopper Plate |
| *a | Push |
While turning the stopper plate of the tensioner clockwise, push in the plunger of the tensioner as shown in the illustration.
While turning the stopper plate of the tensioner counterclockwise, insert a bar with a diameter of 3.5 mm (0.138 in.) into the holes in the stopper plate and tensioner to fix the stopper plate in place.
Install the No. 1 chain tensioner with the 2 bolts.
- Torque:
- 10 N*m (102 kgf*cm, 7 ft.*lbf)
Remove the bar from the No. 1 chain tensioner.
Install a new gasket and the timing chain cover plate with the 4 bolts.
- Torque:
- 9.0 N*m (92 kgf*cm, 80 in.*lbf)
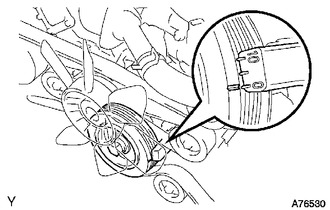
Turn the crankshaft pulley 2 complete revolutions slowly, and align the notch with the "0" timing mark of the timing chain cover.
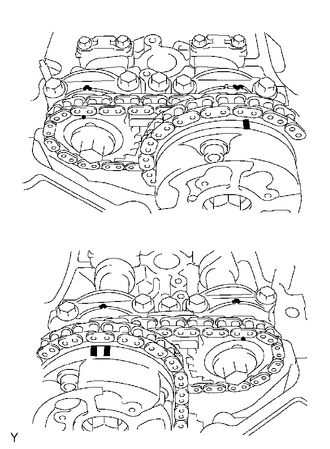
| *A | for Bank 1 |
| *B | for Bank 2 |
| *1 | Timing Mark |
Check that the timing marks of the camshaft timing gears are aligned with the timing marks of the bearing caps as shown in the illustration.
9.SET NO. 1 CYLINDER TO TDC/COMPRESSION
10.INSPECT VALVE CLEARANCE
11.ADJUST VALVE CLEARANCE
12.INSTALL CYLINDER HEAD COVER SUB-ASSEMBLY LH
13.INSTALL CYLINDER HEAD COVER SUB-ASSEMBLY
14.INSTALL IGNITION COIL ASSEMBLY
15.INSTALL INTAKE AIR SURGE TANK
16.CONNECT CABLE TO NEGATIVE BATTERY TERMINAL
- NOTICE:
-
When disconnecting the cable, some systems need to be initialized after the cable is reconnected (See page General>INTRODUCTION>REPAIR INSTRUCTION>INITIALIZATION).
17.INSPECT IGNITION TIMING