1GR-FE INTAKE / EXHAUST INTAKE MANIFOLD INSTALLATION
PROCEDURE

 1.INSTALL STUD BOLT
- HINT:
-
If a stud bolt is deformed or its threads are damaged, replace it.
Using an E7 "TORX" socket wrench, install the stud bolts.
- Torque:
- 8.0 N*m (82 kgf*cm, 71 in.*lbf)
2.INSTALL INTAKE MANIFOLD
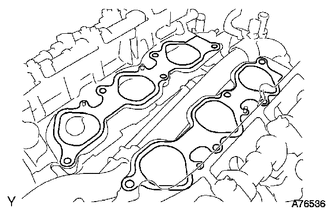
Set 2 new gaskets on each cylinder head.
- NOTICE:
- ·
Align the port holes of the gasket and cylinder head.
- ·
Make sure the gaskets are installed facing the proper direction.
Set the intake manifold on the cylinder heads.
Install and uniformly tighten the 10 bolts in several passes.
- Torque:
- 26 N*m (265 kgf*cm, 19 ft.*lbf)
- HINT:
-
Tighten the inner installation bolts of the intake manifold before tightening the outer bolts.
3.INSTALL FUEL DELIVERY PIPE SUB-ASSEMBLY
4.CONNECT NO. 2 FUEL PIPE SUB-ASSEMBLY
5.CONNECT NO. 1 FUEL PIPE SUB-ASSEMBLY
6.INSTALL INTAKE AIR SURGE TANK
- NOTICE:
- Do not apply oil to the bolts and nuts listed below: :
Oil Application Prohibited Bolts for surge tank and intake manifold Nuts for surge tank and intake manifold
Install a new gasket to the intake air surge tank.
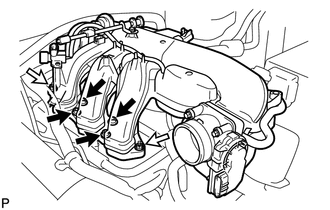

|
Bolt |

|
Nut |
Using an 8 mm hexagon wrench, install the intake air surge tank with the 4 bolts and 2 nuts. Tighten the bolts and nuts in the order shown in the illustration.
- Torque:
- 28 N*m (286 kgf*cm, 21 ft.*lbf)
Install the water hose sub-assembly to the intake air surge tank with the 2 bolts.
- Torque:
- 5.4 N*m (55 kgf*cm, 48 in.*lbf)
Install the No. 2 surge tank stay with the 2 bolts.
- Torque:
- 21 N*m (214 kgf*cm, 15 ft.*lbf)
Install the No. 1 surge tank stay with the 2 bolts.
- Torque:
- 21 N*m (214 kgf*cm, 15 ft.*lbf)
Install the oil baffle plate with the bolt.
- Torque:
- 9.0 N*m (92 kgf*cm, 80 in.*lbf)
Install the throttle body bracket with the 2 bolts.
- Torque:
- 21 N*m (214 kgf*cm, 15 ft.*lbf)
Attach the 3 wire harness clamps and disconnect the wire harness.
Connect the throttle body connector.
Connect the vacuum switching valve (for ACIS) connector.
Connect the purge VSV connector.
Connect the No. 1 PCV hose.
Connect the vacuum hose.
Connect the purge line hose.
Connect the No. 5 water by-pass hose.
Connect the No. 4 water by-pass hose.
7.INSTALL NO. 2 AIR CLEANER HOSE
8.INSTALL AIR CLEANER ASSEMBLY
9.ADD ENGINE COOLANT
10.INSPECT FOR COOLANT LEAK
11.INSPECT FOR FUEL LEAK
12.INSTALL V-BANK COVER
13.INSTALL NO. 2 ENGINE UNDER COVER
Install the No. 2 engine under cover with the 4 bolts.
- Torque:
- 28 N*m (286 kgf*cm, 21 ft.*lbf)