BRAKE CONTROL / DYNAMIC CONTROL SYSTEMS VEHICLE STABILITY CONTROL SYSTEM Slip Indicator Light does not Come ON
DESCRIPTION
Refer to Slip Indicator Light Remains ON (See page Brake>BRAKE CONTROL / DYNAMIC CONTROL SYSTEMS>VEHICLE STABILITY CONTROL SYSTEM>Slip Indicator Light Remains ON).
WIRING DIAGRAM
Refer to VSC OFF Indicator Light Remains ON (See page Brake>BRAKE CONTROL / DYNAMIC CONTROL SYSTEMS>VEHICLE STABILITY CONTROL SYSTEM>VSC OFF Indicator Light Remains ON).
CAUTION / NOTICE / HINT
- NOTICE:
- ·
After replacing the brake actuator assembly, perform calibration (See page Brake>BRAKE CONTROL / DYNAMIC CONTROL SYSTEMS>VEHICLE STABILITY CONTROL SYSTEM>CALIBRATION).
·Before disconnecting the connector, make sure that there are no problems with the connection.
·After disconnecting the connector, make sure that the connector case and terminals are not deformed or corroded.
PROCEDURE
Check if the skid control ECU connector is securely connected.
- OK:
The connector is securely connected.
- Result:
Proceed to OK NG
OK
NG
Turn the ignition switch off.
Disconnect the skid control ECU (brake actuator assembly) connector.
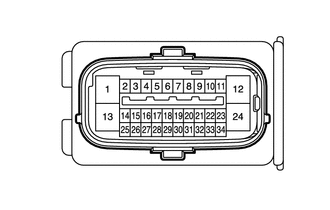
| *a | Front view of wire harness connector
(to Skid Control ECU [Brake Actuator Assembly]) |
Measure the voltage according to the value(s) in the table below.
- Standard Voltage:
Tester Connection Switch Condition Specified Condition A36-34 (IG1) - Body ground Ignition switch ON 11 to 14 V
- Result:
Proceed to OK NG
OK
NG
Turn the ignition switch off.
Disconnect the skid control ECU (brake actuator assembly) connector.
Measure the resistance according to the value(s) in the table below.
- Standard Resistance:
Tester Connection Condition Specified Condition A36-1 (GND1) - Body ground Always Below 1 Ω
- Result:
Proceed to OK NG
OK
NG
Turn the ignition switch off.
Remove the VSC OFF switch.
Click hereBrake>BRAKE CONTROL / DYNAMIC CONTROL SYSTEMS>VSC OFF SWITCH(w/ VSC)>REMOVAL
Inspect the VSC OFF switch.
Click hereBrake>BRAKE CONTROL / DYNAMIC CONTROL SYSTEMS>VSC OFF SWITCH(w/ VSC)>INSPECTION
- Result:
Proceed to OK NG
OK
NG
Turn the ignition switch off.
Disconnect the VSC OFF switch connector.
Disconnect the skid control ECU (brake actuator assembly) connector.
Measure the resistance according to the value(s) in the table below.
- Standard Resistance:
Tester Connection Condition Specified Condition A36-30 (CSW) - G84-3 Always Below 1 Ω A36-30 (CSW) - Body ground Always 10 kΩ or higher G84-4 - Body ground Always Below 1 Ω
- Result:
Proceed to OK NG
OK
NG
Turn the ignition switch off.
Disconnect the skid control ECU (brake actuator assembly) connector.
Disconnect the G20 combination meter connector.
Measure the resistance according to the value(s) in the table below.
- Standard Resistance:
Tester Connection Condition Specified Condition A36-3 (IND) - G20-17 (SLIP) Always Below 1 Ω A36-3 (IND) - Body ground Always 10 kΩ or higher
- Result:
Proceed to OK NG
OK
NG
Turn the ignition switch off.
Connect the intelligent tester to the DLC3.
Turn the ignition switch to ON.
Turn the intelligent tester on.
Enter the following menus: Chassis / ABS/VSC/TRC / Active Test.
- Chassis > ABS/VSC/TRC > Active Test
-
Tester Display Measurement Item Control Range Diagnostic Note Slip Indicator Light Slip indicator light Indicator light ON / OFF Observe the combination meter.
- Chassis > ABS/VSC/TRC > Active Test
-
Tester Display Slip Indicator Light - 50004 105 11
When performing the Slip Indicator Light Active Test, check Slip Indicator Light in the Data List.
- Chassis > ABS/VSC/TRC > Data List
-
Tester Display Measurement Item Range Normal Condition Diagnostic Note Slip Indicator Light Slip indicator light ON or OFF ON: Slip indicator light on
OFF: Slip indicator light off-
- Chassis > ABS/VSC/TRC > Data List
-
Tester Display Slip Indicator Light - 50003 105 53
- Result:
Result Proceed to Data List Display Data List Display When Performing Active Test ON/OFF Operation ON Does not change between ON and OFF A Changes between ON and OFF B OFF Does not change between ON and OFF A Changes between ON and OFF B
A
B
Click hereVehicle Interior>METER / GAUGE / DISPLAY>METER / GAUGE SYSTEM>HOW TO PROCEED WITH TROUBLESHOOTING