INTERIOR PANELS / TRIM ROOF HEADLINING(for Extra Cab) INSTALLATION
PROCEDURE

 1.INSTALL REAR NO. 3 SIDE RAIL SPACER LH
Attach the 4 claws to install the rear No. 3 side rail spacer.
2.INSTALL REAR NO. 3 SIDE RAIL SPACER RH
- HINT:
-
Use the same procedure described for the LH side.
3.INSTALL REAR NO. 2 SIDE RAIL SPACER LH
Attach the 2 claws to install the rear No. 2 side rail spacer.
4.INSTALL REAR NO. 2 SIDE RAIL SPACER RH
- HINT:
-
Use the same procedure described for the LH side.
5.INSTALL SIDE RAIL SPACER
Attach the 2 claws to install the side rail spacer.
6.INSTALL FRONT SIDE RAIL SPACER LH
Attach the 2 claws to install the front side rail spacer.
7.INSTALL FRONT SIDE RAIL SPACER RH
- HINT:
-
Use the same procedure described for the LH side.
8.INSTALL ROOF HEADLINING ASSEMBLY
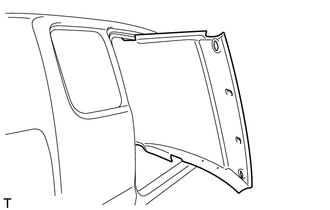
Place the roof headlining into the vehicle as shown in the illustration.
- NOTICE:
-
Be careful not to damage the roof headlining when placing it.
Install the roof headlining with the 5 clips.
Connect the connectors and attach the 4 clamps.
Attach the 5 clamps to the front pillar.
9.INSTALL DEFROSTER NOZZLE ASSEMBLY
10.INSTALL NO. 3 HEATER TO REGISTER DUCT
11.INSTALL NO. 1 HEATER TO REGISTER DUCT
12.INSTALL NO. 2 HEATER TO REGISTER DUCT
13.INSTALL LOWER INSTRUMENT PANEL FINISH PANEL SUB-ASSEMBLY
14.INSTALL UPPER INSTRUMENT PANEL SUB-ASSEMBLY
15.INSTALL ASSIST GRIP
Install the assist grip with the 2 screws.
Attach the 4 claws to close the 2 covers.
16.INSTALL VISOR HOLDER LH
Attach the 2 claws to install the holder.
Install the screw.
17.INSTALL VISOR HOLDER RH
- HINT:
-
Use the same procedure described for the LH side.
18.INSTALL VISOR ASSEMBLY LH
Install the visor with the 2 screws.
Attach the guide.
19.INSTALL VISOR ASSEMBLY RH
- HINT:
-
Use the same procedure described for the LH side.
20.INSTALL NO. 1 ROOM LIGHT ASSEMBLY
21.INSTALL MAP LIGHT ASSEMBLY (w/ Map Light)
22.INSTALL INNER UPPER ROOF SIDE GARNISH LH
Attach the 3 clips to install the inner upper roof side garnish.
w/ Seat Cushion:
Connect the rear seat belt shoulder anchor with the bolt.
- Torque:
- 42 N*m (428 kgf*cm, 31 ft.*lbf)
Attach the 2 claws to close the rear seat belt shoulder anchor cover.
23.INSTALL INNER UPPER ROOF SIDE GARNISH RH
- HINT:
-
Use the same procedure described for the LH side.
24.INSTALL QUARTER PILLAR GARNISH LH
Attach the 2 clips to install the quarter pillar garnish.
Connect the front seat belt shoulder anchor with the bolt.
- Torque:
- 42 N*m (428 kgf*cm, 31 ft.*lbf)
Attach the 4 claws to install the front seat belt shoulder anchor cover.
25.INSTALL QUARTER PILLAR GARNISH RH
- HINT:
-
Use the same procedure described for the LH side.
26.INSTALL QUARTER INSIDE TRIM BOARD LH
Attach the 7 clips, 3 guides and 4 claws to install the quarter inside trim board.
Connect the front seat outer belt floor anchor with the bolt.
- Torque:
- 42 N*m (428 kgf*cm, 31 ft.*lbf)
27.INSTALL QUARTER INSIDE TRIM BOARD RH
- HINT:
-
Use the same procedure described for the LH side.
28.INSTALL LOWER BACK PANEL GARNISH
Attach the 5 clips, 2 guides and 6 claws to install the lower back panel garnish.
29.INSTALL REAR SEATBACK ASSEMBLY
30.INSTALL UPPER BACK PANEL GARNISH
Attach the 5 clips and 4 claws to install the upper back panel garnish.
31.INSTALL REAR SEAT CUSHION ASSEMBLY LH (w/ Seat Cushion)
32.INSTALL REAR SEAT CUSHION ASSEMBLY RH (w/ Seat Cushion)
33.INSTALL FRONT PILLAR GARNISH LH
Attach the 2 guides and 2 clips to install the front pillar garnish.
34.INSTALL FRONT PILLAR GARNISH RH
- HINT:
-
Use the same procedure described for the LH side.
35.INSTALL FRONT ASSIST GRIP SUB-ASSEMBLY (w/ Assist Grip)
- HINT:
-
Use the same procedure for both front assist grips.
Install the front assist grip with the 2 screws.
36.INSTALL ASSIST GRIP PLUG LH (w/ Assist Grip)
- HINT:
-
Use the same procedure for both front No. 1 assist grip plug.
Attach the 2 claws to install the front No. 1 assist grip plug.
37.INSTALL ASSIST GRIP PLUG RH (w/ Assist Grip)
- HINT:
-
Use the same procedure described for the LH side.
38.INSTALL FRONT DOOR OPENING TRIM LH
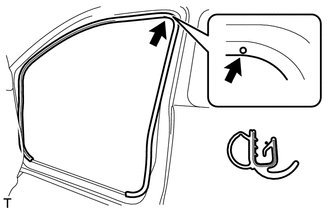
| *1 | Paint Mark |
| *2 | Mark Position |
Align the paint mark on the front door opening trim with the mark position on the vehicle and install the front door opening trim as shown in the illustration.
39.INSTALL FRONT DOOR OPENING TRIM RH
- HINT:
-
Use the same procedure described for the LH side.
40.INSTALL FRONT DOOR SCUFF PLATE LH
Attach the 4 clips and 8 claws to install the front door scuff plate.
41.INSTALL FRONT DOOR SCUFF PLATE RH
- HINT:
-
Use the same procedure described for the LH side.
42.INSTALL FRONT SEAT ASSEMBLY LH
43.INSTALL FRONT SEAT ASSEMBLY RH
- HINT:
-
Use the same procedure described for the LH side.
44.CONNECT CABLE TO NEGATIVE BATTERY TERMINAL (w/ Airbag System)
- NOTICE:
-
When disconnecting the cable, some systems need to be initialized after the cable is reconnected (See page General>INTRODUCTION>REPAIR INSTRUCTION>INITIALIZATION).
45.CHECK SRS WARNING LIGHT (w/ Airbag System)