 |
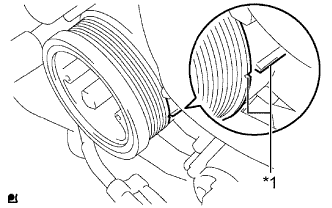
Align the matchmarks of the crankshaft pulley and timing gear case cover by rotating the crankshaft clockwise.
| *1 | Matchmark |
- HINT:
- Make sure that both cam lobes (intake side and exhaust side) of the No. 1 cylinder face upward.
VALVE CLEARANCE > ADJUSTMENT |
| 1. REMOVE CYLINDER HEAD COVER SUB-ASSEMBLY |
| 2. SET NO. 1 CYLINDER TO TDC/COMPRESSION |
|
Align the matchmarks of the crankshaft pulley and timing gear case cover by rotating the crankshaft clockwise.
| *1 | Matchmark |
| 3. INSPECT VALVE CLEARANCE |
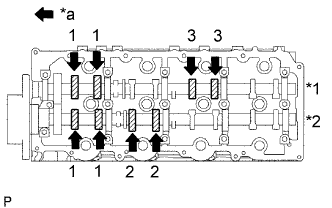 |
Check only the valves indicated.
Using a feeler gauge, measure the clearance between the valve lifter and camshaft.
| Item | Specified Condition |
| Intake | 0.2 to 0.3 mm (0.00787 to 0.0118 in.) |
| Exhaust | 0.35 to 0.45 mm (0.0138 to 0.0177 in.) |
| *1 | Exhaust |
| *2 | Intake |
| *a | Front |
Turn the crankshaft 360° to set the No. 4 cylinder to TDC/compression.
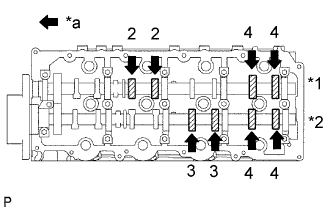 |
Check only the valves indicated.
Using a feeler gauge, measure the clearance between the valve lifter and camshaft.
| Item | Specified Condition |
| Intake | 0.2 to 0.3 mm (0.00787 to 0.0118 in.) |
| Exhaust | 0.35 to 0.45 mm (0.0138 to 0.0177 in.) |
| *1 | Exhaust |
| *2 | Intake |
| *a | Front |
| 4. ADJUST VALVE CLEARANCE |
Remove the fuel injector.
Remove the timing belt.
Remove the camshaft timing pulley.
Remove the No. 2 timing belt cover.
Remove the camshafts.
Remove the valve lifters.
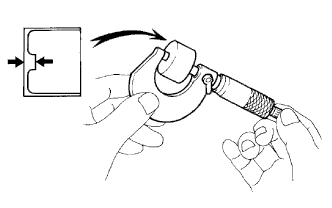 |
Using a micrometer, measure the thickness of the removed lifter.
Calculate the thickness of a new lifter so that the valve clearance is within the specified range.
| A | B | C |
| New lifter thickness | Used lifter thickness | Measured valve clearance |
Select a new lifter with a thickness as close as possible to the calculated values.
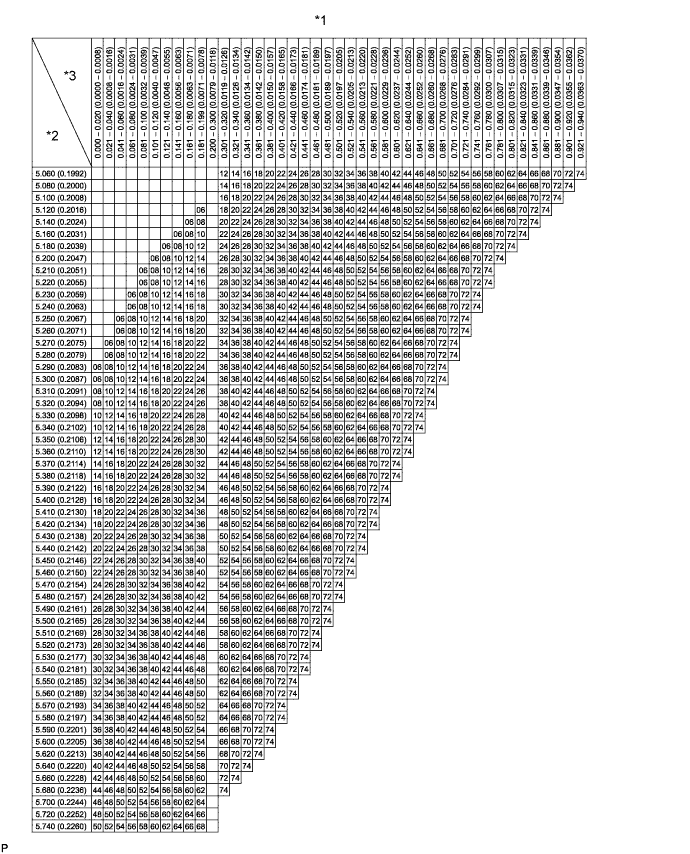
| *1 | Valve Lifter Selection Chart (Intake) | *2 | Installed lifter thickness mm (in.) |
| *3 | Measured clearance mm (in.) | - | - |
| Lifter No. | Specified Condition | Lifter No. | Specified Condition | Lifter No. | Specified Condition |
| 06 | 5.06 mm (0.1992 in.) | 30 | 5.30 mm (0.2087 in.) | 54 | 5.54 mm (0.2181 in.) |
| 08 | 5.08 mm (0.2000 in.) | 32 | 5.32 mm (0.2094 in.) | 56 | 5.56 mm (0.2189 in.) |
| 10 | 5.10 mm (0.2008 in.) | 34 | 5.34 mm (0.2102 in.) | 58 | 5.58 mm (0.2197 in.) |
| 12 | 5.12 mm (0.2016 in.) | 36 | 5.36 mm (0.2110 in.) | 60 | 5.60 mm (0.2205 in.) |
| 14 | 5.14 mm (0.2024 in.) | 38 | 5.38 mm (0.2118 in.) | 62 | 5.62 mm (0.2213 in.) |
| 16 | 5.16 mm (0.2031 in.) | 40 | 5.40 mm (0.2126 in.) | 64 | 5.64 mm (0.2220 in.) |
| 18 | 5.18 mm (0.2039 in.) | 42 | 5.42 mm (0.2134 in.) | 66 | 5.66 mm (0.2228 in.) |
| 20 | 5.20 mm (0.2047 in.) | 44 | 5.44 mm (0.2142 in.) | 68 | 5.68 mm (0.2236 in.) |
| 22 | 5.22 mm (0.2055 in.) | 46 | 5.46 mm (0.2150 in.) | 70 | 5.70 mm (0.2244 in.) |
| 24 | 5.24 mm (0.2063 in.) | 48 | 5.48 mm (0.2157 in.) | 72 | 5.72 mm (0.2252 in.) |
| 26 | 5.26 mm (0.2071 in.) | 50 | 5.50 mm (0.2165 in.) | 74 | 5.74 mm (0.2260 in.) |
| 28 | 5.28 mm (0.2079 in.) | 52 | 5.52 mm (0.2173 in.) | - | - |
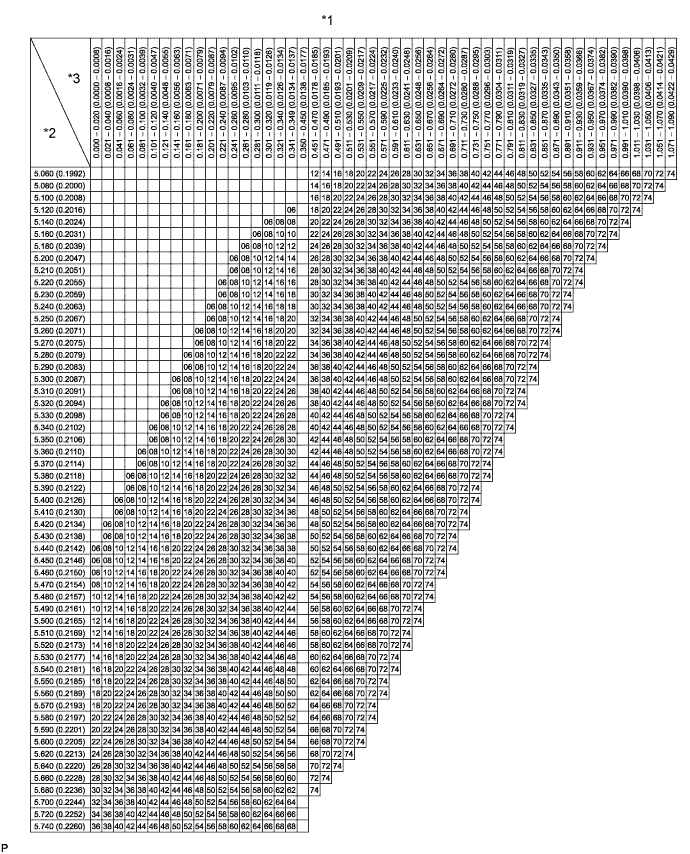
| *1 | Valve Lifter Selection Chart (Exhaust) | *2 | Installed lifter thickness mm (in.) |
| *3 | Measured clearance mm (in.) | - | - |
| Lifter No. | Specified Condition | Lifter No. | Specified Condition | Lifter No. | Specified Condition |
| 06 | 5.06 mm (0.1992 in.) | 30 | 5.30 mm (0.2087 in.) | 54 | 5.54 mm (0.2181 in.) |
| 08 | 5.08 mm (0.2000 in.) | 32 | 5.32 mm (0.2094 in.) | 56 | 5.56 mm (0.2189 in.) |
| 10 | 5.10 mm (0.2008 in.) | 34 | 5.34 mm (0.2102 in.) | 58 | 5.58 mm (0.2197 in.) |
| 12 | 5.12 mm (0.2016 in.) | 36 | 5.36 mm (0.2110 in.) | 60 | 5.60 mm (0.2205 in.) |
| 14 | 5.14 mm (0.2024 in.) | 38 | 5.38 mm (0.2118 in.) | 62 | 5.62 mm (0.2213 in.) |
| 16 | 5.16 mm (0.2031 in.) | 40 | 5.40 mm (0.2126 in.) | 64 | 5.64 mm (0.2220 in.) |
| 18 | 5.18 mm (0.2039 in.) | 42 | 5.42 mm (0.2134 in.) | 66 | 5.66 mm (0.2228 in.) |
| 20 | 5.20 mm (0.2047 in.) | 44 | 5.44 mm (0.2142 in.) | 68 | 5.68 mm (0.2236 in.) |
| 22 | 5.22 mm (0.2055 in.) | 46 | 5.46 mm (0.2150 in.) | 70 | 5.70 mm (0.2244 in.) |
| 24 | 5.24 mm (0.2063 in.) | 48 | 5.48 mm (0.2157 in.) | 72 | 5.72 mm (0.2252 in.) |
| 26 | 5.26 mm (0.2071 in.) | 50 | 5.50 mm (0.2165 in.) | 74 | 5.74 mm (0.2260 in.) |
| 28 | 5.28 mm (0.2079 in.) | 52 | 5.52 mm (0.2173 in.) | - | - |
Install the selected valve lifters.
Install the camshafts.
Install the No. 2 timing belt cover.
Install the camshaft timing pulley.
Install the timing belt.
Install the fuel injector.
| 5. INSTALL CYLINDER HEAD COVER SUB-ASSEMBLY |
| 6. INSPECT FOR COOLANT LEAK |
Check for engine coolant leaks (Click here).
| 7. BLEED AIR FROM FUEL SYSTEM |
| 8. INSPECT FOR FUEL LEAK |
| 9. INSPECT FOR OIL LEAK |
Start the engine. Make sure that there are no oil leaks from the areas that were worked on.