FUEL LID LOCK CONTROL > INSTALLATION |
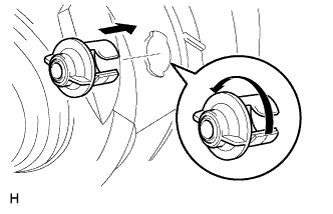
| 1. INSTALL FUEL FILLER OPENING LID LOCK RETAINER |
|
Install the fuel filler opening lid lock retainer and turn it counterclockwise as shown in the illustration.
| 2. INSTALL FUEL LID LOCK CONTROL CABLE SUB-ASSEMBLY |
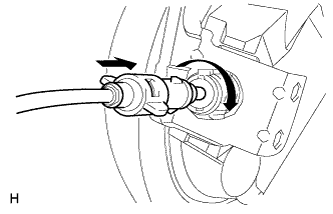 |
Install the fuel lid lock control cable and turn the fuel filler opening lid lock retainer clockwise as shown in the illustration.
Attach the cable to each of the clamps shown in the illustration and install new tape.
Install the fuel lid lock open lever.
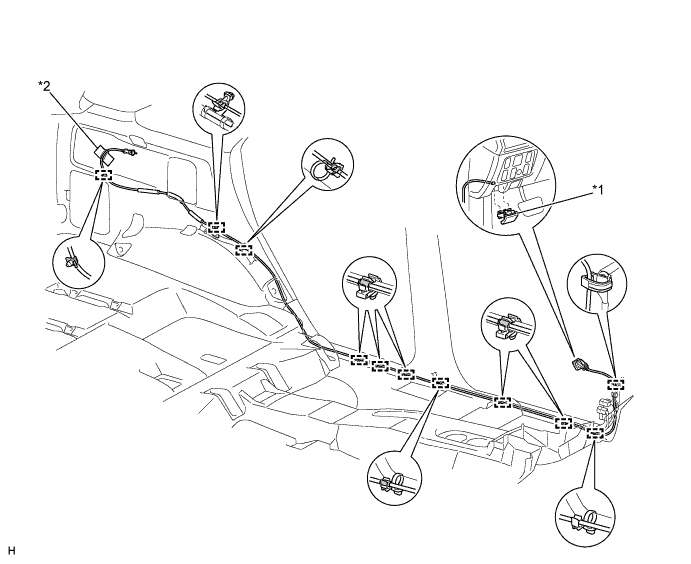
| *1 | Fuel Lid Lock Open Lever | *2 | Tape |
| 3. INSTALL FRONT FLOOR CARPET ASSEMBLY |
Install the front floor carpet.
| 4. INSTALL QUARTER INSIDE TRIM BOARD LH |
Connect the power point socket connector.
Attach the 7 claws and 10 clips to install the quarter inside trim board.
Install the clip.
Install the rear door opening trim weatherstrip.
w/ Rear No. 2 Seat:
Connect the rear No. 2 seat outer belt floor anchor with the bolt.
Connect the rear No. 1 seat outer belt floor anchor with the bolt.
Attach the 2 claws to install the outer lap belt anchor cover.
| 5. INSTALL QUARTER TRIM HOOK |
Install the quarter trim hook with the screw.
| 6. INSTALL BACK DOOR SCUFF PLATE |
Attach the 4 claws, 2 guides and 6 clips to install the back door scuff plate.
| 7. INSTALL LOWER CENTER PILLAR GARNISH LH |
Attach the 2 claws, 2 guides and 2 clips to install the lower center pillar garnish.
Install the front door opening trim and rear door opening trim weatherstrip.
Connect the front seat outer belt floor anchor with the bolt.
Attach the 2 claws to install the outer lap belt anchor cover.
| 8. INSTALL REAR DOOR SCUFF PLATE LH |
Attach the 2 clips and 7 claws to install the rear door scuff plate.
| 9. INSTALL COWL SIDE TRIM BOARD LH |
Attach the 2 clips to install the cowl side trim board.
Install the clip.
Install the front door opening trim.
| 10. INSTALL FRONT DOOR SCUFF PLATE LH |
Attach the 3 clips and 7 claws to install the front door scuff plate.
| 11. INSTALL TONNEAU COVER HANGER LH (w/ Tonneau Cover) |
Install the tonneau cover hanger with the screw.
| 12. INSTALL TONNEAU COVER HOLDER LH (w/ Tonneau Cover) |
Install the tonneau cover holder with the screw.
| 13. INSTALL TONNEAU COVER ASSEMBLY (w/ Tonneau Cover) |
Install the tonneau cover.
| 14. INSTALL CONSOLE BOX ASSEMBLY |
| 15. INSTALL REAR NO. 2 SEAT ASSEMBLY LH |
| 16. INSTALL REAR NO. 1 SEAT ASSEMBLY LH |
| 17. INSTALL REAR NO. 1 SEAT ASSEMBLY RH |
| 18. INSTALL FRONT SEAT ASSEMBLY LH |
for Manual Seat:
(Click here)
for Power Seat:
(Click here)
| 19. INSTALL FRONT SEAT ASSEMBLY RH |