POWER OUTLETS (INT) POWER POINT SOCKET(for Front Side) REMOVAL
CAUTION / NOTICE / HINT
- HINT:
- ·
Use the same procedure for RHD and LHD vehicles.
·The procedure listed below is for LHD vehicles.
PROCEDURE

 55667
1.REMOVE INSTRUMENT PANEL REGISTER BEZEL GARNISH
55012A
2.REMOVE NO. 2 INSTRUMENT PANEL GARNISH SUB-ASSEMBLY
55011A
3.REMOVE NO. 1 INSTRUMENT PANEL GARNISH SUB-ASSEMBLY
55405B
4.REMOVE CENTER INSTRUMENT CLUSTER FINISH PANEL SUB-ASSEMBLY
55522B
5.REMOVE RADIO TUNER OPENING COVER (w/o Audio)
86120
6.REMOVE RADIO RECEIVER ASSEMBLY (w/ Audio, for Radio Receiver Type)
86140A
7.REMOVE RADIO AND DISPLAY RECEIVER ASSEMBLY (w/ Audio, for Radio and Display Type)
86120L
8.REMOVE NAVIGATION RECEIVER ASSEMBLY (w/ Navigation System)
55905J
9.REMOVE CONTROL KNOB SUB-ASSEMBLY (for Manual Cooler System)
84013A
10.REMOVE INTEGRATION PANEL SUB-ASSEMBLY (for Manual Cooler System)
55900
11.REMOVE AIR CONDITIONING CONTROL ASSEMBLY (for Automatic Air Conditioning System)
55407C
12.REMOVE LOWER INSTRUMENT COVER SUB-ASSEMBLY
85530
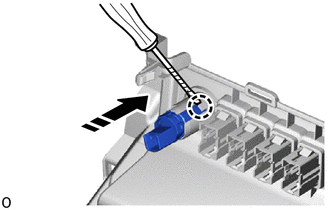
13.REMOVE NO. 1 POWER OUTLET SOCKET ASSEMBLY

|
Protective Tape |

|
Remove in this Direction |
Using a thin-bladed screwdriver, detach the claw, and remove the No. 1 power outlet socket assembly as shown in the illustration.
- HINT:
-
Tape the thin-bladed screwdriver tip before use.
85535B
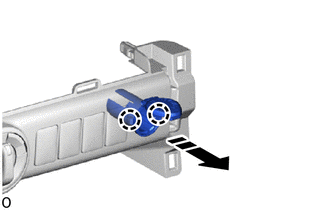
14.REMOVE NO. 1 POWER OUTLET SOCKET COVER
|
|
Remove in this Direction |
Detach the claw and remove the No. 1 power outlet socket cover as shown in the illustration.