1GR-FE ENGINE MECHANICAL CYLINDER HEAD GASKET REMOVAL
CAUTION / NOTICE / HINT
The necessary procedures (adjustment, calibration, initialization, or registration) that must be performed after parts are removed, installed, or replaced during the cylinder head gasket removal/installation are shown below.
| Replacement Part or Procedure | Necessary Procedures | Effects/Inoperative when not Performed | Link |
|---|---|---|---|
| Replacement of ECM | Vehicle Identification Number (VIN) registration | DTC P0630 is output | ( ) |
| Code registration (Immobiliser system) | Engine start function | See the Service Bulletin for the registration method. | |
| Replacement of engine assembly | Inspection after repair | Poor idle, engine start, etc. | ()
|
·
Replacement of throttle with motor body assembly ·
Cleaning the deposits from the throttle with motor body assembly ·
Replacement of cylinder head sub-assembly ·
Replacement of cylinder head LH ·
Replacement of camshaft ·
Replacement of No. 2 camshaft ·
Replacement of No. 3 camshaft sub-assembly ·
Replacement of No. 4 camshaft sub-assembly ·
Replacement of camshaft timing gear assembly ·
Replacement of fuel injector assembly ·
Replacement of ignition coil assembly ·
Air leaks from intake system ·
Gas leaks from exhaust system |
Inspection After Repair | Poor idle, engine start, etc. | ()
|
PROCEDURE

 11302
1.REMOVE TIMING CHAIN COVER SUB-ASSEMBLY
16356
2.REMOVE REAR WATER BY-PASS JOINT
3.SET NO. 1 CYLINDER TO TDC/COMPRESSION
13540
4.REMOVE NO. 1 CHAIN TENSIONER ASSEMBLY
13559
5.REMOVE CHAIN TENSIONER SLIPPER
13530
6.REMOVE IDLE SPROCKET ASSEMBLY
13562
7.REMOVE NO. 2 CHAIN VIBRATION DAMPER
13506
8.REMOVE CHAIN SUB-ASSEMBLY
13561
9.REMOVE NO. 1 CHAIN VIBRATION DAMPER
10.REMOVE CAMSHAFT TIMING GEARS AND NO. 2 CHAIN SUB-ASSEMBLY (for Bank 1)
13550
11.REMOVE NO. 2 CHAIN TENSIONER ASSEMBLY
12.REMOVE CAMSHAFT TIMING GEARS AND NO. 2 CHAIN SUB-ASSEMBLY (for Bank 2)
13560A
13.REMOVE NO. 3 CHAIN TENSIONER ASSEMBLY
14.REMOVE CAMSHAFT BEARING CAP (for Bank 1)
13511
15.REMOVE CAMSHAFT
13512
16.REMOVE NO. 2 CAMSHAFT
11811
17.REMOVE NO. 1 CAMSHAFT BEARING
11821
18.REMOVE NO. 2 CAMSHAFT BEARING
19.REMOVE CAMSHAFT BEARING CAP (for Bank 2)
13053
20.REMOVE NO. 3 CAMSHAFT SUB-ASSEMBLY
13054
21.REMOVE NO. 4 CAMSHAFT SUB-ASSEMBLY
11101
22.REMOVE CYLINDER HEAD SUB-ASSEMBLY
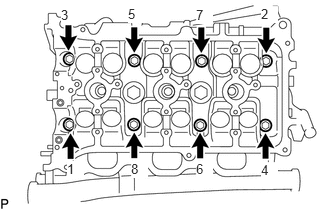
Using a 10 mm bi-hexagon wrench, uniformly loosen the 8 cylinder head set bolts in the sequence shown in the illustration and remove the 8 cylinder head set bolts and 8 plate washers.
- NOTICE:
- ·
Be careful not to drop the plate washers into the cylinder head sub-assembly.
·Cylinder head sub-assembly warpage or cracking could result from removing bolts in the incorrect order.
- HINT:
-
Be sure to keep the removed parts separate for each installation position.
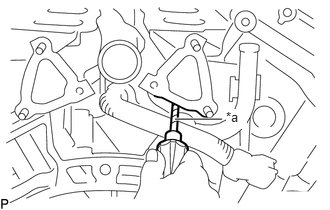
| *a | Protective Tape |
Remove the cylinder head sub-assembly.
- NOTICE:
-
Be careful not to damage the contact surfaces of the cylinder head sub-assembly and cylinder block sub-assembly.
- HINT:
- ·
If the cylinder head sub-assembly is difficult to lift off, pry between the cylinder head sub-assembly and cylinder block sub-assembly with a screwdriver.
·Tape the screwdriver tip before use.
11115
23.REMOVE CYLINDER HEAD GASKET
11102
24.REMOVE CYLINDER HEAD LH
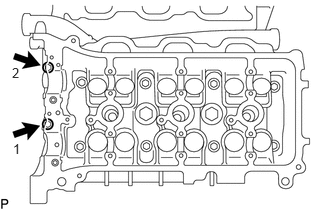
Uniformly loosen the 2 bolts in the sequence shown in the illustration and remove the 2 bolts.
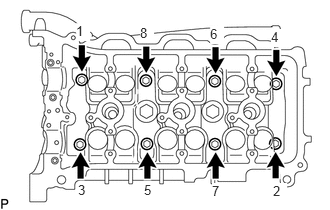
Using a 10 mm bi-hexagon wrench, uniformly loosen the 8 cylinder head set bolts in the sequence shown in the illustration and remove the 8 cylinder head set bolts and 8 plate washers.
- NOTICE:
- ·
Be careful not to drop the plate washers into the cylinder head LH.
·Cylinder head LH warpage or cracking could result from removing bolts in the incorrect order.
- HINT:
-
Be sure to keep the removed parts separate for each installation position.
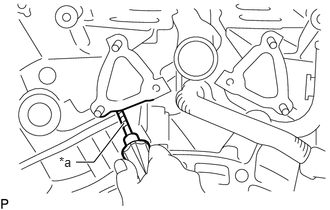
| *a | Protective Tape |
Remove the cylinder head LH.
- NOTICE:
-
Be careful not to damage the contact surfaces of the cylinder head LH and cylinder block sub-assembly.
- HINT:
- ·
If the cylinder head LH is difficult to lift off, pry between the cylinder head LH and cylinder block sub-assembly with a screwdriver.
·Tape the screwdriver tip before use.
11116
25.REMOVE NO. 2 CYLINDER HEAD GASKET
11101A
26.INSPECT CYLINDER HEAD SET BOLT
11101
27.INSPECT CYLINDER HEAD SUB-ASSEMBLY